
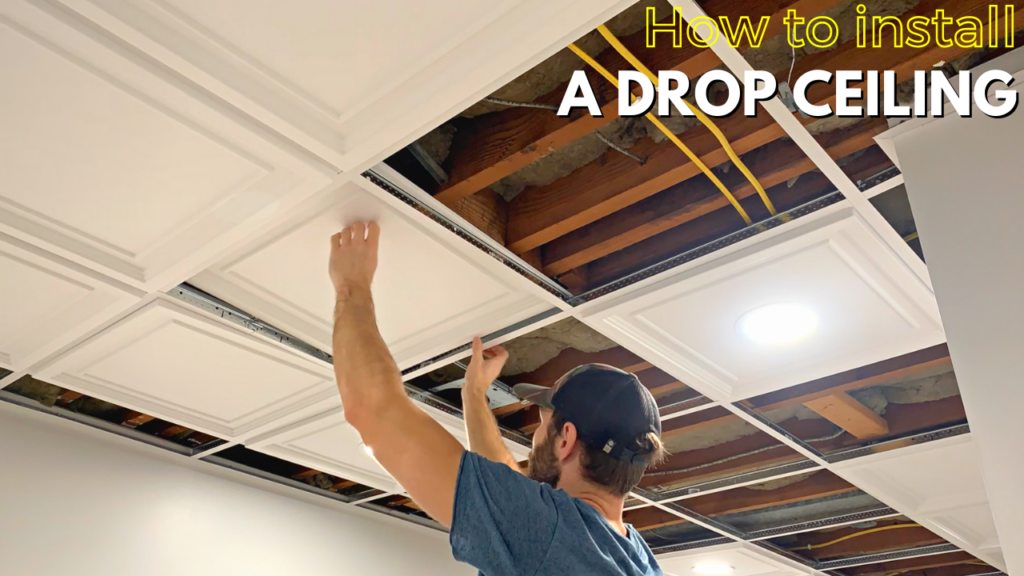
A drop ceiling is an excellent ceiling option for basements, bathrooms, or commercial spaces since it is easy to install, visually pleasing, and offers convenient access to piping, HVAC ducts, etc. that are located above. Additionally, there are many different drop ceiling panel styles available which make it easy to match the ceiling aesthetic to the rest of the room.
To install a drop ceiling, start by planning your drop ceiling grid and attaching the wall molding to each wall in the room. Next, install the hanger wire and position the ceiling grid so that it is supported by the wall moldings along the wall and the hanger wire in the center of the room. After installing the main beams and cross tees of the ceiling grid, square the grid and ensure that it is perfectly level by hanging a magnetic level to the bottom of the grid beams. Make adjustments as necessary. Finally, install the drop ceiling panels within each grid opening.
Overall, installing a drop ceiling is an easy DIY project that the average homeowner can tackle. This article will focus on the installation of the Armstrong Drop Ceiling System that utilizes Quikhang Grid Hooks.
Tools and Materials Needed to Install a Drop Ceiling

To install a Drop Ceiling, you will likely need all of the tools and materials listed and pictured below:

- Safety Glasses
- Gloves
- Tape Measure
- Hammer
- Straight Edge (ruler)
- Utililty Knife
- Pencil
- Tin Snippers
- Chalk Line OR Laser Level (Recommended)
- Clamps
- Wire Cutting Pliers
- Magnetic Level
Having the right tools for your project is critical, so it is highly recommended that you purchase these tools and materials prior to beginning your drop ceiling installation.
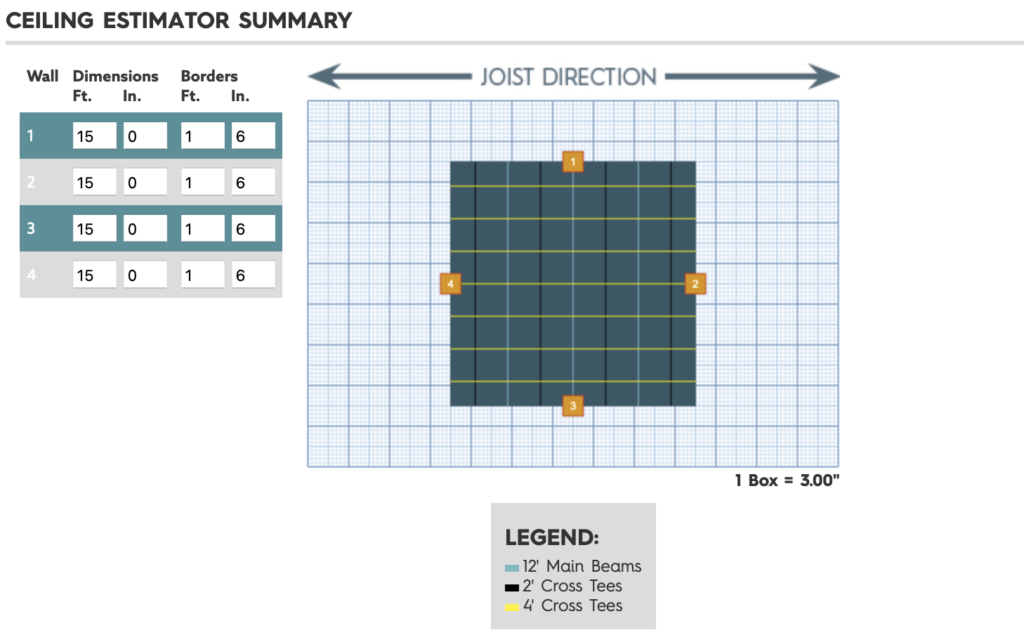
Plan out your Drop Ceiling Grid Layout
Planning out your drop ceiling grid layout ahead of time is one of the more critical aspects of the drop ceiling installation process. The drop ceiling grid consists of the following components:
- Wall molding (installed as the border to the grid along the walls)
- Main Beams (Run perpendicular to ceiling joists and are supported by hanger wire or “Quickhang” grid hooks)
- Cross Tees (Run parallel to ceiling joists and in between main beams)
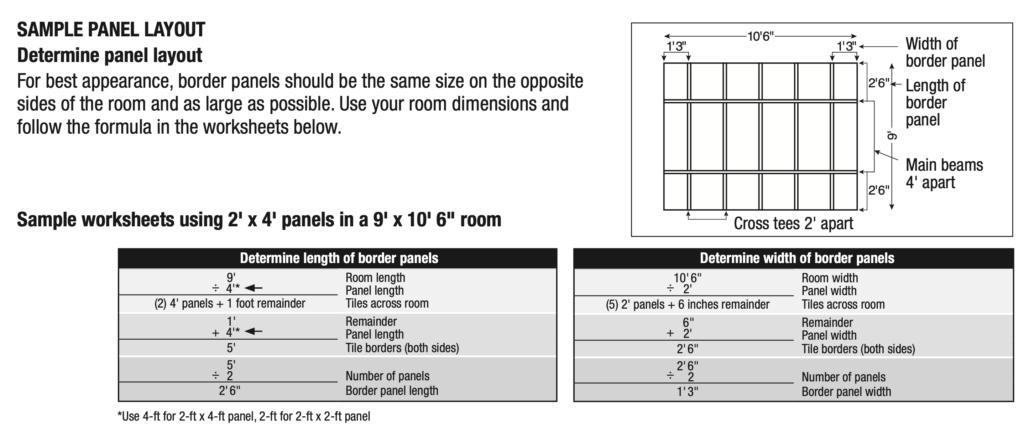
For the best drop ceiling appearance, the border panels should be roughly the same size on opposite sides of the room and as large as possible. Small slivers at the border should be avoided whenever possible. Spend some time measuring and mapping out your room layout and then compare the room size to the size of drop ceiling panels you plan on installing. With a little bit of math, you can determine the best way to trim the border panels so that they are even (and as large as possible) on opposite sides of the room.
Armstrong Ceilings has a Online Ceiling Estimator and Layout Tool that can help you in determining your drop ceiling layout and the quantity of drop ceiling materials you will need for your project.
Additionally, graph paper is a great “low-tech” way to plan out your drop ceiling grid layout.
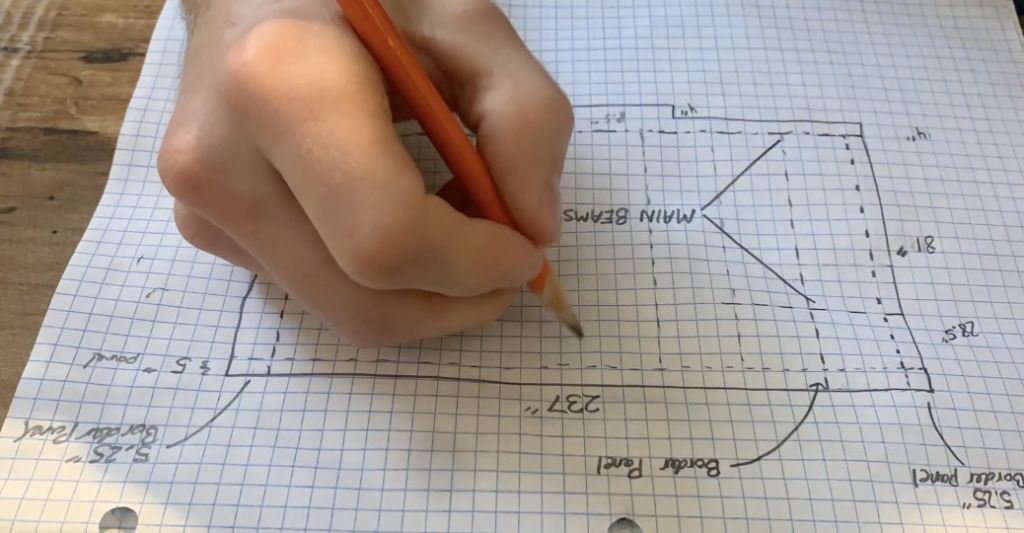
Spend some time measuring your room layout and using graph paper and/or Armstrong’s layout tool to plan out your layout and strategize how large you will want to make your border panels. A sample panel layout is provided below – courtesy or Armstrong Ceilings.
Install Wall Molding
After mapping out your ceiling grid layout, the first step in the actual drop ceiling installation is to install the wall molding. The wall molding is a 90 degree angled support bracket that mounts directly to the wall studs and supports the edge of the drop ceiling grid.
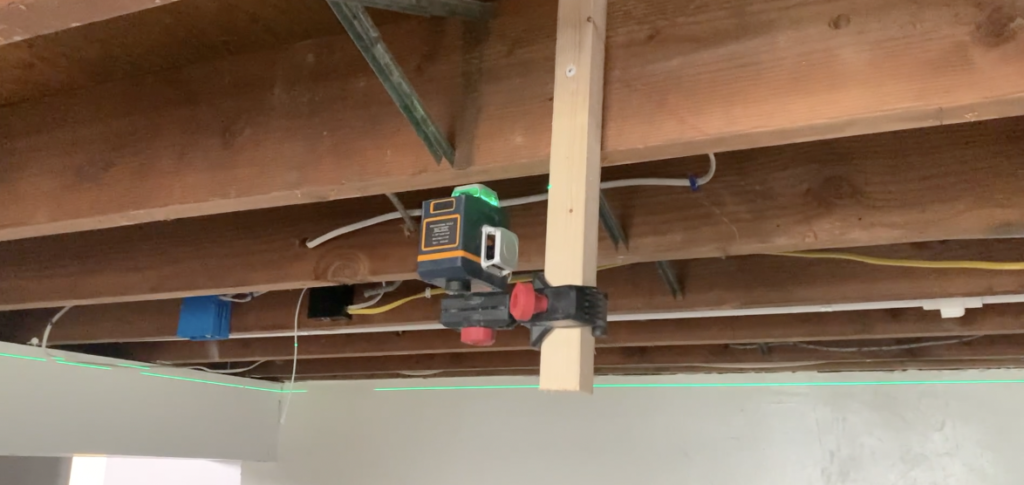
To begin the wall molding installation, start by marking the desired drop ceiling height on the wall using a pencil and then use a laser level (or a chalk line) to establish a perfectly level and straight line line across the first wall.
PRO TIP: It is recommend that you allow 4″ between the drop ceiling grid and the joists above to allow for adequate space to insert and position the drop ceiling panels in subsequent steps.
A laser level is by far the fastest and most accurate way to establish a level line for your wall molding, but you can also use a chalk line or a standard 6′ level.
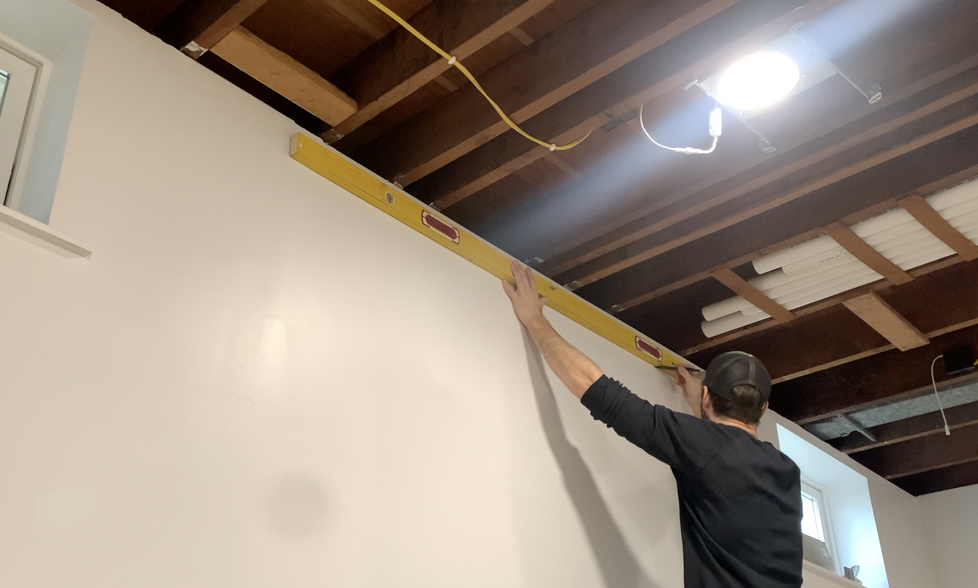
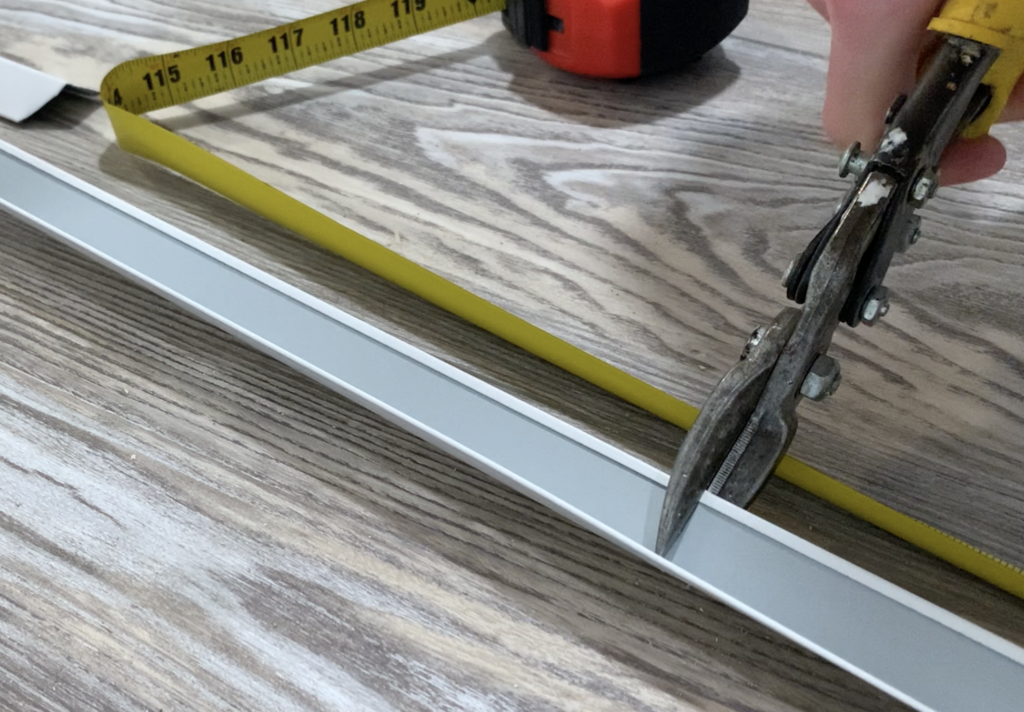
After marking the the wall molding installation line on each wall with a pencil, you can begin the wall molding installation process. To install the wall molding, position it along the marked line and attach it to the wall studs every 16″ O.C.
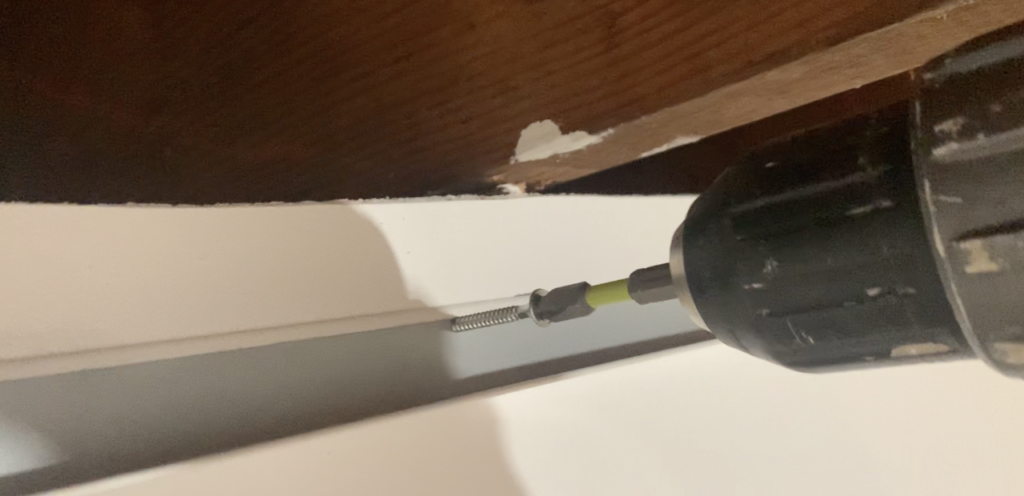
I found that using self tapping metal screws was the best option for screwing through the metal wall molding and into the studs. You also have the option to pre-drill holes in the wall molding so that you do not need to you use self-tapping screws.
Use tin snips as needed to cut the wall molding to the correct length.
For inside corners, install the molding into the corner on one wall and then “butt” the perpendicular piece of corner molding up to the previously installed section of wall molding.
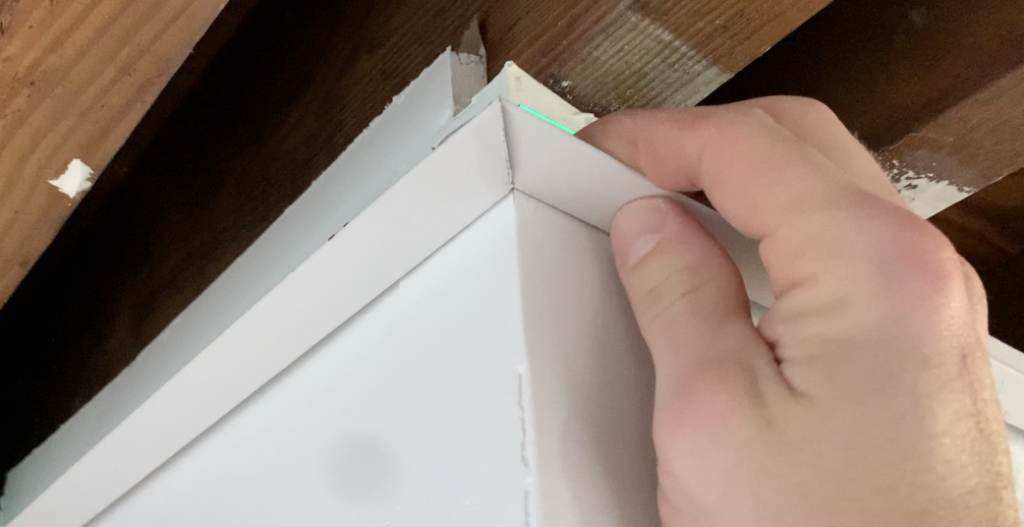
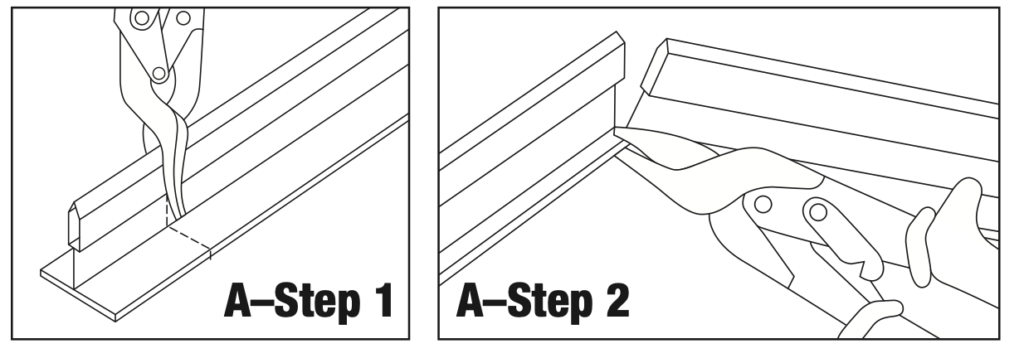
For outside corners, use tin snips to cut a 45 degree miter on both of the intersecting pieces of wall molding and position them so that they are touching- creating the 90 degree corner. Refer to the images below:

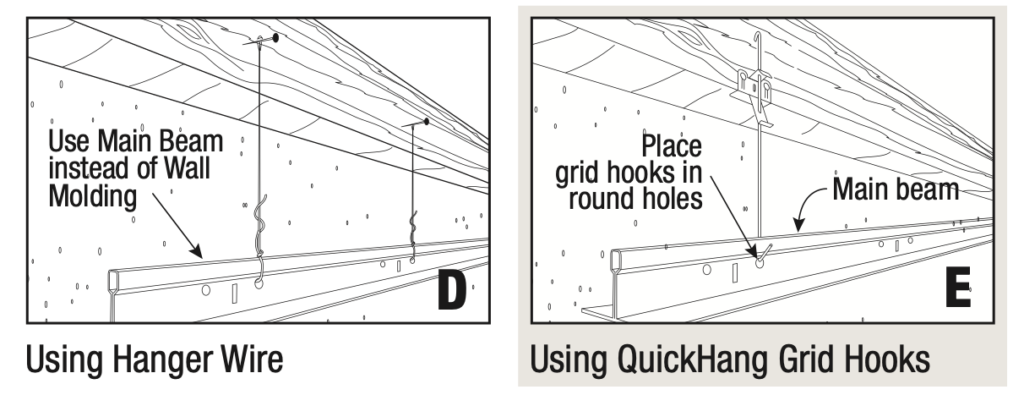
PRO TIP: If you are installing a drop ceiling where the walls are concrete or cinderblock and mounting the the wall molding directly to the wall is not possible, hang a section of Main Beam (discussed later) along the wall using hanger wire or Quickhang Grid Hooks – refer to the figure below:
After installing the wall molding on all four walls of the installation area, you can move on to the next step and install the wire.
Install Hanger Wire or “Quickhang” grid hooks
Although the drop ceiling will be supported around the perimeter of the room by the wall moldings, hanger wire or “Quickhang” grid hooks will be needed to support the MAIN BEAMS – which will support the drop ceiling grid in the middle of the room. Main beams will run perpendicular to the floor joists and are the “structural backbone” of ever drop ceiling installation.
Although most commercial drop ceilings will use traditional hanger wire to support the drop ceiling grid, Armstrong Ceiling’s “Quickhang” grid hooks are perfect for residential installations. I used “Quickhang” grid hooks for the drop ceiling in my basement.
When positioning your hanger wire or “Quickhang” Grid Hooks, you will need to refer back to your grid layout. If you are installing a 2’x4′ drop ceiling panel, you will want you your main beam to be positioned a “border panel size” distance from the wall. In a 2’x2′ drop ceiling panel installation, however, you have the option to install the first main beam a “border panel size” distance from the wall OR a “border panel size” + 24″ (2′) from the wall.
Pro Tip: Quickhang grid hooks should not be spaced more than 4′ apart in any direction in order to ensure a strong and durable drop ceiling grid.
After establishing where the main beam will be positioned based on the spacing from the wall, use a chalk line to snap an even line across the floor joists – this line will be used to ensure that the “Quickhang” hooks are installed in a perfectly straight line.
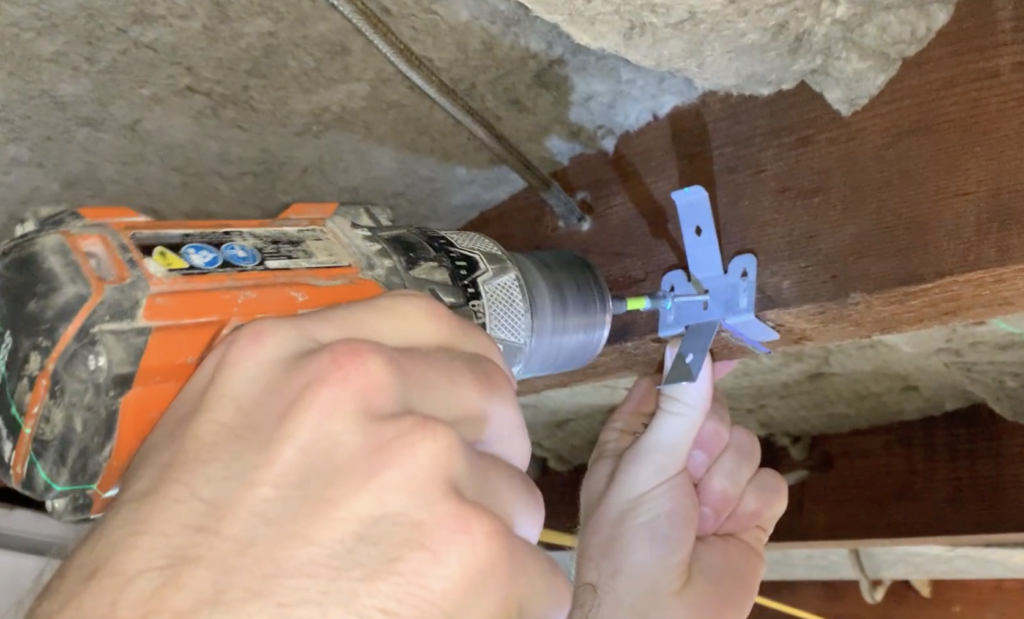
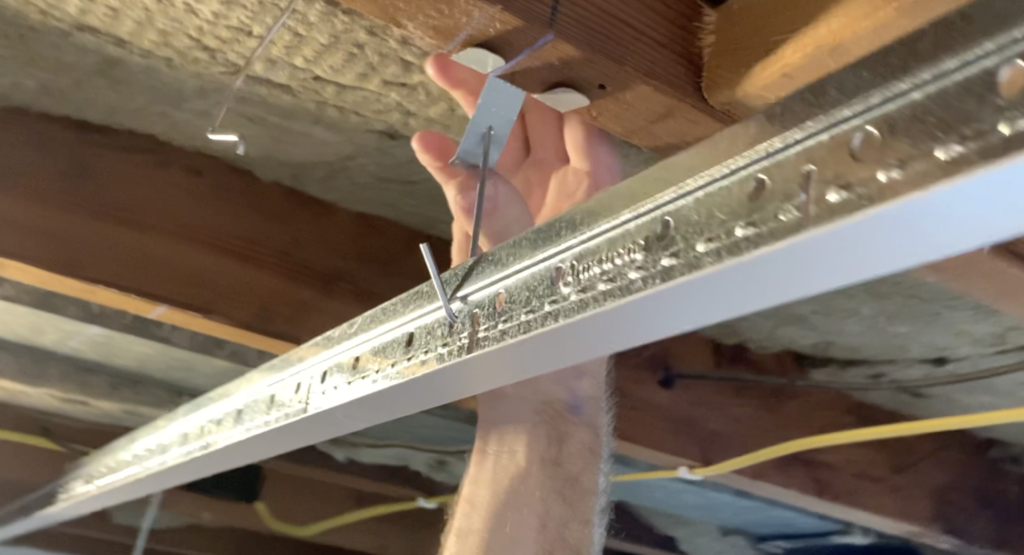
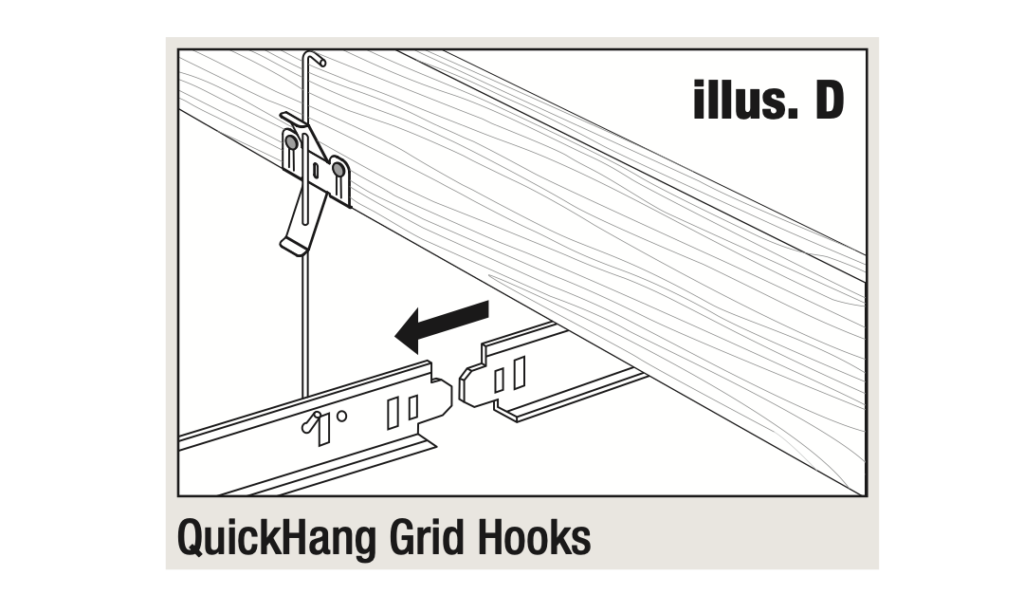
After marking the line, position the “Quickhang” grid hook in place and use the “hammer tabs” to preliminarily hold them in place.
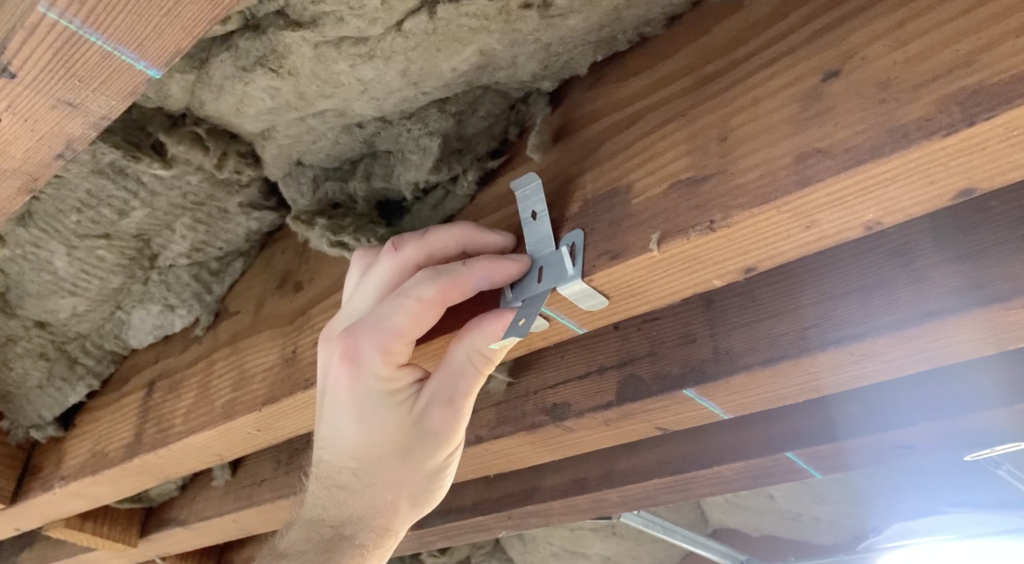
Next, use nails or a screw to permanently secure the “Quickhang” grid hooks to the joists. Repeat this process for all of the main beams in your installation.
Next, insert the grid hook into the “Quickhang” hardware by squeezing the two tabs together. Turn each hook so that it is parallel with the floor joist and adjust the height of each hook so that the bottom of each hook is roughly the same height as the top of the wall molding.
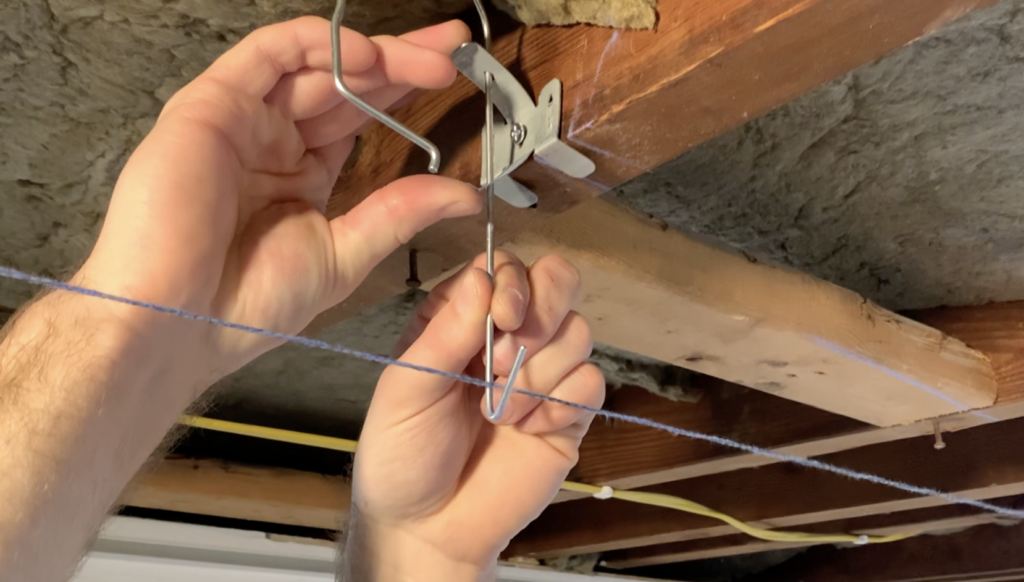
PRO TIP: Do not cut the top of the grid hooks. If the hook needs to be shortened due to an obstruction, bend the top of the hook using pliers.
The figure below effectively summarizes the “Quickhang” Installation process.

After hanging all of the “Quickhang” hardware and inserting all of the grid hooks in place, you can begin your installation of the main beams – which is the first step in the grid installation.
Install the Drop Ceiling Grid
The next few sections will outline all of the steps in installing the drop ceiling grid:
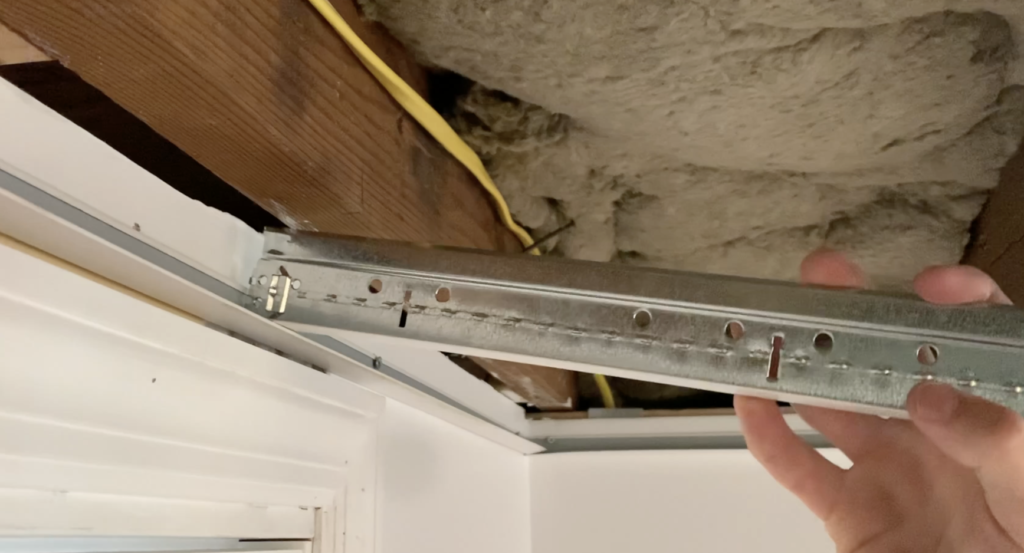
Prepare and Hang Main Beams
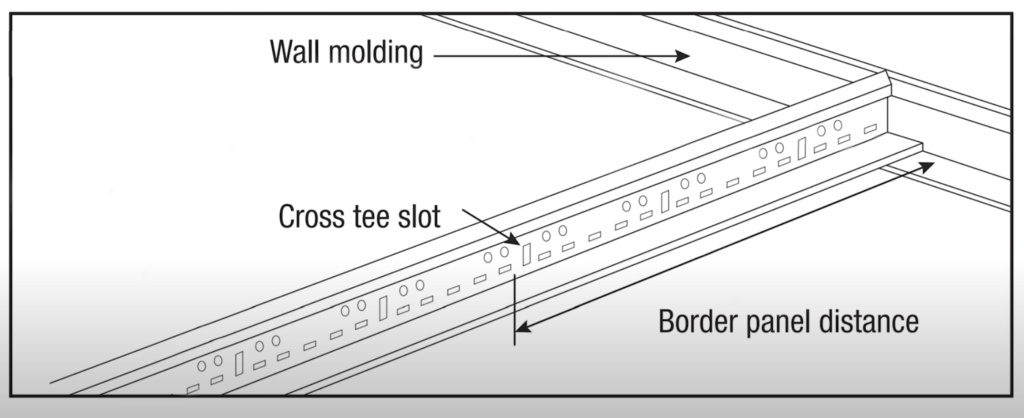
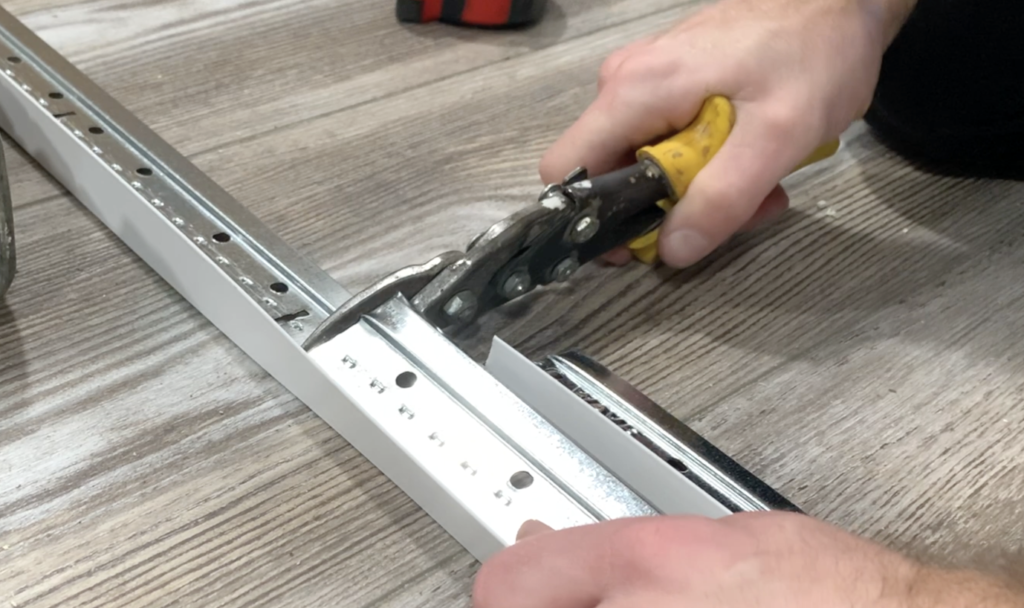
Before hanging the first main beam, you will need to trim the main beam so that a cross tee slot is a border panel distance away from the wall. Refer to the figure below.
To cut the main beam, use tin snips – similar to what was done for the wall molding.
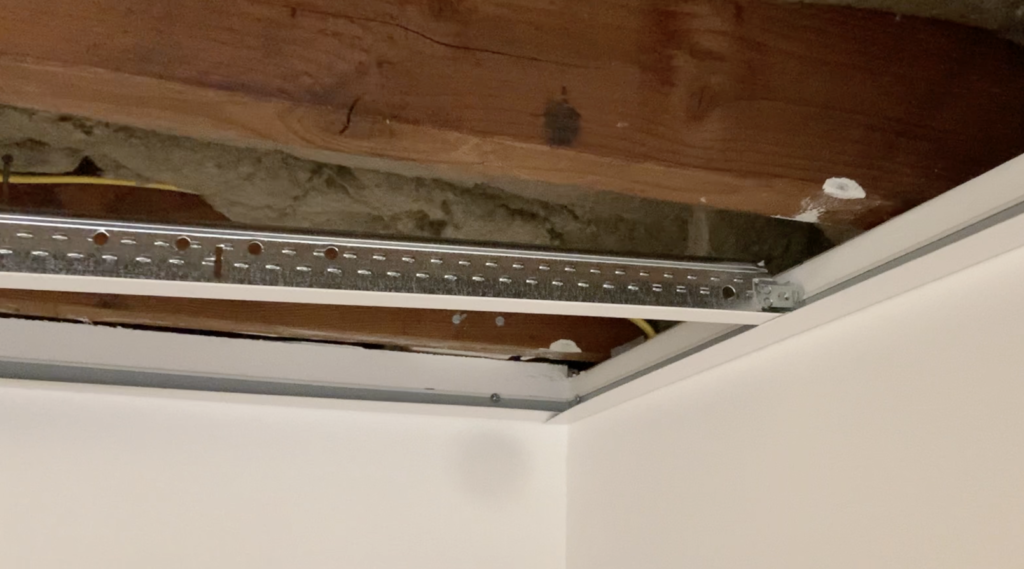
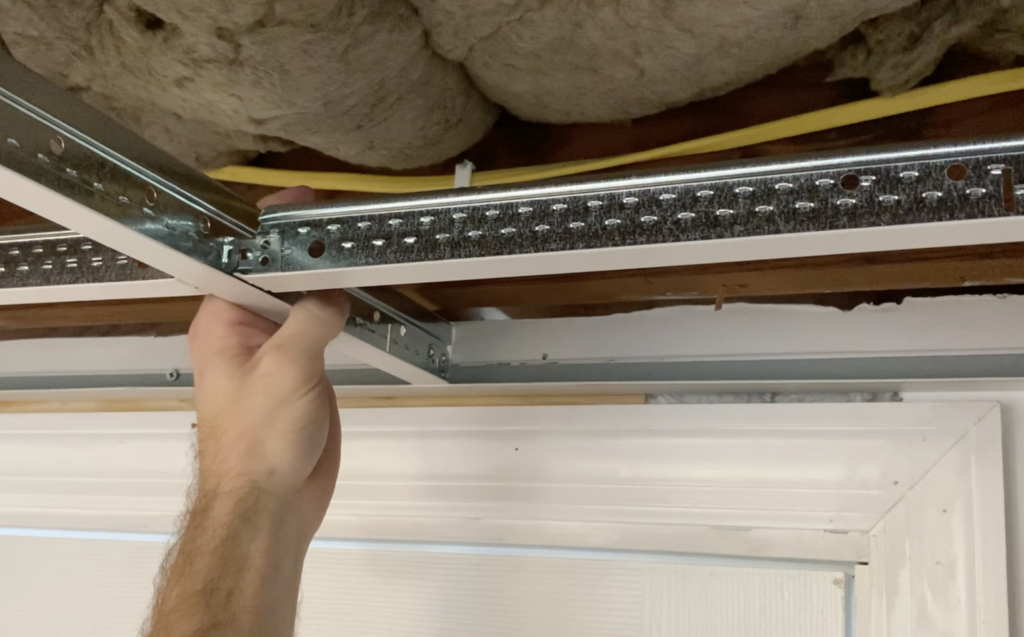
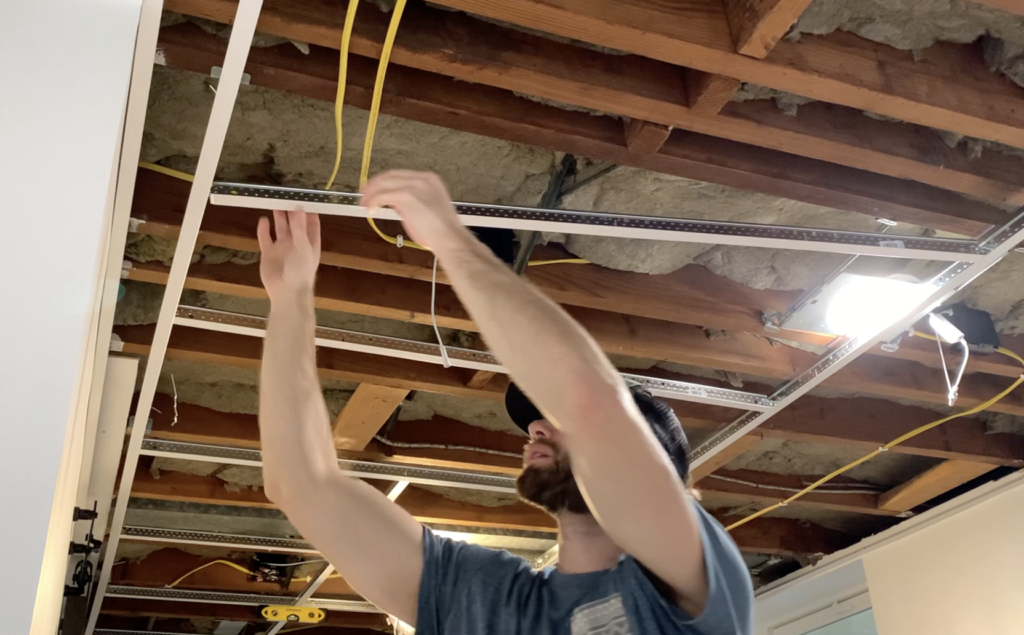
Next, place the end of the main on the wall molding and insert each of the grid hooks into the nearest circular hole in the main beam.
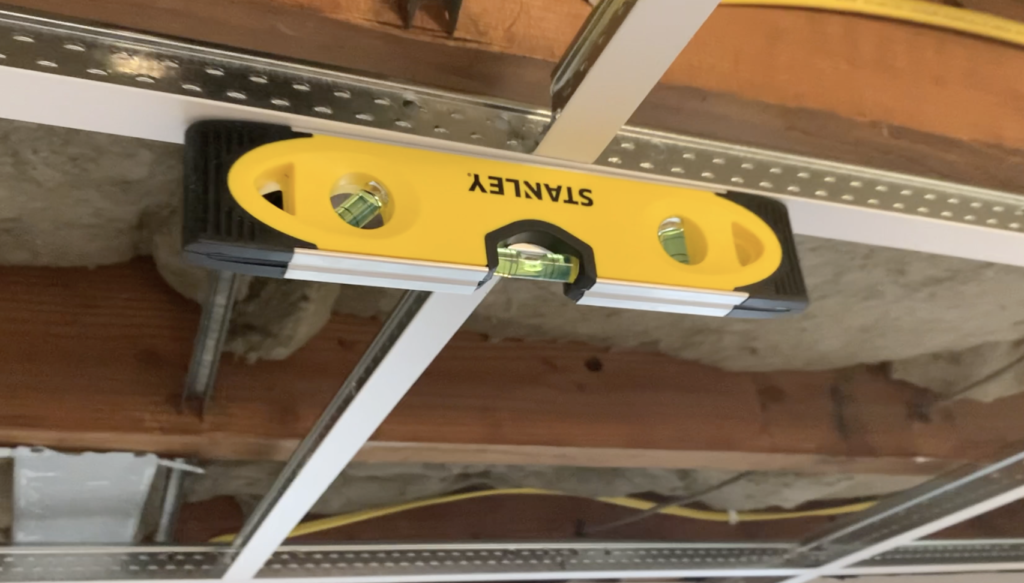
Use a magnetic level to check the level of the main beam and make any adjustment to the hook height by squeezing the adjustment tabs and sliding the hook up or down as needed.
Repeat this process for the remaining main beams such that each main beam is parallel to and 4′ away from the previously installed main beam.
Prepare and Cut Border Cross Tees
The first cross tee will be position to that the one side is supported by the wall molding and the other side is inserted into the main beam. Additionally, this first cross tee will be a “border panel’s” distance away from the wall.
If you cut your main beam correctly, you should have a cross tee slot available for the cross tee at a distance that is a “border panel’s” length away from the wall.
To cut the first “border” cross tee, position it in place – with one side on the wall molding and the other extending towards the main beam.
Cut the cross tee where it overlaps the main beam using tin snips and then position the cut side on the wall molding.
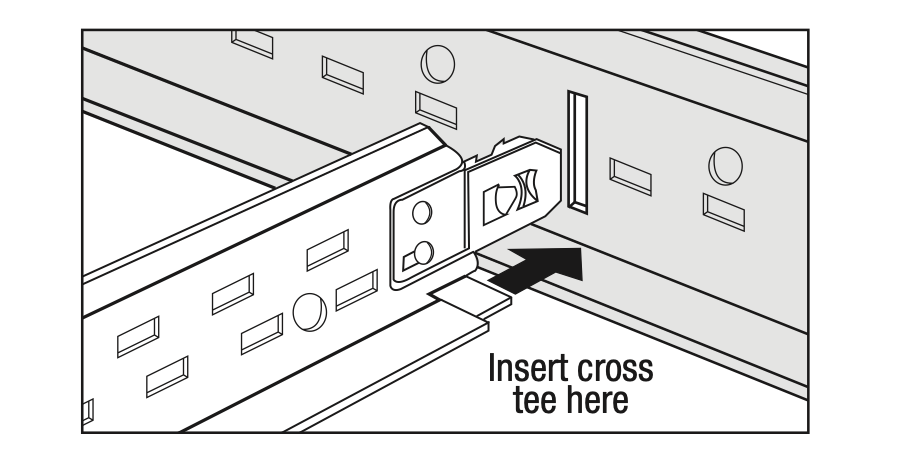
Next, insert the end tab of the uncut end of the cross tee into the cross tee slot. You should hear a “click” sound when inserted properly.
Repeat the steps above for the other “border” cross tees that make up your drop ceiling.
After installing the first two “border” cross tees, install full 4′ cross tees between the main beams – as shown below:

When connecting two cross tees in the same rectangular hole of a main beam, insert the second tee into the slot by passing on the right side of the already installed cross tee.
At this point, you can now check to ensure that the drop ceiling grid is “square”.
Square the Grid
For the best possible result, it is important to “square” the drop ceiling grid at this stage of the project.
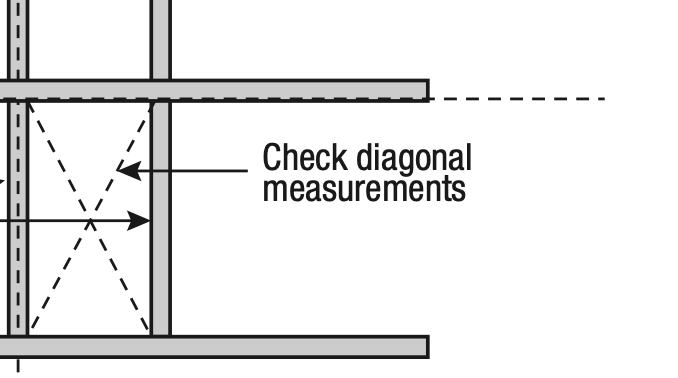
To check that the drop ceiling grid is square, measure the across the diagonals of the 2’x4′ opening. If the measurements are the same, your grid is square and you can proceed. If the measurements across the diagonals are different, make adjustment as required until the diagonal measurements become the same.
Install Remaining Grid and Level the System
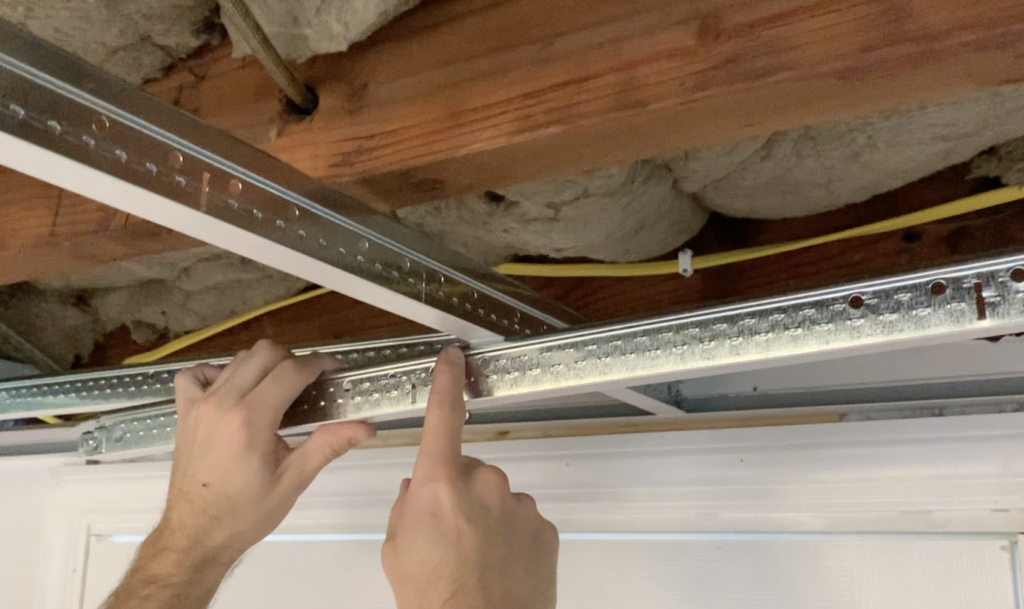
After confirming that the drop ceiling grid is square, you can continue to install the remaining grid. If your room requires, you may need to attach two main beams together. To do this, simply insert the end of one main beam into the end of another main beam until you hear an audible click. Refer to the figure below:
At this point, continue to install all of the cross tees until you have completed the entire drop ceiling grid.
PRO TIP: Use the left-over ends of the cut main beams to start additional rows of main beams.
After inserting the all of the cross tees, you should be left 24″x48″ openings in your grid. If you are installing 24″x24″ drop ceiling panels, install 2′ cross tees perpendicular to the 4′ cross tees. This will create 2’x2′ opening for the drop ceiling panels.
After installing all of the main beams, 4′ cross tees, and 2′ cross tees (if applicable), your drop ceiling grid should look like this:

Perform Final Leveling of the System
Once the drop ceiling grid has been installed, perform a final leveling of the system using a magnetic level. Place the level on each of the main beams and make adjustments (as needed) by raising or lowering the grid hooks. After ensuring the grid is perfectly level, you can begin to install the drop ceiling panels.
Install Drop Ceiling Panels
At this point in the drop ceiling installation process you can begin to install the drop ceiling panels. Armstrong Ceilings manufactures a variety drop ceiling panels in various styles and colors. For this basement drop ceiling project, I installed the shallow coffer panels since they look great and are made of PVC (which is inherently waterproof).
Installing the panels
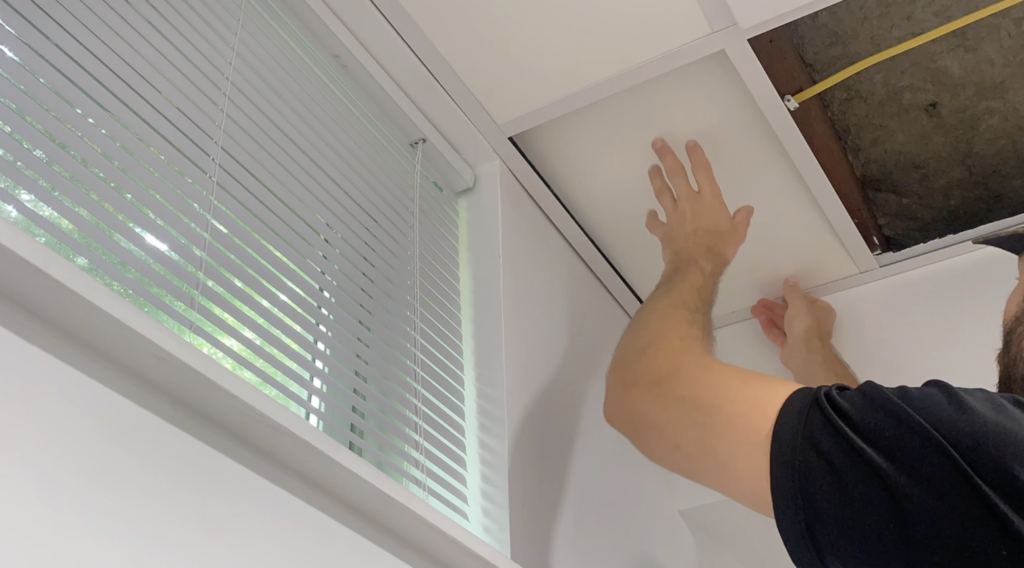
To install the drop ceiling panels, simply lift the panel up through the grid at an angle and then lower it into place so that it is supported by the main beams, 4′ cross tees, and 2′ cross tees.
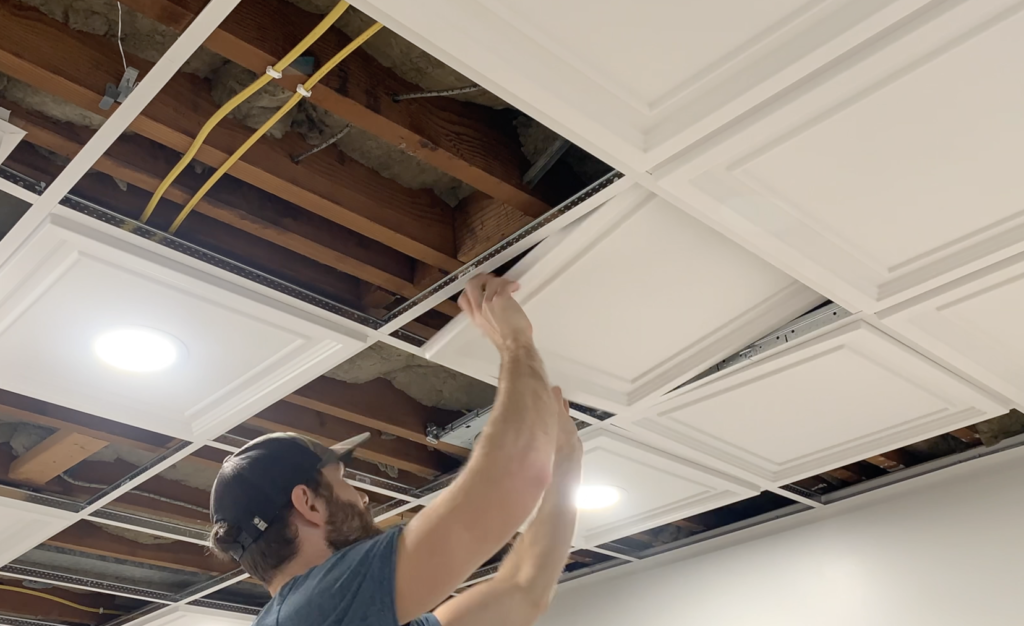
Repeat the drop ceiling panel installation for all of the full size panels in your installation area.
Cutting the panels
For the border panels, you will need to trim the drop ceiling panels to size. For most grid panels, you can use a straight edge and a utility knife to score the surface of the panel and snap it along the scored line.
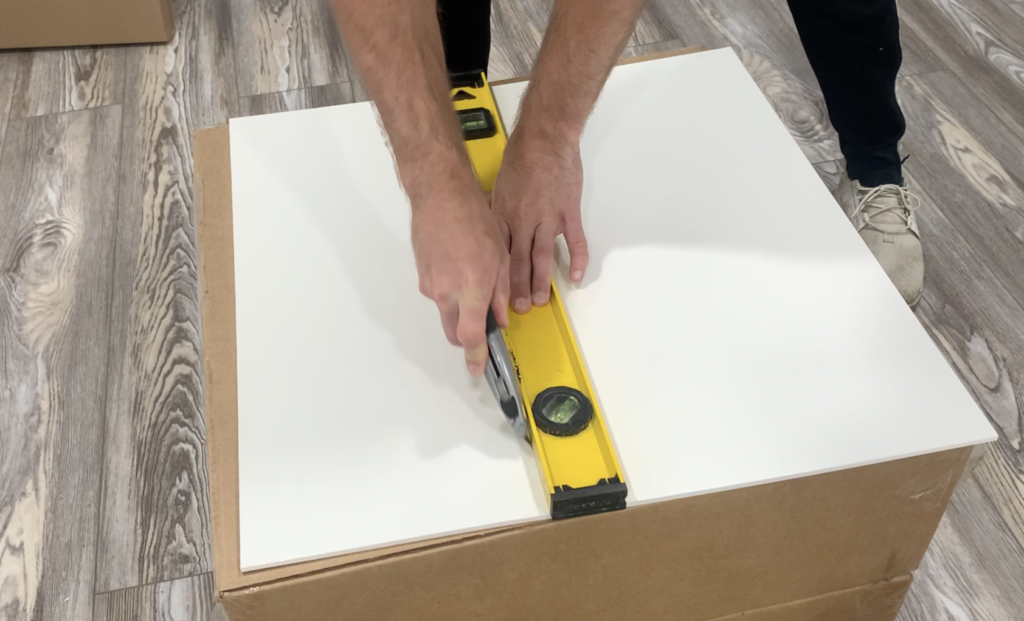
For PVC panels, however, you can also cut the panels with tin snips.
PRO TIP: It is not recommend that you cut coffered drop ceiling panels for the for the end panel. Instead, use flat panels as your border panels.
After cutting the border panels to the correct size, simply position them in place within the grid.
Repeat this process for all of the drop ceiling border panels.
Installing recessed lighting in a drop ceiling
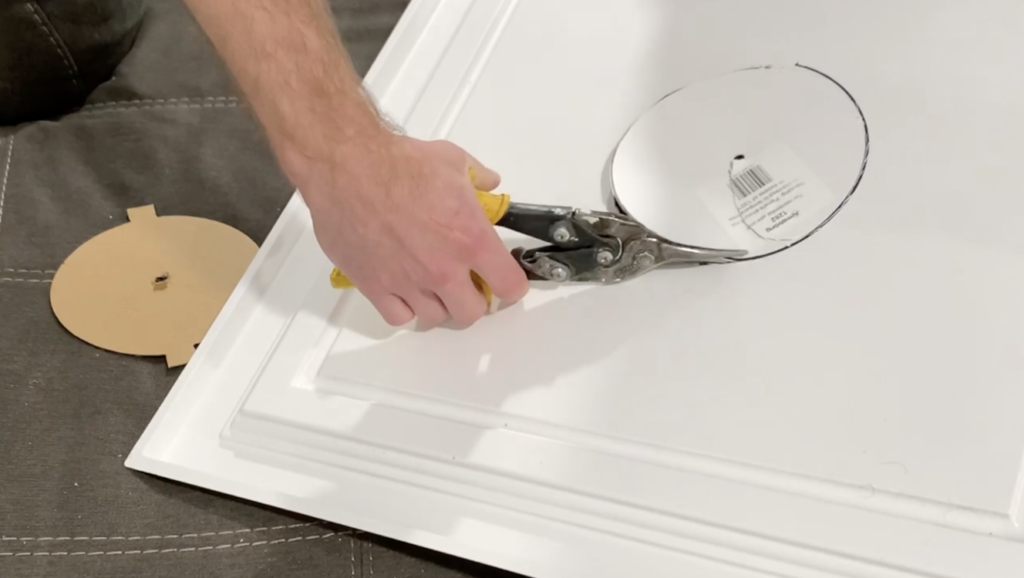
To install recessed lighting in your drop ceiling panels, use the recessed lighting “cut” template to mark the penetration on the drop ceiling panel.
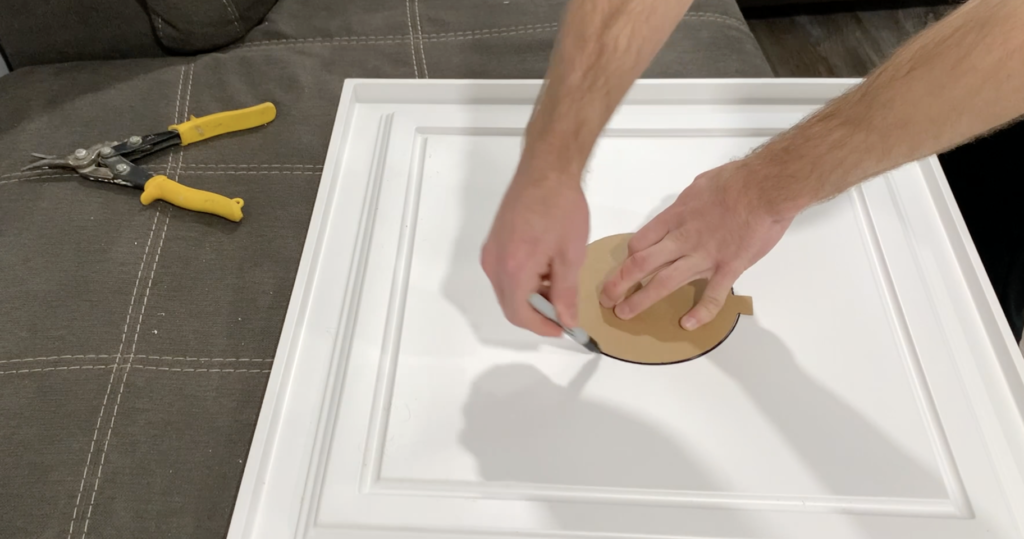
Next, cut out the penetration using tin snips.
Place the recessed light through the penetration so that the tabs hold the light in place.
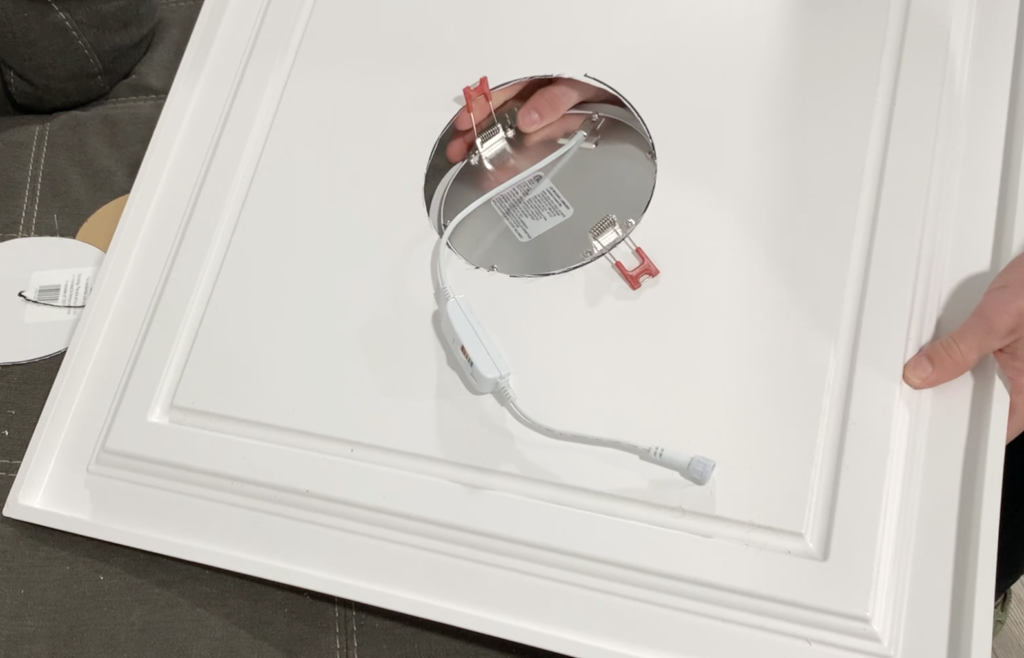
Finally, make the electrical connection and position the drop ceiling panel (with the recessed light installed) within the grid.
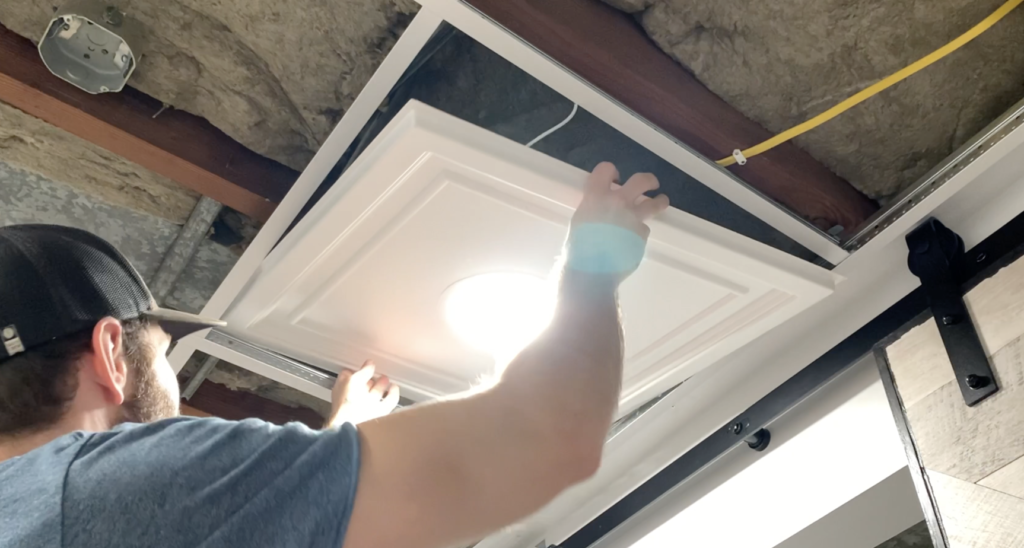
Repeat this process for all of the recessed lights needed for your drop ceiling.
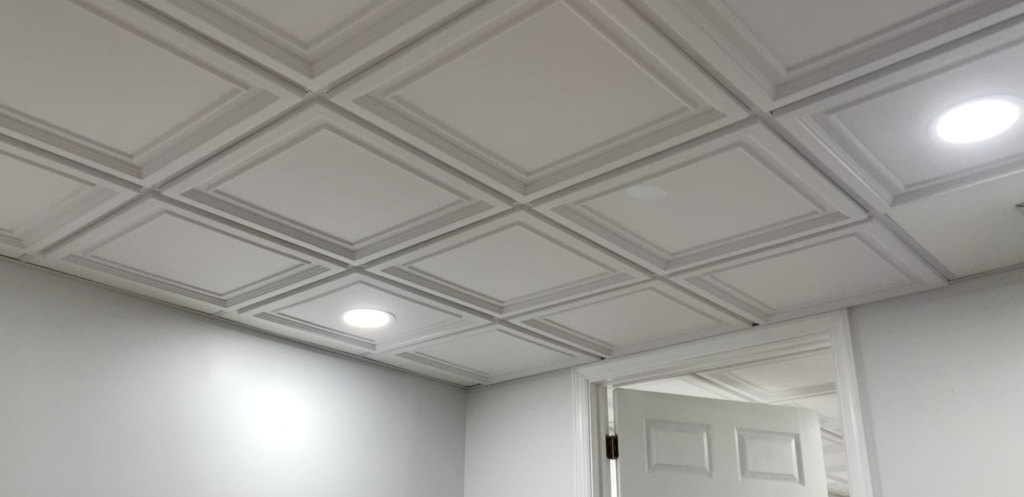
Final Drop Ceiling Installation Result
At this point, the drop ceiling installation is complete and you should have a beautiful result that looks like this!
If you are more of a visual learner, I recommend that you check out my “How to Install a Drop Ceiling” Youtube Video below:
You can also watch Armstrong Ceiling’s drop ceiling installation video which explains each step of the drop ceiling installation process in detail.
To check out the rest of my basement transformation, check out my YouTube Playlist or check out the blog articles linked below. Thanks!
Thanks so much for checking out ATImprovements! If you learned something from this project, you might also like these other DIY Projects:
- How to Install Rigid Foam Insulation in a Basement: https://atimprovements.com/how-to-install-rigid-foam-insulation/
- How to Frame Basement Walls: https://atimprovements.com/how-to-frame-a-basement-wall/
- How to Frame Around HVAC Ducts or Pipes in a Basement: https://atimprovements.com/how-to-frame-around-ductwork/
- How to Install Luxury Vinyl Plank in a Basement: https://atimprovements.com/lvp-flooring-installation/