
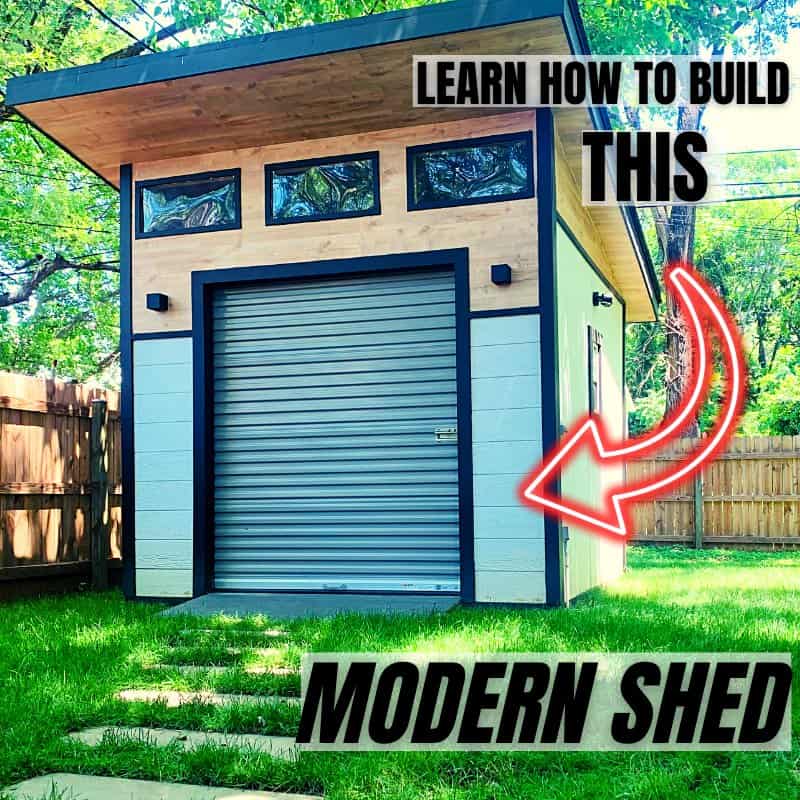
Building your own storage shed is a great way to create addition storage in your backyard for the lawnmower, tools, bikes, etc. By building your own shed, you are able to customize the size, look, and functionality to meet your needs. Additionally, you are able to build the shed using higher quality materials than what would be included with the cheap, pre-fabricated sheds sold at most big box stores. Overall, building your own storage shed is a fun DIY project that the average homeowner can tackle.
To build a lean-to shed, start by building the foundation. Next, frame your shed walls with 16″ O.C. stud spacing. The side and back walls will be the same height and the front wall will be slightly taller in order to create the roof slope. Fasten siding (typically T1-11 of LP SmartSiding) to the wall studs using a framing nailer. Next, install the roof rafters by cutting birdsmouth notches and securing them to the front and back wall of the shed using rafter ties. Install the plywood roof decking and install asphalt shingles or a metal roof. Finally, install shed trim, windows, lights, etc. and paint the shed to your desired color.
This article will cover every step of the shed building process from the foundation to the asphalt shingle roof. Additionally, this article will include links to my YouTube instructional videos that show every detail of the shed building process.
This article is thorough and detailed, so feel free to skip around to specific sections of the article using the Table of Contents below. With all that said, let’s take a look at each step of the lean-to shed construction process.
TOOLS AND MATERIALS NEEDED TO BUILD A SHED:

Could you build a shed with a hammer, nails, and a paint brush? Probably…
Should you build a shed with a hammer, nails, and a paint brush? ABSOLUTLEY NOT.
Before explaining each step in the shed building process, let’s take a moment to discuss the tools and materials that you will need to build a shed.
Materials Needed to Build a Lean-to Shed
Determining what materials (and quantities) you will need in order to build a shed from scratch is often the most time consuming and intimidating part of the shed planning process. As mentioned previously, I determine the quantities of materials needed for my 10’x10’ Modern Shed by modeling the entire shed in a 3D modeling software. Having a 3D Model really helped me to determine exactly what materials and quantities I would need to purchase ahead of time.
An alternative to 3D modeling is a notepad and pencil… Simply sketching out your shed on graphing paper can help you to visualize your shed and get an idea for the quantity of materials that will be needed.
Obviously, the quantities of materials needed will depend on the type and size of the shed you are building. The basic materials and lumber components you will need for any shed (based on my experience) are listed below:
| SHED COMPONENT | MATERIAL I USED FOR MY SHED | OTHER MATERIAL OPTIONS |
| Floor Joists | 4”x4” Pressure Treated Lumber | 2”x6” Pressure Treated Lumber |
| Shed Subfloor | ¾” Pressure Treated Plywood | ½”- ¾” Plywood or OSB |
| Wall Studs | 2”x4” Lumber | 2”x3” Lumber (Not recommended) |
| Wall Bottom Plate | 2”x4” Pressure Treated Lumber | 2”x4” Lumber |
| Roof Rafters | 2”x6” Lumber | 2”x4” Lumber, 2”x8” Lumber |
| Roof Sheathing | ½” Plywood | ½” – ¾” Plywood |
| Siding | LP SmartSide Panels | T1-11 |
There are many other shed materials that you will need to select, (roof shingles, trim, doors, windows, etc.) but these items are more of a builder preference as opposed to a standard material.
You will get a better idea of the materials you will need to build your shed in the following Sections.
Tools Recommended to Build a Lean-to Shed
To successfully build a shed, you will likely need the following Tools:
- Safety Equipment (Glasses, gloves, boots, etc.)
- Tape Measure
- Drill
- Exterior Screws
- Circular Saw OR Miter Saw
- Air Compressor
- Framing Nailer
- Exterior Framing Nails (for nail gun)
Although the tools listed above are a good starting point, you may need more/less tools depending on your specific shed.
Now that you have general idea of the Tools and Materials Needed to build a shed, let’s begin the shed construction process.
How to Build a Shed Foundation

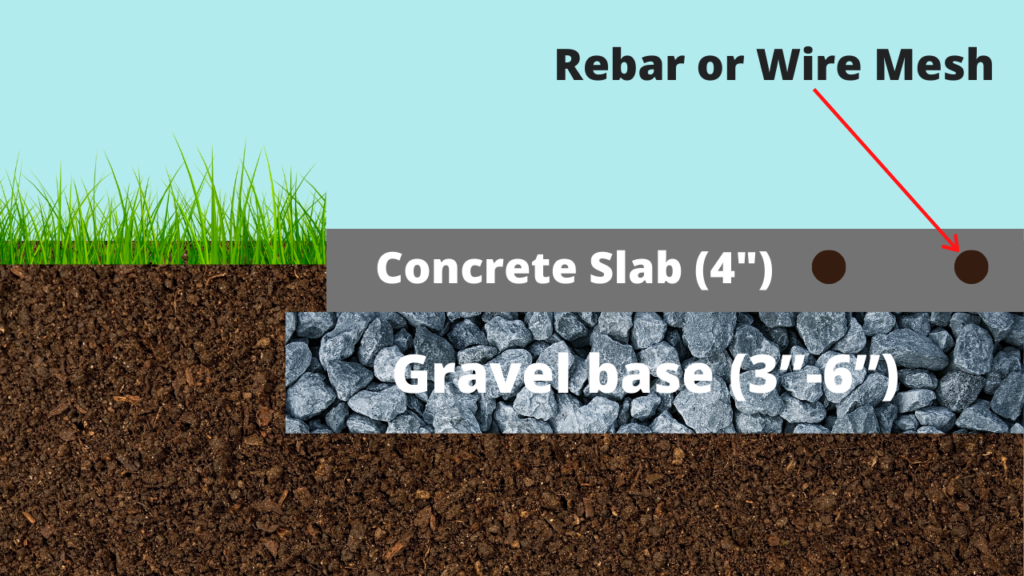
Building a concrete shed base slab is widely considered the most durable and sturdy of all the shed base options. Although there are other shed base options (Gravel base, Concrete Block, etc.) none are as reliable as a concrete slab.
Here are the basic steps for building a shed foundation
Plan Out Your Shed Base Concrete Slab Area

The first step in a successful concrete slab shed base project is to plan out your slab area. Spend some time thinking about how large your shed will be and, as a result, how large you shed base concrete slab will need to be.
When determining how large to make your shed base concrete slab, keep the following in mind.
- If you make your slab larger than your shed, you will likely have some exposed concrete slab that will need to be maintained (i.e. power washed, etc.)
- If you make your slab the exact same size as your shed (e.g. a 10’x10’ concrete slab for a 10’x10’ shed), you will have no exposed concrete slab.
Either of these options is fine – it just depends on your preference.
Once you have an idea of the general size of your shed base concrete slab area, it is recommended that you mark the area with spray paint. You also have the option to mark the area with stakes and a string line, but this is usually more difficult then simply marking the area with spray paint.
You don’t need to have the layout perfectly dimensioned at this stage. Final dimensions will be established as part of the concrete form construction process – which is discussed later in this article.
After preliminarily planning out your shed base concrete slab area, it’s time to begin the excavation process.
Excavate the Shed Base Concrete Slab Area
After establishing your shed base concrete slab area, excavate the area to approximately 8″-10″ below grade. Your excavation depth should allow for approximately 4″ of gravel sub-base and approximately 4″ for your shed base concrete slab. See below:
Continue to excavate your entire slab extension area to a depth of 8″-10″. I completed the excavation by hand using a shovel, but depending on the size of your slab base concrete slab, you may want to consider renting mechanical excavation equipment.
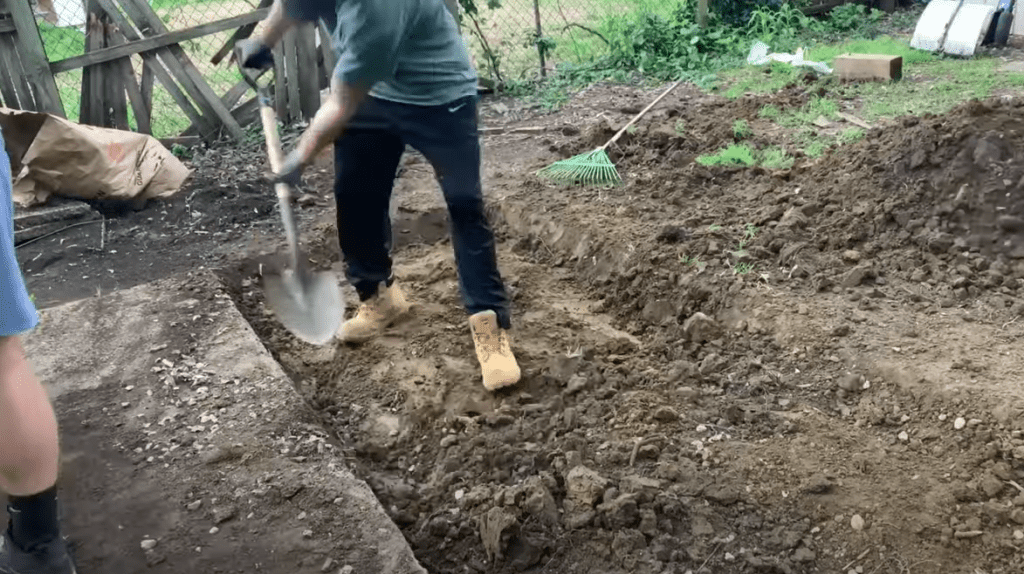
After excavating the shed base slab area, it is recommended that you compact the excavated area.
I used a hand tamp to accomplish soil compaction, but I recommend that you rent a mechanical compactor for larger shed base slab projects.
Backfill the Shed Base Concrete Slab Area with Stone
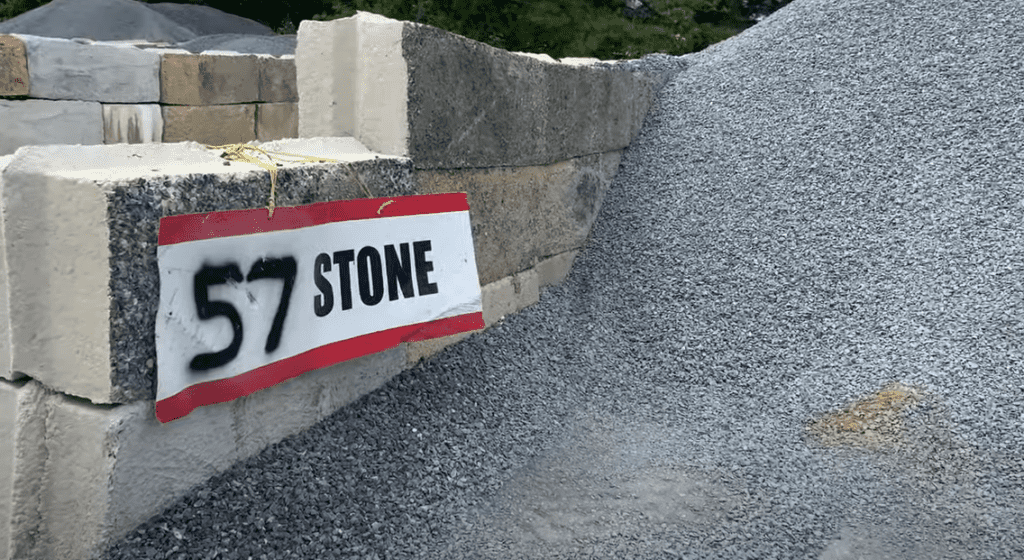
Once your shed base slab area has been excavated and compacted, it is time to backfill the excavation with approximately 4″ of stone. There are a variety of stone types that can be used used for your concrete slab stone base, but No. 57 stone/gravel is typically the most common. Crusher Run gravel and Recycled Concrete Aggregate (RCA) are also sometimes used as a concrete slab stone base.
You can typically have the stone delivered to your home or job site for a small delivery fee. However, you also have the option to pick up your stone from a local concrete or landscape supply company.
Once you have purchased your concrete slab stone base material, apply it to the excavated area until a 4″ stone bed has been placed over the entire excavation area.
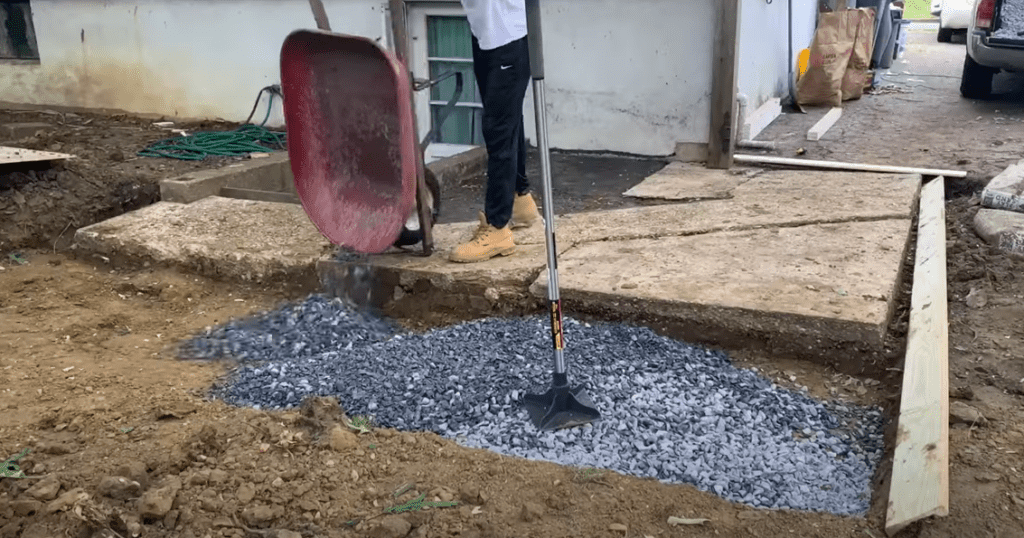
Once all of your concrete slab stone base has been applied to the excavation area, you can proceed with compacting the stone sub base.
Compact the Concrete Slab Stone Base
Once the stone base has been installed and you have a consistent 4″ stone bed across the entire shed base concrete slab area, compact the stone using a hand tamp or a mechanical compaction device.
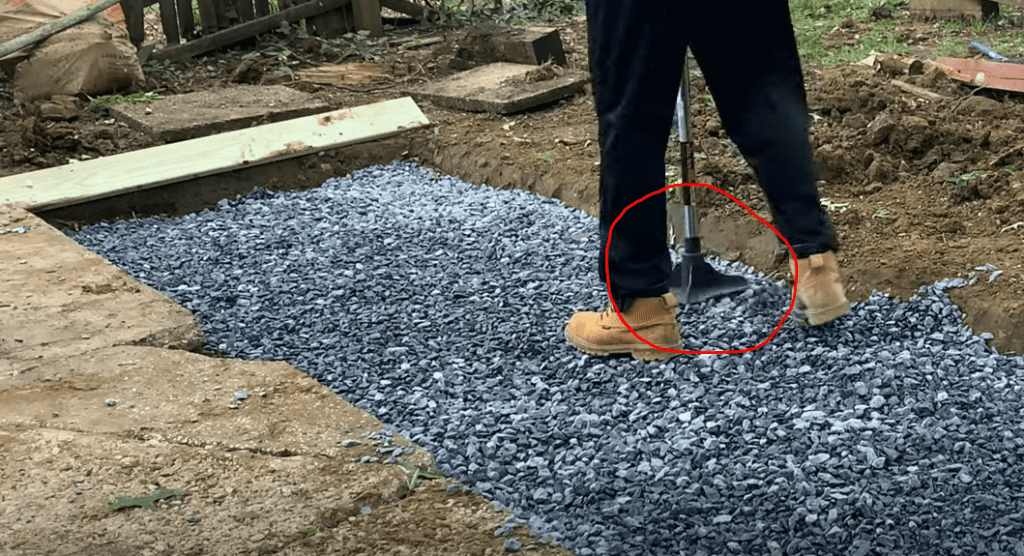
For larger shed base concrete slabs, it is highly recommended that you rent a mechanical compactor for the compaction of both your soil and the stone sub base. This will ensure that your shed base concrete slab is well compacted and will minimize the amount of settling that occurs beneath the slab.
Construct Concrete Forms
At this stage of the shed base concrete slab construction process, you will need to construct your concrete slab forms. Concrete forms are used as the perimeter of the concrete slab and are used to give the slab shape during the pouring process.
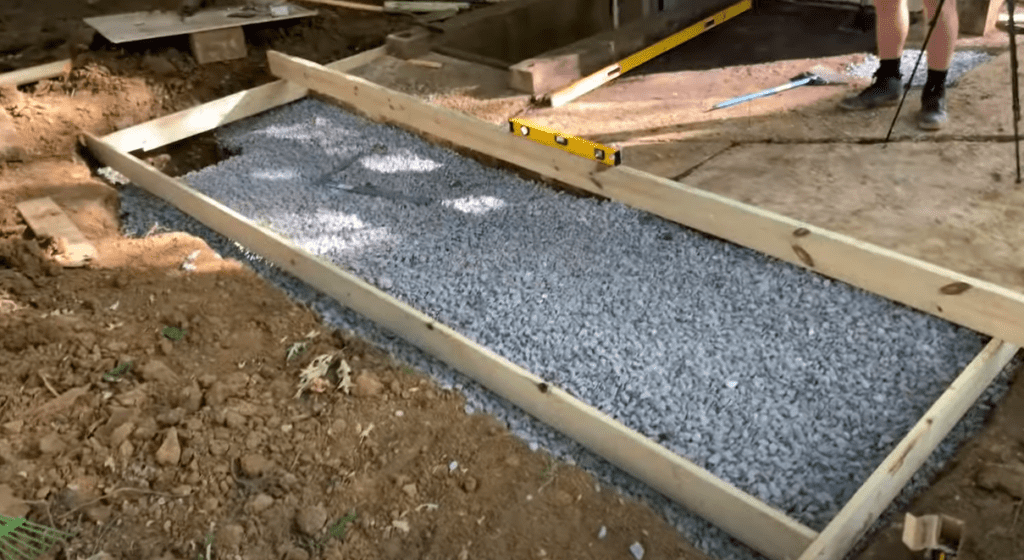
Depending on the thickness of your concrete slab, use appropriate lumber for your concrete forms. Typically, the concrete forms will be 2”x4” for concrete shed base slabs.
As you construct your shed base slab concrete forms, use a piece of lumber and a level to check that your concrete form is perfectly level.
Once you have constructed your concrete forms with lumber and ensured that the forms are level, secure the forms in place with stakes.
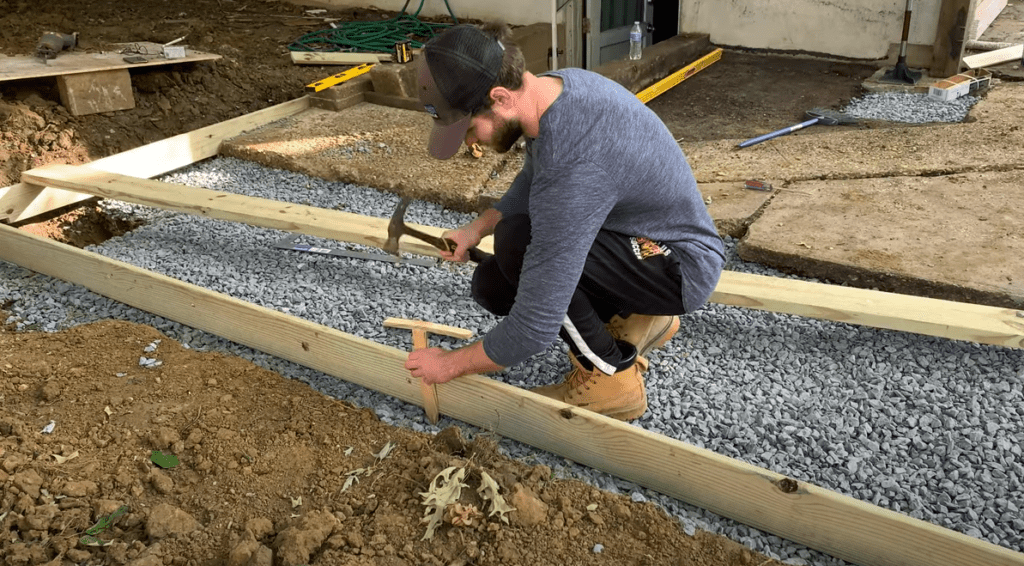
Securing the forms with stakes will prevent the forms from shifting during the concrete pouring process. Additionally, be sure to screw your concrete form lumber together at any corners.
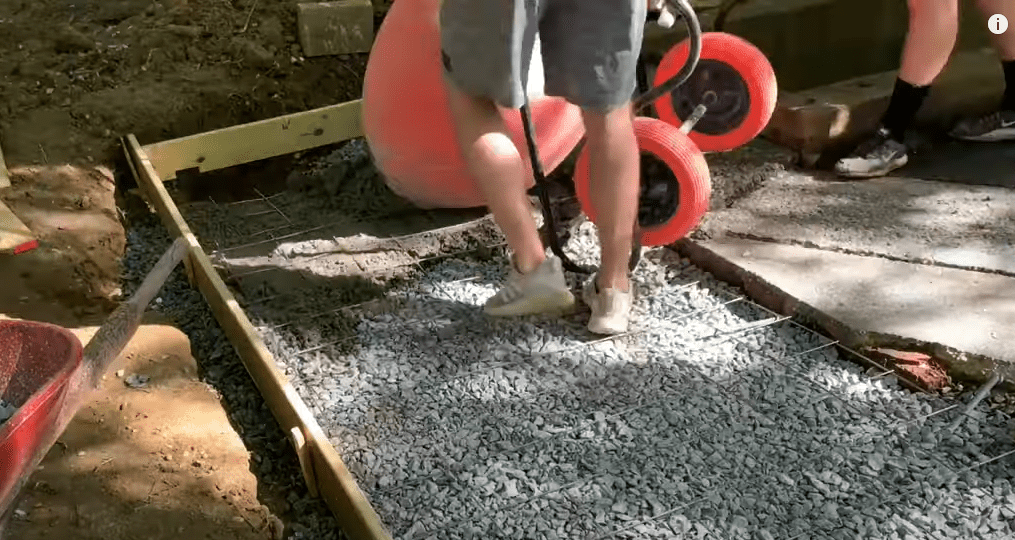
Mix up and Pour Your Concrete into the Shed Base Concrete Slab Area
At this stage, you can begin preparation for your concrete pour. If you have a small shed base concrete slab area, you may consider mixing up your concrete by hand. However, if you have a large shed base concrete area, it is highly recommended that you have your concrete delivered via a concrete truck.
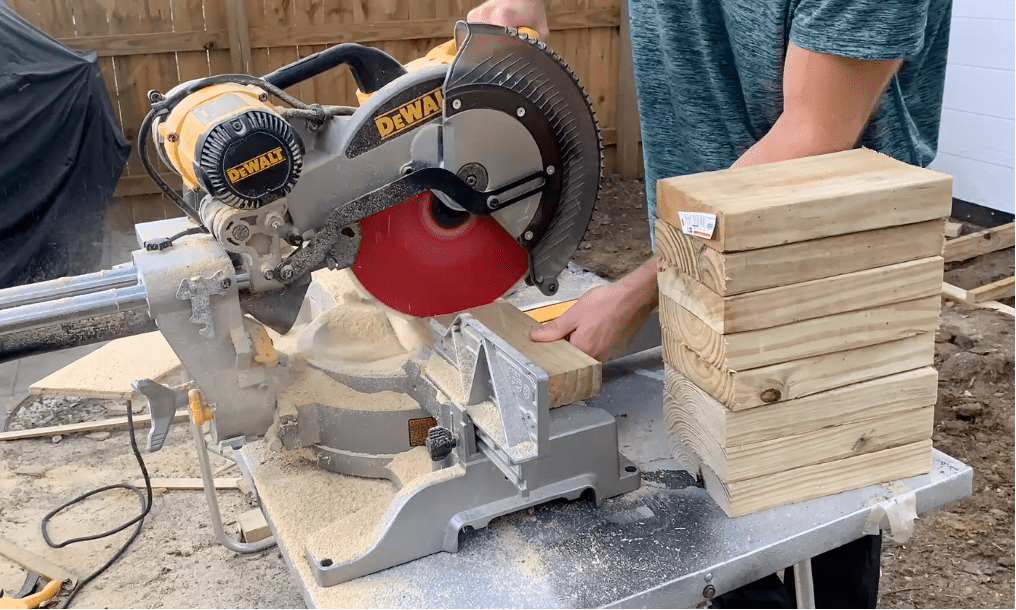
For our shed base concrete slab project, we rented a concrete mixer and mixed approximately 70, 80 pound bags of concrete. See below:
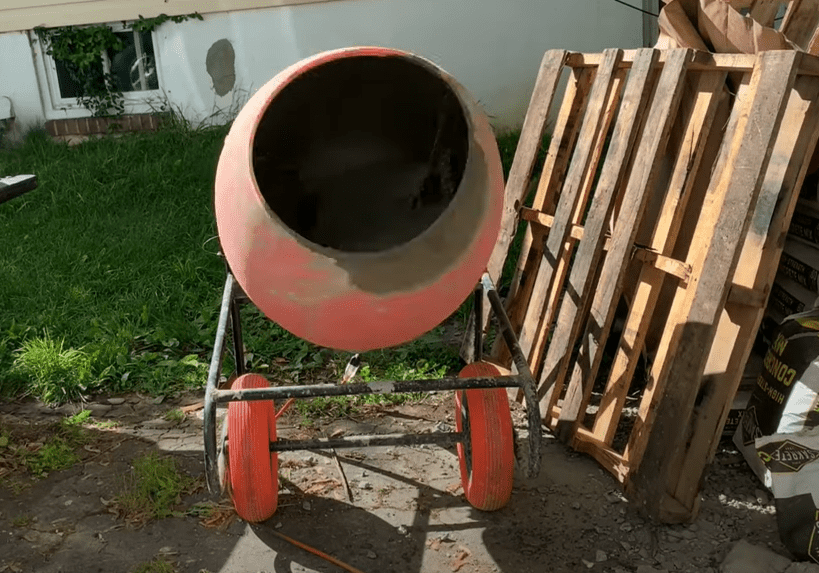
PRO TIP: Mixing Concrete by Hand is difficult, time consuming, and messy. We mixed approximately 70 bags of concrete for this project and it was a ton of work.
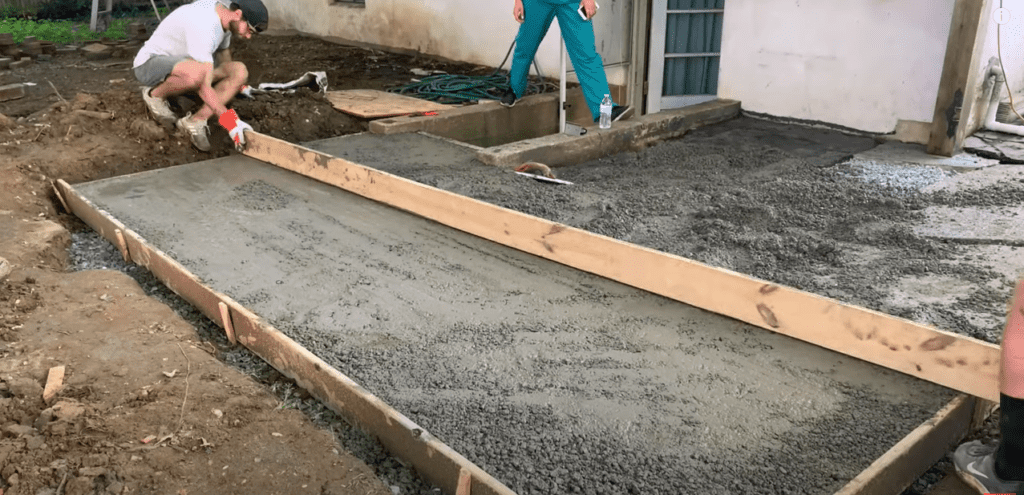
Add water to your concrete mix in accordance with the manufacturer’s recommendations and apply concrete to your shed base concrete slab area.
Continue to mix concrete and apply it to the shed base concrete slab area until you have added enough concrete to completely fill the concrete form area. At a minimum, concrete should be added until it is even with the top of your concrete forms.
Once you have added sufficient concrete to your shed base concrete slab area, you can begin the concrete slab finishing process.
Finish the Shed Base Concrete Slab Surface
To finish your shed base concrete slab surface, start by “screeding” off any excess concrete using a piece of lumber. To accomplish this, move a piece of flat lumber back and forth along the top of you concrete forms in a sawing motion. This will help to remove any excess concrete and will level out the surface of your concrete slab.
After “screeding” the surface of your concrete slab, it is recommended that you smooth the surface using a bull float.
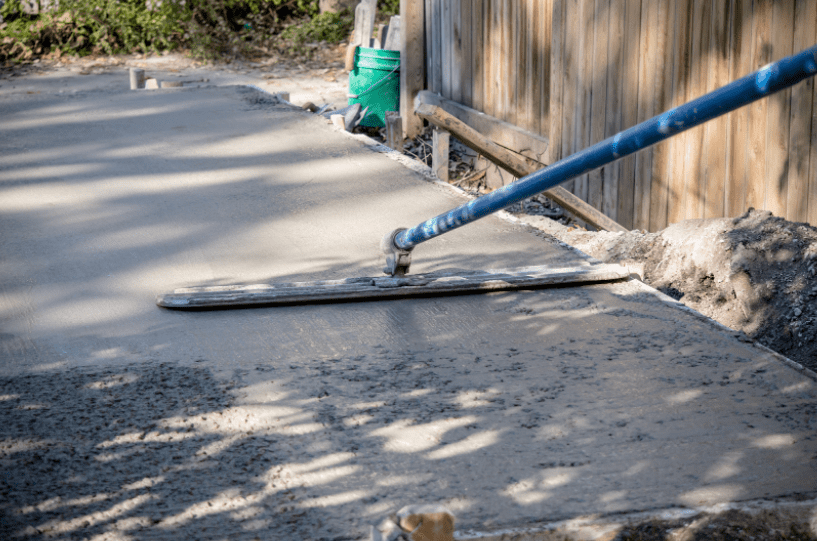
A bull float can be rented from your local box store for a few bucks and will make the concrete finishing process much easier.
PRO TIP: Concrete slab surface finishing is an art. Achieving a perfect concrete finish is difficult without considerable concrete surface finishing practice. I recommend that you spend some time watching concrete finishing Youtube videos so that you are prepared to take on your concrete finishing job with confidence.
Using a bull float will draw the water to the surface of the concrete and will give you a smooth surface. After the bull floating process, use a hand/finishing trowel to smooth out any rough patches.
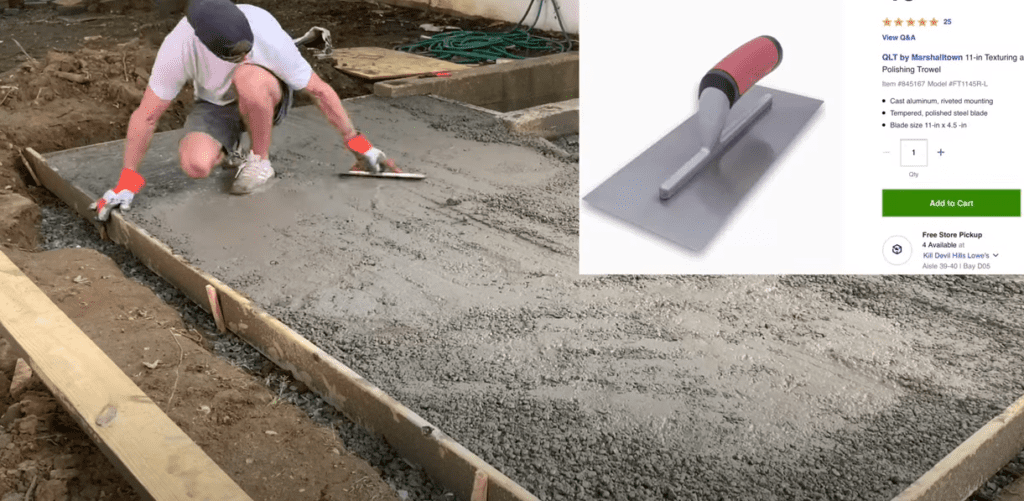
Additionally, use an edging trowel to smooth out your shed base concrete slab edges to give them a nice rounded look.

Once you have smoothed out your shed base concrete slab surface with a bull float/finishing trowel and rounded all of the concrete slab edges with an edging trowel, allow your concrete to cure for 2-3 days.
Remove Concrete Forms and Perform any Touch Up Work
After allowing your shed base concrete slab 2-3 days to cure, remove the concrete forms by removing any stakes or screws that are holding the forms together. You may need to use a prybar to separate the lumber from the concrete slab.
After removing the concrete forms, inspect the concrete slab shed base for any imperfections. If there are any, use a concrete repair mortar to fill in any holes, spalling, or any parts of the concrete that may have been damaged as part of the concrete form removal process.
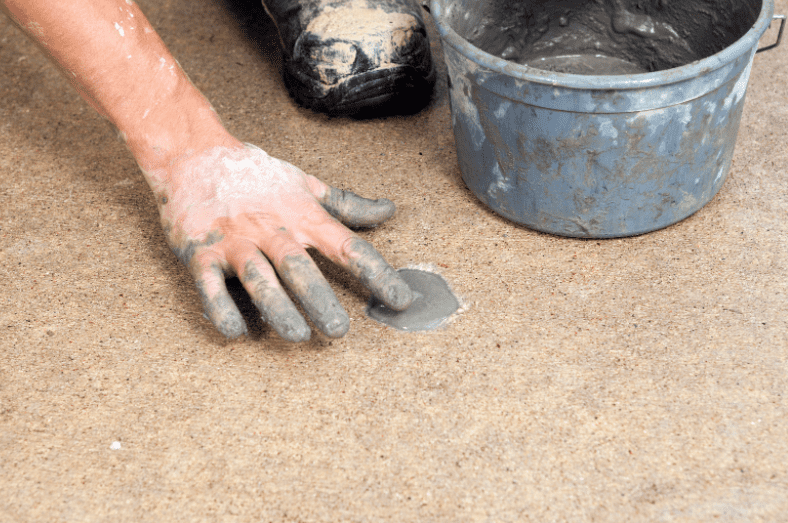
After repairing any trouble spots on your shed base concrete slab your project is nearly complete.
Install Control Joints (if needed)
Depending on the size of your shed base concrete slab, you may want to consider adding control joints to your slab. If your slab is smaller than 12’x12’, control joints are likely unnecessary.
Concrete control joints are planned cuts in your slab that create an intentional “weak-point” in the slab. These control joints will be the first to crack when the shed base concrete slab experiences settling.

The general rule of thumb is that control joints should be placed no more than 3X the slab thickness apart (in inches). For example, a 4″ slab should have control joints placed a maximum of 12 feet apart.
Control joints can be added to your shed base concrete slab in two ways:
- Create a control joint when the concrete is still wet using a grooving tool
- Create a control joint after the concrete surface has cured using a concrete saw
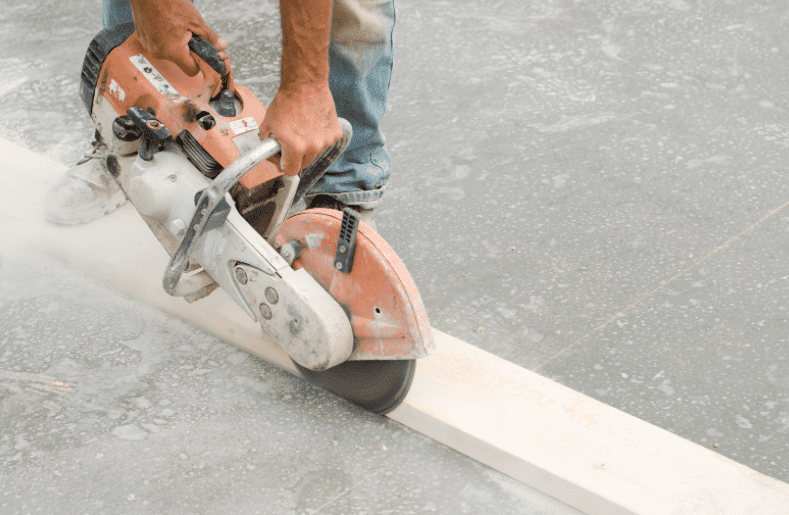
Both of these options are acceptable and will give you more control over where your concrete will crack. Control joints should be cut to roughly 25% of the slab thickness. For example, a 4″ slab, should have control joints that are approximately 1″ deep.
Since my concrete shed base slab was small (10’x10’), I decided not to include control joints. For more information on Shed Foundation Options, you can check out my YouTube video linked below:
At this stage, all steps required for your concrete shed base slab project have been completed. You can now begin constructing the Shed Base Frame.
How to Build a Shed Base Frame
The key to building shed that will last for decades is to start by constructing a solid shed floor base. Building a shed floor base is simple, but it needs to be done correctly in order for the rest of your shed build to be successful. There are many different ways to build a shed floor base, but 4″x4″ pressure treated floor joist lumber will guarantee a durable shed floor base that will last for years.
To build a shed floor base with pressure treated 4″x4″ lumber, start by positioning your floor joists so that that the edges of the plywood subfloor will land directly in the center of your shed floor joists. Space your floor joists approximately 12″-16″ on center, or as required based on the thickness of your subfloor. Next, attach a pressure treated 2″x4″ end cap to the front and back of the shed base frame, perpendicular to the shed floor joists. Finally, attach the plywood subfloor to the shed floor joists.
Overall, building a shed floor base is a relatively simple step in the shed building process. With a bit of planning and preparation, you can ensure that you set up a solid shed base foundation for the rest of your shed build.
Determine the Size of your Shed Floor Base
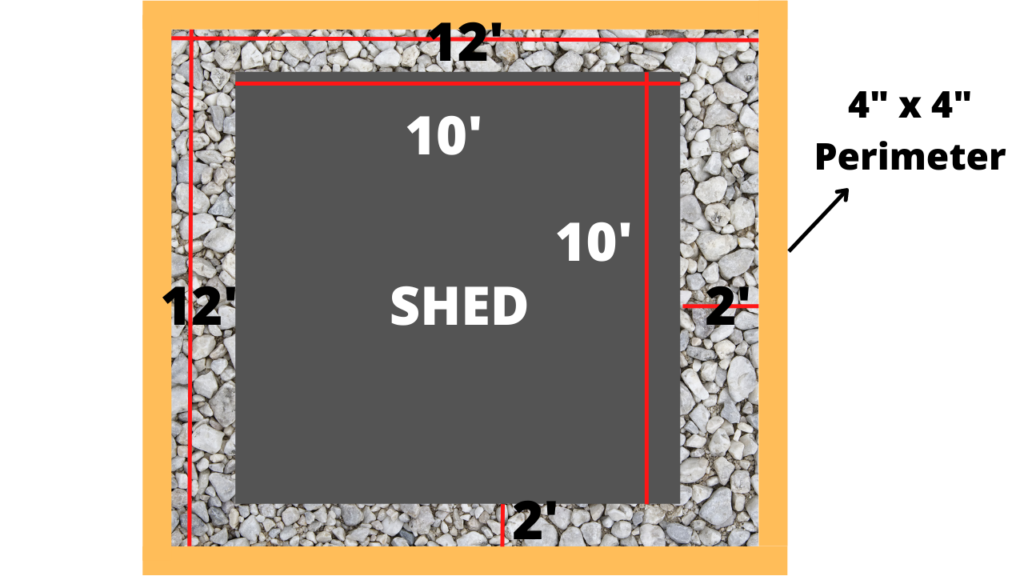
Although this goes without saying, you need to determine the size your shed before you can construct the shed floor base for it. For the purposes of this article, we will be constructing a 10’x10′ shed floor base. If you are building a different size shed, you can modify these instructions slightly in order to accommodate your specific shed size.
After determining your shed floor base size, you can start to layout the shed base floor joist spacing.
Determine Your Shed Base Floor Joist Spacing
When determining your 4″x4″ floor joist spacing, you want to ensure that that edges of your plywood subfloor (to be installed in later steps) will rest directly in the center of the floor joists below. Typically, this will be 16″ O.C. (on center) spacing. Spend some time thinking about how you will need to space your shed base floor joists so that the plywood subfloor will be properly supported.
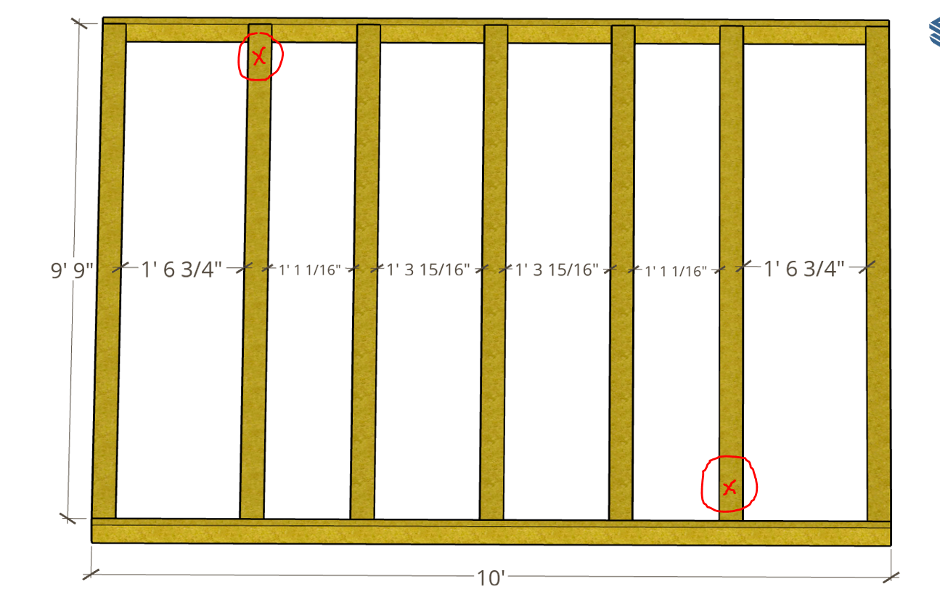
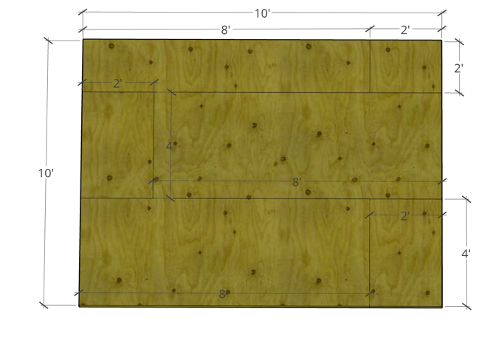
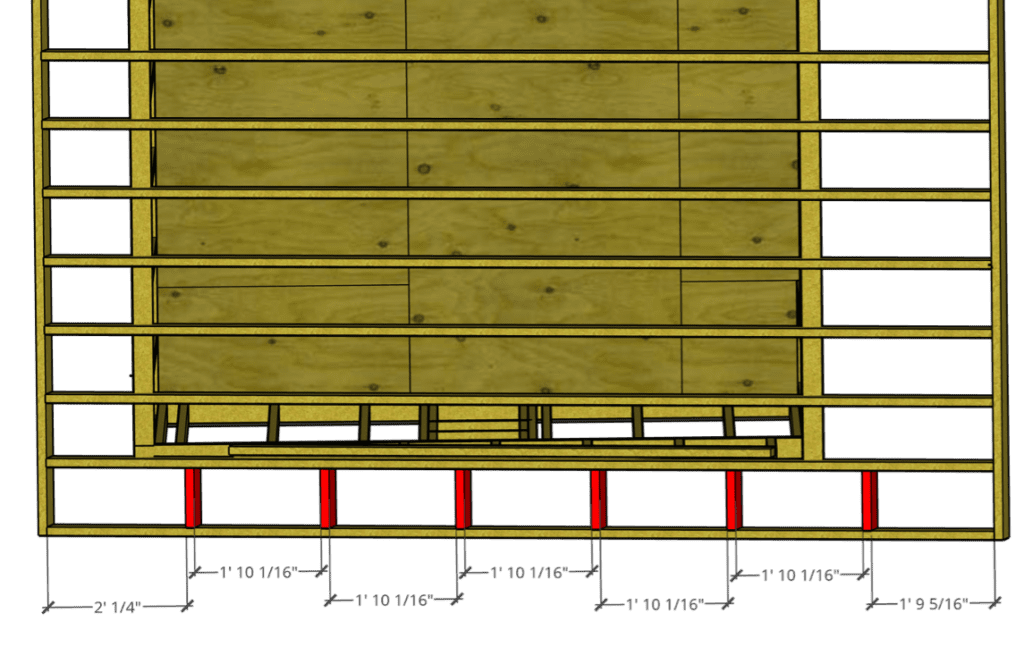
For a 10’x10′ shed, the following floor joist spacing will allow for the 4’x8′ plywood subfloor to land directly in the center of the joist – as indicated by the red “X’s” below.
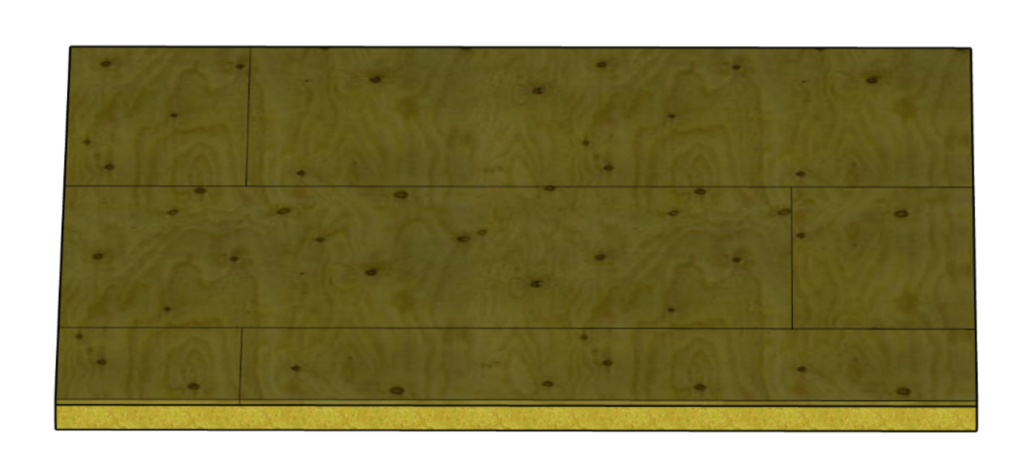
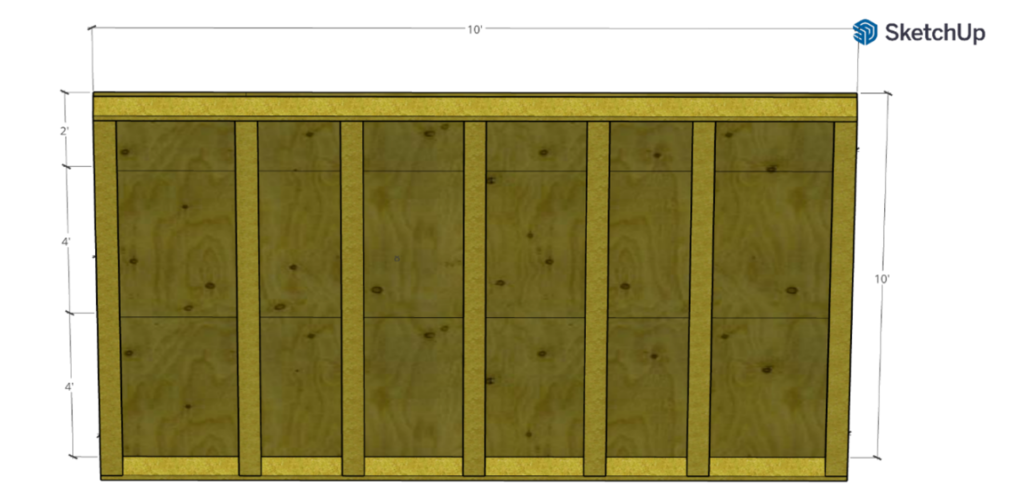
The figure below gives a preview of what the 10’x10′ shed floor base will look like once the plywood subfloor is installed.
Consider using graph paper or a 3D modeling software like Sketchup to model the shed base frame and the associated floor joist spacing. Again, the floor joists should be positioned such that the edges of plywood subfloor land directly in the center of the floor joists.
For a 10’x10′ shed base, seven (7) 4″x4″x10′ pressure treated floor joists are required in order to provide sufficient support for the plywood subfloor. Additionally, two pieces of 2″x4″x10′ pressure treated lumber will be needed for the end caps that run perpendicular to the floor joists. A sample 10’x10′ floor joist and end cap layout is shown below:

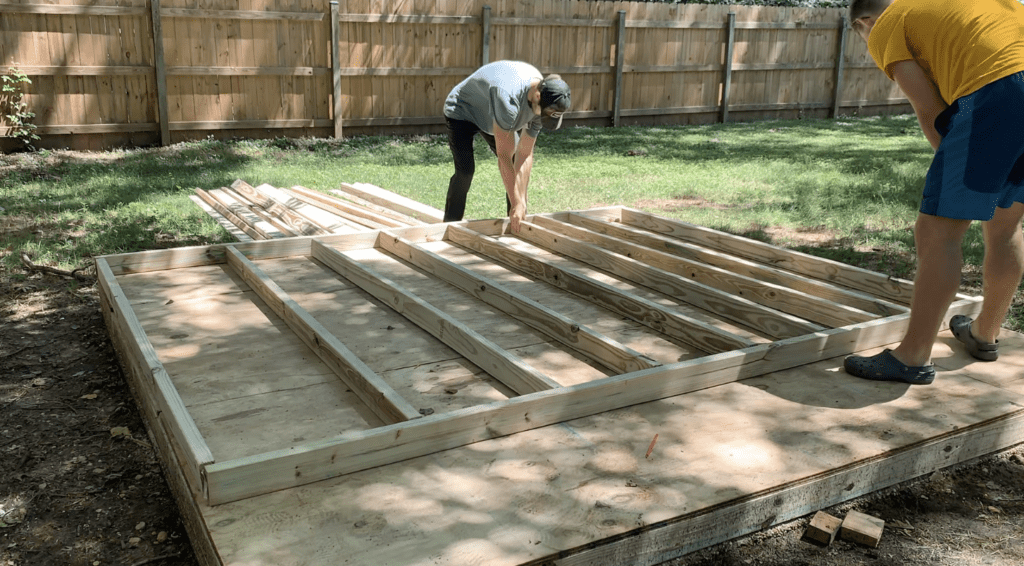
Layout The Shed Floor Base Frame
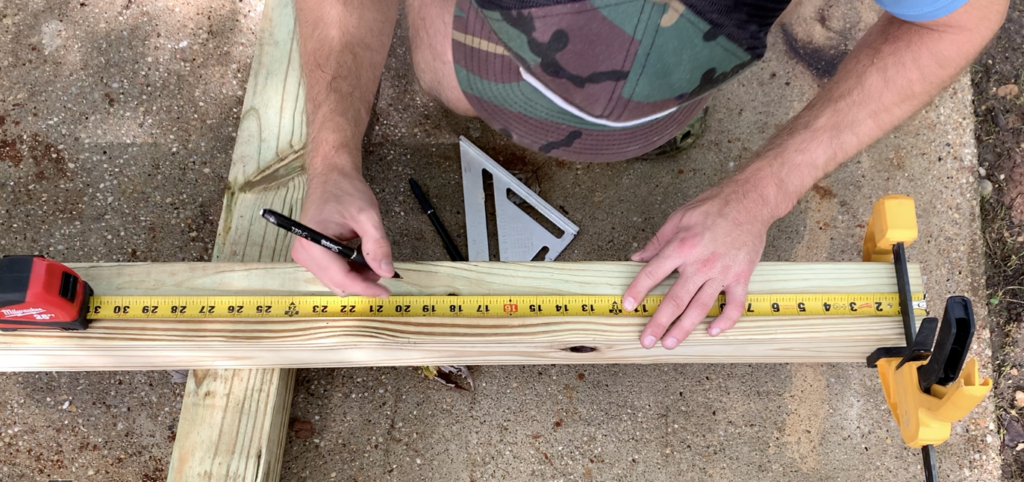
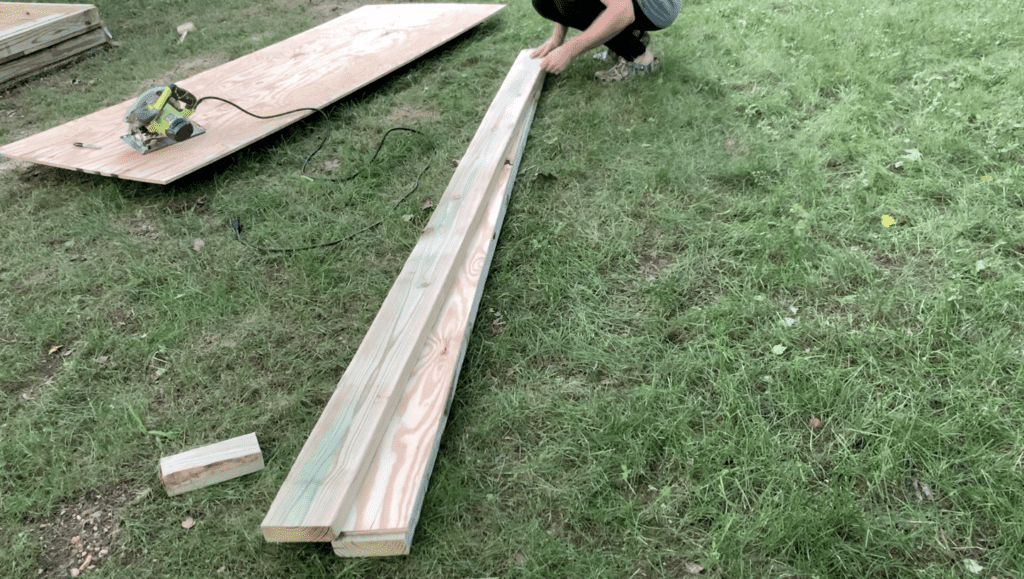
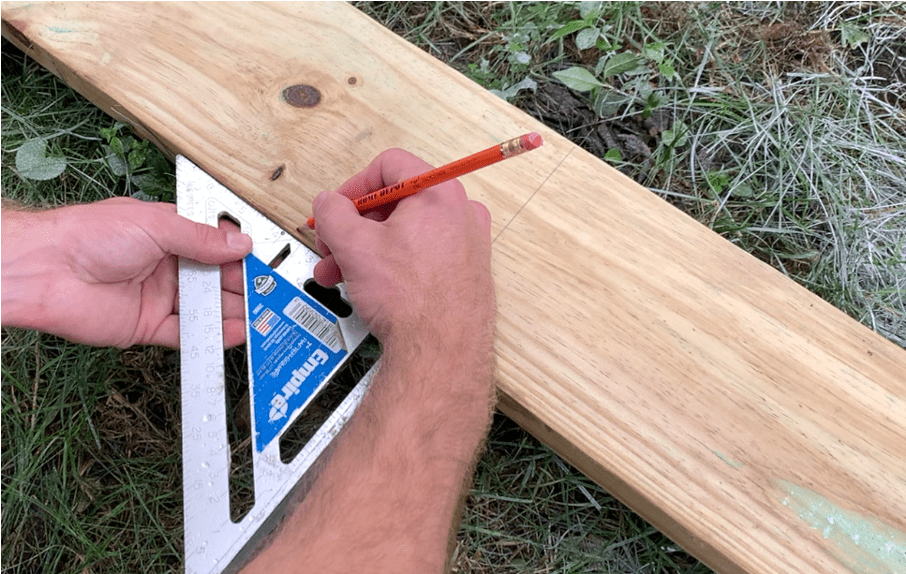
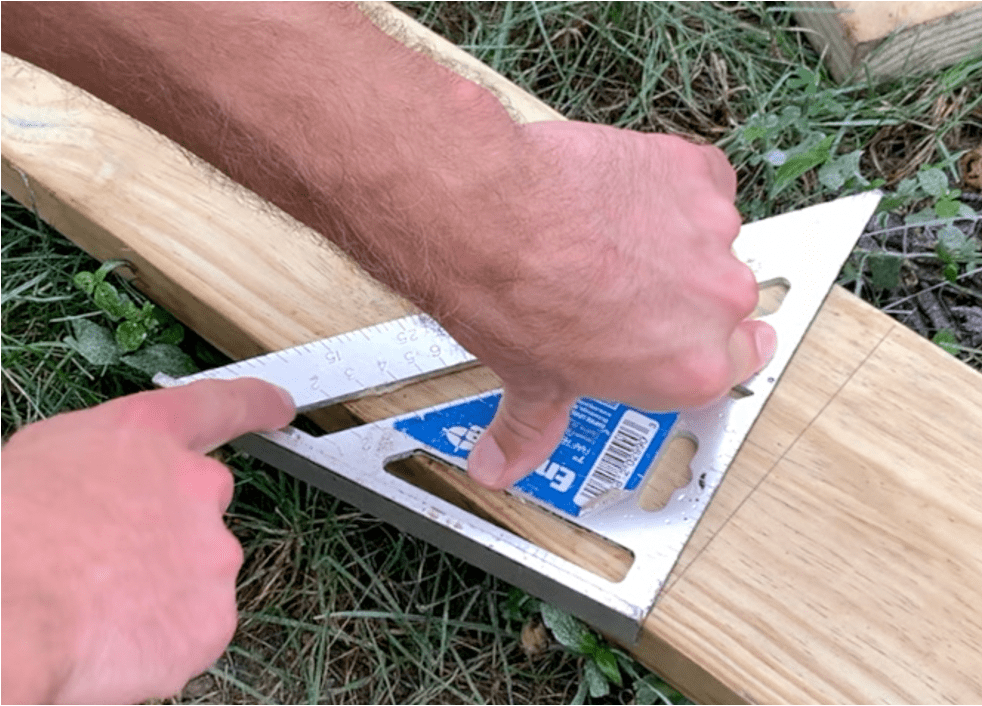
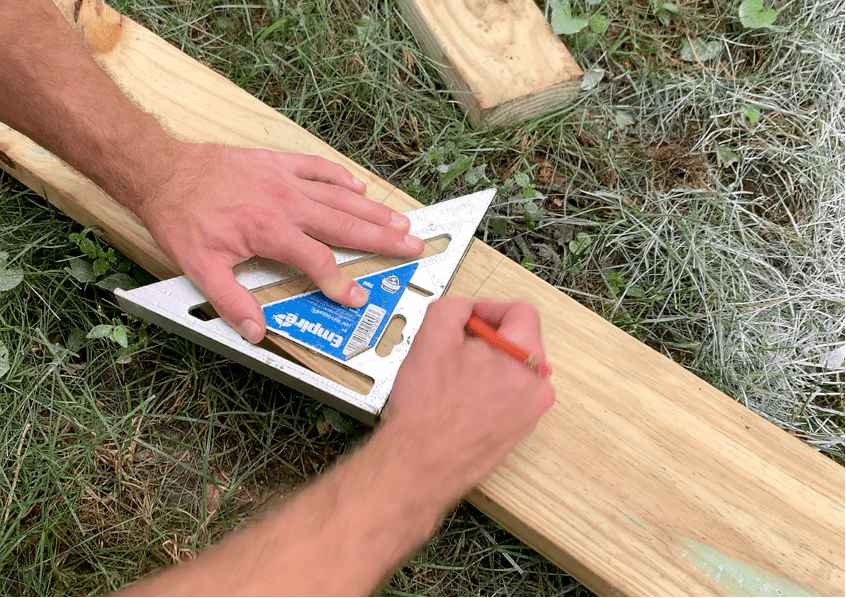
After determining the shed’s floor joist spacing, trim the 2″x4″x10′ end caps to the required length (10′, in this case). Next, mark the joist spacing on the both end caps at the same time using a pencil.
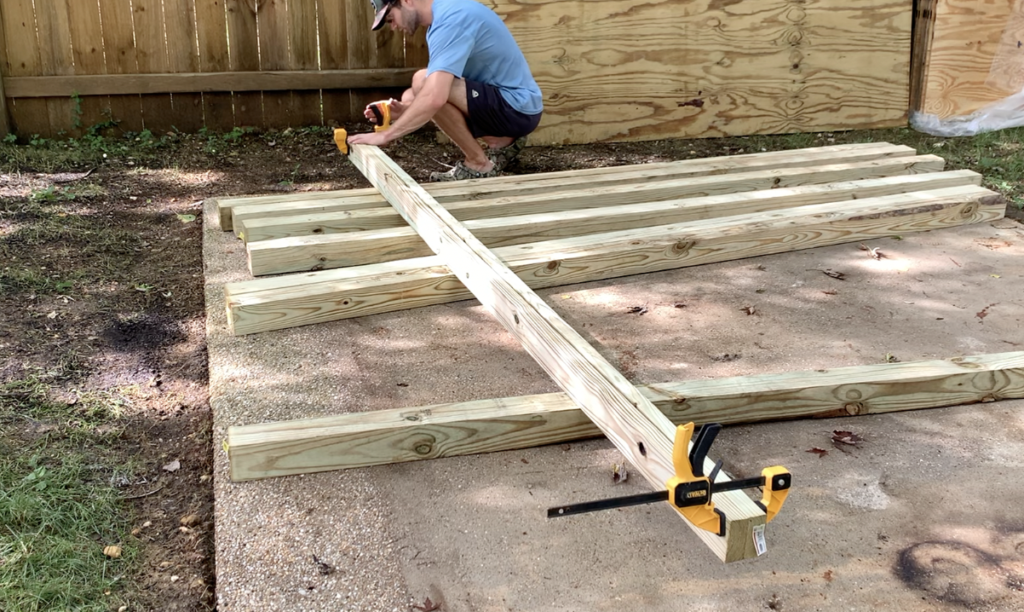
By marking both end caps at the same time, you will easily be able to position you floor joists in the correct location.
Mark each shed base floor joist location on the end caps as required to ensure that the edges of the plywood subfloor will land directly in the center of a floor joist. For a 10’x10′ shed floor base, consider marking the end caps with floor joist spacing as shown below:
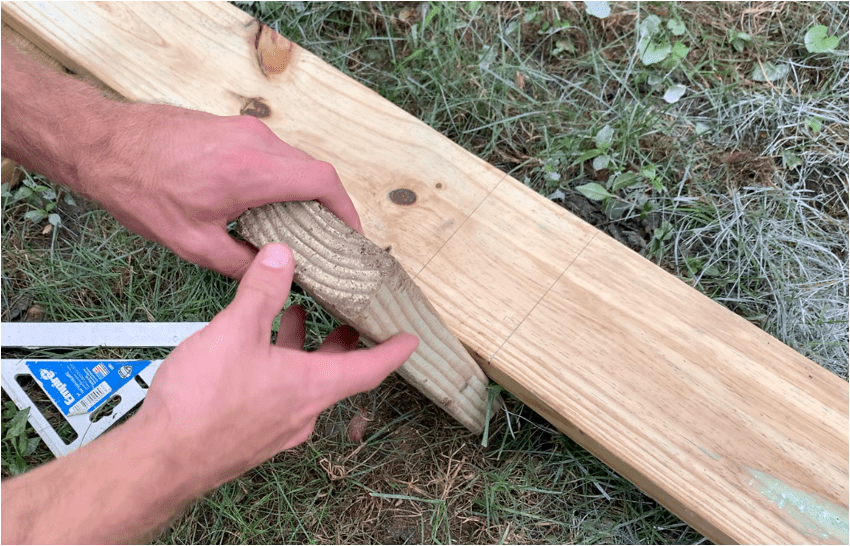
Next, cut the 4″x4″ floor joists to length. For a 10’x10′ shed, cut the joists to a length of 9′-9″. Once you attach both end caps (1.5″ +1.5″), you will have a 10’x10′ square shed base.
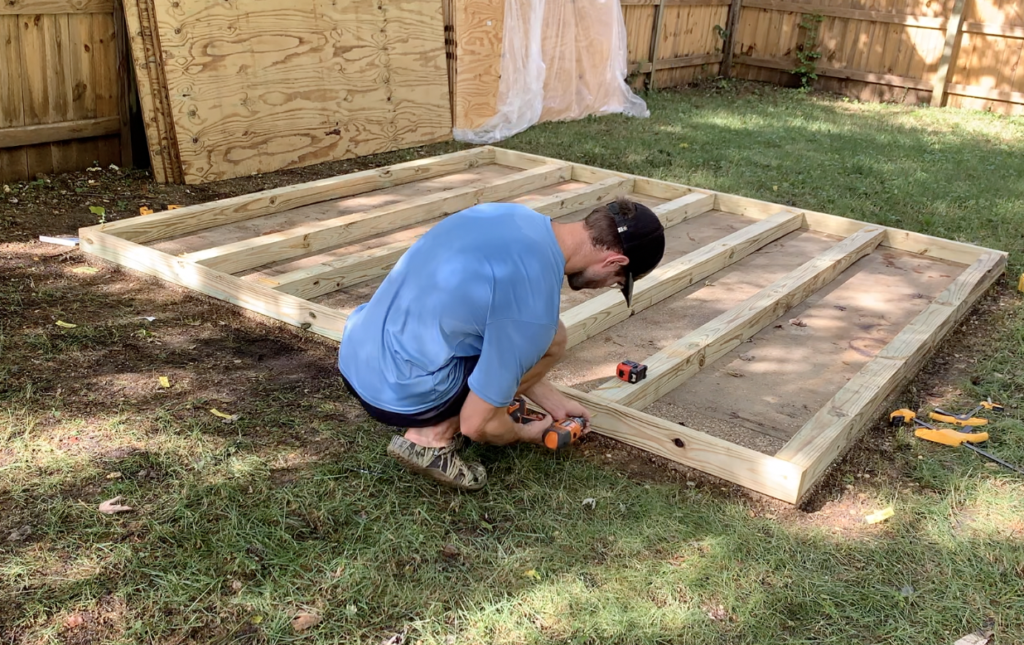
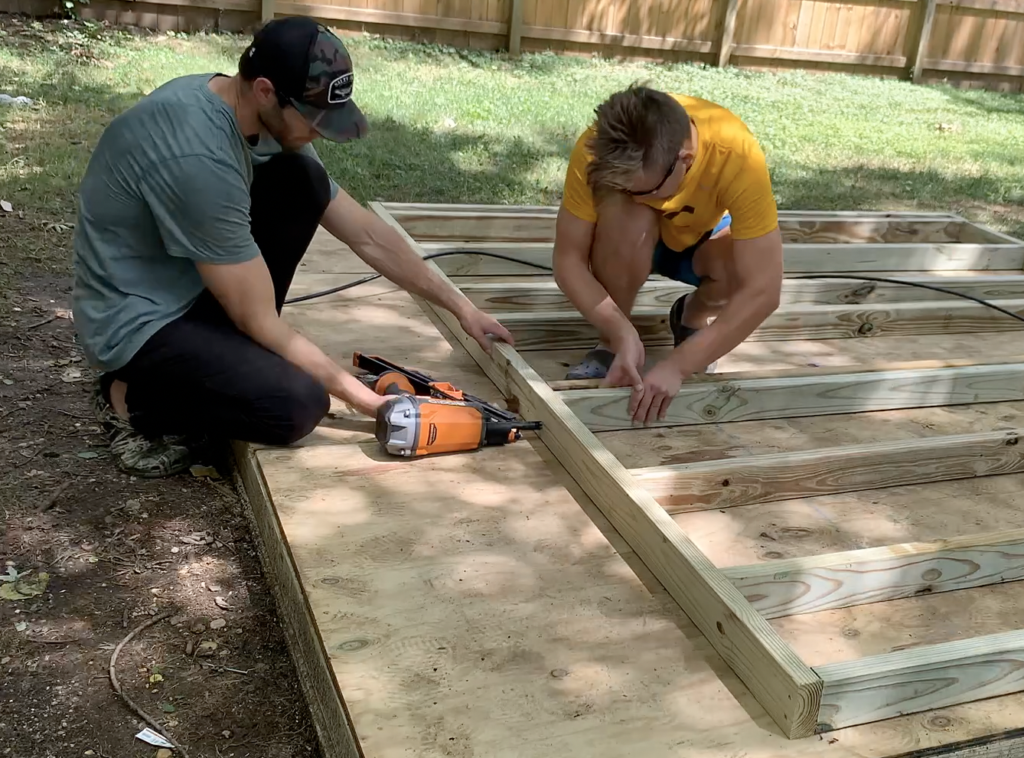
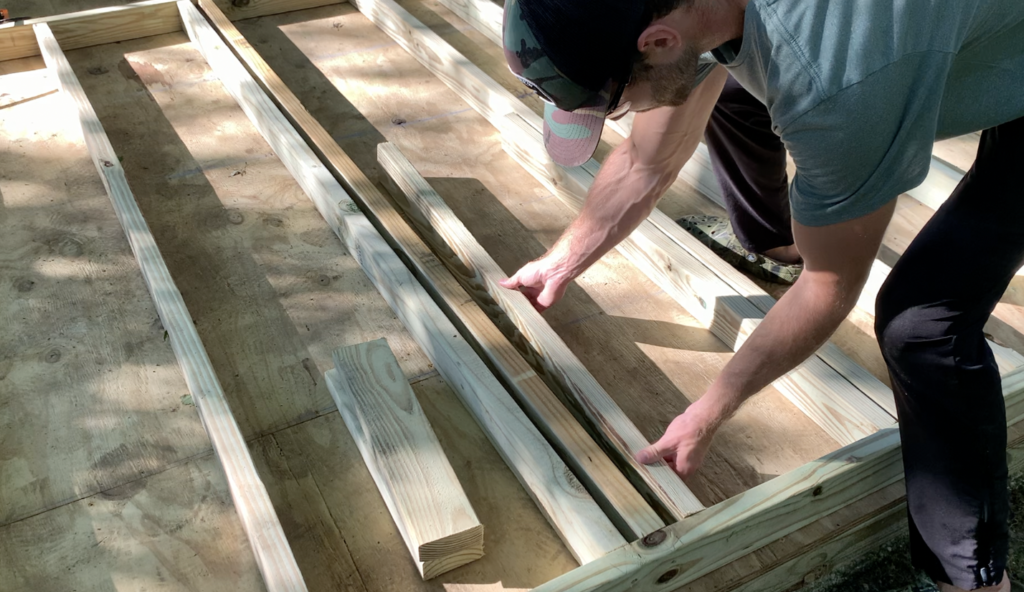
Position your end caps in place and begin positioning your 4″x4″ floor joists perpendicular to the end caps at the locations of the shed base floor joist markings made previously. Once you have positioned your end caps and floor joists in place, you shed floor base frame should look like this:
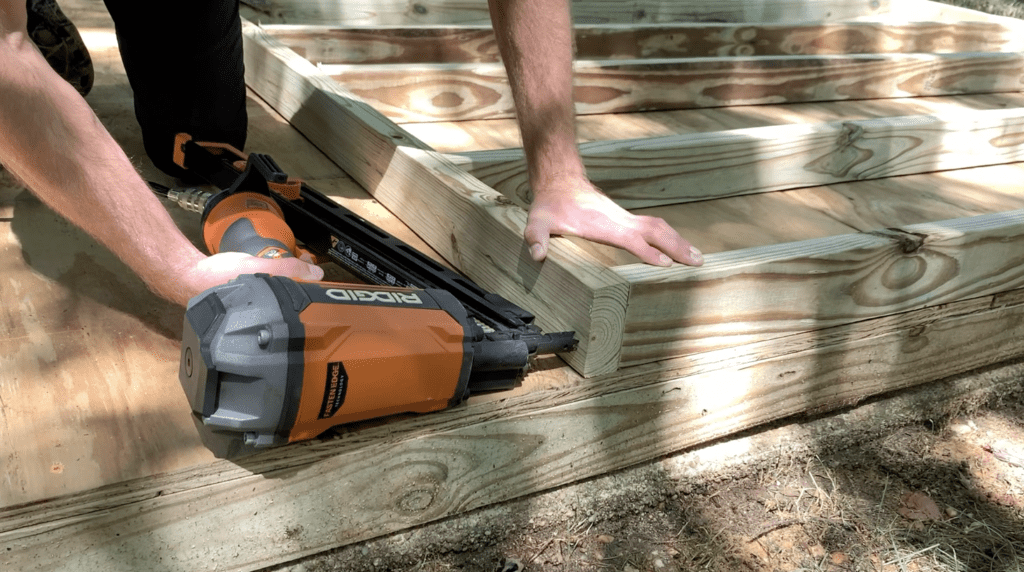
Attach the Shed Base Frame Together
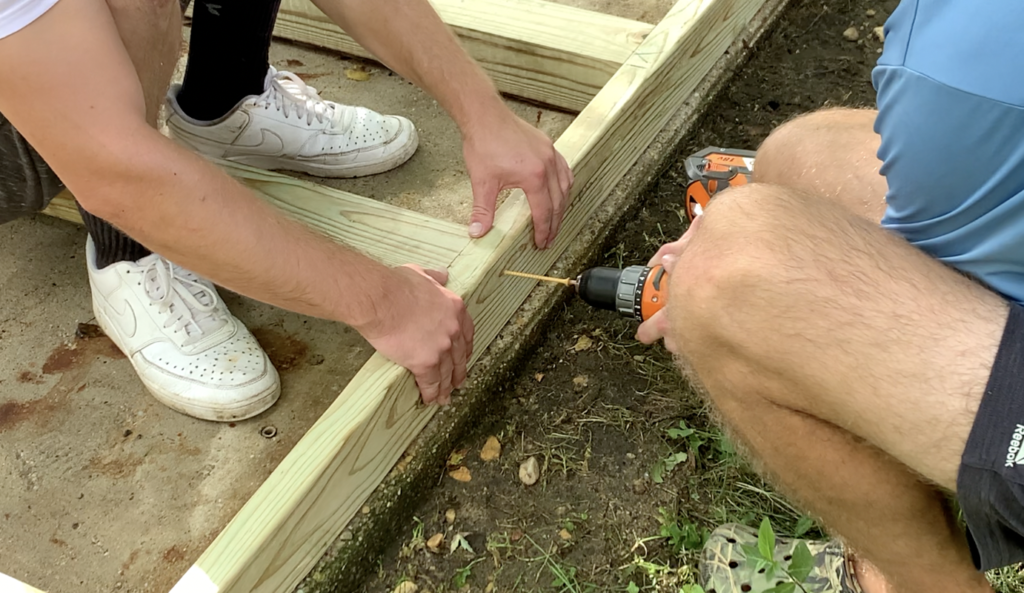
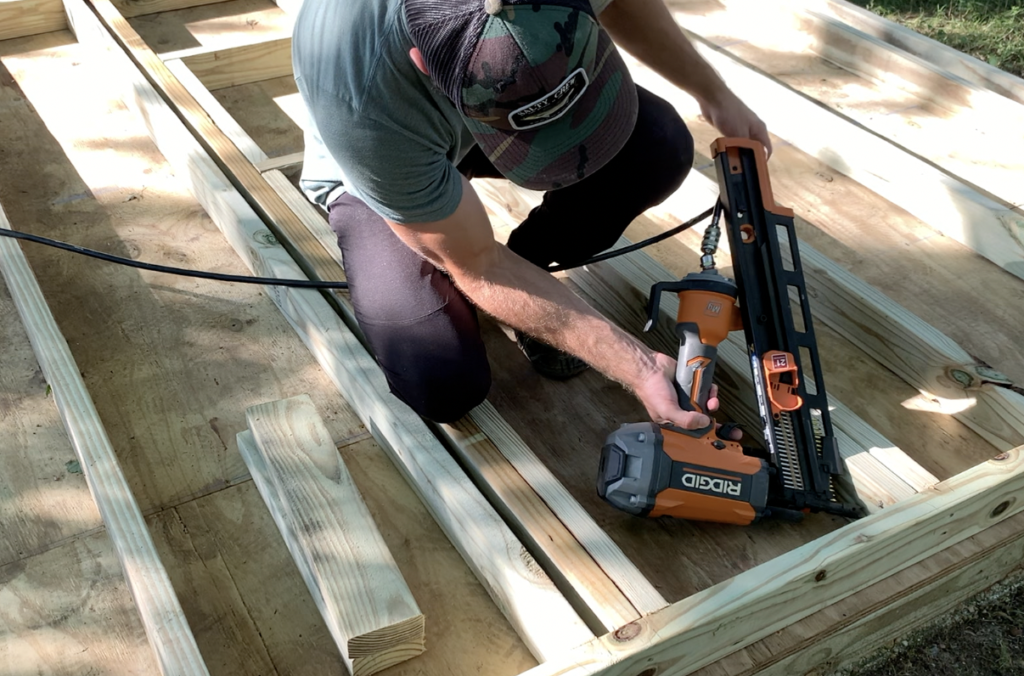
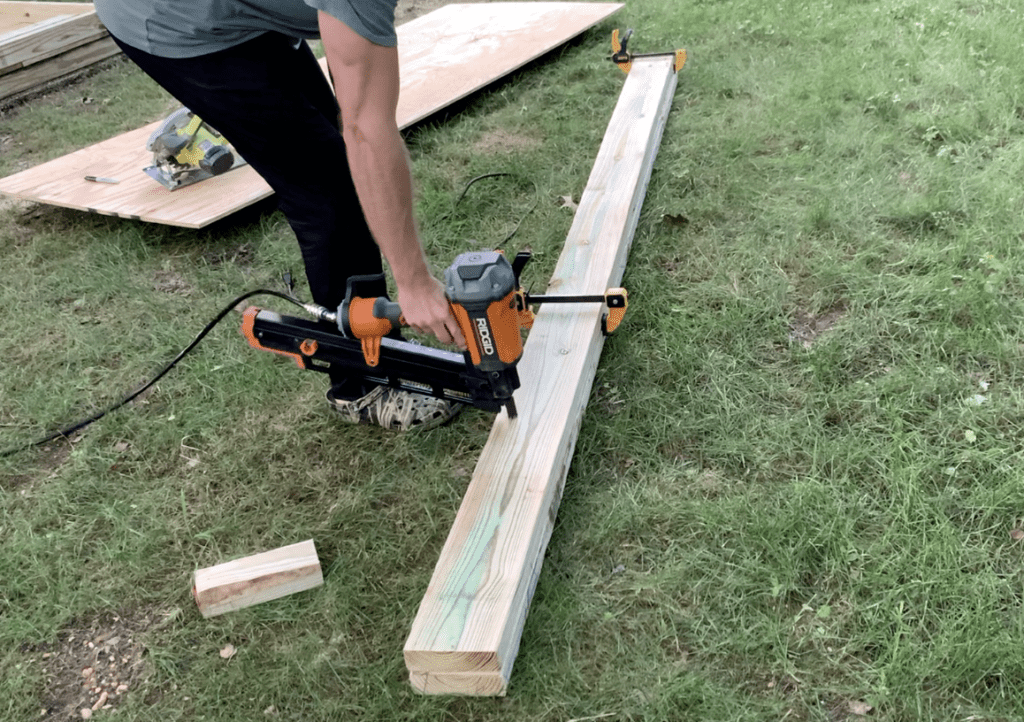
After laying out the shed base floor joists and end caps, attach the 4″x4″ floor joists to the 2″x4″ end caps using exterior rated screws or galvanized nails. Two screws (or nails) per connection is recommended.
PRO TIP: Attach the shed floor joists to the end caps by screwing through the end cap and into the floor joists. 3.5″ screws or nails are recommended. You may also attach the joists to the end cap by “toe-nailing” nails though the 4″x4″ floor joist and into the end cap.
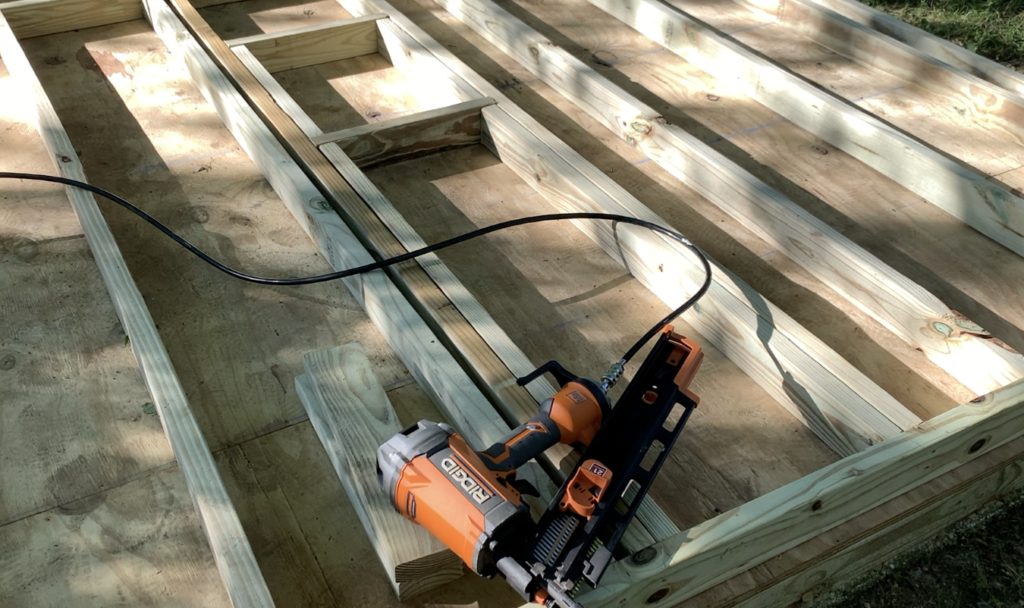
After securing each shed floor joist to the end cap, you can proceed to the next step of the shed floor base construction process.
Square the Shed Floor Base Frame
After attaching the floor joists to the end caps, square the shed base frame to ensure that the plywood subfloor will fit appropriately. To square the shed, use a tape measure to compare the distance from each set of opposite corners. If the measurements are the same, the shed floor base frame is square. If the measurements differ, adjust the frame as needed until the measurements from each set of opposite corners is the same.

Anchor the Shed Floor Base to the Concrete Slab below (optional)
In high wind areas, it is often a code requirement to secure your shed to the concrete slab below. Consult with your local code requirements as needed.
To attach your 4″x4″ shed floor base Frame to a concrete slab, it is recommended that you install a piece of 2″x4″ pressure treated blocking in between a few of your floor joists – as shown below:
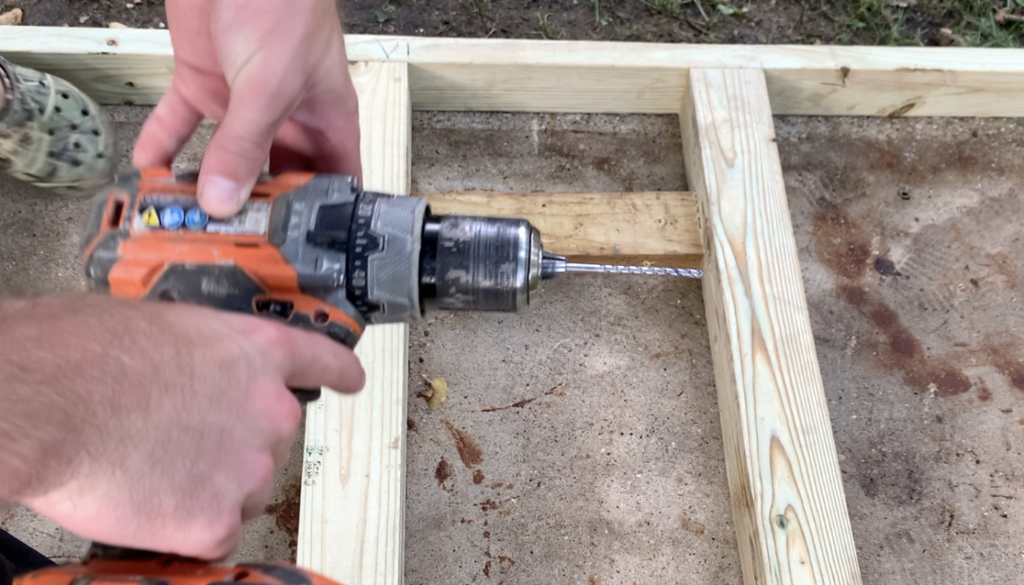
After attaching the blocking to the floor joists with exterior rated screws or galvanized nails, pre-drill through the blocking and into the concrete slab using a masonry bit and a hammer drill. Ensure that you drill at least 1.5″ into the concrete slab with the masonry bit.
Next, use a Tapcon concrete screw to drill though the blocking and into the concrete slab – effectively securing the shed base to the slab.
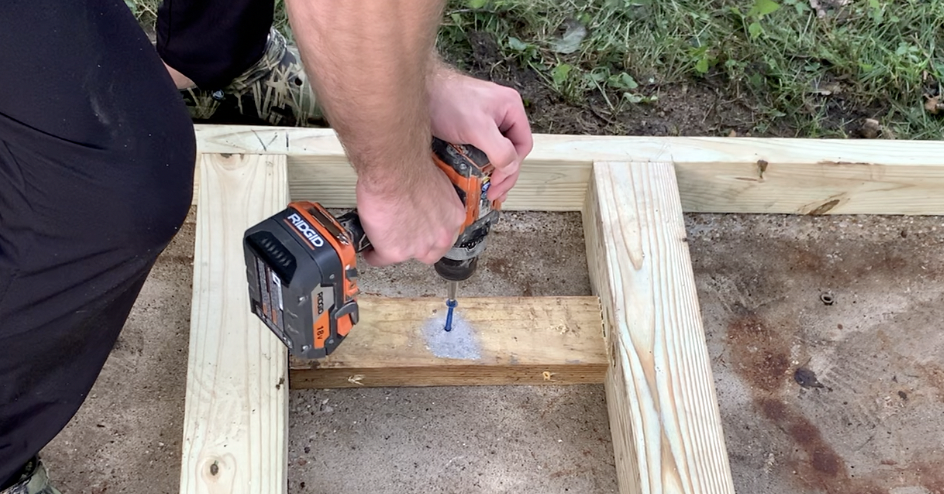
PRO TIP – Ensure that you coordinate your masonry bit and masonry (Tapcon) screw sizes accordingly. Typically, the masonry bit will be slightly smaller in diameter than the Masonry screw used. Check the Tapcon / Masonry screw packaging to determine what size pre-drilled hole is needed.
Repeat this process for as many anchor locations into the slab as you desire (or as code requires).
Attach the Plywood Subfloor to the Shed Base Frame

After confirming that the Shed floor Base frame is perfectly square, you can begin installing your plywood subfloor.
For most shed bases, pressure treated plywood makes for the best shed subfloor material. Because your joists will inevitably get wet, it is best practice to use a pressure treated subfloor in order to maximize the lifetime of your shed. Although standard plywood is also acceptable, it is not nearly as durable as pressure treated plywood in this application.
PRO TIP – Avoid using OSB for your shed subfloor. OSB swells and degrades when exposed to moisture – making it the worst subfloor option for you shed floor base.
If you planned out your joist spacing carefully, installing the shed subfloor should be a very straightforward process.
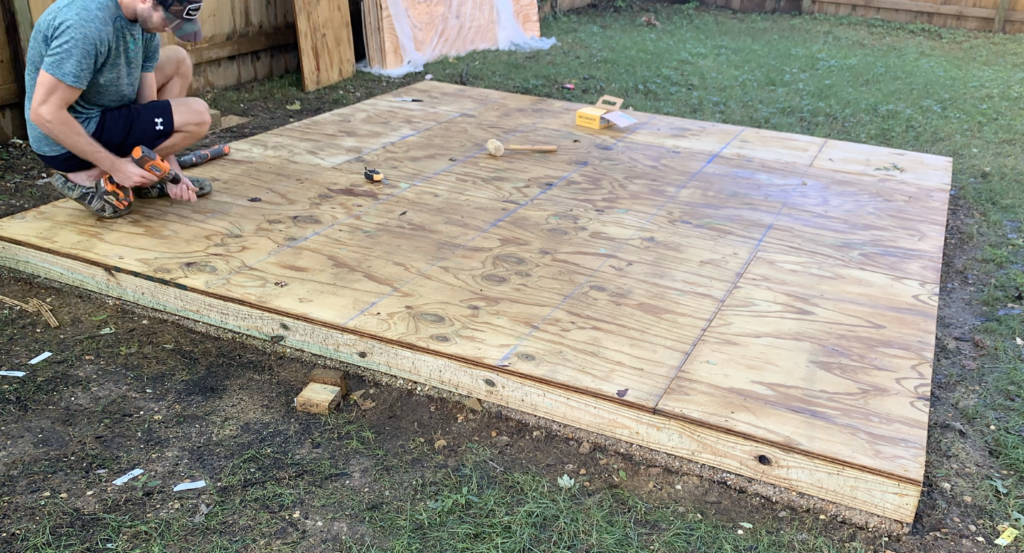
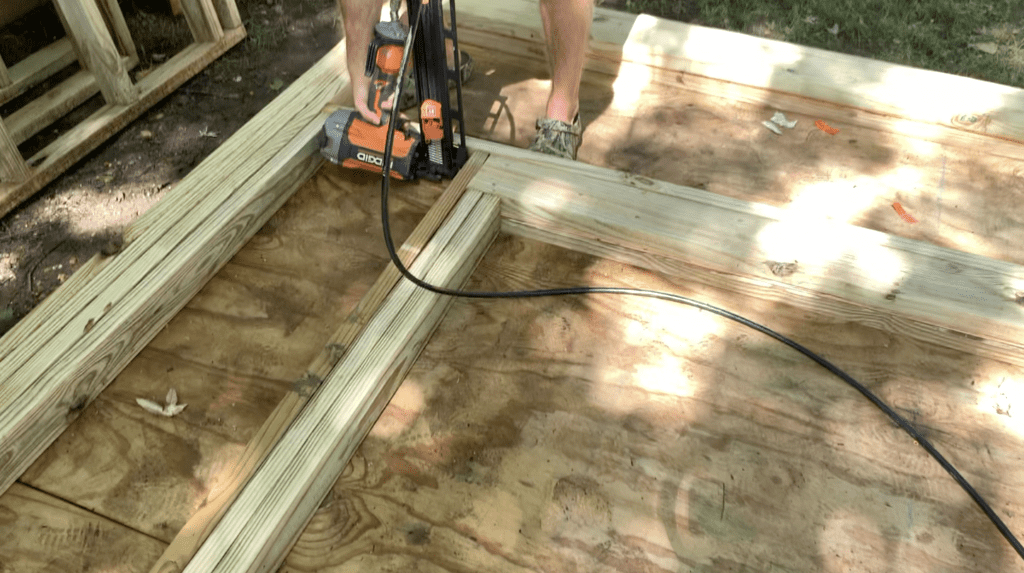
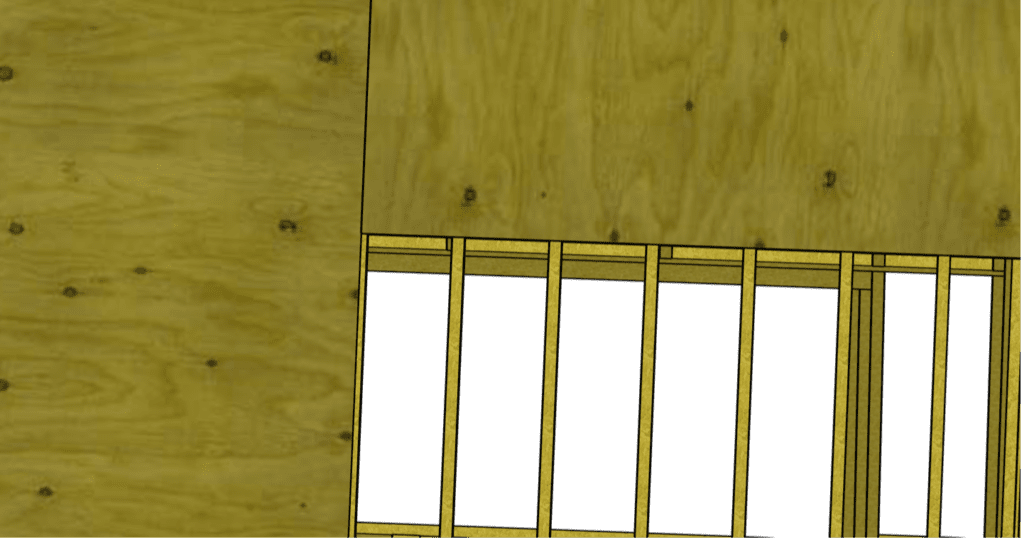
Use full sheets of 4’x8′ pressure treated plywood and position the plywood in place upon the shed base frame. The edge of each piece of plywood should land in the center of the floor joists. Position the first sheet of plywood so that it is flush with the shed base frame and also in the center of a floor joist. Next, attach the plywood to the joists and end cap using exterior rated screws or galvanized nails every 12″ O.C.
Continue to position plywood in place on top of the shed base frame until the entire frame is covered by a the plywood subfloor.
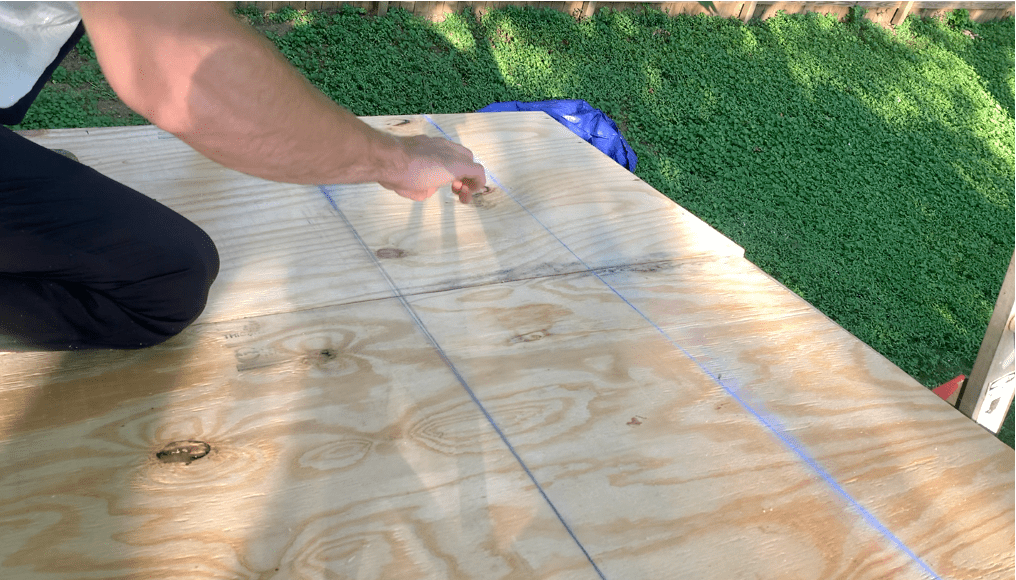
PRO TIP – Consider marking the joist locations on each end cap and then using a chalk line to establish the joist location on the plywood subfloor. This may make it easier to identify the exact joist location when attaching the plywood subfloor the the shed base frame below.
It is generally good practice to leave a slight expansion gap (1/8″) between each sheet of the shed’s plywood subfloor. However, pressure treated lumber typically shrinks once it dries out. Therefore, it is also common for pressure treated plywood to be butted up right next to the adjacent sheet (with the expectation that the plywood sheet will shrink over time).
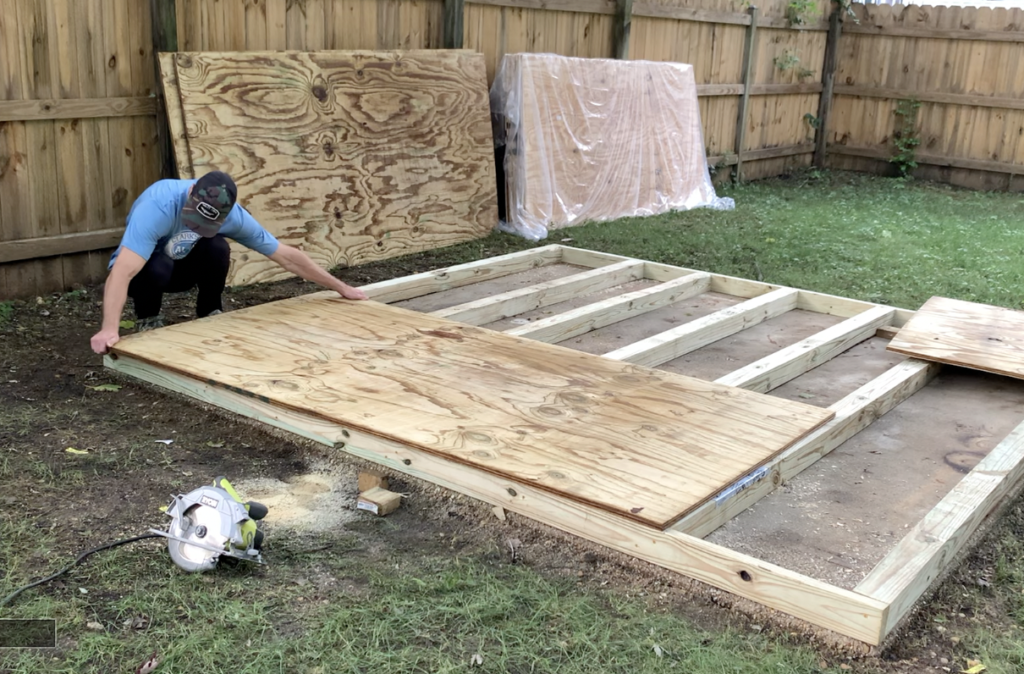
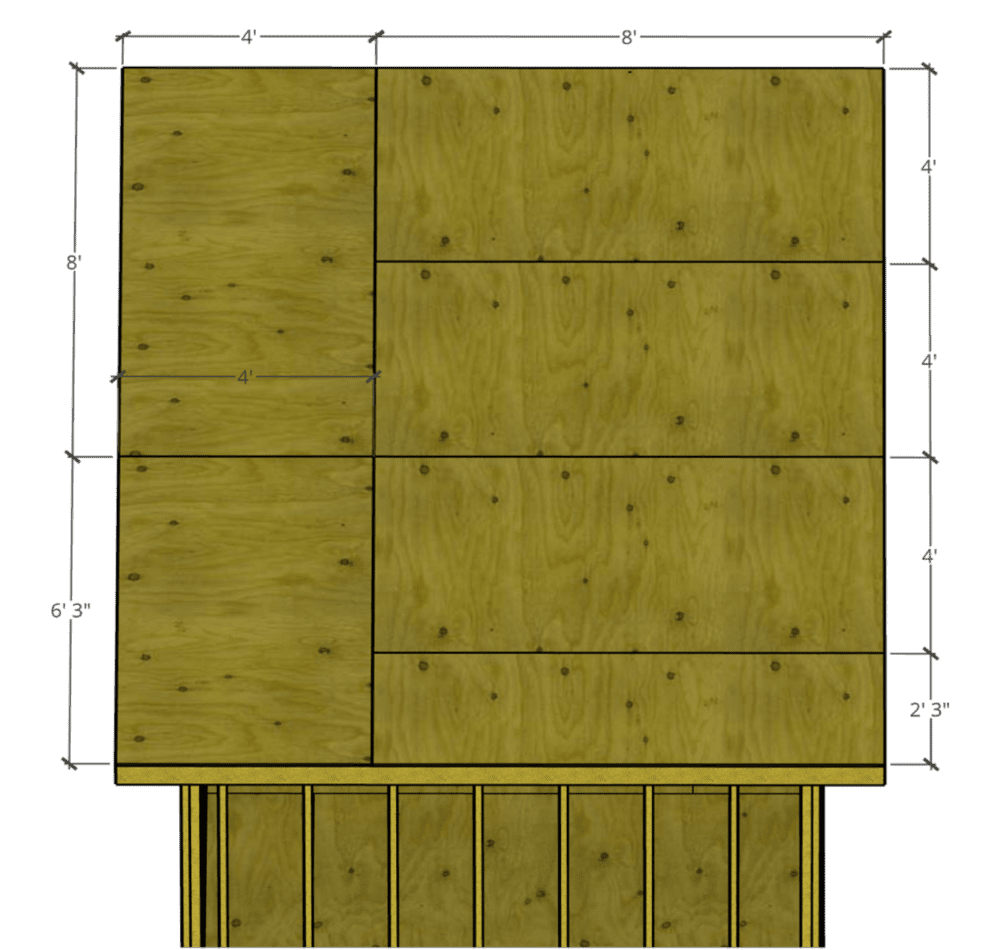
Continue to install plywood until the entire shed base frame has been covered by the subfloor. For a 10’x10′ shed, you will have a plywood subfloor arrangement similar to what is shown below:
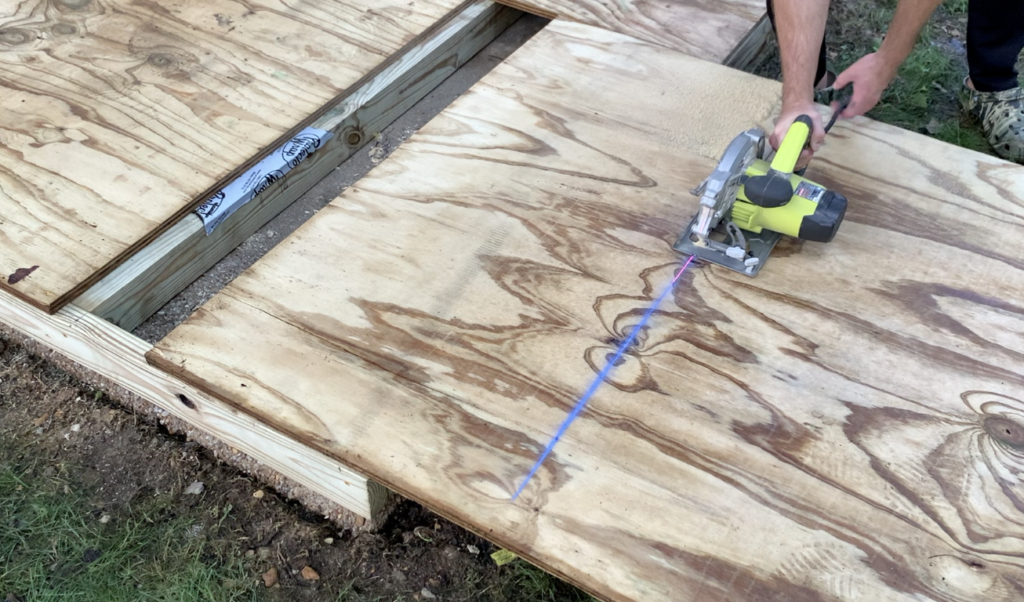
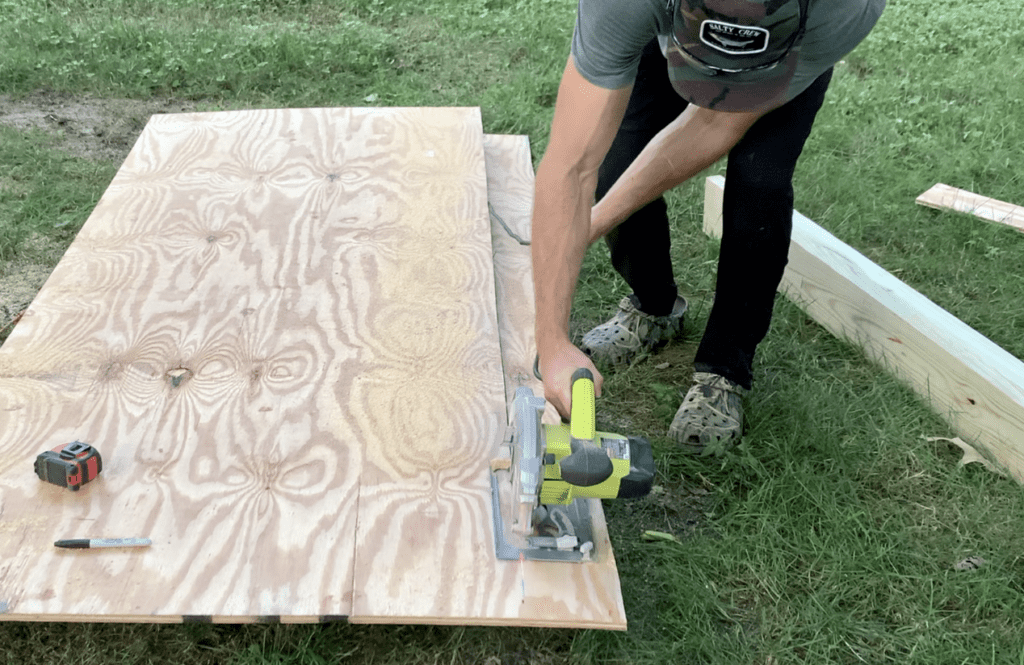
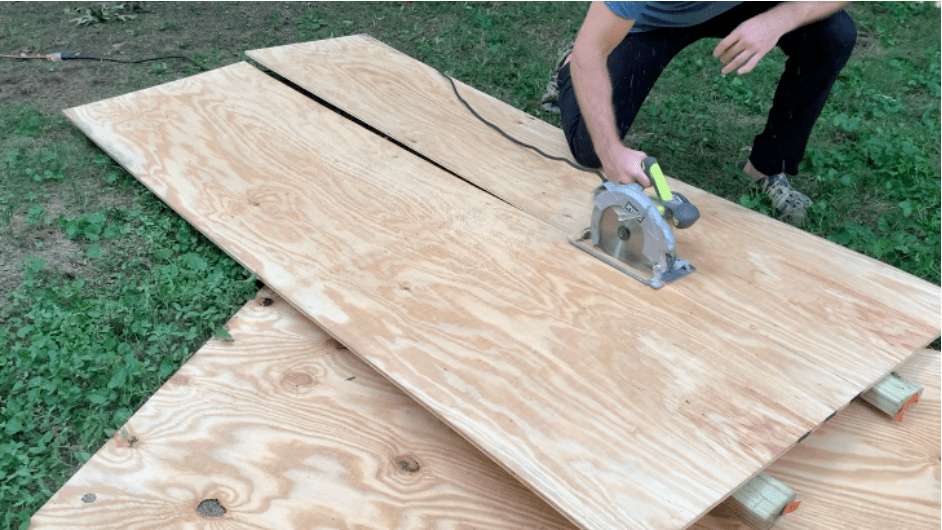
For the smaller sections of plywood subfloor, use a chalk line to establish the cut line and then trim the plywood subfloor to size using a circular saw.
After securing your plywood subfloor to the the shed base frame below, your shed base frame is complete. For detailed video instruction of the shed base frame construction process, check out the video below:
You can now move on to the next step in the Shed Building Process – Framing the Walls.
How to Frame Shed Walls
Most sheds (including the 10’x10′ modern shed we are constructing in this article) are comprised of one (1) back wall, two (2) identical side walls, and one (1) front wall.
It is recommended that you begin framing the shed’s back wall – since it is the easiest.
Framing the Back Wall of the Shed
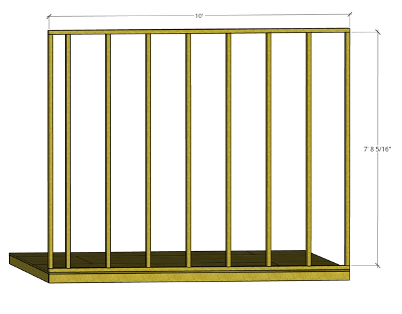
To frame the back wall of the 10’x10′ shed shown above, start with two (2), 2”x4”x10’s for the top and bottom plate. Ensure that your 2”x4”x10’s are exactly 10 feet long (sometimes, this will require minor trimming).
Next, cut the wall studs to the desired height (usually around 8′)
Once the 2”x4” top plate, bottom plate, and studs are cut to length, it’s time to assemble the back wall. I recommend that you assemble the back wall horizontally by placing it on the previously constructed plywood subfloor shed base – as shown below.
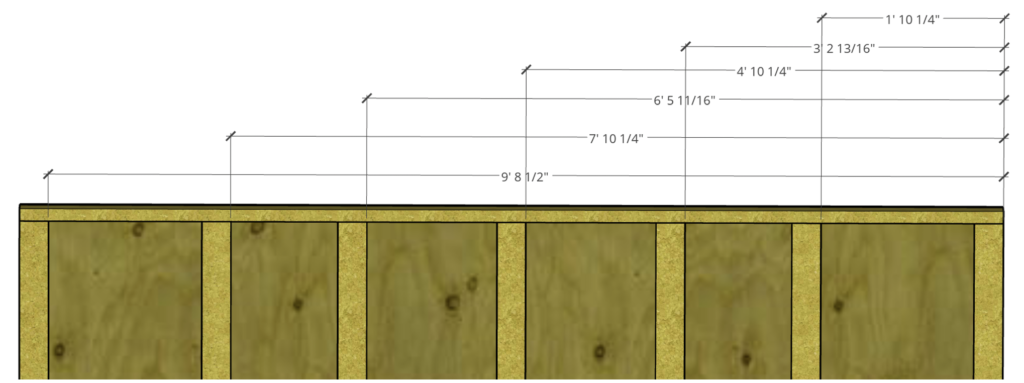
For stud spacing, we will be using 16” OC (on center) spacing with minor adjustments to ensure that the siding will land on stud.
PRO TIP – Plan your wall stud spacing so that the sheathing/siding (typically 4’x8′ plwood. TI-11, or SmartSide Panels) will land directly in the center of a stud.
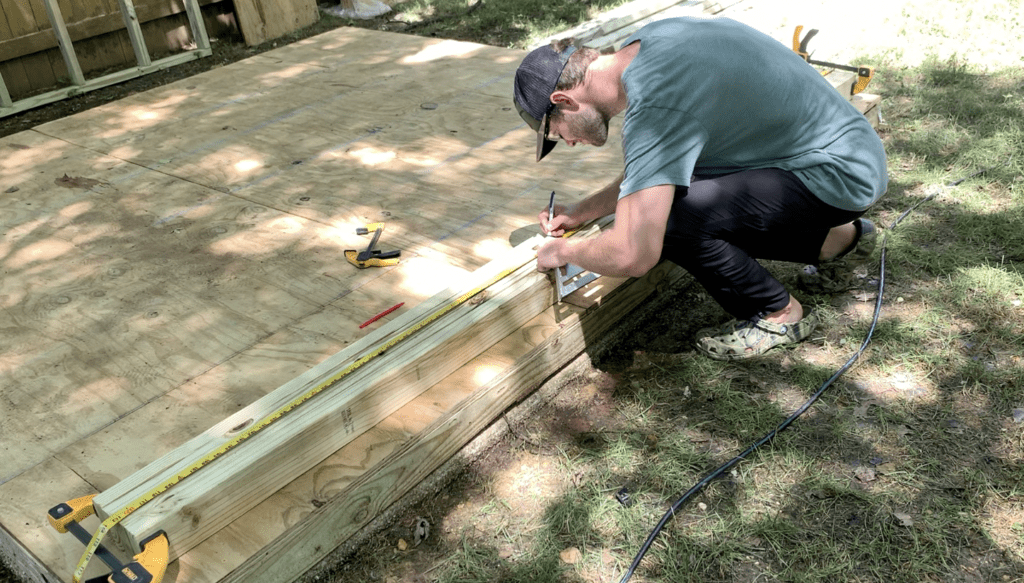
In order to easily mark your stud spacing, I recommend that you clamp the 2”x4”x10’ top and bottom plates together. Next, I recommend that you mark both 2”x4”x10’s at the same time by running your tape measure as shown on the Figure below.

After marking the stud locations on the top and bottom plate, attach the studs to the top and bottom plate with exterior rated nails or screws as shown.
Once you have framed your shed’s back wall, move it out of the way so that you can frame your other walls.
Framing the Side Walls of the Shed
Typically, both shed side walls will be 100% identical – So you will need to repeat the steps listed below for the second side wall. The side walls are typically more complex than the back wall, since they will (often times) include a window rough opening.
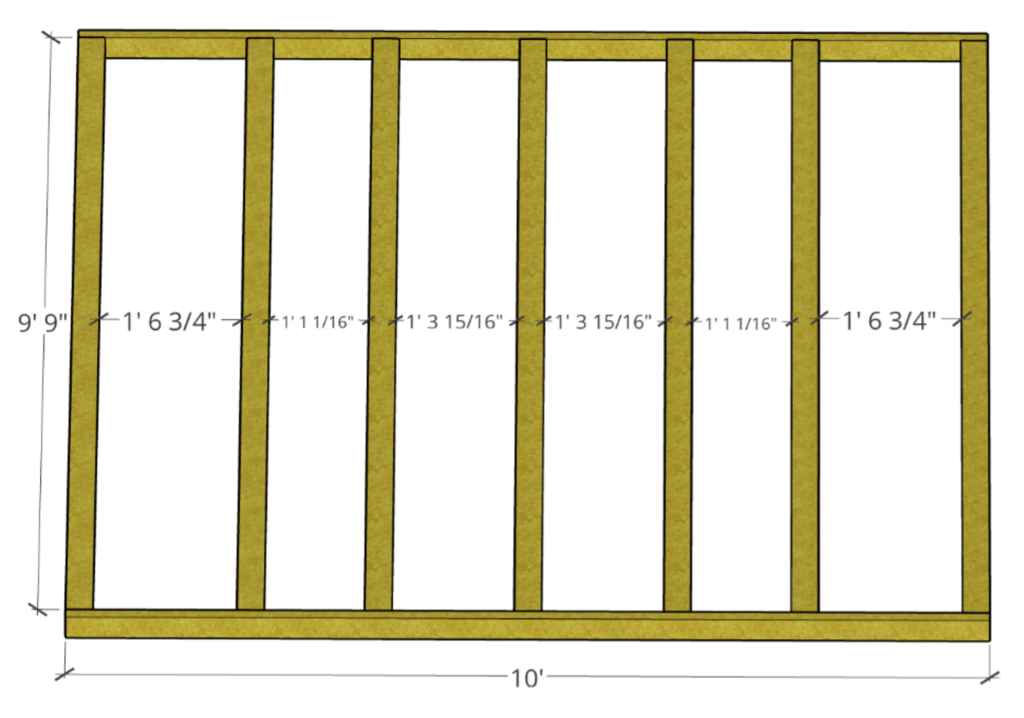
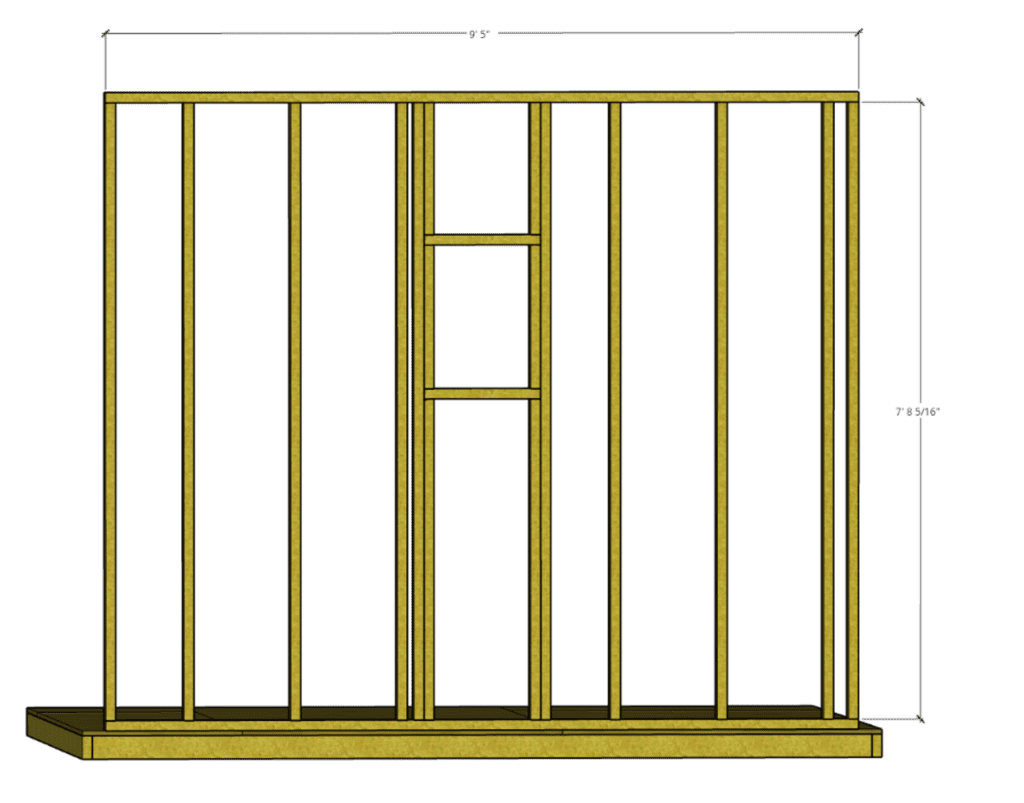
For a 10’x10′ shed it is recommended that you cut two (2), 2”x4”x10’s to 9’-5” each. These 9’-5” pieces of 2”x4” lumber will serve as the top and bottom plate for the side wall. Next, to cut ten (10), 2”x4”x8’s to to you desired wall stud length – typically 8′ (be sure to match your back wall stud length)
Configure the Side Wall Stud Spacing as Shown in the Sample Wall Framing Figure Below (or as desired):
Similarly to the back wall, it is recommended that you mark the stud spacing on both the top and bottom plate at the same time. Since both side walls will be identical, both bottom plates and both top plates can be marked at the same time (for efficiency).
After marking the stud locations on the top and bottom plates, layout the side wall similar to how it was done for the back wall. Once all of the studs are positioned appropriately, fasten each stud to the top and bottom plate using a nail gun and galvanized screws. Two nails per connection location are recommended.
Framing the Rough Opening for the Shed Side Wall Window
Most shed sids walls will include a window – so you will need to frame the rough opening for the window when planning out your side wall framing layout. However, before you can frame the window’s rough opening, you need to decide what size shed window you are going to use.
Select the Shed Window Size

There are many different styles and sizes of windows to choose from for your shed. Pick a shed window size that works for your specific shed installation.
For this guide, we will be installing 14″x21″ shed windows that were purchased from Amazon.
These windows include a window mounting flange (discussed later) that will be used to attach the window to the shed.
Frame the Shed Window
Once you have selected you window size, it’s time to frame the shed’s window. When framing a shed window, there is a bit of terminology to keep in mind. The different components of a shed window’s rough opening are listed below:
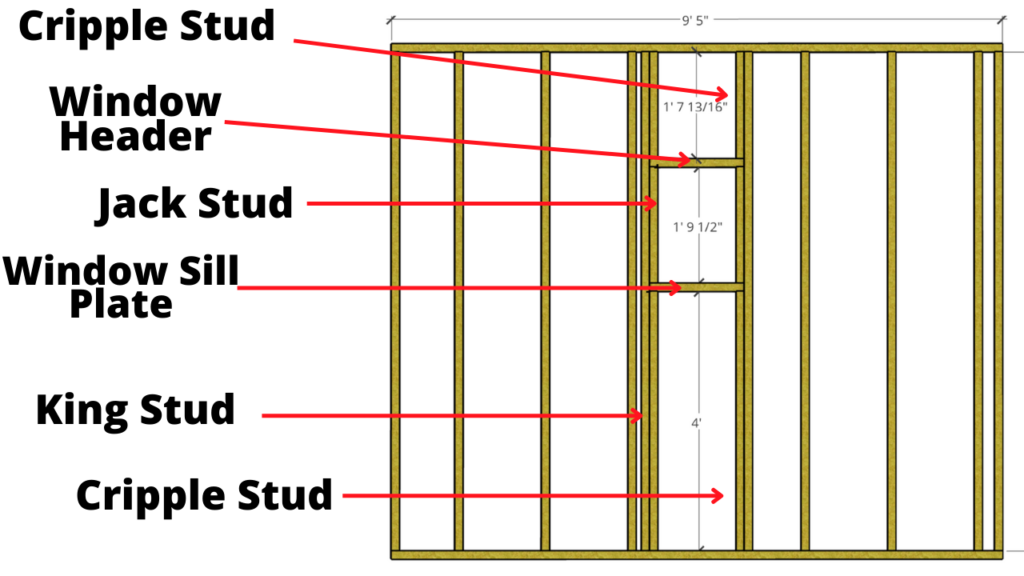
WIth the an understanding of the different components that make up a window’s rough opening, you can now begin framing the shed window.
When determining the actual size of a window’s rough opening, you will want to check the window manufacturer’s instructions. Typically, the window’s rough frame will be approximately 1/2″-1″ wider and taller than the actual window. This slightly larger opening will allow the window to fit in place while also allowing for minor adjustments to be made. Further, the slightly larger rough opening frame will allow for the window flanges to contact the sides of the shed while still allowing the window to fit securely within the window’s rough frame.
For this shed window, the rough frame was constructed 1/2″ taller and 1/2″ wider than the actual shed window. Therefore, for the 14″x21″ window, the window’s rough frame was determined to be 14 1/2″ – 21 1/2″. It is always a good idea to have your shed window on-site so that you can refer to it when determining the appropriate rough in opening.
At this stage, it is recommended that you install the king studs so that they are appropriately spaced. For our 14 1/2″ shed window rough opening width, the spacing between king studs was 17 1/2″ (to account for the jack studs – which are 1.5″ each). See below:
You can either frame the shed window before you stand up the shed walls (horizontally), or after the wall is lifted into place. The choice is yours.
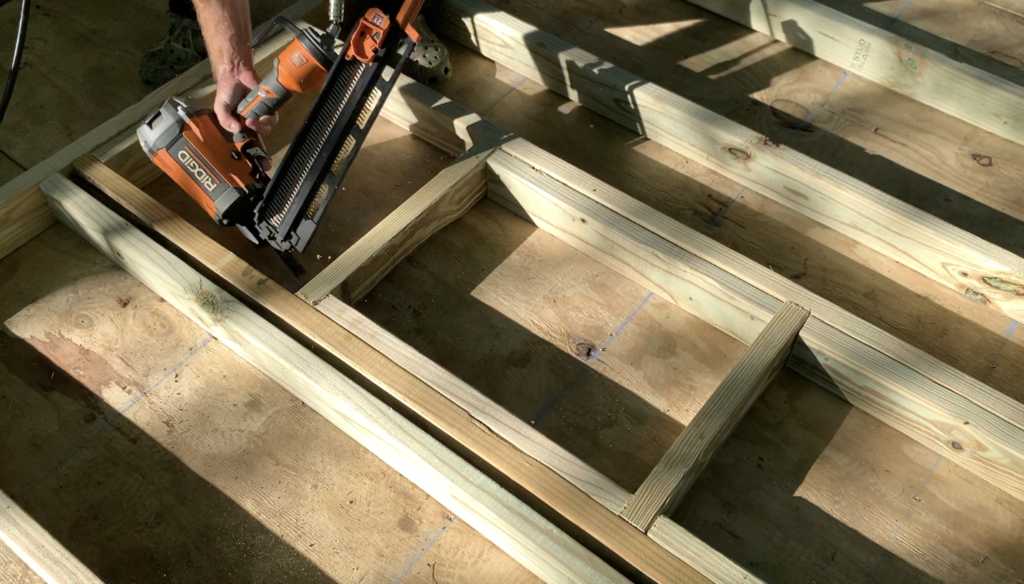
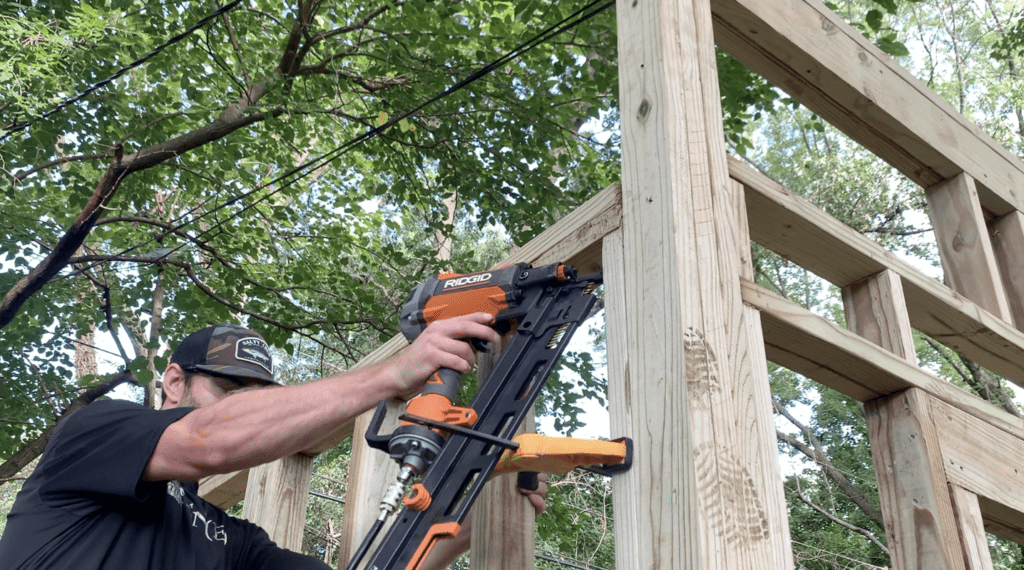
Use a framing nailer and galvanized (exterior) nails to fasten the window’s rough framing together.
After determining the shed window rough opening size, establish the Shed window height. For this application, I used 4′ high cripple studs to support the window’s sill plate (as shown below).
Attach the cripple studs (and all shed window rough opening framing) to the King Studs and Top/Bottom Plates of the walls with a framing nailer.
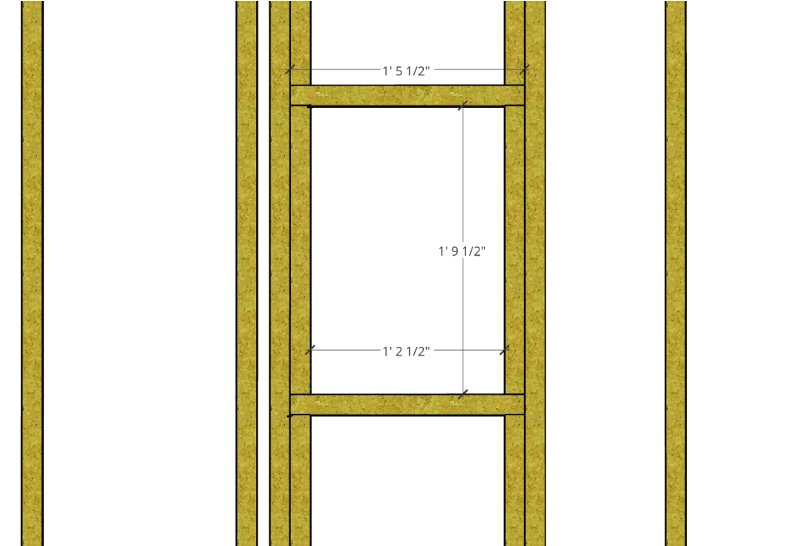
Continue to install the the rest of the shed window rough frame components as shown in the Figure above. Fasten the window’s rough frame to the king studs, cripple studs, etc. as you assemble.
Continue to fasten every component of the shed window’s rough frame with a framing nailer as shown:
After framing the entire shed window rough opening as shown above, perform a “dry-fit” of the shed window within the frame.
Dry Fit the Shed Window in the Rough Opening Frame
After framing the shed window rough frame, take some time to dry fit the shed window within the rough opening to confirm fit.
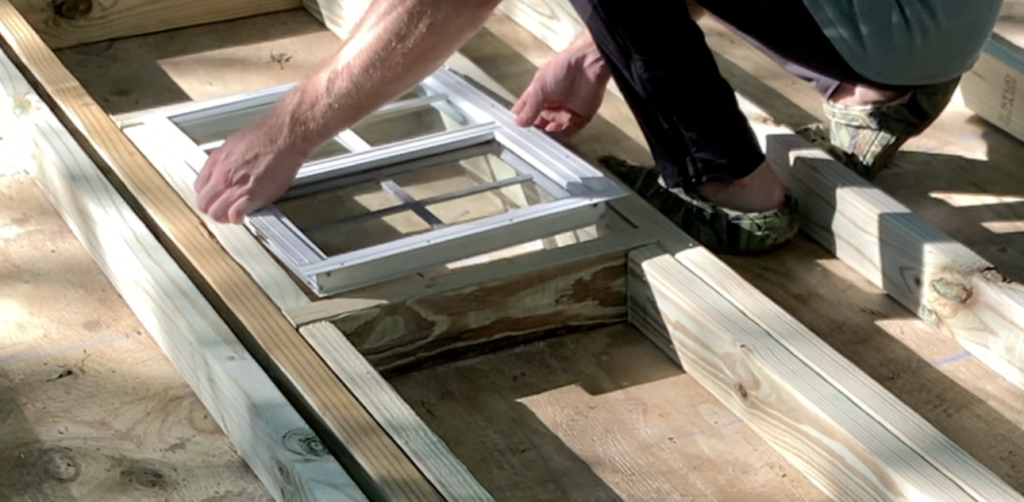
When performing a dry-fit of the shed window, check for the following:
- Ensure that the Shed Window will fit within the Rough Opening
- Confirm that the Shed window flanges will “catch” on the rough opening frame
- Confirm that window can be installed level and plumb
After you have completed the shed window dry-fit and you are satisfied with the fit, you can pause the shed window installation and finish framing your shed. Before you can proceed with the window installation, the shed’s sheathing and/or siding needs to the installed.
For additional information on how to install a shed window, skip ahead to the “How to Install a Shed Window” Section of this article or check out my dedicated “How to Install a Shed Window” Article.
Framing the front Wall
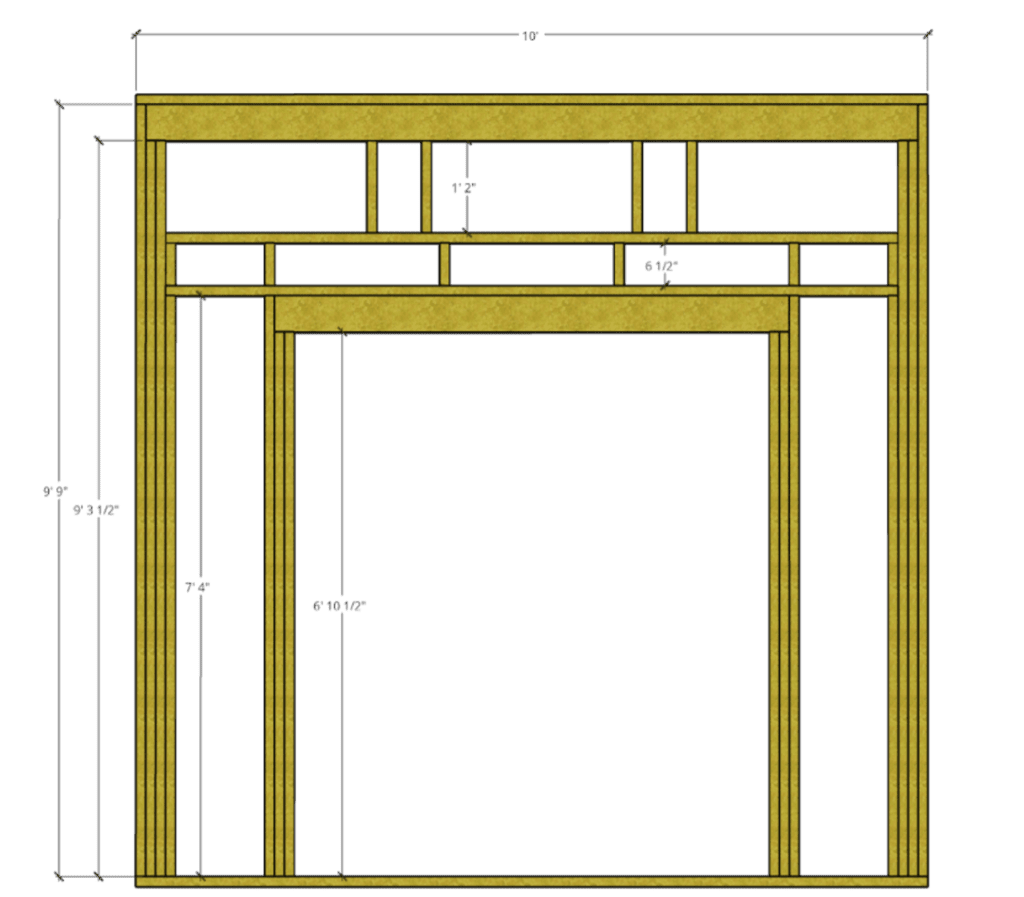
Framing the shed’s front wall is typically the most complex part of the shed framing process since it usually consists of the door’s rough opening, window rough openings, 2”x6” Lumber headers, etc. To assemble the 10’x10′ front wall as included in this guide, you will need to make the following cuts. However, feel free to customize the shed framing plan as you see fit – this guide is for reference only. Note that this front wall framing is designed for a 6′ wide by 7′ tall roll-up door.
- Cut two (2), 2”x4”x10’s to exactly 10’ (sometimes, the factory boards require minor trimming).
- Cut two (2), 2”x4”x10’s to 9’- 9”.
- Cut four (4), 2”x4”x10’s to 9’- 3½”
- Cut four (4), 2”x4”x8’s to 7’- 4”
- Cut four (4), 2”x4”x8’s to 6’- 10½”
- Cut four (4), 2”x4”x8’s to 1’-2”
- Cut six (6), 2”x4”x8’s to 6½”
Refer to the Figure Below for the overall Shed Front Wall Layout.
You will also need to make the following cuts for the horizontal front wall headers:
- Cut two (2), 2”x6”x10’s to 9’-9”
- Cut two (2), 2”x6”x10’s to 6’-6”
- Cut two (2), 2”x4”x10’s to 9’-3”
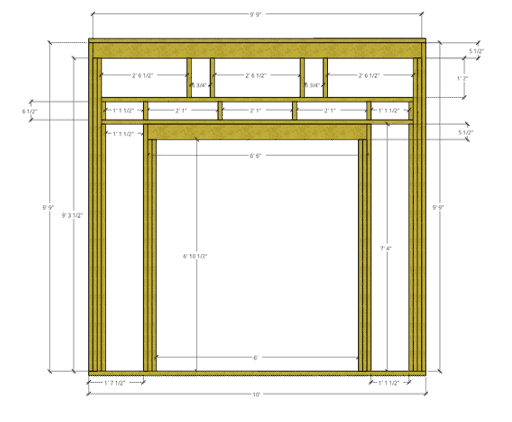
You can now assemble the front wall as shown:

An important Note about your 2”x6” Shed Wall Headers:
To assemble your 2”x6” headers (over the door rough opening), you will need to take your two pieces of 2”x6” lumber and attach them together. However, each 2”x6” is only 1.5” thick. Therefore, these will be approx. ½” thinner than the 3.5” wall depth. To make up the additional ½”, cut strips of your 1/2” plywood and sandwich it in between the two pieces of the 2”x6”.
Because the plywood sheets we are using are only 8’ long, you will need to use two pieces of 1/2″ plywood for the 9’-9” header. Finally, nail the header together on both sides.
After cutting all of your Front wall lumber (and plywood strips) to size, fasten each stud to the top and bottom plate using a nail gun and/or galvanized screws. Two nails per connection location are recommended. Attach adjacent studs together with nails and toe-nail in additional fasteners as required. Attach 2”x6” headers and plywood together using nails from both directions.
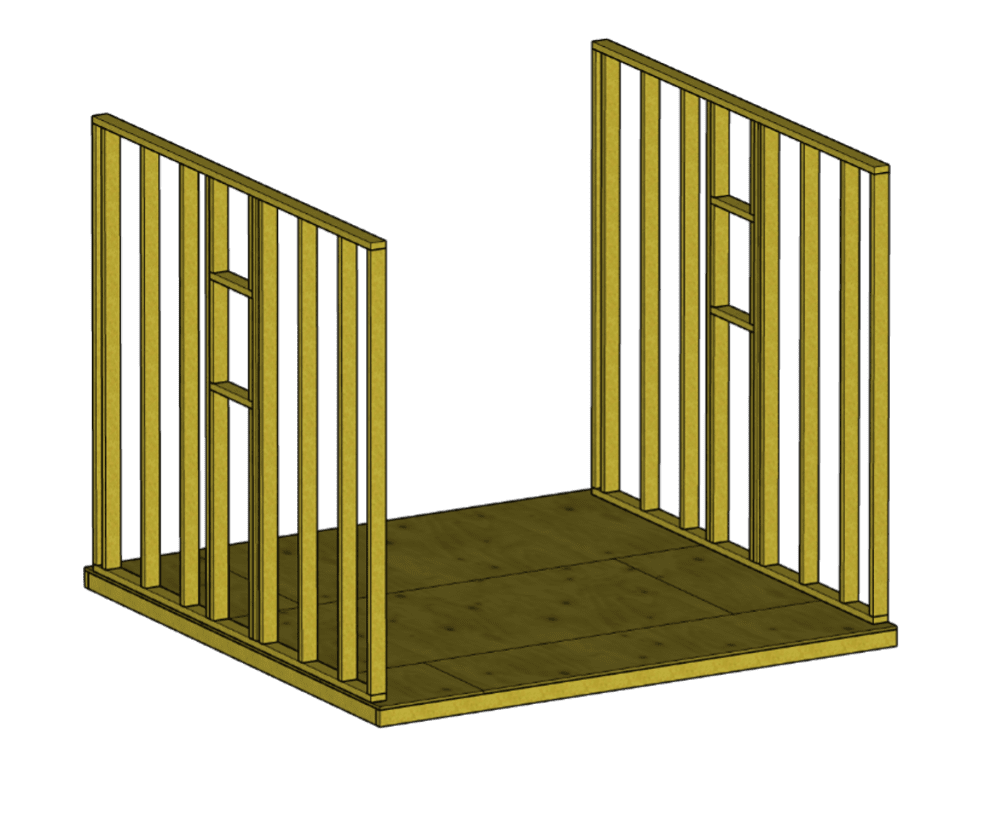
At this stage, all of the Shed Walls have been framed and you can begin lifting the walls into place.
Lifting the Shed Walls into Place and Attaching them Together
Once all of your shed walls are framed assembled, I recommend that you get some help to stand them up. The shed’s front wall, in particular, is quite heavy. I recommend that you start with the front wall (since it is the heaviest).
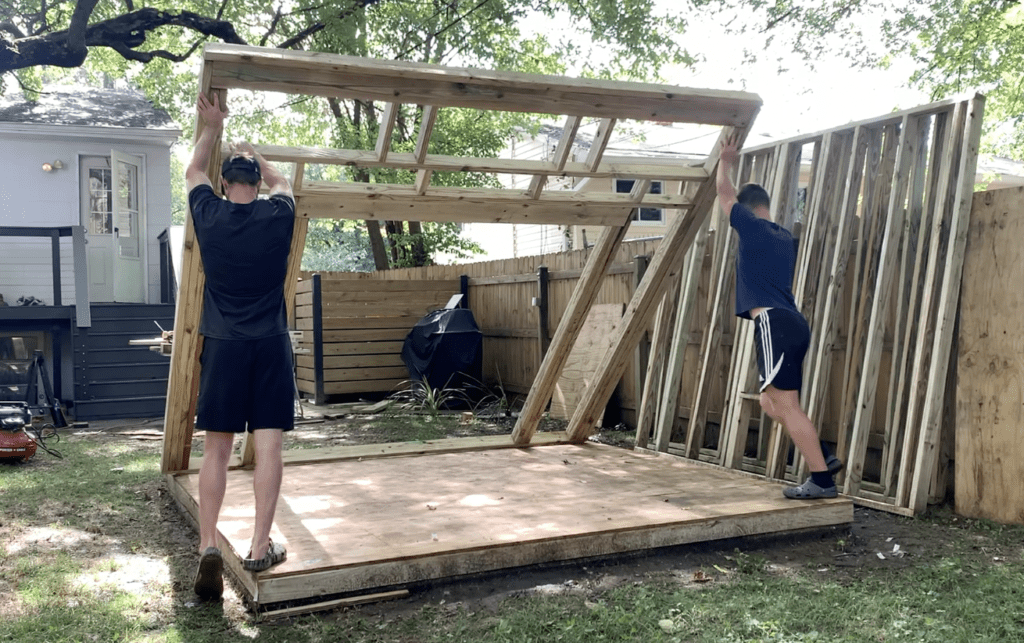
Lift the front wall into place and ensure that it is perfectly flush with the front and sides of shed base frame. Once the front wall is positioned correctly, tack it into place with nails. It is recommended that you install a temporarily brace to hold the walls in place until you have all of the shed walls in place.
Next, position your side walls, ensure that they are flush with the shed base and the adjacent front wall, and tack them in place with nails. You can also use bar clamps to temporarily hold the walls in place before you tack them into place with nails.
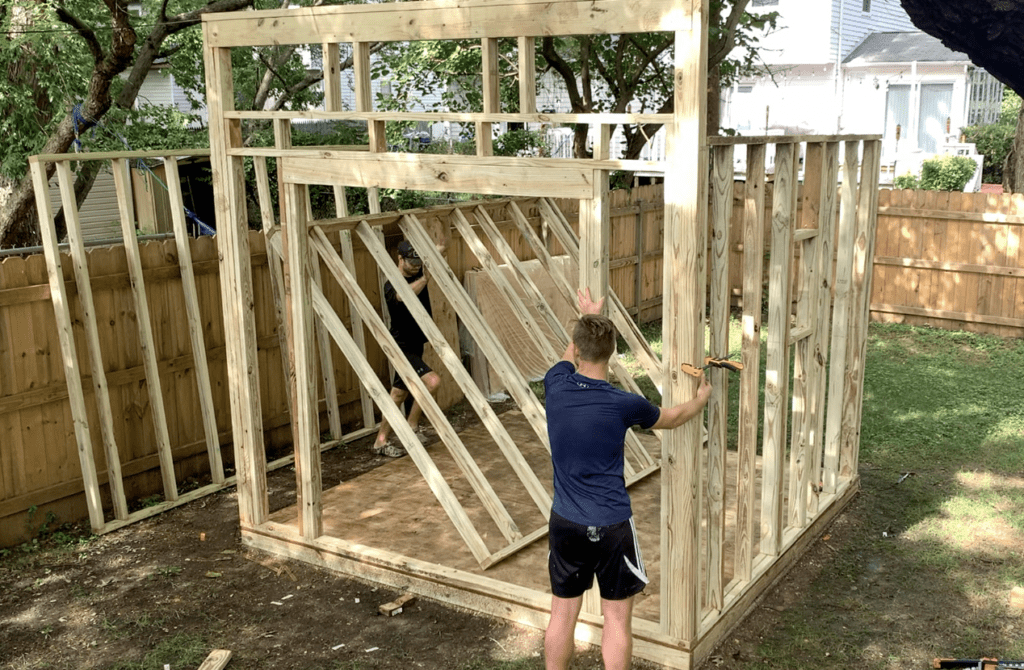
Finally position the back wall in place and tack it in place with nails.
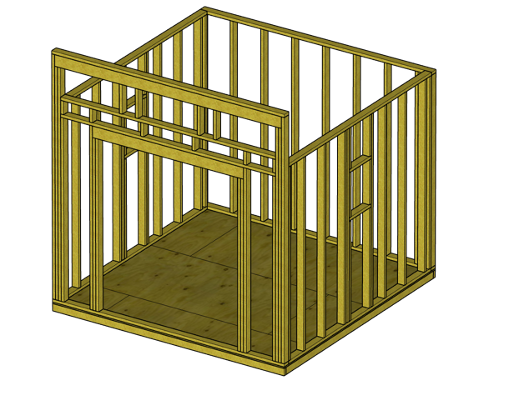
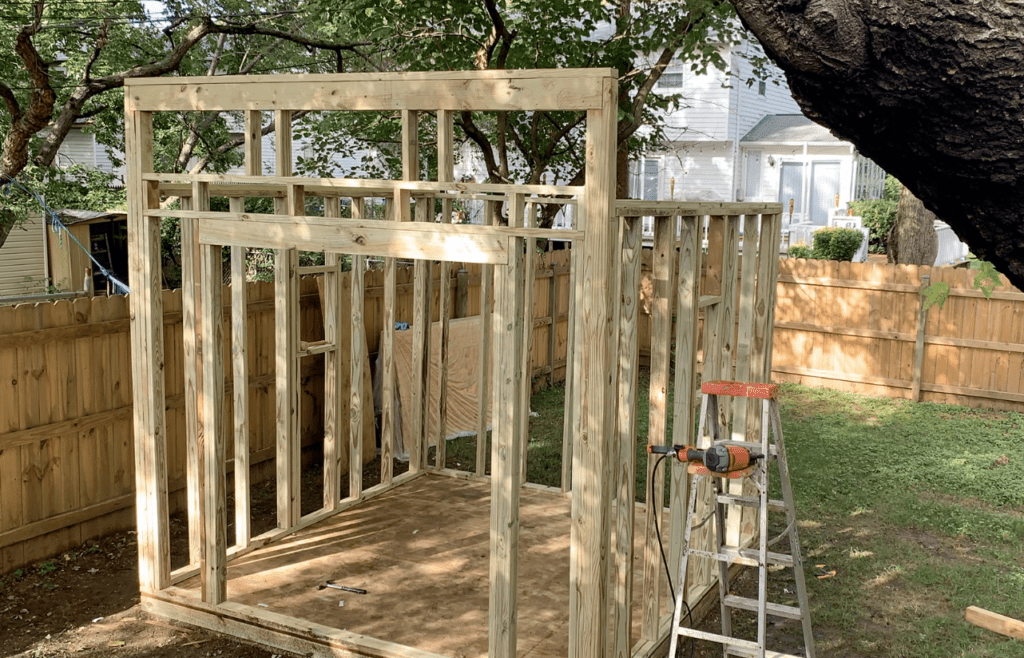
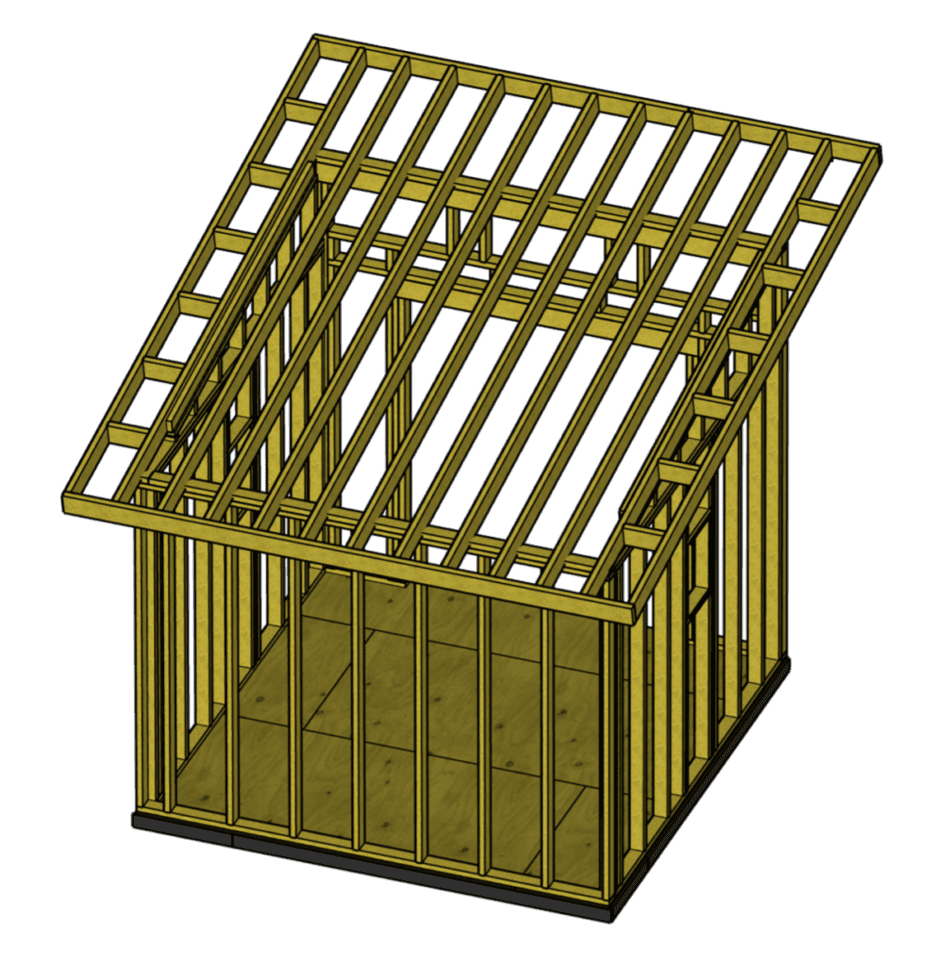
Once you have stood all of the shed walls up and secured them in place, your shed should look like this:
Be sure to attach all of the shed walls together with framing nail, screws, etc. Consider using a bar clamp to hold the shed walls as you fasten them together.
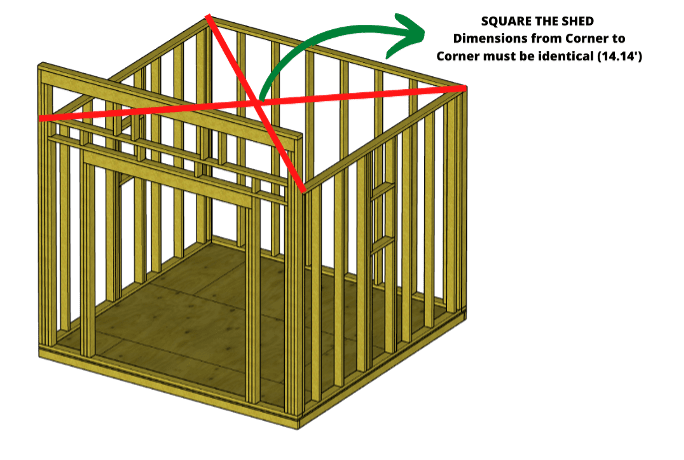
Before proceeding any further, Square the Shed to confirm that none of the walls are out of plumb. To do this, ensure that the measurement between opposite corners are the same.
Reinforcing the shed walls with a double top plate
Next, reinforce the shed wall top plates with additional pieces of 2”x4”x10’ top plates (known as a double top plate) as shown in the Figure Below:
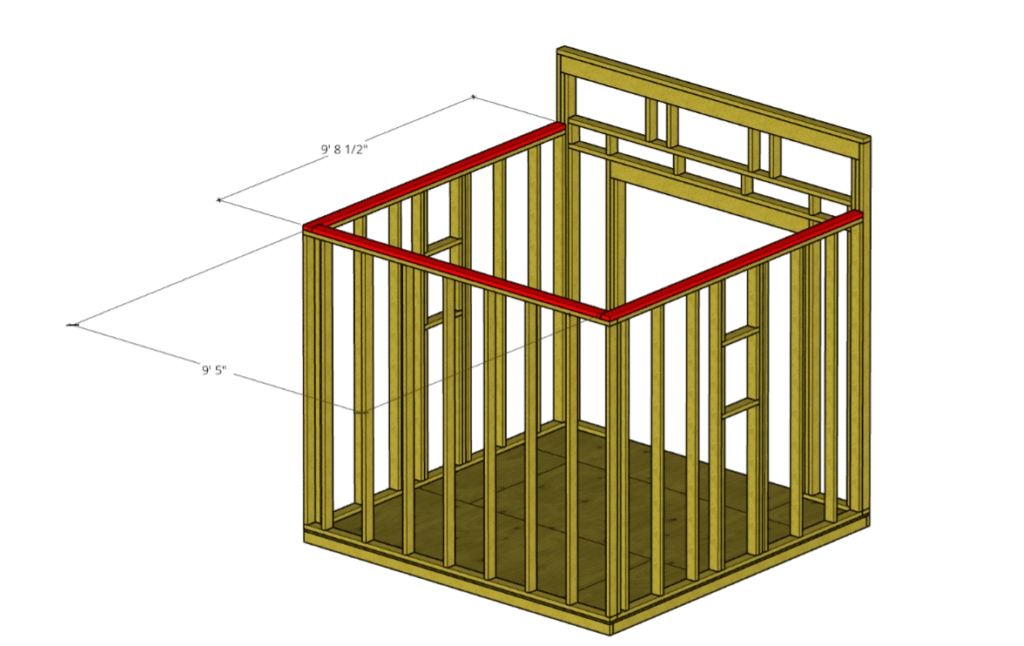
To accomplish this, you will need to make the following cuts (according to the 10’x10′ shed plan herein):
- Cut two (2), 2”x4”x10’s to 9’-8 1/2”
- Cut one (1), 2”x4”x10’ to 9’-5”
Next, simply tack the 2”x4”s in place with nails as shown below:
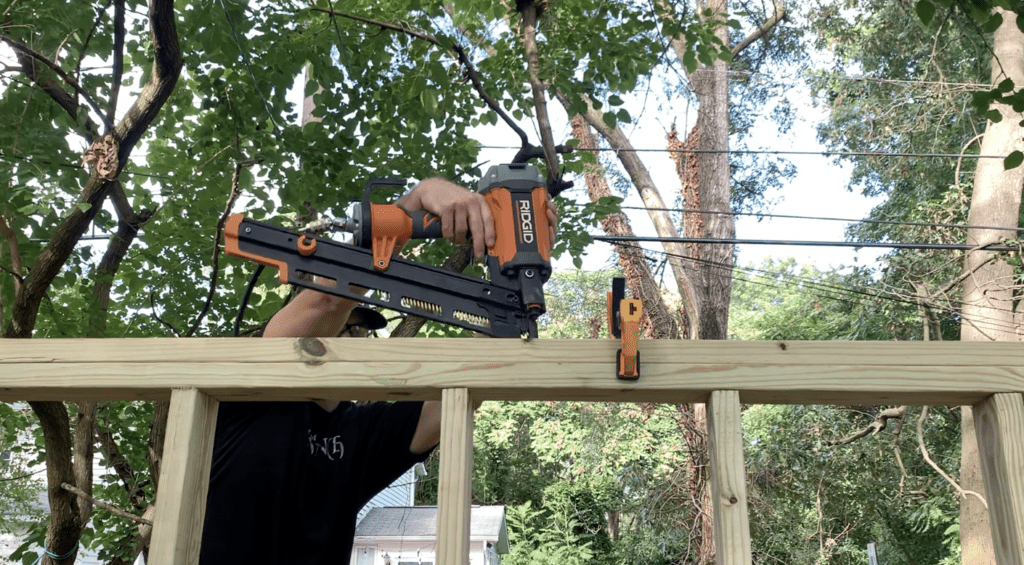
Double top plates will add additional strength and durability to the shed by anchoring the adjacent walls together at the top of the wall.
Take this time to ensure that you have adequate fasteners installed to attach the shed walls to each other and also to the shed base joists below.
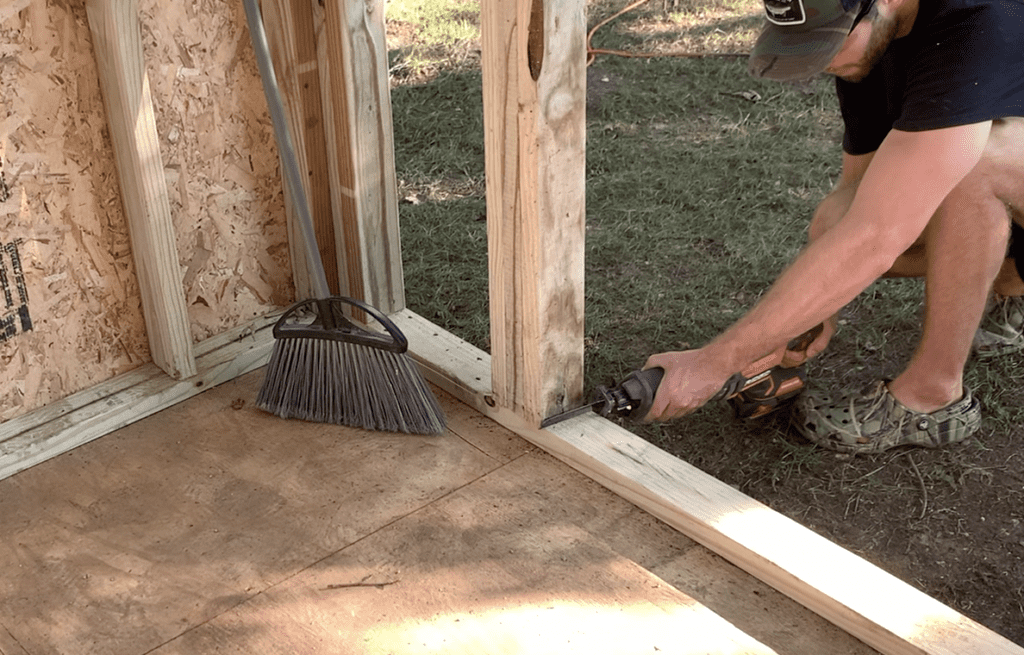
Removing the Bottom Plate from the Shed Door Opening
Lastly, cut out the portion of the 2”x4” bottom cap which is impeding the entrance to the Shed.

To cut this segment out, I recommend that you use a reciprocating saw.
At this point, your 10’x10′ shed walls have been fully framed. For a complete video tutorial of the entire shed framing process, check out the video below:
How to Install T1-11 or LP SmartSide Siding on a Shed (T1-11 or LP SmartSide Shed Siding Installation)

When building a shed or outdoor structure, there are many different siding options to choose from. However, T1-11 siding or LP SmartSide panels are the most commonly installed for exterior building applications. Both T1-11 siding and LP SmartSide Siding are great siding options for a shed with nearly identical installation instructions.
To install T1-11 or LP SmartSide Siding, begin by establishing the desired siding height on the shed or exterior structure. Next, install a ledger board or temporary ledger nails at the base of the shed wall that will serve as the ledge in which the siding panels will rest as you install them. Ensure that the ledger board or temporary ledger nails are at the correct height based on your desired siding height and then place your siding panels on the ledger. Attach the siding panels to the shed using a nails spaced every 6″-8″ on center. Cut any T1-11 or SmartSide Panels to length as needed. Finally, install trim at the outside corners where the siding intersects.
Installing T1-11 or LP SmartSide Siding is a relatively easy project that the average homeowner can tackle. This guide will show you all of the steps needed to successfully install T1-11 or LP SmartSide on a shed or outdoor structure.
What is T1-11 Siding

T1-11 Siding is a pine plywood material that is typically used for exterior siding applications such as sheds, dog houses, chicken coops, etc. T1-11 is weather resistant and resists impact marks and denting. Additionally, T1-11 siding can be painted or stained to suit the look you are going for. Although T1-11 Siding does not offer a manufacturer’s warranty, it is still commonly viewed as a durable exterior siding option.
What is LP SmartSide Siding
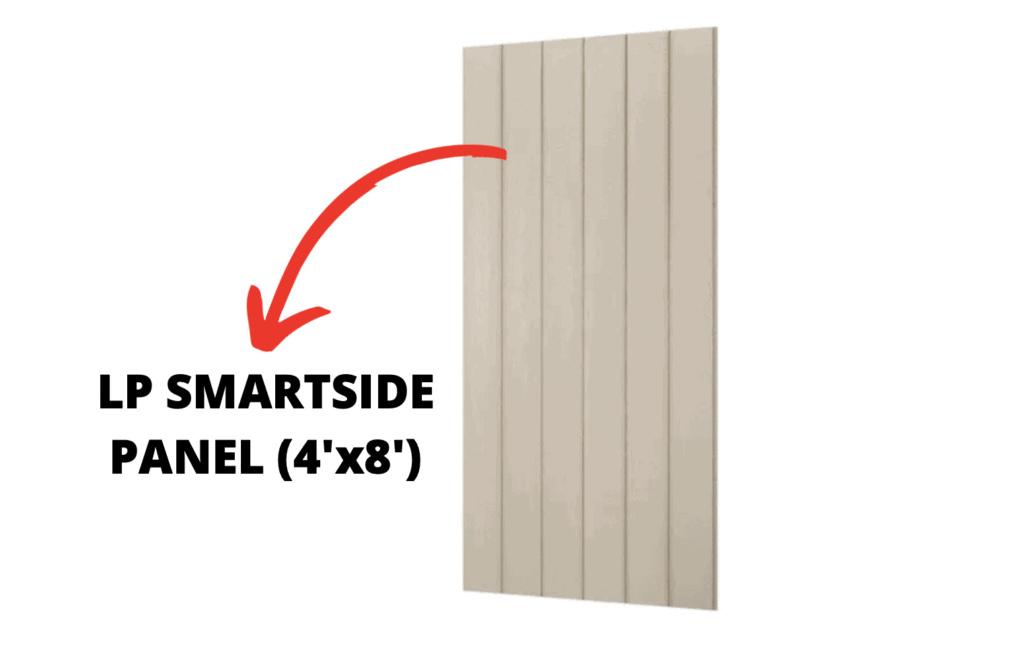
LP SmartSide Siding is a 4’x8′ pressure treated engineered wood panel that is commonly used for exterior siding applications. LP Smartside comes pre-primed with excellent pain adhesion and is manufactured with “overlap” and “underlap” edges for a seamless installation. This product comes with a 50 year manufacturer’s warranty and is strong enough to be nailed directly to to wall studs – eliminating the need for additional sheathing in many applications.
Comparing T1-11 Siding to LP SmartSide Panels
Although T1-11 and LP SmartSide Siding are similar in nature, there are a few differences. A comparison between T1-11 and LP SmartSide Paneling is listed in the following table.
T1-11 vs LP SmartSide Siding Comparison Table
| T1-11 Siding | LP SmartSide | |
| Panel Size | 4’x8′ | 4’x8′ |
| Panel Material | Weather Resistant Pine | Treated Engineered Wood |
| Approx. Cost per Panel (2022) | $39.72 | $42.98 |
| Warranty | None | 50 year |
| Paintable | Yes | Yes |
Although LP SmartSide Siding is slightly more expensive than T1-11 Siding, the warranty and additional pressure treatment give it a slight leg-up over T1-11. However, both T1-11 and LP SmartSide Panels are fantastic options for shed siding.
Now that you have been presented with all of the information needed to decide whether T1-11 or LP SmartSide Panels is best for your shed siding application, we can begin looking at the installation process.
Although the installation of T1-11 and LP SmartSide is VERY similar, this guide will be slightly catered towards to LP SmartSide – since that is what I installed on my shed.
Establish Where the Siding will Attach to the Shed Walls
Because T1-11 and LP SmartSide Panels are 4’x8′ in size, 16″ O.C. Stud spacing on the shed walls is recommended to ensure that the edges of the siding panels will land in the center of a wall stud.
Depending on the height of your shed, you may need to trim your SmartSide Panel height to suit. Additionally, if you have a tall shed, you may need to stack multiple siding panels.
Measure the distance from the bottom of your shed walls to the desired height of your smart side panel.
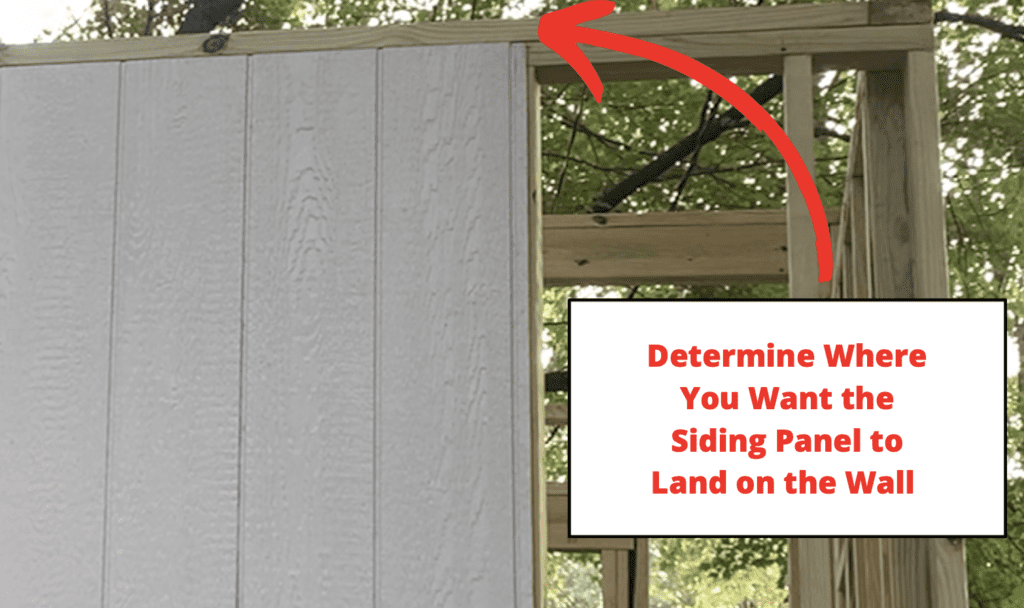
Note – A minimum of 6″ of clearance between the bottom of the siding and grade is recommended. This will prevent the likelihood of water contacting the bottom of the siding, reducing the useful life of the product.
When framing your shed, consider framing the walls so that you can can use a full 8′ high siding panel sheet for your shed walls. This is the approach I took when framing my shed walls.
After establishing the desired height of where you want your siding panels to land on the walls, you can move on to the next step of the T1-11 or LP SmartSide Installation.
Install a Ledger Board or Temporary Ledger Nails
After establishing the height for your panel siding, it is recommended that you install a trim board at the bottom of your shed wall which will serve as a ledger board in which you can rest your Siding Panels Upon.
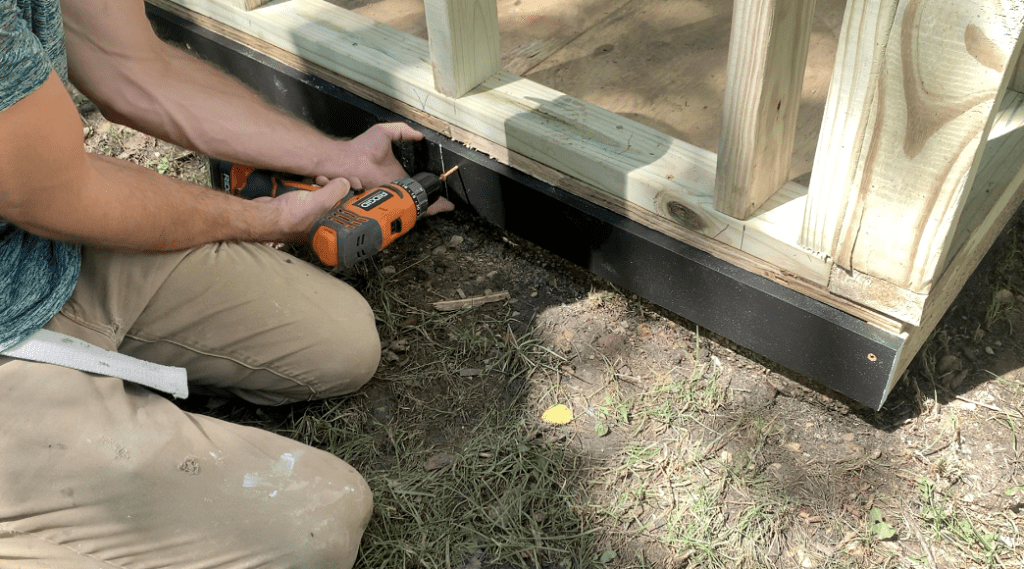
If you don’t plan on installing a piece of trim at the bottom of your shed, you can install a few temporary “ledger” nails in which you can place your siding panels upon.
This trim board (or the temporary ledger nails) will allow you to rest your siding panels on the ledger so that they are positioned at your desired height.
Consider using a laser level to ensure that your ledger board (or temporary ledger nails) is perfectly level around the entire perimeter base of the shed.
After installing the ledger trim or temporary ledger nails, you can install your first piece of T1-11 or LP SmartSide Siding.
Install the First Panel of T1-11 of LP SmartSide Siding.
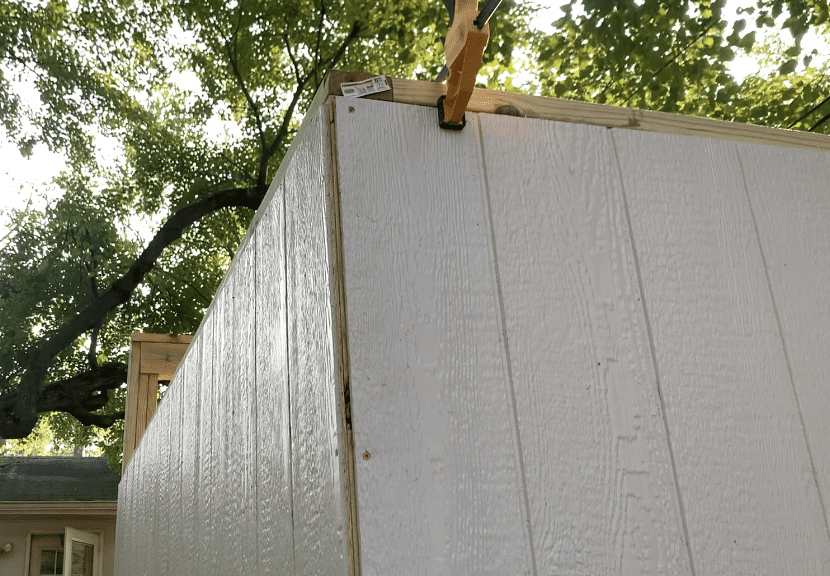
Install the first piece of T1-11 or LP SmartSiding by placing it on on top of the ledger board on the corner of the shed.
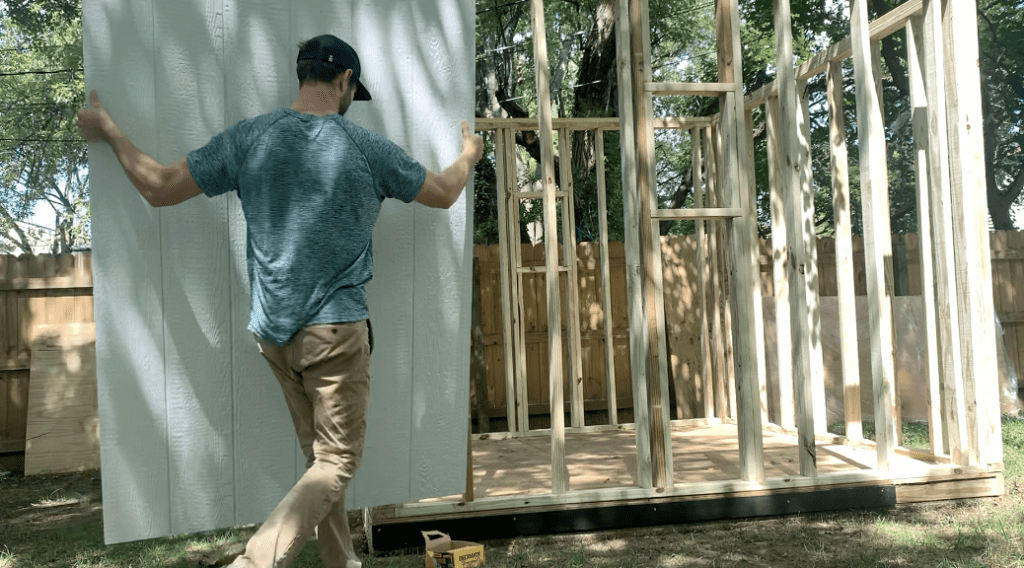
The “overlap” side of the siding panel should be placed at the corner of the shed and the “underlap” side of the panel should land directly on a wall stud. Refer to the images below:
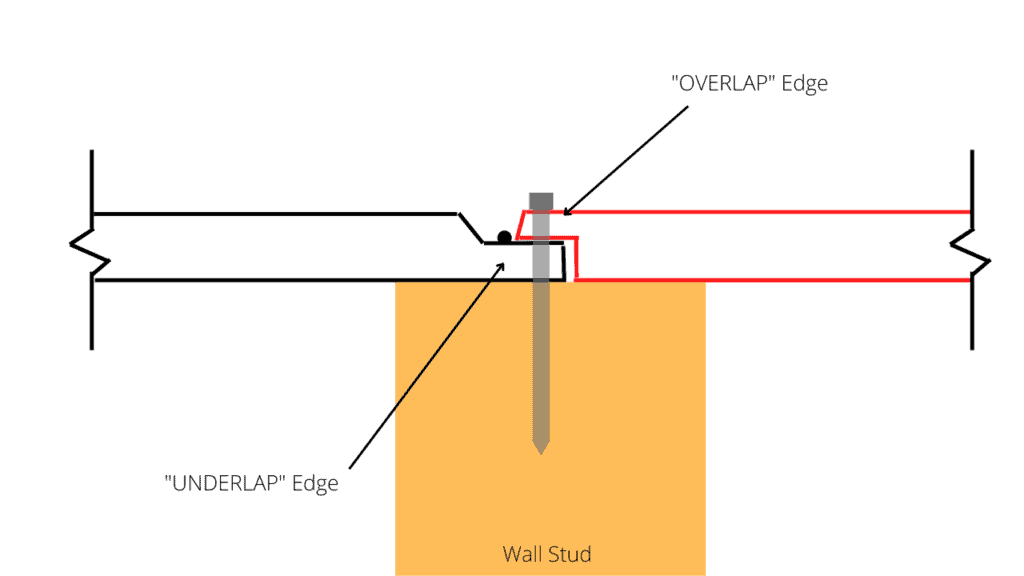
As shown below, the “underlap” side of the T1-11 or LP SmartSide panel should land directly in the center of a wall stud.
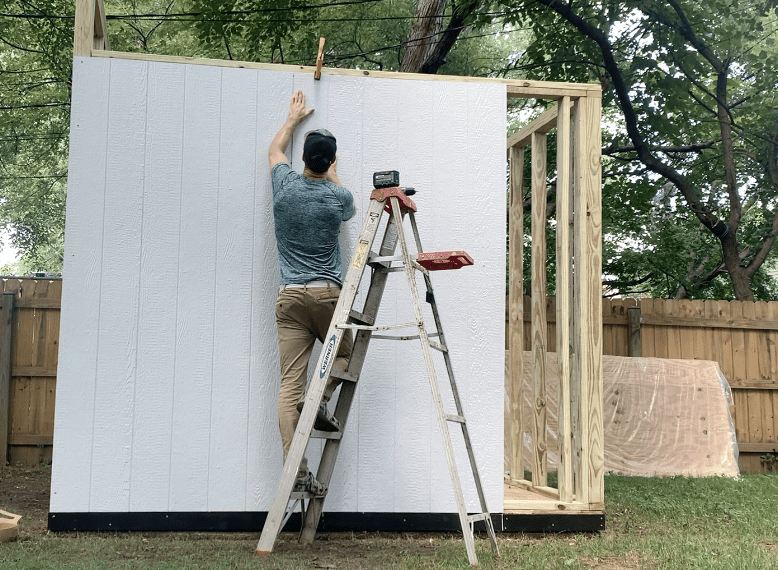
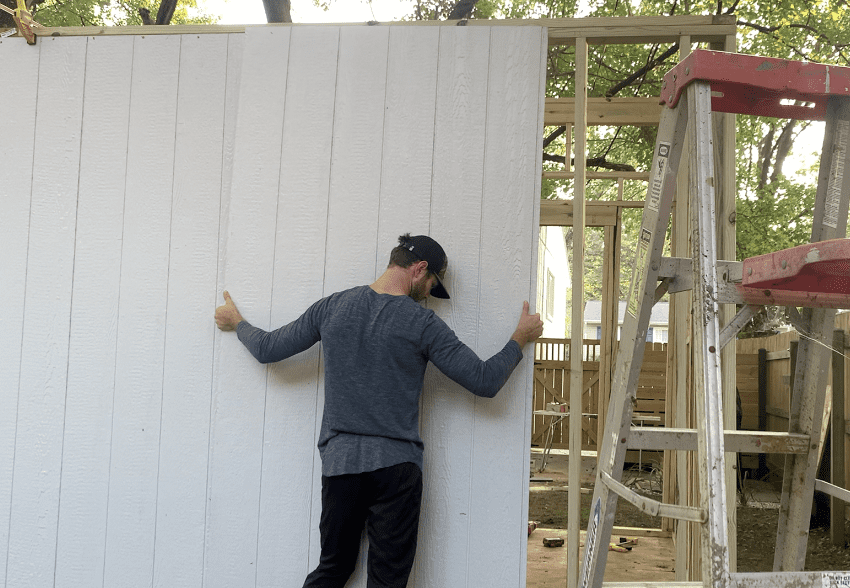
Ensure that the Siding panel is perfectly plum and perfectly in line with the front of the shed or outdoor structure wall – as shown below:
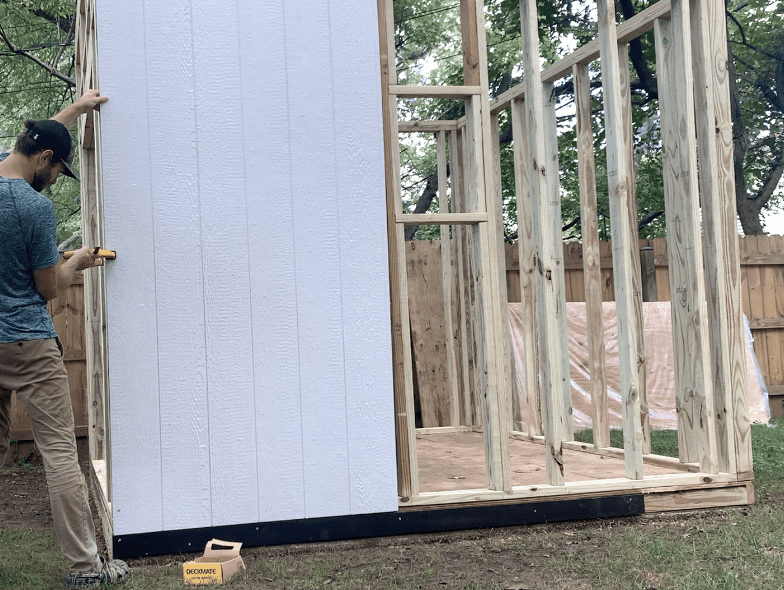
Use bar clamps (as needed) to secure the siding in place while you fasten the siding to the shed.
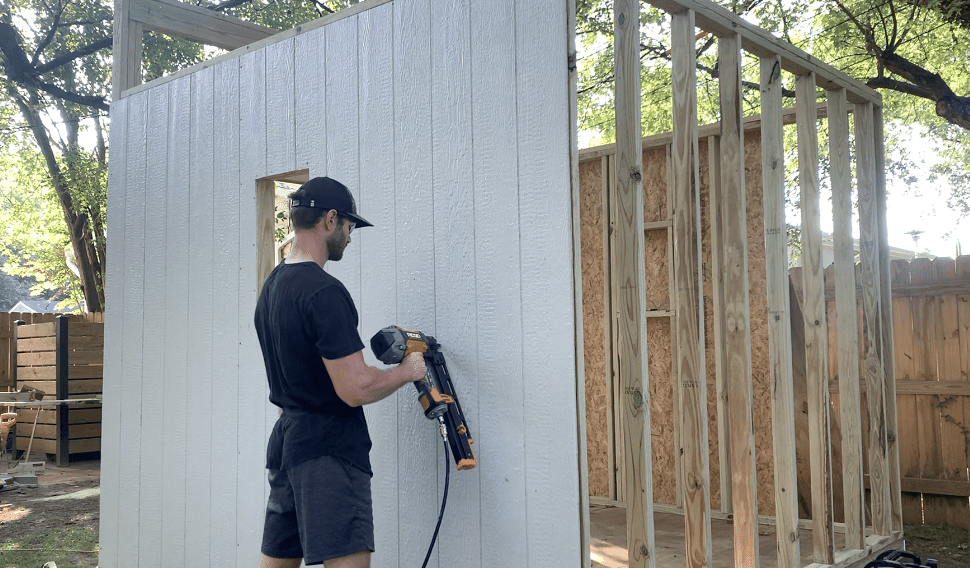
Fasten the T1-11 or SmartSide Siding to the shed using exterior rated screws or nails every 6″-8″ on center.

Do not install too many fasteners into the “underlap” side of the siding at this stage. This side of the panel will be attached to the shed as part of the next step.
Install the Second Piece of Panel Siding
After installing the first piece of T1-11 or LP SmartSide Siding, you can position the second piece of siding in place.
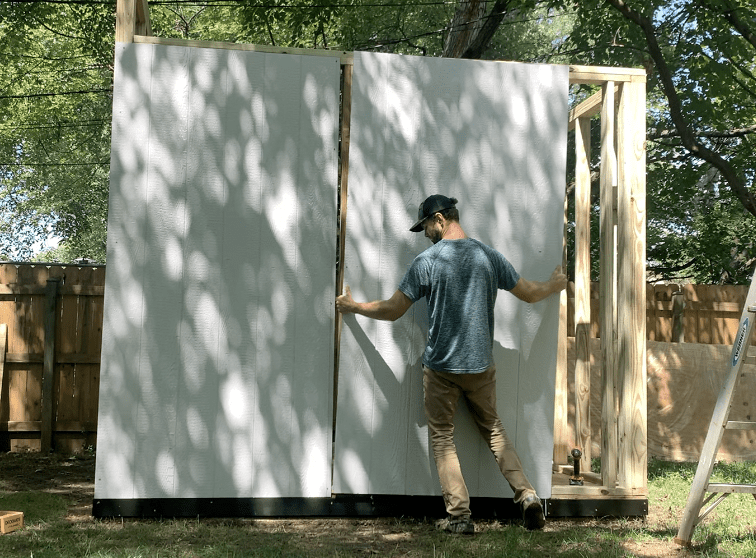
Because the “underlap” Side of the first panel was attached to the wall stud, you will position the “overlap” side of the second piece of siding such that it contacts the “alignment bead”. Refer to the figure below:
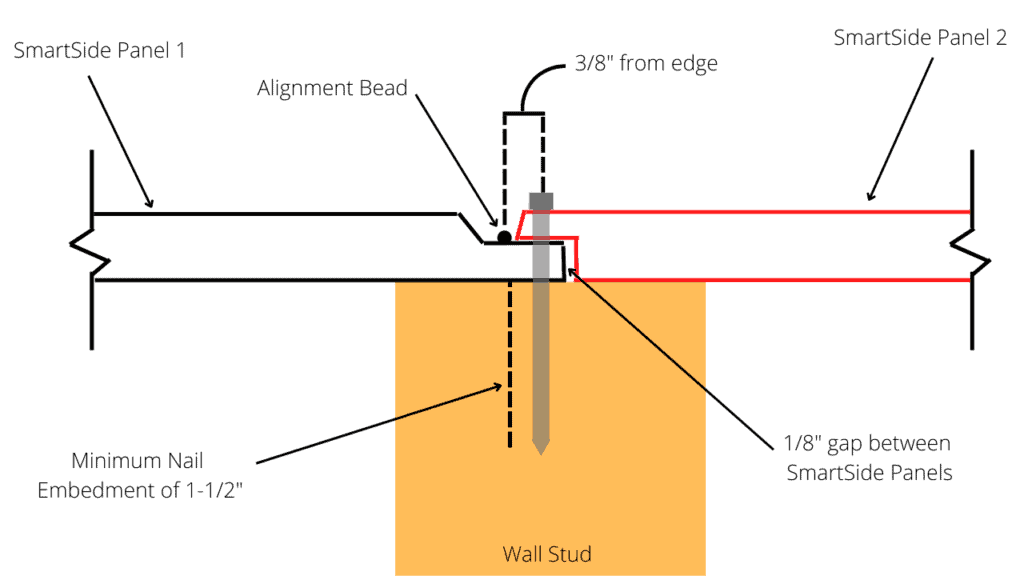
Position the second panel of siding as shown on the figure above and temporarily secure it in place using bar clamps.
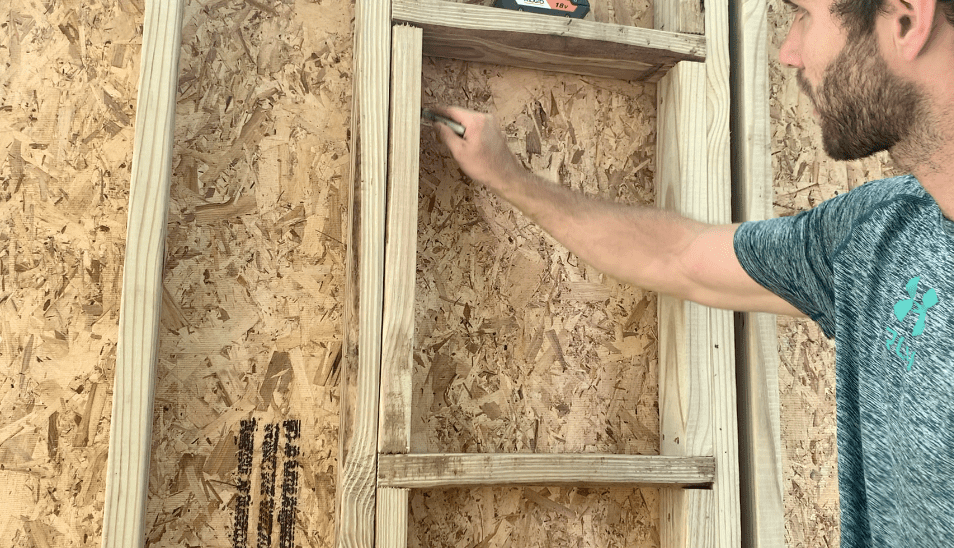
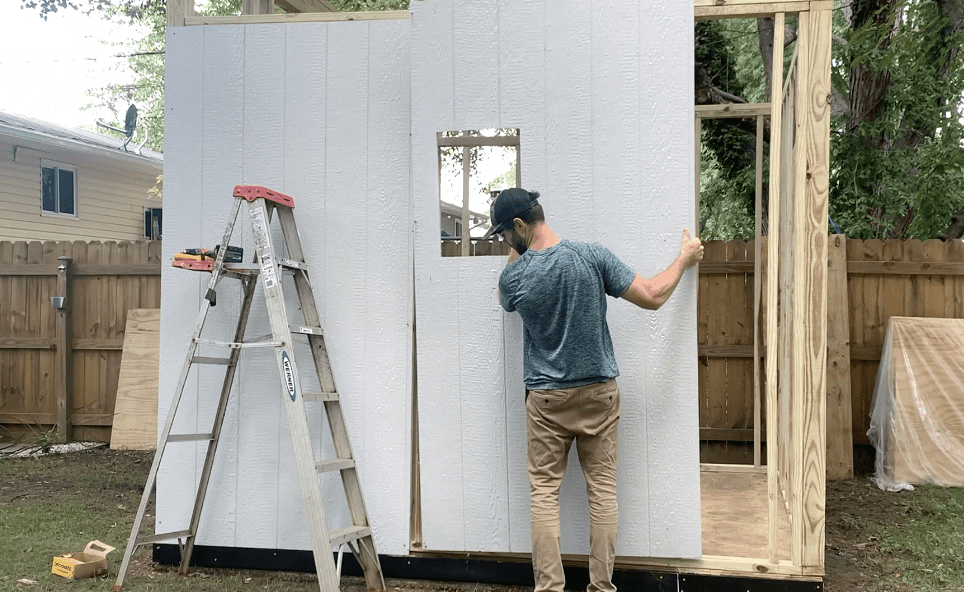
If you are installing windows for your shed or outdoor structure, consider marking the window rough opening on the inside of the shed as shown below:
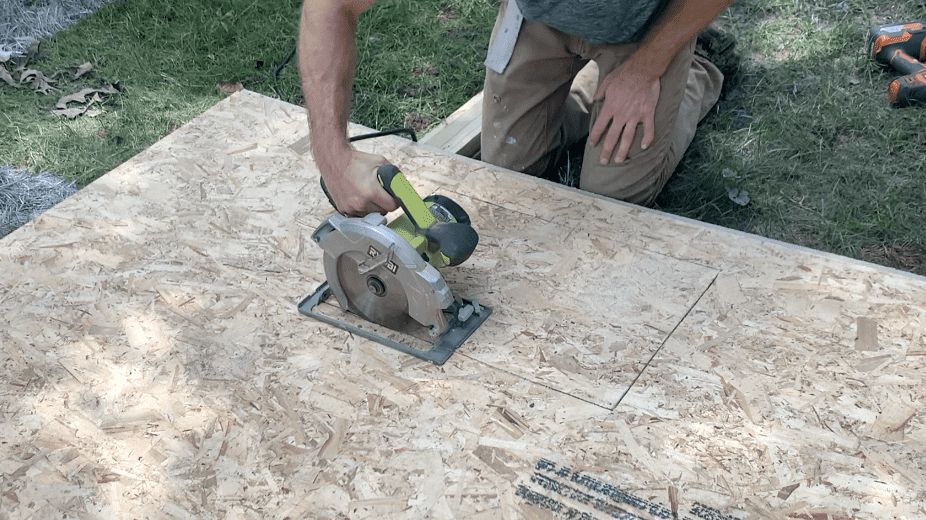
Use a circular saw to Cut out the window rough opening in the siding (as shown).
After cutting out any rough openings required in the T1-11 or LP SmartSide Panel, re-position it in place on the shed.
Permanently attach the T1-11 or LP SmartSide Siding to the shed or exterior structure using a framing nailer and galvanized nails.
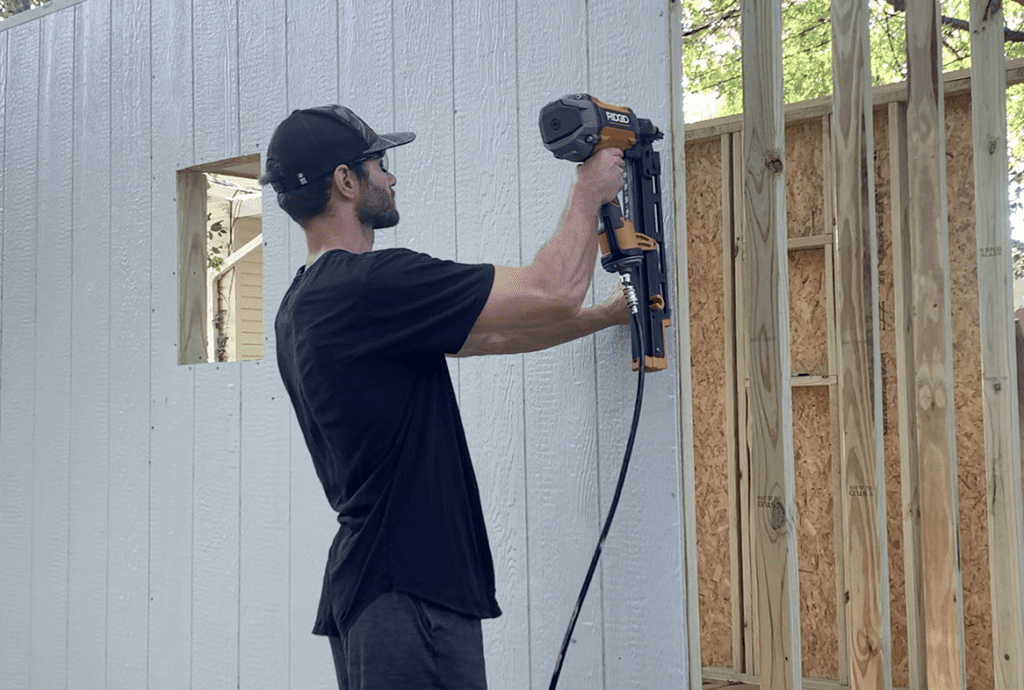
Be sure to fasten the Siding to all of the wall studs behind the the panel. Use a tape measure as needed to identify the stud locations that are behind the T1-11 or LP SmartSide Panels.
Attach nails though the siding and into the studs every 6″-8″ O.C.
Note – Nails should be driven so that they seat snug to the face of the siding. Nails should not be overdriven such that the siding surface is distorted. If nails are overdriven, it is recommended that you apply sealant (caulk, or wood sealer). It is recommended that the exposed nail heads be painted.
Install the Remaining T1-11 or LP SmartSide Siding Panels.
At this stage, continue to install the T1-11 or LP SmartSide panels – following the same procedure as above.
Continue to position the “overlap” side of the siding on top of the “underlap” side of the siding, ensuring that each panel lands in the center of a stud.
Cut T1-11 or LP SmartSide Panels to Size (as needed)
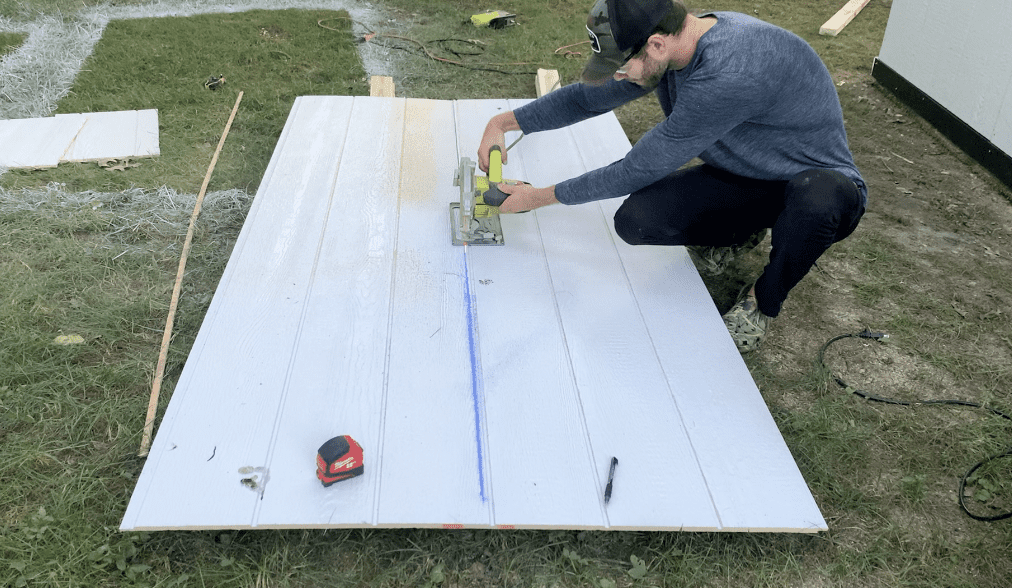
For nearly all T1-11 or SmartSide Panel installations, you will be required to trim the panels to length. To cut or trim T1-11 or SmartSide panels, measure the distance from the alignment bead of the previously installed panel to the end of the shed. Next, transfer this mark over to your Siding panel.
Cut along the marked line using a circular saw – as shown.
After cutting the T1-11 or SmartSide Panel to length, position it in place on the shed wall.

PRO TIP – Be sure that you have cut the correct side of the T1-11 or LP SmartSide Panel. In other words, be sure to measure from the correct side of the panel to ensure that the “underlap” and “overlap” edges mate together properly.
After confirming fit, attach the trimmed piece of T1-11 or SmartSide Panel in place.
After installing T1-11 Siding (or LP SmartSide) siding on all four walls of the shed or structure, you can begin to install trim on the outside corners.
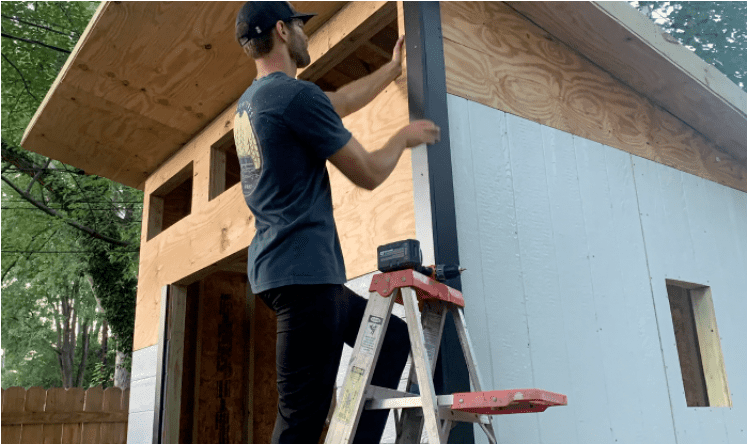
Install the Siding Trim at Corners
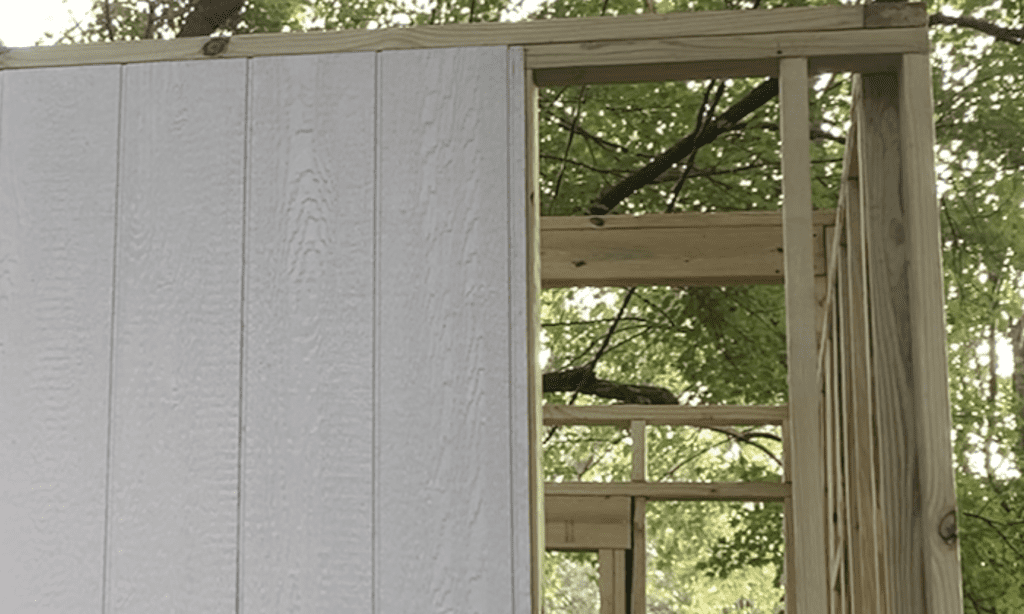
When installing T1-11 or LP SmartSide panels, you will likely notice that there is a butt joint at all of the outside corners of the shed – as shown below:
To cover this up, it is recommended that you install trim boards on the corners.
To install Shed corner Trim Boards, start with the less visible side (i.e. the side of the shed) and install the trim board so that it is flush with the front of the siding.

Next, install the trim board on the more visible side of the shed (i.e.the front of the shed) such that it is flush with the previously installed trim board. Refer to the images below:
Be sure to install the second piece of trim so that it creates a flush, 90 degree angle with the previously installed piece of trim. Refer to the image below.
Repeat this process as necessary to install trim over all the T1-11 and SmartSide Panel outside Corners.
Paint the T1-11 or LP SmartSide Panel Siding as Needed
You have two options when painting your T1-11 Siding or LP SmartSide Panels:
- You can paint all of your T1-11 or LP SmartSide Panels BEFORE installing them on your Shed
- You can paint all of your T1-11 or LP SmartSide Panels in place once you have already installed the panels on the shed.
To paint my SmartSide Siding panels, I painted all of them on the ground (prior to installing the siding panels) on the shed using my paint sprayer.

In my opinion, it is easier to pre-paint your siding panels ahead of time since since you don’t need to worry about masking anything off. You can use a paint roller or a paint sprayer to paint all of the panels before they are installed on the shed.
Paint the T1-11 or LP SmartSide Panels with the “grain” (parallel) to the texture of the panel – if applicable.
After installing the T1-11 or LP SmartSide Panels on the Shed, you can perform any touch-up paint (i.e. to cover up the nails) as needed.

At this point, your T1-11 or LP SmartSide Siding Installation is Complete. For complete video instruction of the entire shed siding installation, check out my YouTube video below:
Next, it’s time to frame the shed roof rafters.
How to Build a Lean To Shed Roof (Lean to Shed Roof Installation and Framing)

A lean to style shed roof is one of the simplest and most durable shed roof options available. Learning how to build a lean to shed roof is very simple overall – but the birdsmouth cut (described herein) can make lean to shed roof framing seem intimidating to some.
By following the steps within this guide, you will be able to build and frame a lean to shed roof like a pro.
Determine your Shed Roof Pitch
The pitch of your shed roof is determined based on the number of inches the shed roof rises vertically for every 12″ the roof extends horizontally. Refer to the figure below:
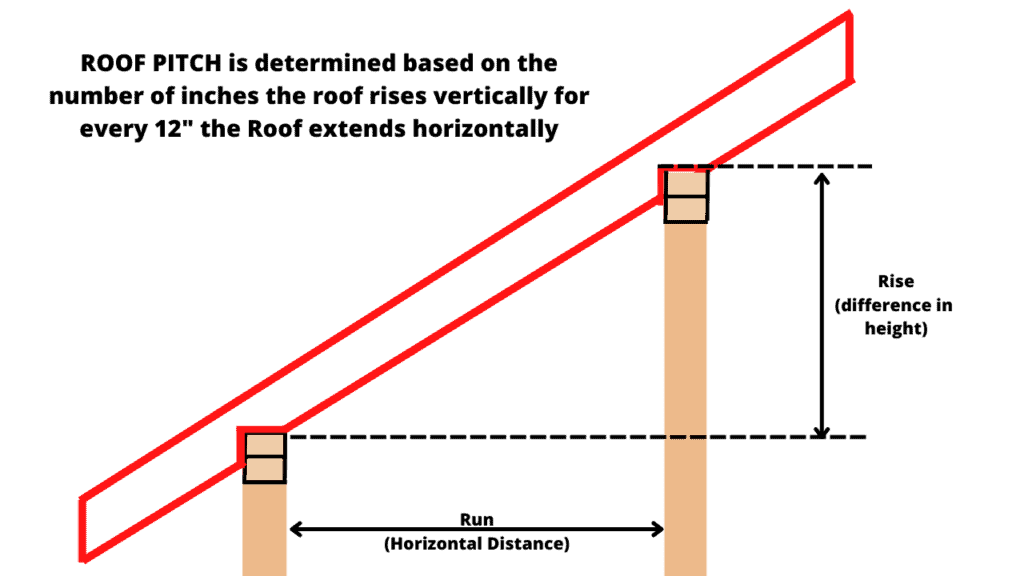
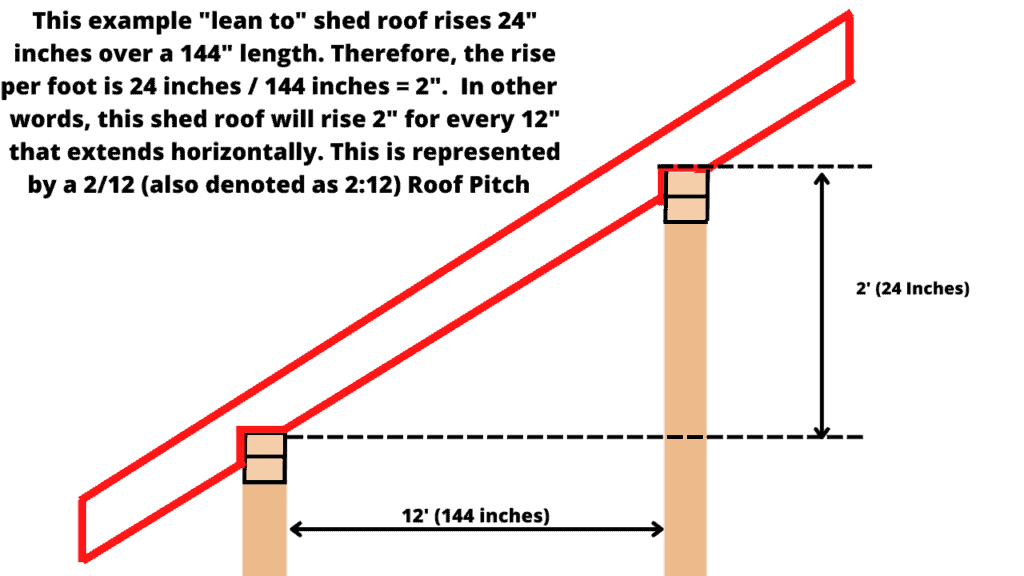
When determining the Roof pitch of a lean to shed, it is usually customary to measure the delta (rise) between the back wall top plate and the front wall top plate. Then, simply take that number (rise) and divide it by the distance between the front and back wall (horizontal distance) to get your roof pitch. Refer to the example below:
After determining the pitch of your shed roof, you can move on to the next step of the lean to shed roof framing process.
Determine the Desired Rafter Overhang at the front, Back, and Sides of the Shed
After determining the the roof pitch, spend some time thinking about your desired shed roof rafter overhang at the front, back, and sides of the shed. Having an overhang is usually desired to keep rainwater from running down the shed’s siding.
Typically, you will have a longer overhang at the front of the shed with a shorter overhang (~ < 12″) at the sides and back. Pick an overhang that works for your specific shed application.
After deciding on the rafter overhang, you can then cut your roof rafters to size.
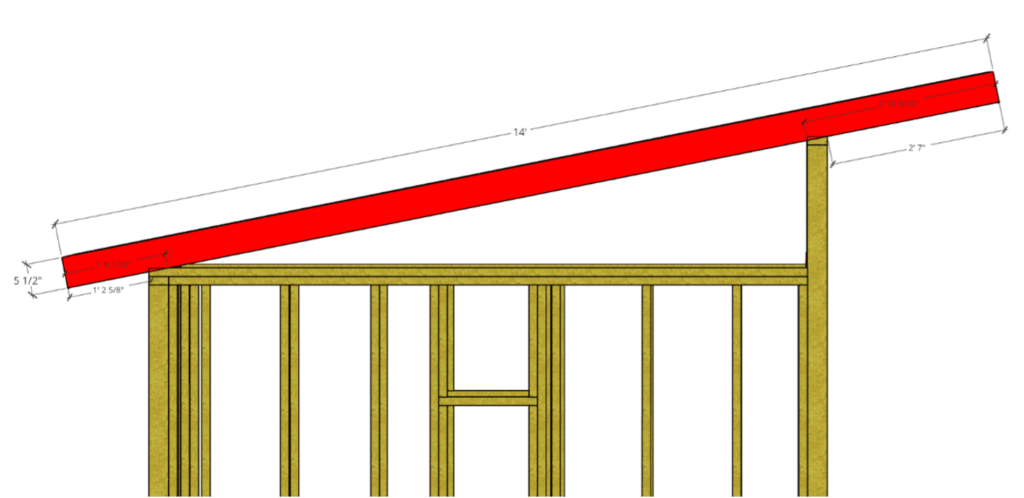
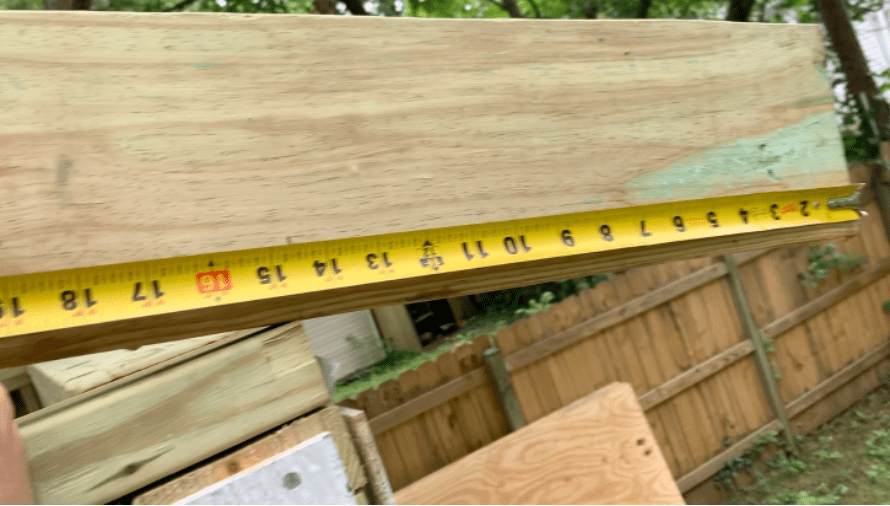
Cut the lean to shed roof rafters to size based on distance between the front and back walls PLUS the desired overhang at the front and back. For example, if you have a 10′ shed (front wall to back wall), and a desire a 3′ overhang on the front, and a 1′ overhang on the back, cut your roof rafters to 14′.
When considering what size lumber to use for your lean to shed roof rafters, consider the span from front wall to back wall of the shed. For spans 4′ – 6′, 2″x4″ rafters should be fine. For spans ranging from 4′ – 10′, 2″x6″ roof rafters are recommended. For spans larger than 10′, consult a rafter span chart.
Important Note: Consult with local code requirements regarding roof rafter sizing. Areas with high snow loads will likely require larger roof rafters.
Determine Your Shed Roof Rafter Spacing
After determining the length of the lean to roof rafters, spend some time thinking about your shed roof rafter spacing. Roof rafters are typically spaced 12″ or 16″ O.C. (On center). However, you want to make adjustments as needed to ensure that the edges of your plywood roof decking will land in the center of a roof rafter.
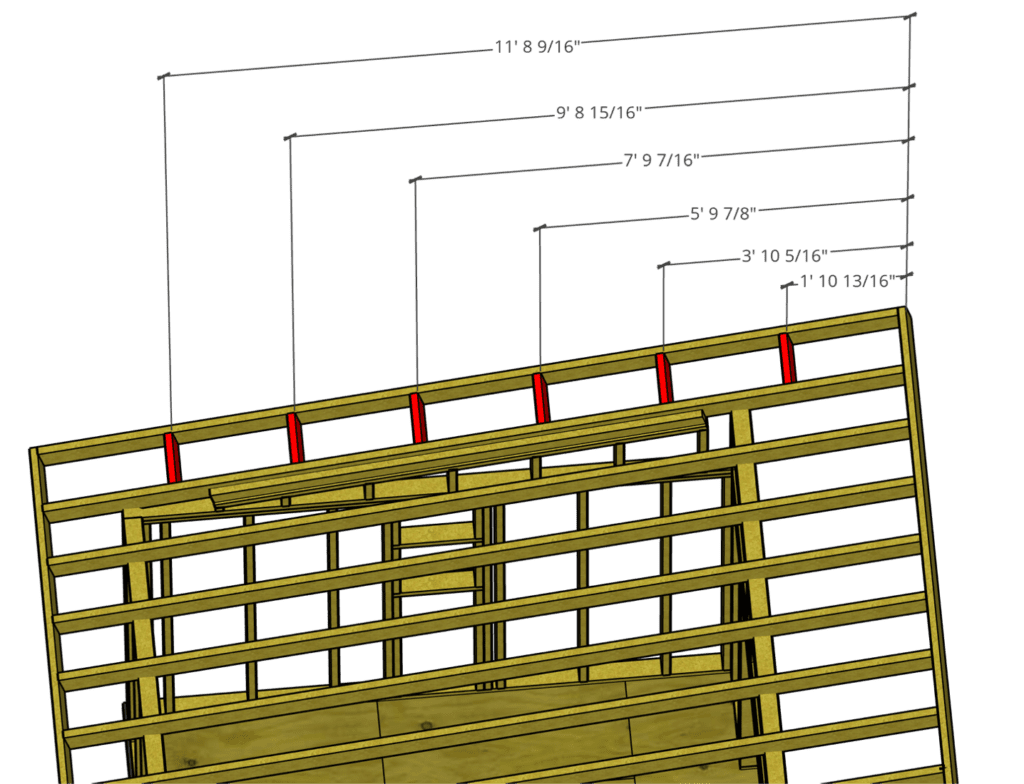
For the 10’x10′ lean to shed roof that was constructed as the example for this article, the following rafter spacing was used.
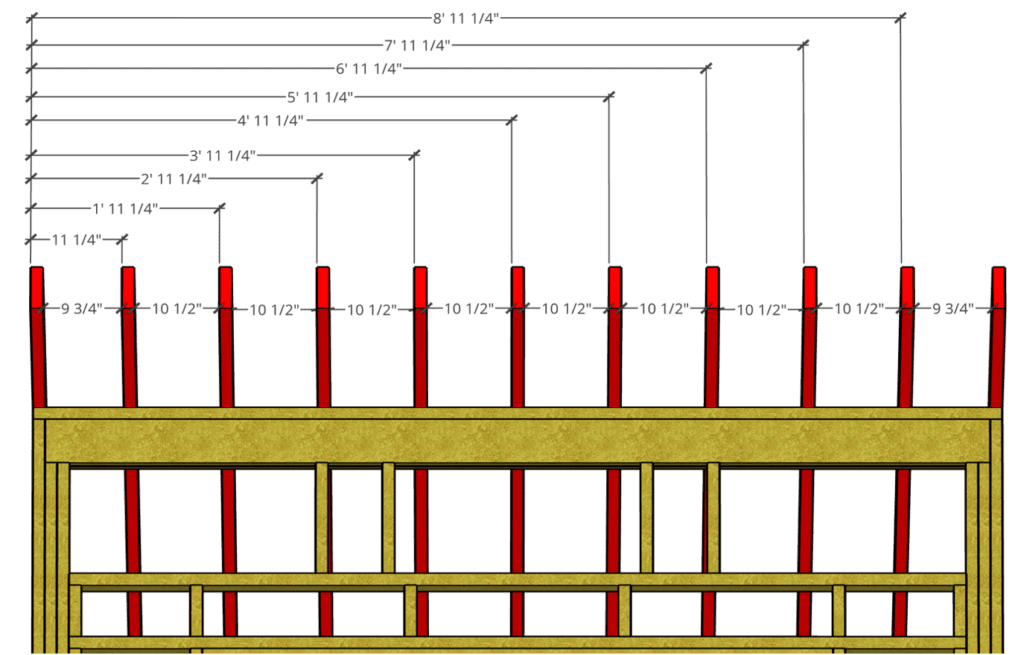
In order to frame the lean to roof example displayed above, thirteen (13) pieces of 2”x6”x16’ lumber were needed. Determine the shed roof rafter spacing based on the size and desired rafter overhang for your specific lean to shed.
Make your Birdsmouth Cuts
At this stage, birdsmouth cuts will be made for all of the lean to roof rafters that will rest on the shed walls.
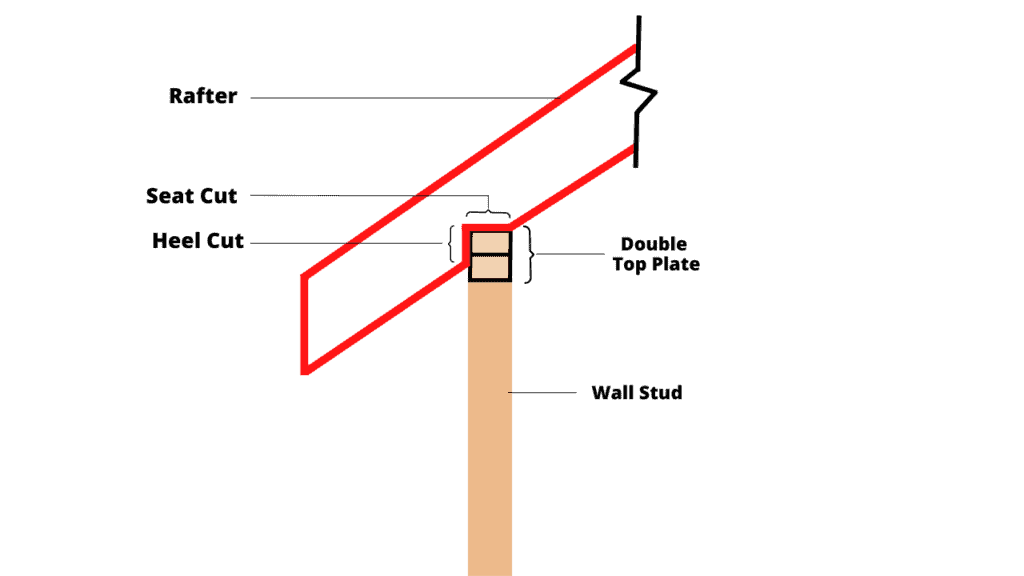
A ‘birdsmouth’ cut is small triangular cutout/nothch in the bottom (and also the top for lean to style roofs) of a rafter that provides a flat area so that the rafter can rest flat and securely on the wall top plate. See example of a birdsmouth cut below:
Refer to the figure below for the “anatomy” of a birdsmouth cut:
Your birdsmouth cut will be dictated by the shed roof pitch established previously.
To make the birdsmouth cuts, I recommend that you first place a rafter on the shed roof as shown below:
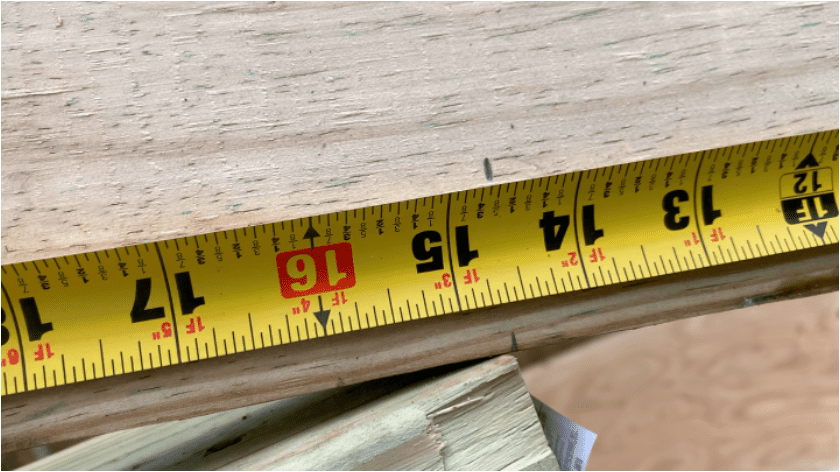
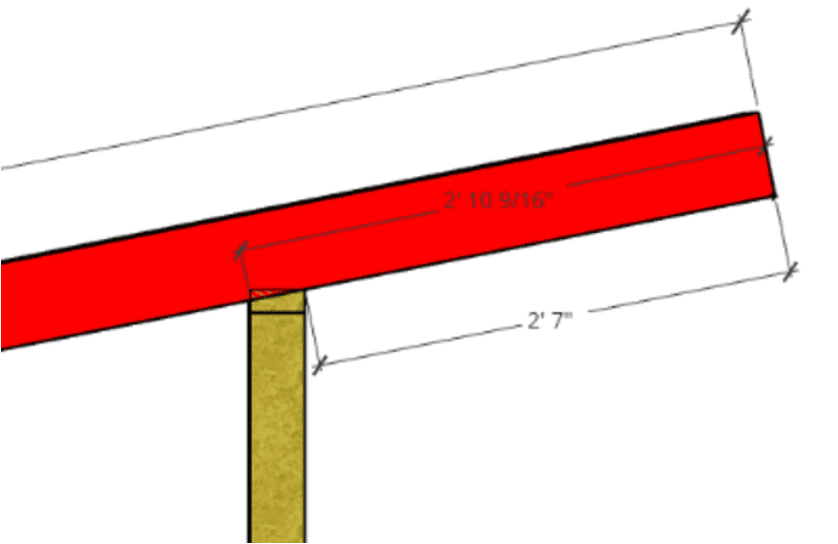
In order to mark and cut the birdsmouths on the rafters, it is recommended that you first mark your desired overhang (over the back wall of the shed) on the back of the rafter as shown below:
After marking the overhang distance from the back of the rafter, position the rafter so that that the marked line is perfectly in line with the top plate.
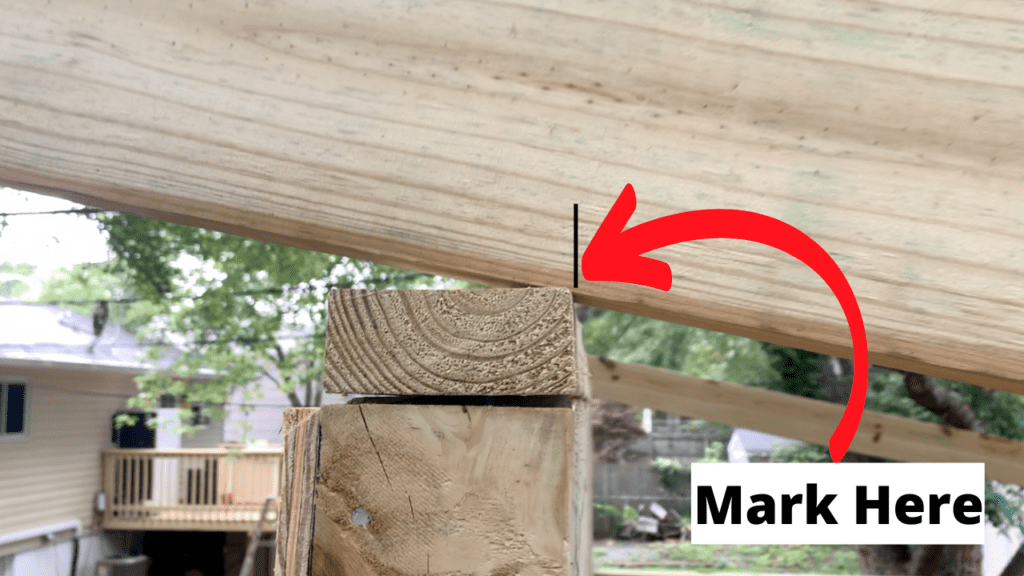
After positioning the back of the lean to shed rafter in place, move to the front of the rafter and mark the back of the birdsmouth cut where it lines up with the double wall plate, as shown.
With the location of the back of the birdsmouth cut marked at both the front and back of the rafter, you can begin making your birdsmouth cuts.
We will start by making the birdsmouth cut at the back of the rafter – as shown below:

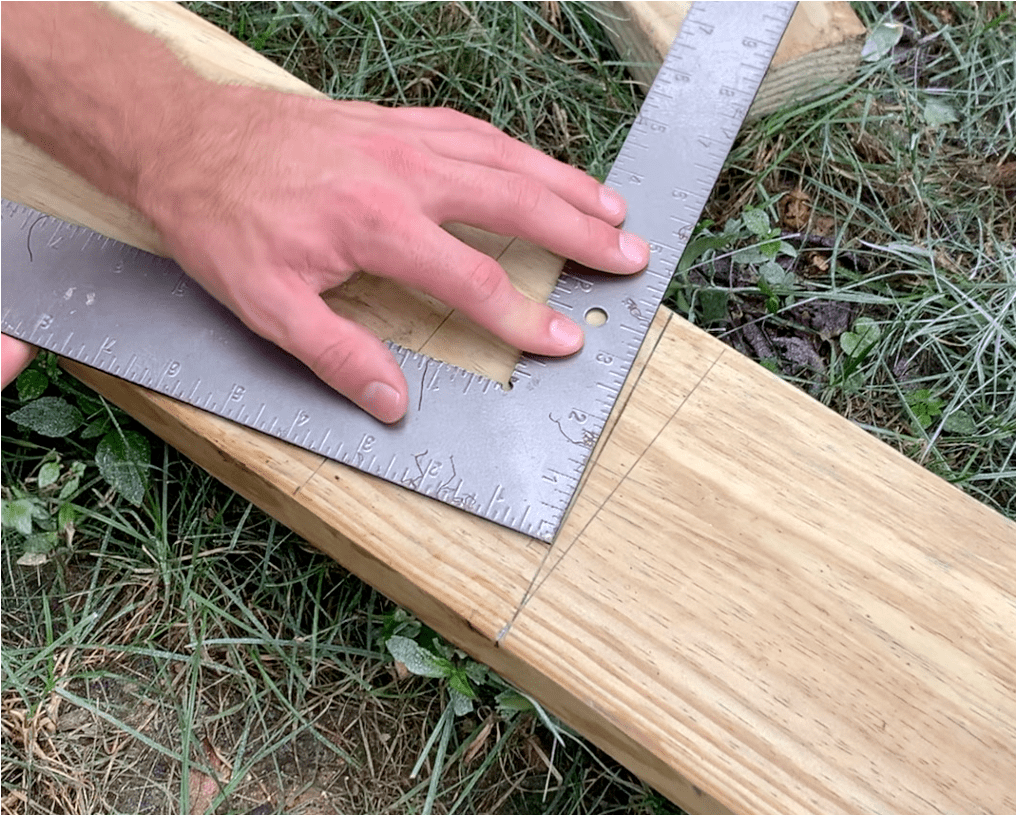
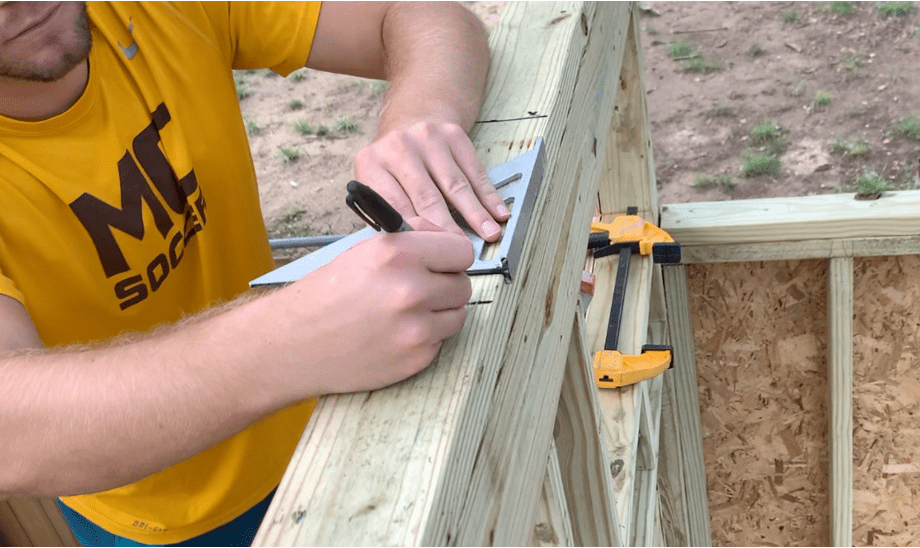
In order to make the birdsmouth cut, utilize a carpenter’s square. Start by making a straight line mark across the entire rafter along the line you marked previously (that corresponds to the back of the top plate).
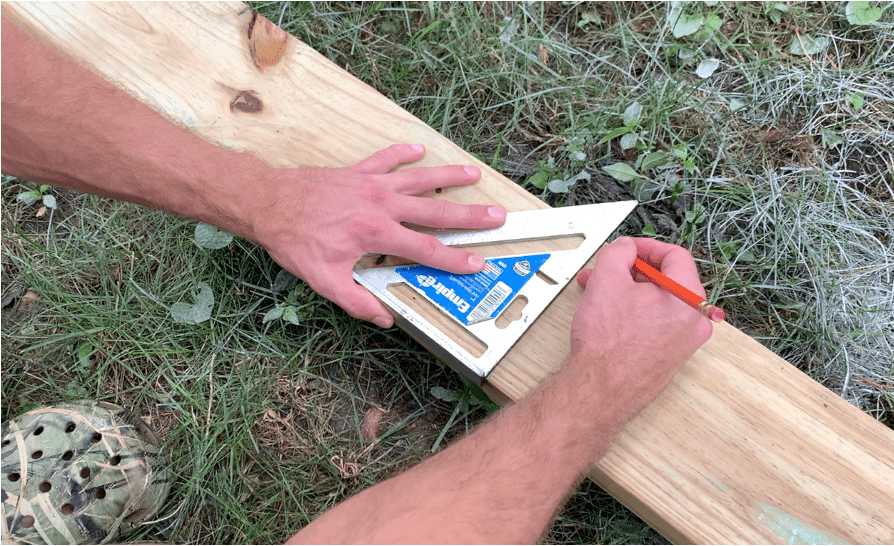
Next, mark 3-1/2” in front of the original mark (towards the front of the shed/rafter) to account for the 2”x4” top plate. Note that a standard 2”x4” piece of lumber is actually 1.5”x3.5”.
As illustrated below, this mark 3-1/2” away from the original mark will illustrate where the rafter will intersect with the top plate.
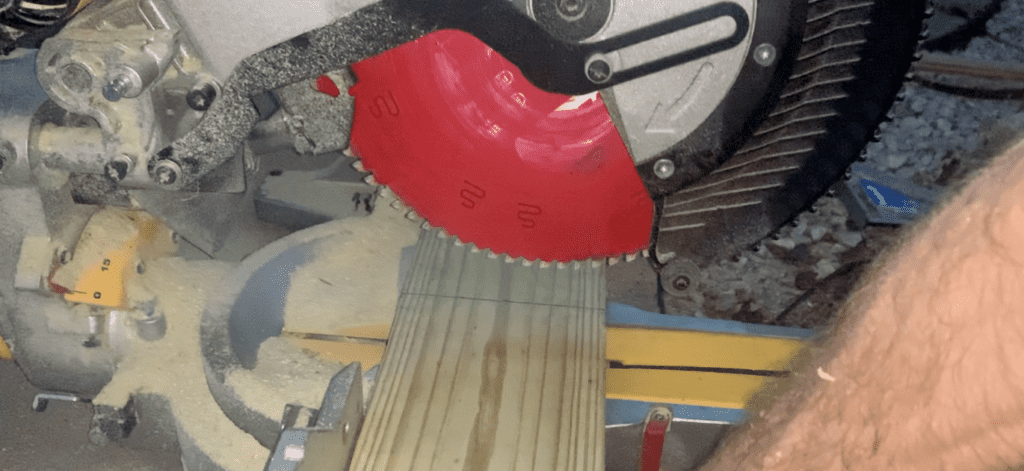
Next, rotate/pivot the carpenter’s square along the pivot point until the “2” is in line with the bottom of the rafter. This “2” indicates a 2:12 Rafter/Roof Pitch – which we will be using for this example.
Once the “2” is in line with the bottom of the rafter, mark the diagonal line.
Once you have the diagonal line marked, use a framing square and position it along the rafter until it is parallel with the diagonal line that you marked in the previous step.
Slide the framing square down the rafter while keeping it in line (parallel) with the diagonally marked line. Keep adjusting the carpenter’s square until it hits the other mark made 3-1/2” away from the birdsmouth mark at the back.
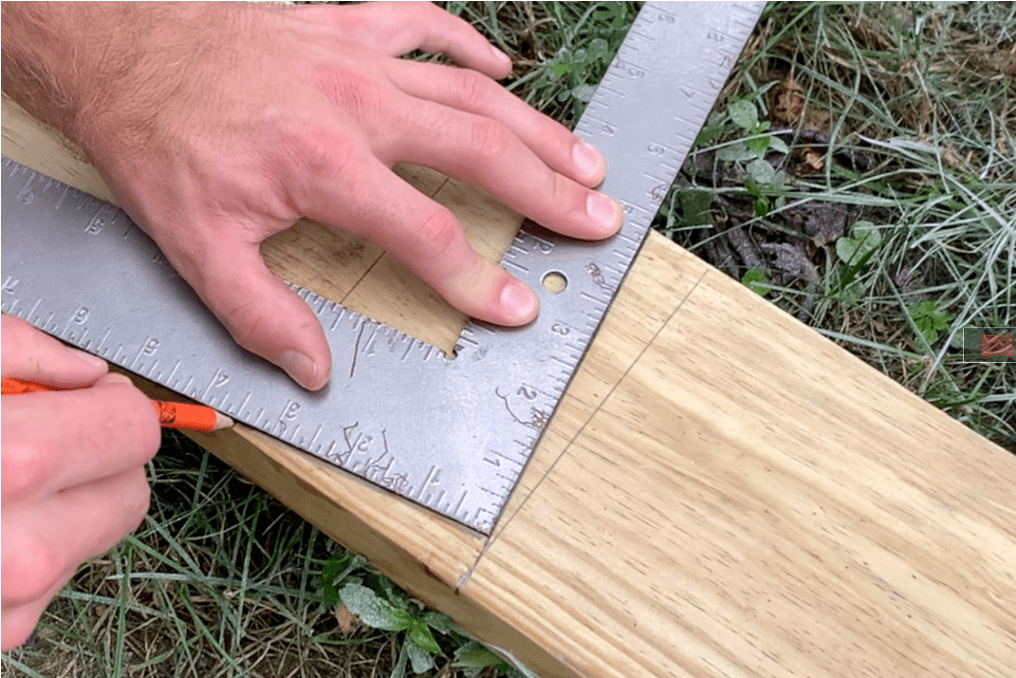
Once the bottom of the carpenter’s square hits the line that was made 3-1/2” away from the original mark, use a pencil to mark this line.
At this stage, the birdsmouth cut at the back of the rafter has been marked. The shaded area (above) indicates the part of rafter that we will need to cut out to make the birdsmouth.
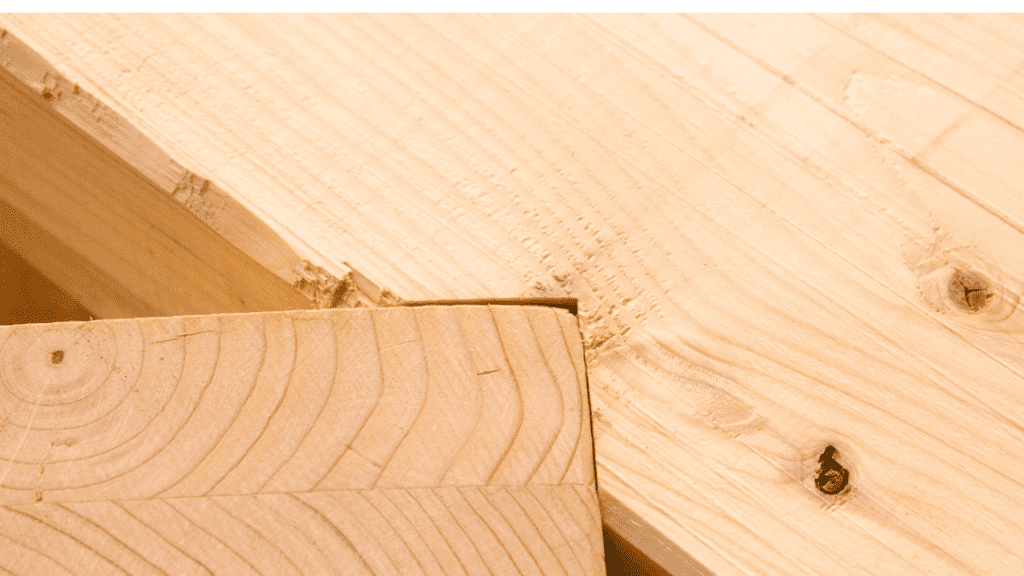
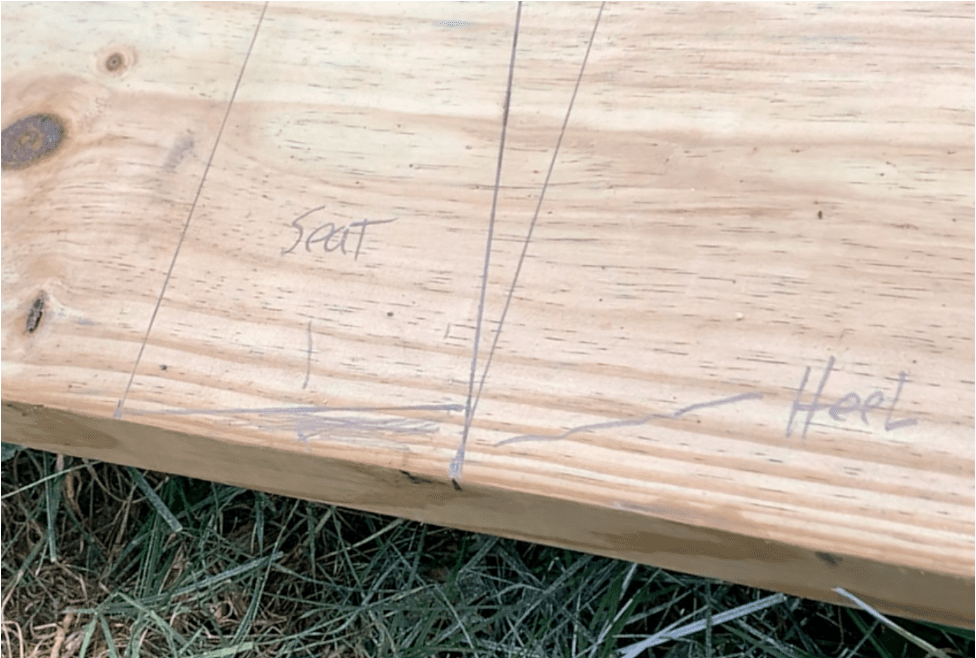
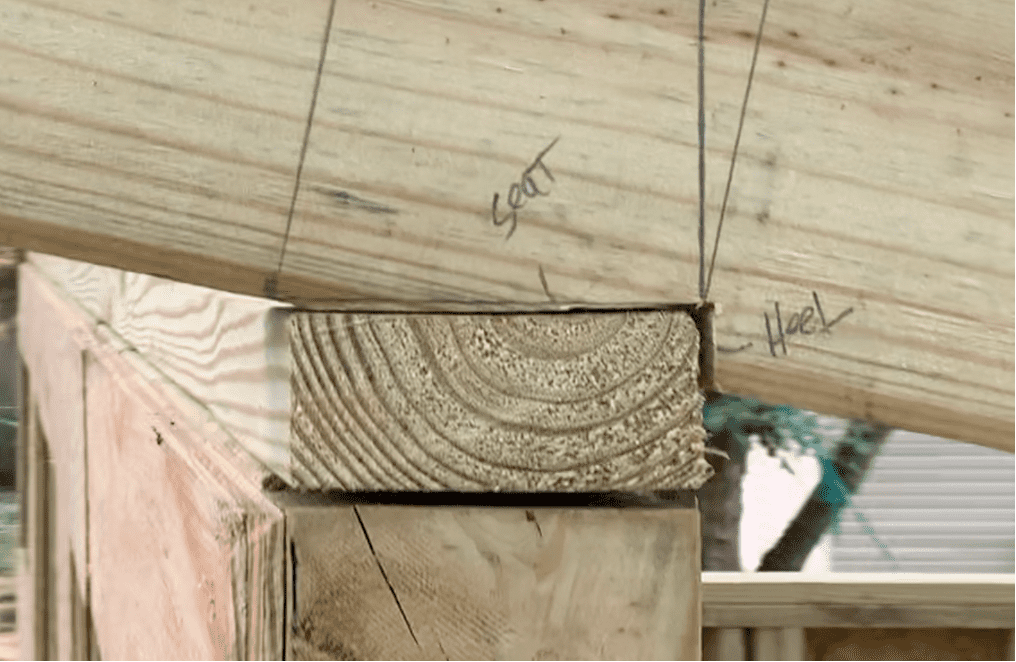
Use a circular saw to cut out the “Seat” and “Heel” of the birdsmouth as shown below.
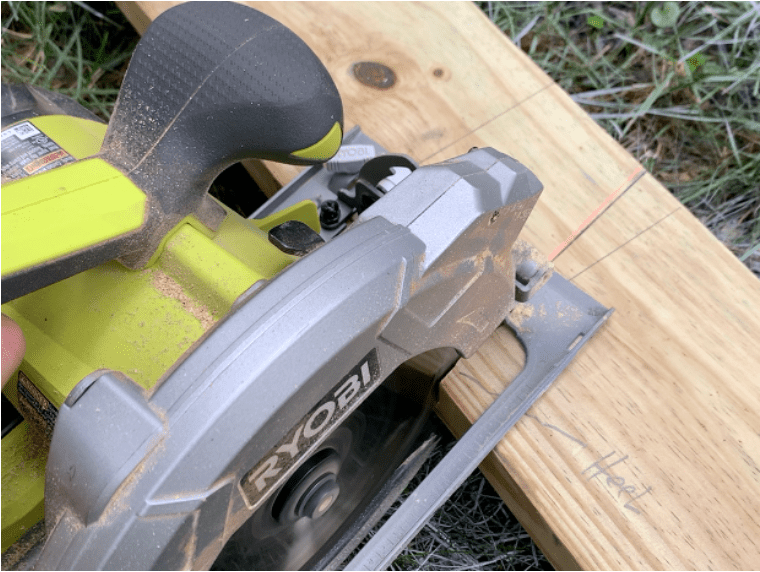
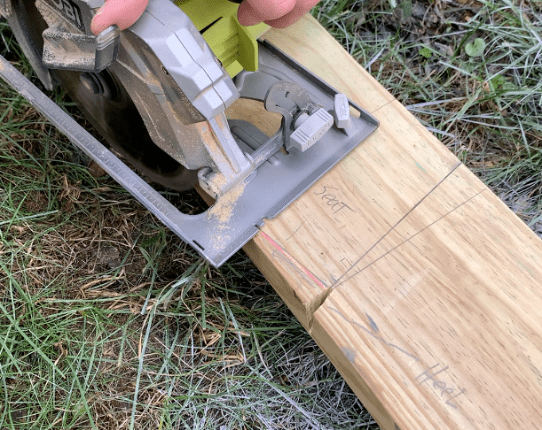
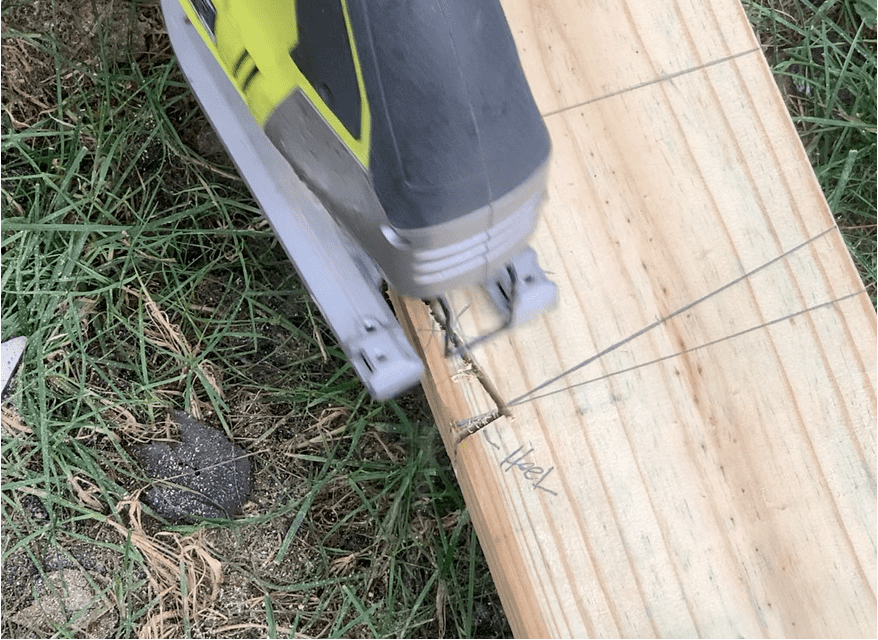
Because these cuts are small, you will likely need to clean up the inside corners of the birdsmouth cuts with a hand saw or jigsaw.
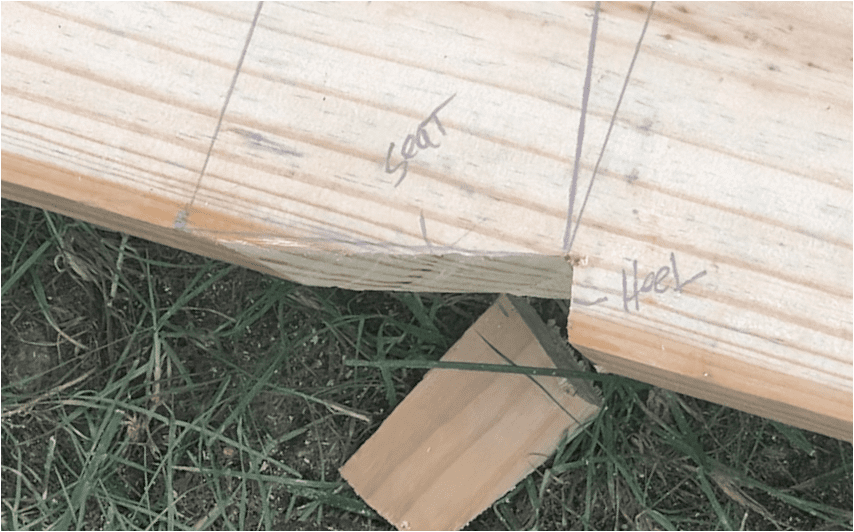
Below is a look at a completed birdsmouth cut on the back of the shed rafter:
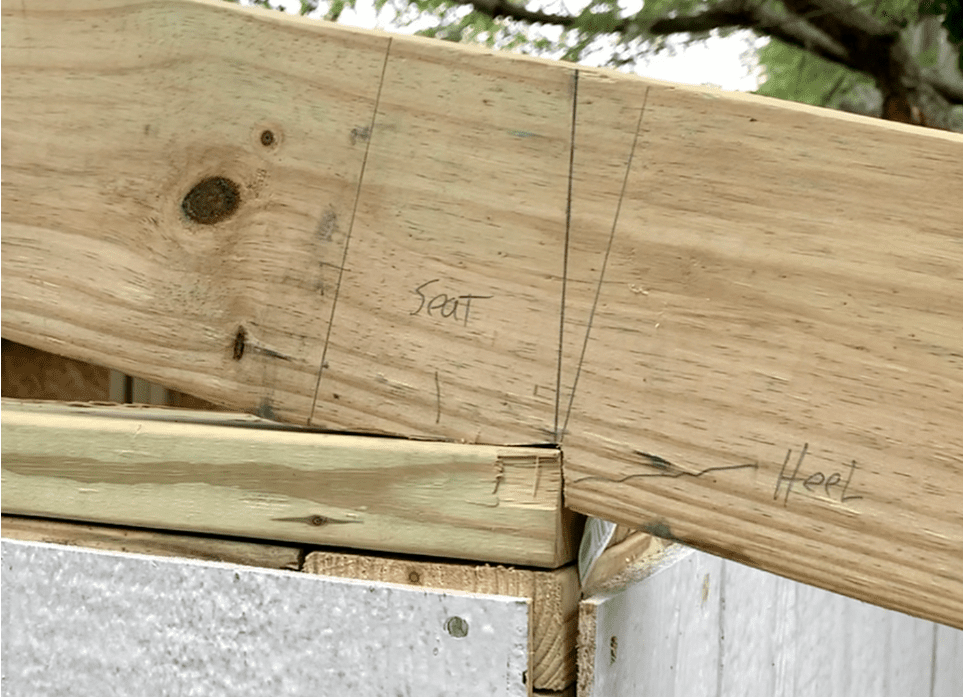
Below is a look at how the birdsmouth cut that rest on the back wall of the shed will look once installed:
After completing the bridsmouth cut at the back of the rafter, move to the front of the rafter and prepare to make the birdmouth cut that will rest on the front wall of the shed.

To make the birdsmouth cut at the front of the rafter, you will follow the exact same steps that were performed for the birdsmouth cut at the back of the rafter.
As a reminder:
- Mark the back line of the birdsmouth cut as a refernce line using a carpenter’s square.
- Mark the front of the birdsmouth cut 3-1/2” in front of the back line for the birdsmouth cut and mark the reference line using a carpenter’s square.
- Place the pivot point of the carpenter’s square on back mark of the birdsmouth cut and pivot the square until the “2” line intersects with the bottom of the rafter.
- Mark this diagonal line on the rafter.
- Use a framing square and position it so that one end is parallel to the diagonal line and that the other end intersects the mark that was made 3-1/2” away from the orginal mark.
- Scribe the line with a pencil.
- Cut out the seat and heel marks of the birdsmouth cut using a circular saw.
- Clean up the cuts (if needed) using a hand saw or circular saw.
By following these steps for the birdsmouth cut at the front of the rafter, you will be left with a birdsmouth cut that rests on the front wall of the shed as shown below:
Below is an alternate view of how the birdsmouth cut at the front of the rafter will look:
After cutting the birrdsmouth cuts on the front and back of one of the shed roof rafters, dry fit it in place on top of the shed. If you are happy with the fit and the birdsmouth cuts land appropriately on the top plate for both the front and back wall, use that rafter as a template board to mark all of the rest of the birdsmouth cuts on the remaining rafters.
Mark the template board and use it to make the birdsmouth marks on the remaining shed roof rafters.

After marking all of the birdsmouth cut lines on the rafters, cut out the birdsmouths with a circular saw and hand/jigsaw as described in the previous steps.
PRO TIP – Cut a few rafters and confirm the fit on the shed. In some cases, you may need to make minor adjustments as you go.
NOTE: Some people will cut the front and backs of the rafters so that the fascia boards attached later are perfectly vertical. To do this, you simply need to mark the same pitch line (2:12 in this case) on the ends of the rafter and cut them off accordingly.
Making Birdsmouth Cuts can a be a bit confusing. I recommend that you check out my “How to Cut Birdsmouths and Frame Shed Roof Rafters” Video below for additional detail.
Position Your Lean To Shed Roof Rafters in Place
At this stage, you will place your shed roof rafters on top of the lean to shed based on the rafter spacing determined previously.
It is recommend that you mark the locations of the rafters on the front wall and back wall top plates all at one time before installing any of the rafters.
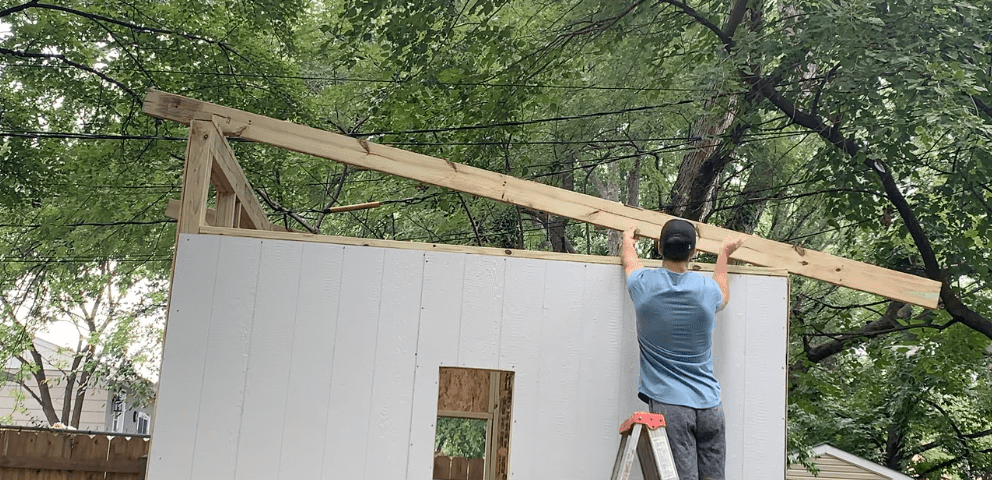
After marking the rafter spacing, lift all of the roof rafters into place:
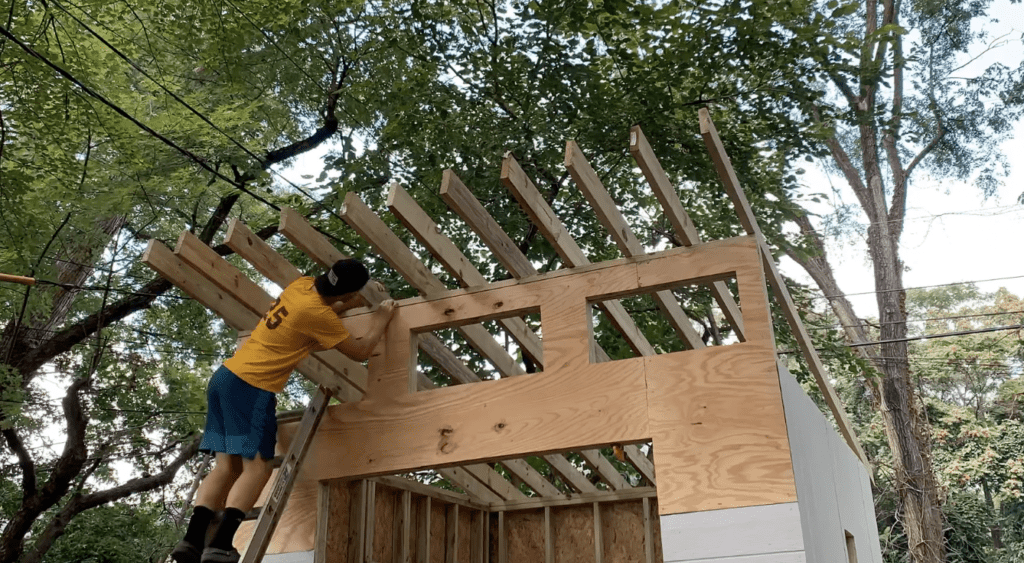
Attach Shed Roof Rafters to Walls with Rafter Ties
After positioning all of the lean to shed roof rafters in place, secure the rafters to the top plate with hurricane or rafter ties. You can also “toenail” the rafters to the top plate with a nail gun, but this not as secure as using hurricane/rafter ties.

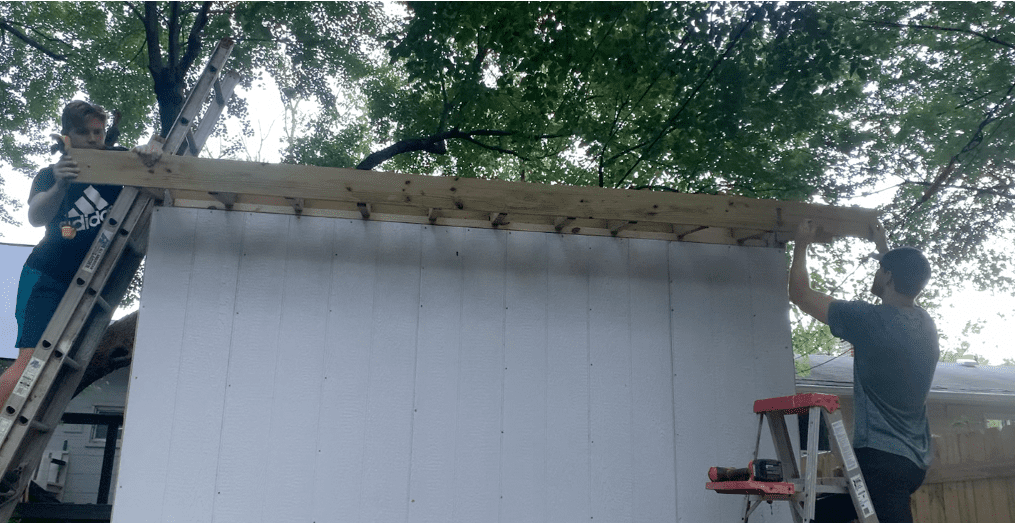
Attach the Fascia Boards
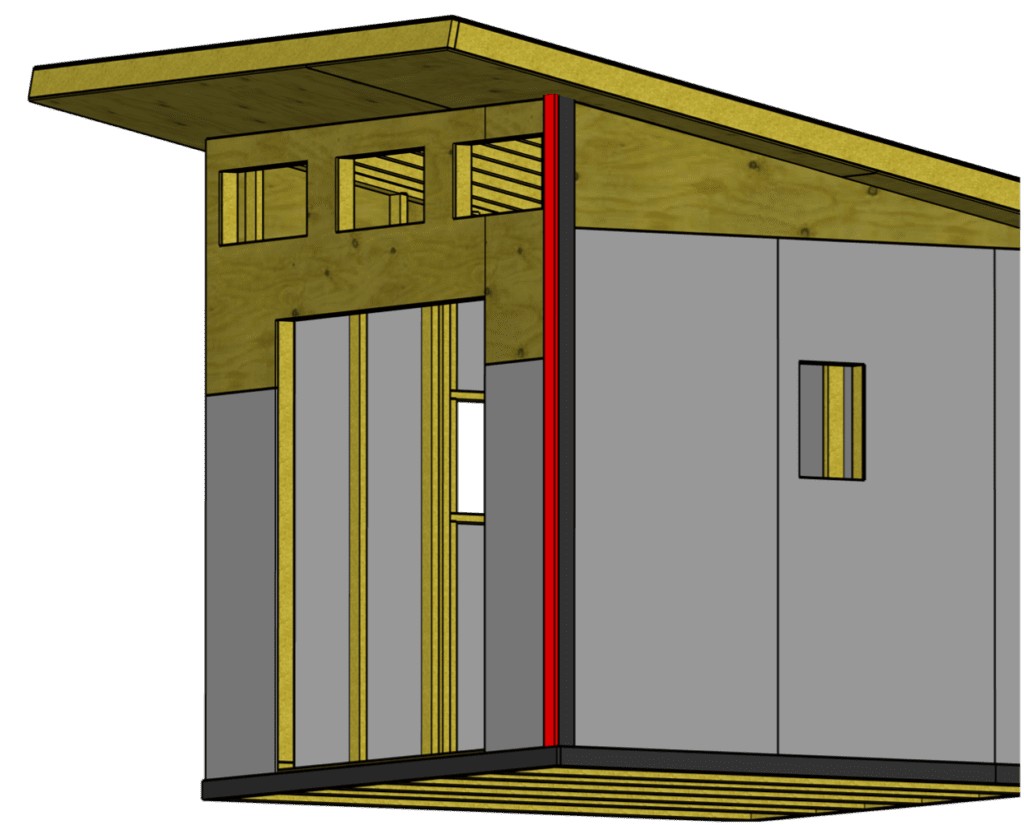
At this point in the shed installation, we will install the fascia boards on the front and back of the shed as shown below:
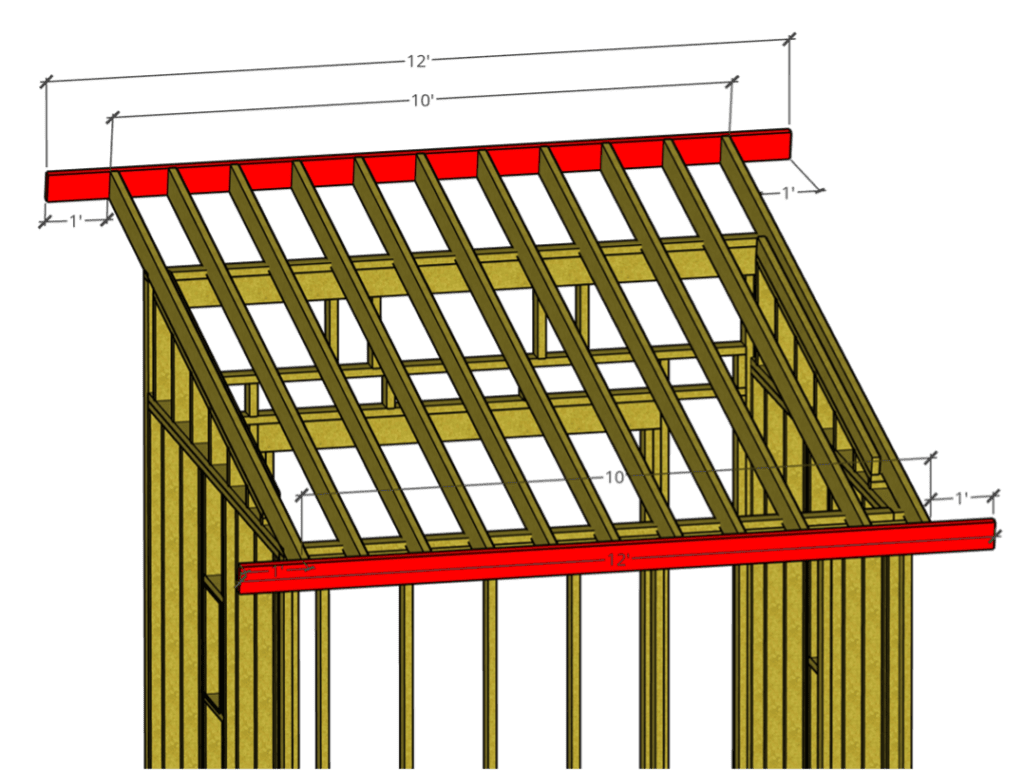
Cut your fascia boards as needed to achieve your desired overhang on each side of the shed. In this example, we have a one foot overhang on each side of the shed.
Mount the first fascia board to the front of the shed rafters leaving your desired overhang (1′ in this case) on each side as shown below.
If you are installing the fascia boards by yourself, you can install a temporary “holding brace” on on side of the rafters as shown below:

After positioning the fascia board in place, attach it to the front of each rafter using a nail gun. It is also recommended that you install a few exterior rated screws through the fascia board and into the rafters for a bit of additional durability.
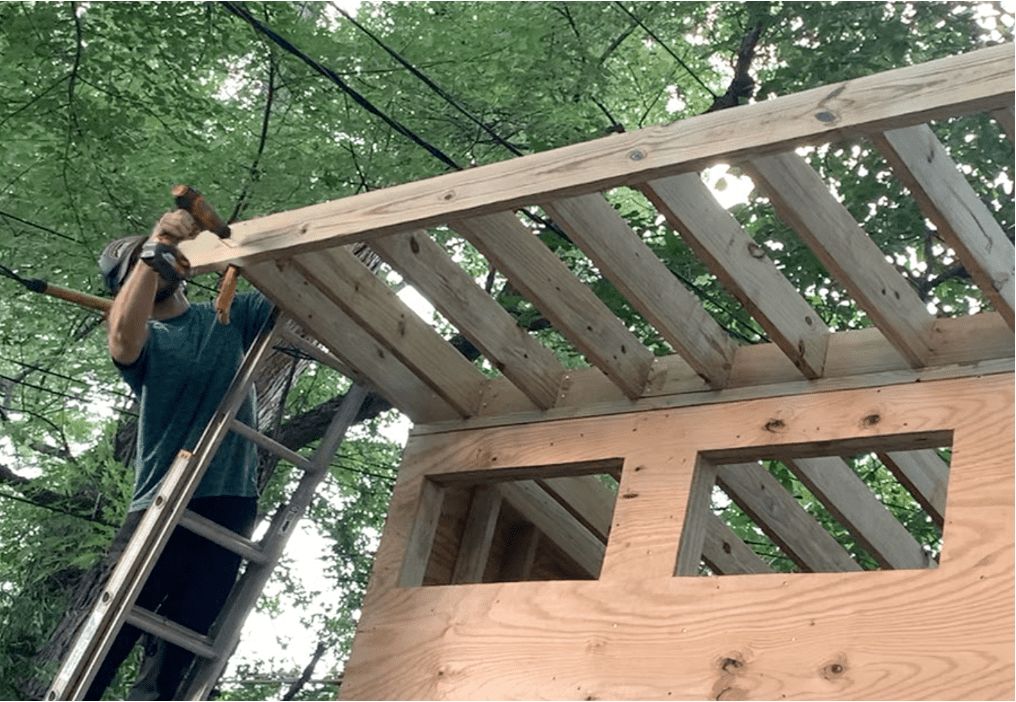
Use a clamp as needed to ensure that the fascia board is perfectly flush with the top/bottom of the rafter it is attached to.
After securing the front fasica board to each rafter at the front of the shed, move to the back of the shed and repeat the same process.
Match the same rafter overhang as was done on the front fascia board, position it in place on the back rafters of the shed, and then attach the fascia board to the rafters.
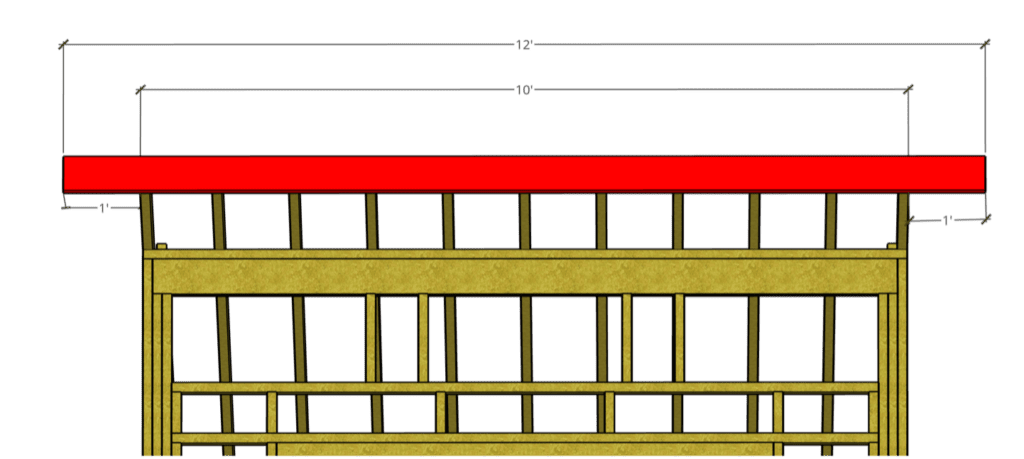
At this stage both the front and back fascia boards have been installed as Shown in red below:
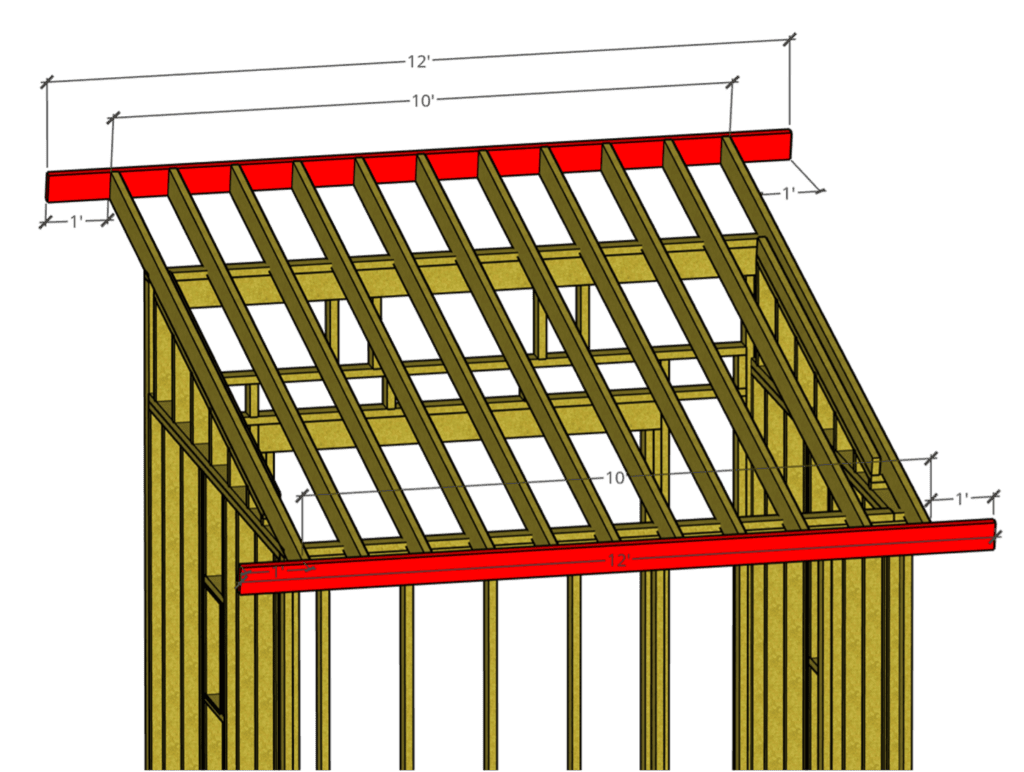
Next, we will install the final two roof rafters.
Install Blocking and Side Rafter Overhang
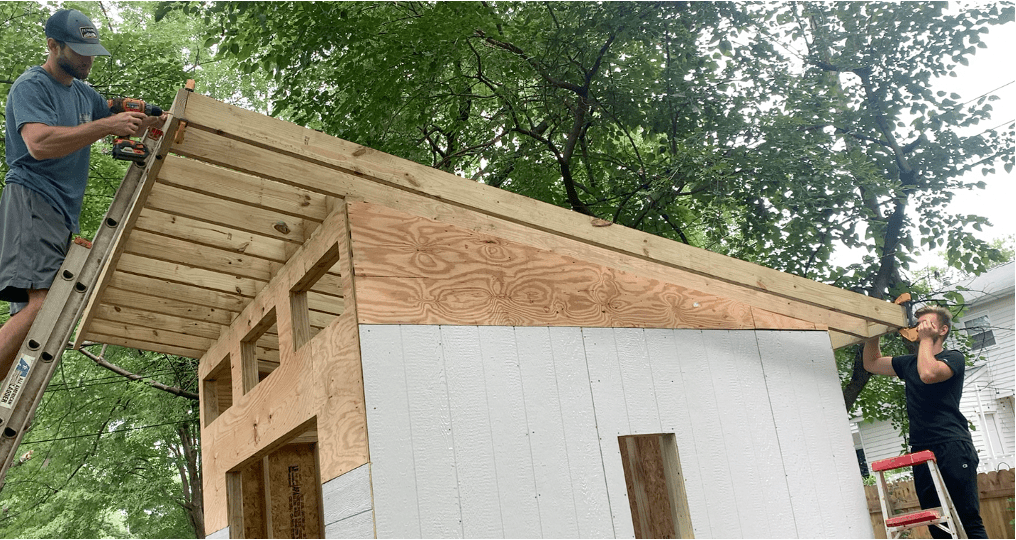
After attaching the fascia boards with the desired overhang (1′ in this case), you can now install the final rafter which will overhang the shed sides by 1’.
Install the rafters between both fascia boards so that they are flush with the end of the fascia boards. Refer to the Figure below:
Use clamps as necessary to temporarily hold the rafter in place while you fasten it to the fascia board. It is recommended that you use exterior rated screws to attach the overhung rafters to the fascia board (for additional strength).
Next, cut blocking to go between the outermost rafters based on your overhang distance.
This blocking will be installed to provide addition support to secure the overhung rafter to the adjacent rafter as shown below:
Maintain the spacing between the blocking needed for your specific shed application.
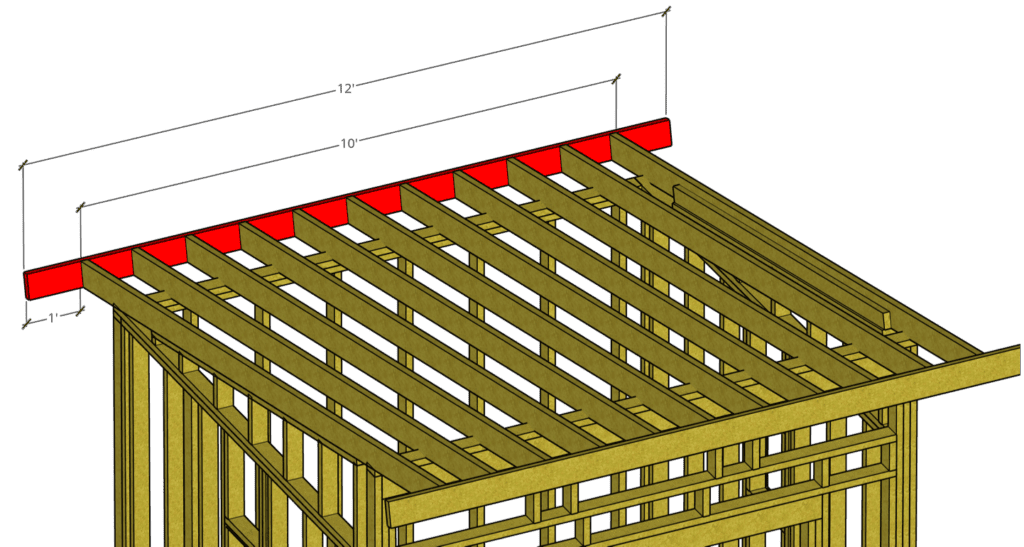
Select your blocking spacing to ensure that the edges of the plywood roof decking (to be installed later) will land directly over a stud/block. Use clamps as needed to temporarily hold the blocking in place and fasten the blocking to the rafters using a nail gun.
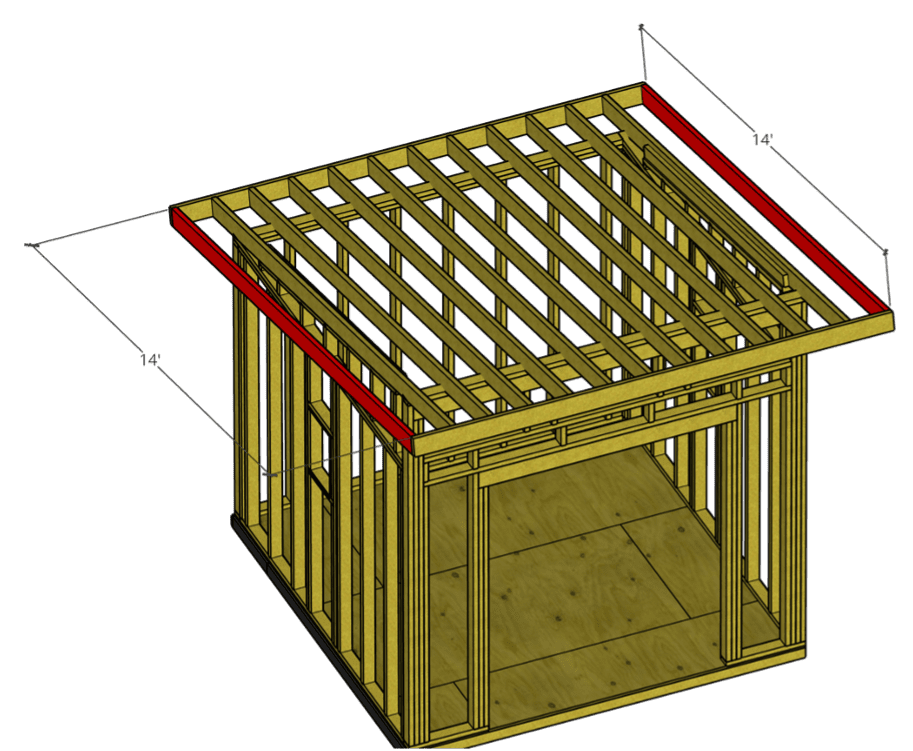
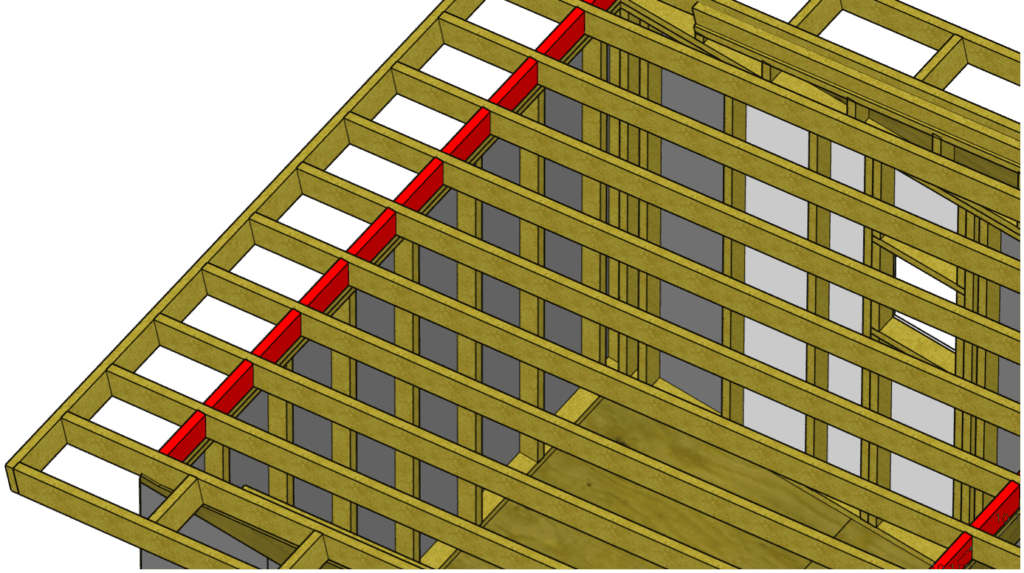
Once the rafters, fascia boards, and support blocking have been installed, your lean to shed roof will look like this:
The last step to complete the lean to shed roof framing is to install blocking between each rafter at both the front and back of the shed as shown in the Figure below:
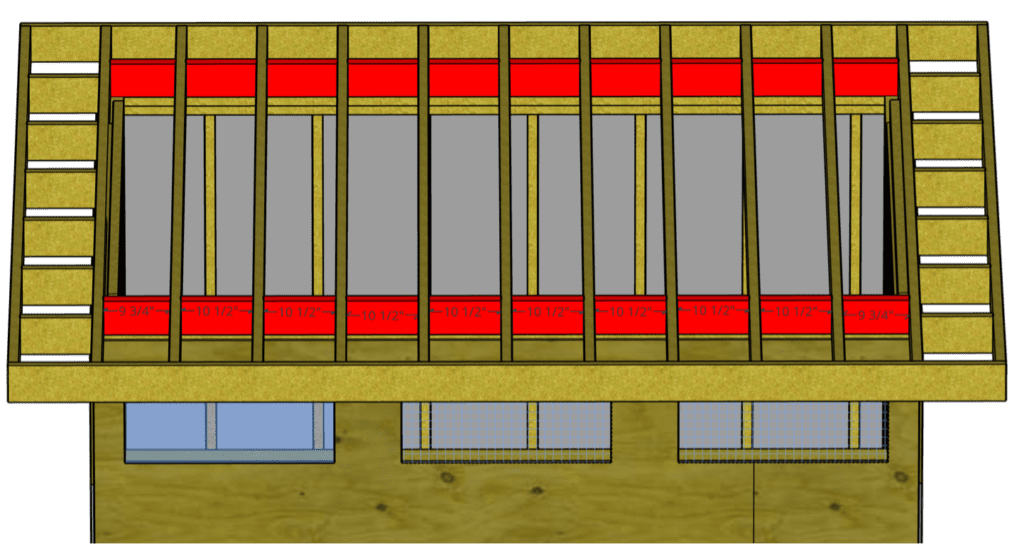
To do this, I recommend that you first trim off approximately ¼” off the width from the blocking lumber to account for the angle of the roof. If you don’t do this, your blocking may extend higher than the rafters, which is not acceptable. Refer to the figure below which shows how a full width blocking board could prevent the shed roof decking from laying flat.
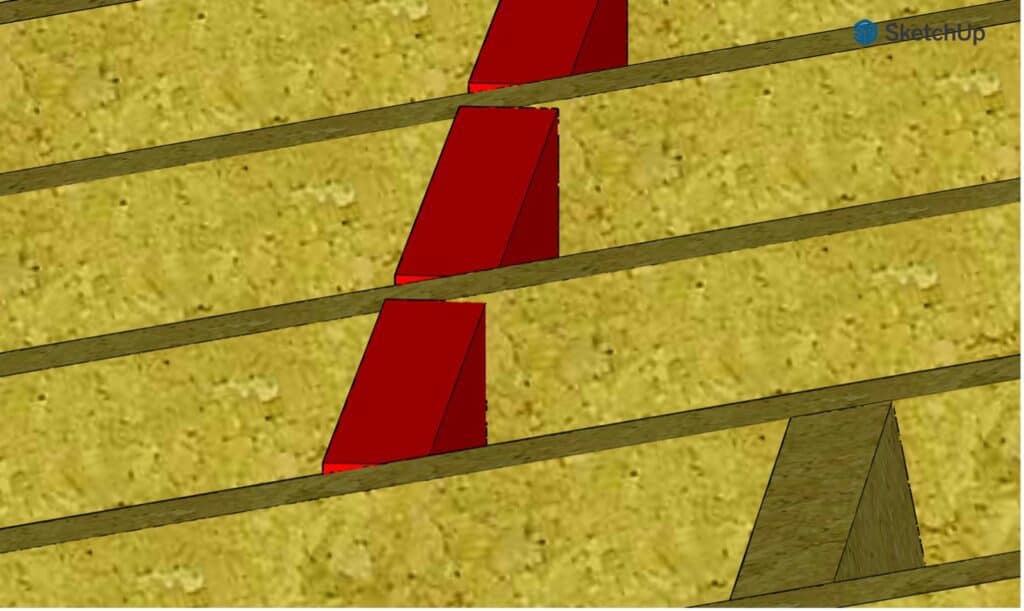
To trim the blocking lumber, I recommend that you run a circular saw along the entire length of a board and then cut the individual pieces of blocking to length.
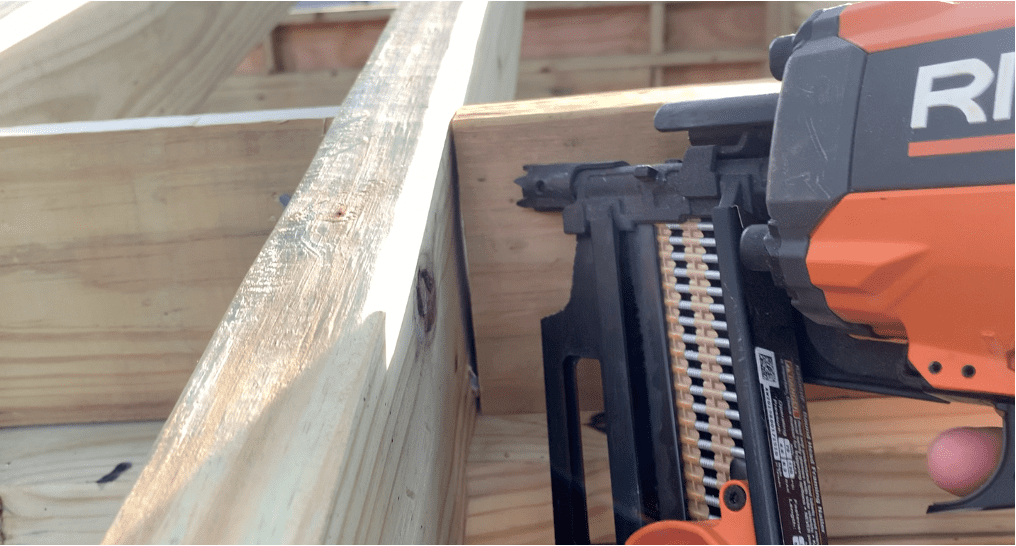
Place each piece of blocking in place between the rafter and attach it to each rafter by toenailing in nails with a nail gun.
Below is an alternate view of the blocking installed at the back wall of the shed.
Once the blocking has been installed between the lean to shed roof rafters, the only thing left to do is install the plywood roof decking.
Install Plywood Roof Decking
At this Stage, your lean to shed roof is fully framed. The last step in the lean to shed roof framing process is to install the plywood roof sheathing. If you planned out your rafter spacing appropriately in the previous steps, your plywood decking layout should ensure that the edges of each piece of plywood land in the center of a rafter. For the example shed described herein, the plywood roof decking layout would look like this:
It is recommended that you install all of the full plywood decking sheets first. Then, fill in the remaining gaps.
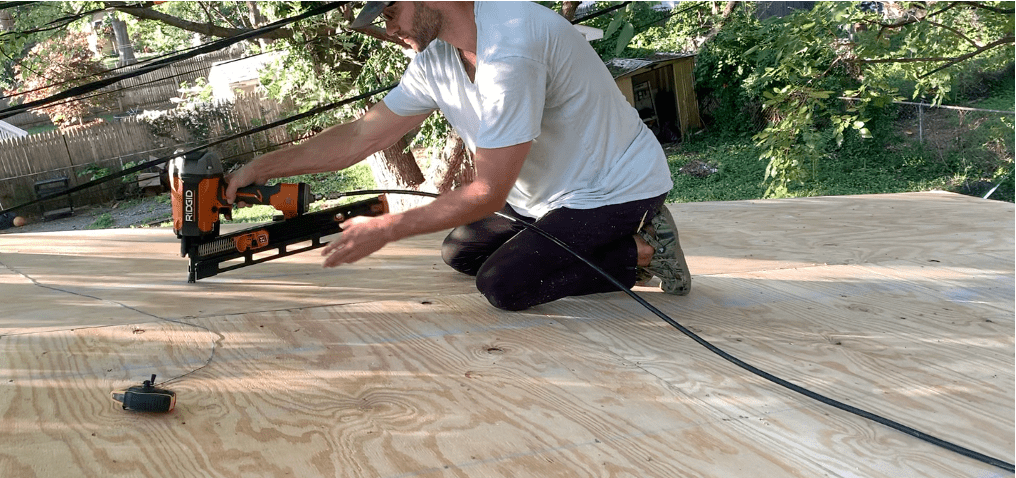
Position the each piece of plywood roof decking so that it is flush with the Fascia Board/Rafter and then attach it to the rafters/fascia boards with a nail gun.
Ensure that the edges of the plywood sheathing land directly in the center of a rafter/piece of blocking.
For the plywood decking that needs to be trimmed, consider dry fitting the plywood sheet in place and marking the cut line from below:
After marking the plywood roof decking cut line, make the cut with a circular saw as shown.
Again, the plywood roof decking edges should land in the center of a rafter/block – as shown below.
After placing all of your plywood roof decking in place, you may find it helpful to run a chaulk line to help identify the rafter location beneath the plywood roof decking.
Install any remaining nails needed to secure the plywood roof decking to the rafters (space nails every 12” O.C.)
At this stage, your plywood roof decking has been installed and your lean to shed roof is fully constructed – as modeled below:

Additional information on how to Frame a Lean-to Shed Roof can be Found on Youtube.
How to Install Asphalt Shingles on a Shed Roof
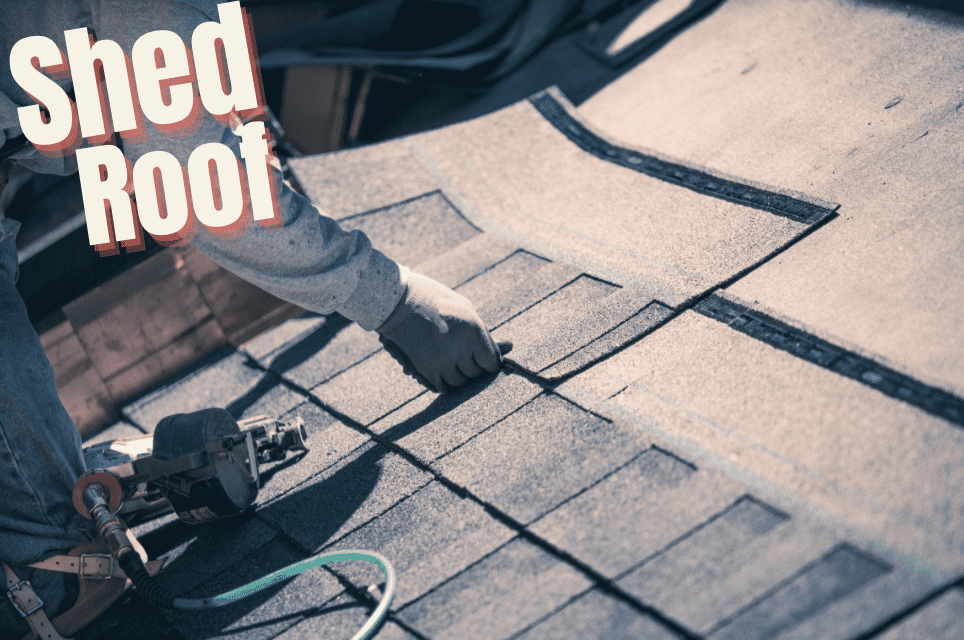
Installing shingles on a lean to shed roof is a relatively simple project that the average homeowner can tackle. Additionally, shingles are a very cost-effective shed roof option that be installed in a few hours.
To install asphalt shingles on a lean to shed roof, start by installing tar paper on the plywood shed roof decking. Next, install the drip edge along the perimeter of the shed roof. Install the drip edge below the tar paper on the Eave (bottom) side of the shed and above the tar paper on the Rake (side) of the shed. Next, Install the starter strip of shingles along the bottom of the shed roof. After Installing the starter strip, install the first row of shingles, attaching them to the plywood roof decking with a roofing nailer. Install 4 nails per shingle or 6 nails if you live in a high wind area. Continue to install each row of shingles until you reach the top of the of the shed roof. Install the final piece of ridge flashing over the shingles and front fascia board, attaching it in place with roofing nails and asphaltic coating.
The following sections will outline each step of asphalt shingle installation process.
Understanding the “Anatomy” of a shed roof:
Before, proceeding with the shed roof shingle installation, let’s spend some time defining the “anatomy” of a shed roof. The sides of the the shed roof are knows as the “Rake”. The front of the shed is referred to as the “Ridge”. The back of the Shed is referred to as the “Eave”. Refer to the figure below for a visual representation of the Ridge, Rake, and Eave of the shed.
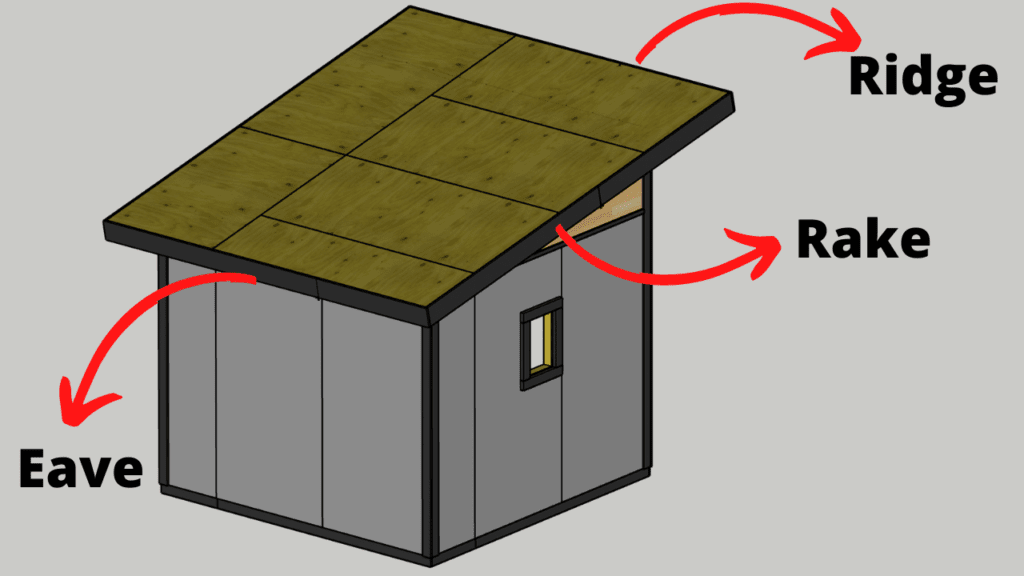
We will be referring to these terms a lot throughout this guide, so it is important to define them before proceeding.
Determine the Number of Shingles You Will Need
The first step in any shed roofing project is determining the roof square footage. Measure the length and width of your shed roof and multiply them together to determine your total square footage.
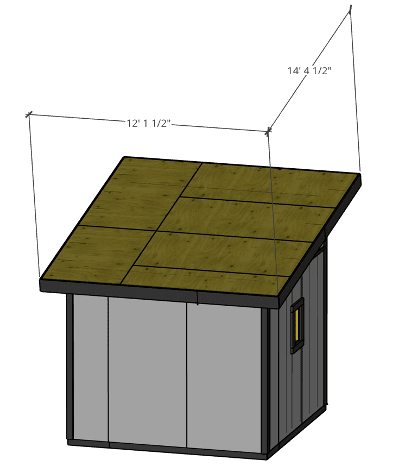
In my case, the length is 14’-4 ½” and the width is 12’ – 1 ½”. Multiplying them together, we get a total square footage of 175 SF.
Next, determine the coverage per bundle of shingles you plan to install. Typically, shingle bundles cover approximately 33.3SF per bundle. Therefore, divide you total square footage by the SF covered by bundle to determine the total amount of shingle bundles you will need. It this case, 175SF / 33.3 SF gives us 5.25 bundles. Therefore, I would need to order 6 bundles of shingles in order to cover the entire Shed Roof.
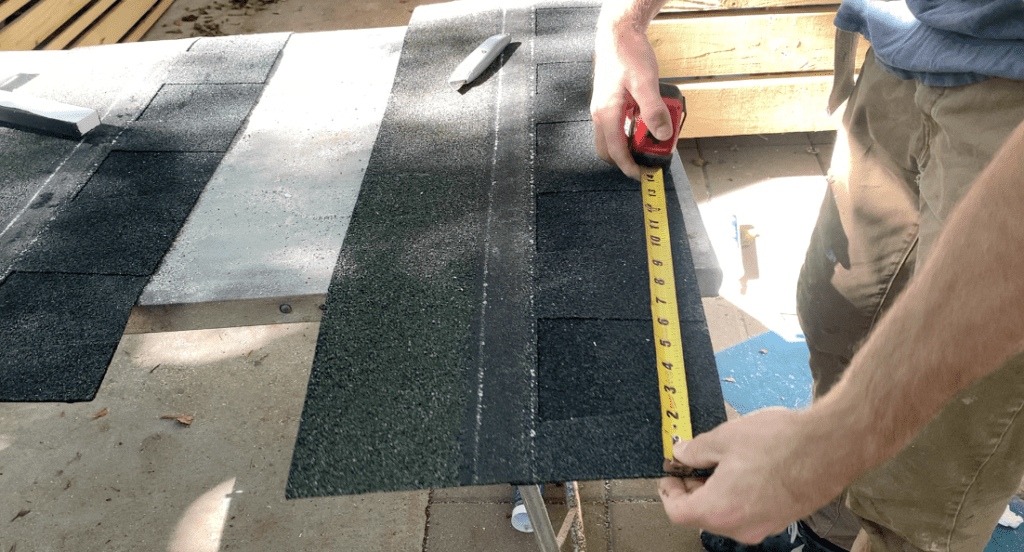
You will also need to account for the amount of “starter strip” you will need for your roof installation. To do this, measure the width of the shed. In our case, this is 12’-1 ½”. Typically, shingles are 39 3/8”, so we would need 4 shingles if we were going to make our own starter strips (don’t worry – this will be explained in more detail later).
Since we only need 5.25 bundles to cover our roof’s SF and we are ordering 6 bundles, we will have enough leftover shingles to make our own starter strips. Keep this in mind as you order your materials.
You also have the option to purchase pre-made started strips from your local home supply store (we will discuss this later).
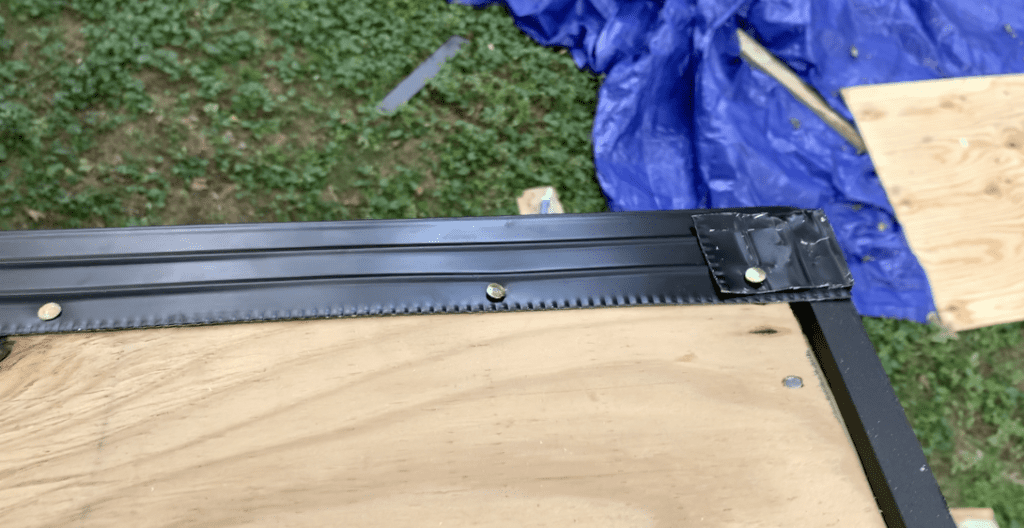
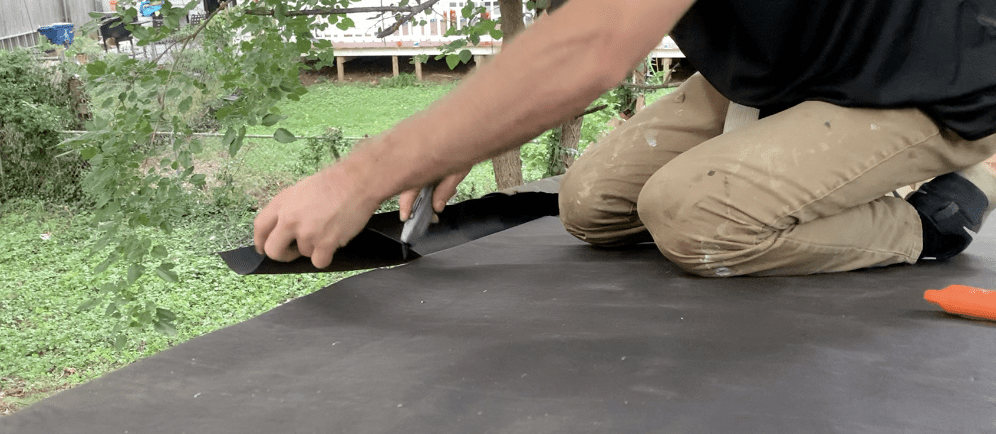
Install the Drip Edge on the Eave (Back) of the Shed Roof
The first step in the shed roof installation process is to install the drip edge on the “Eave” (back) of the Shed roof.
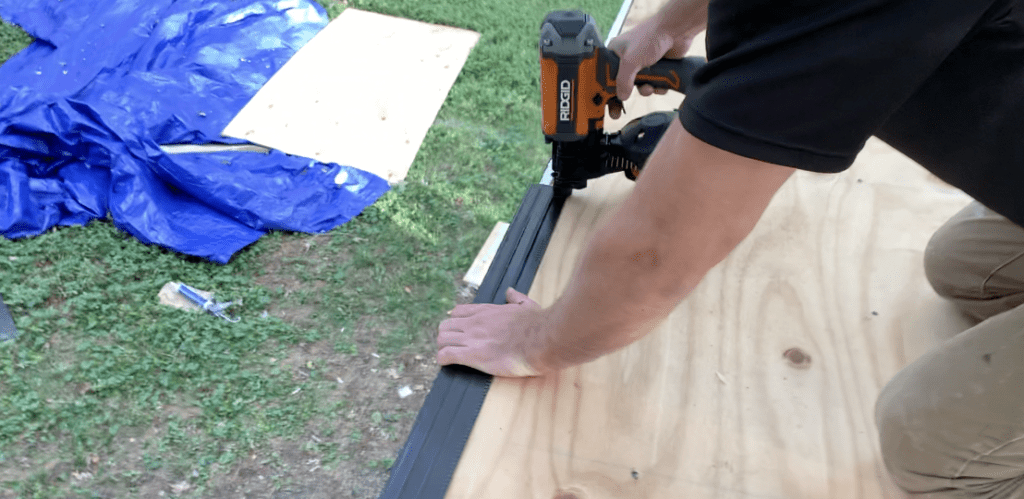
Drip Edges are typically made of non-corrosive metal and are nailed directly to the plywood roof sheathing. The purpose of the drip edge is to protect your shed roof fascia board by directing any water that drips off the roof away from the fascia board.
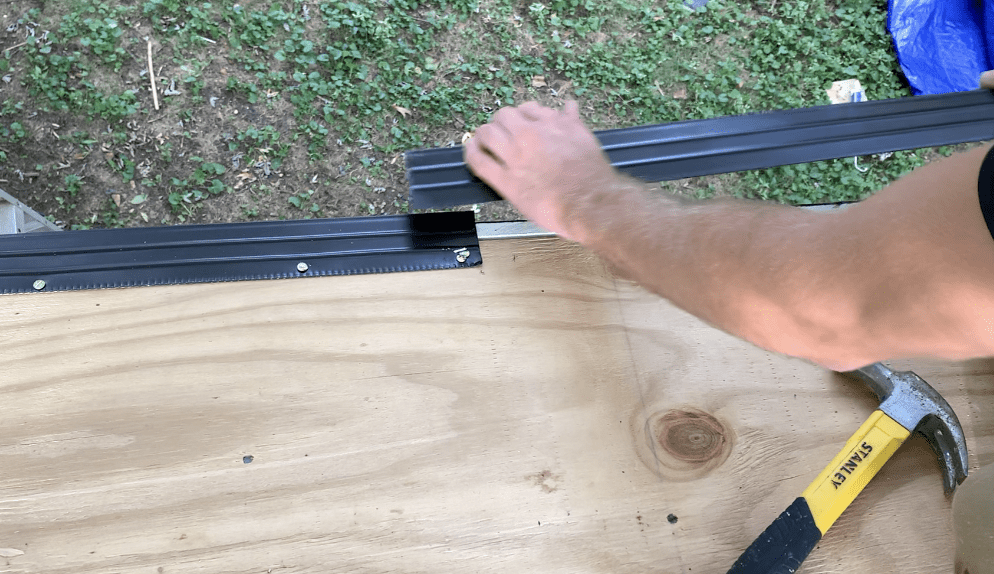
In the event that your drip edge does not span the entire width of your shed eave, overlap the second piece of drip endge over the first drip edge by a minimum of 4”.
At the corners of Eave/Rake intersection, it is sometimes recommended to bend the drip edge at a 90” degree angle so that you have a surface you can mount your rake edge drip edge upon.
To create this 90″ angle, cut the top of the drip edge with tin snips and bend the drip edge 90 degrees with pliers.
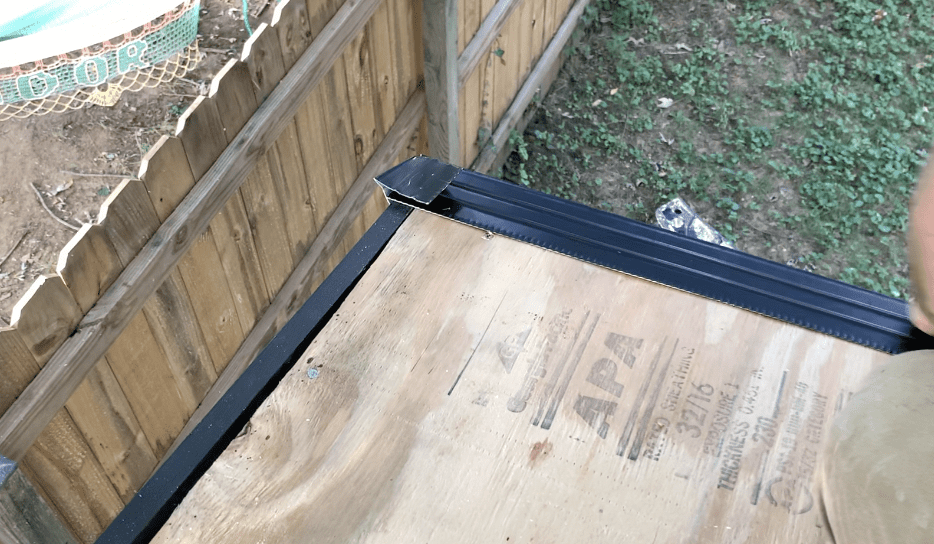
It is recommended that you install a nail at the corner of the drip edge – as shown below:
After installing the drip edge on the Eave of the shed roof, you can begin installing your tar paper.
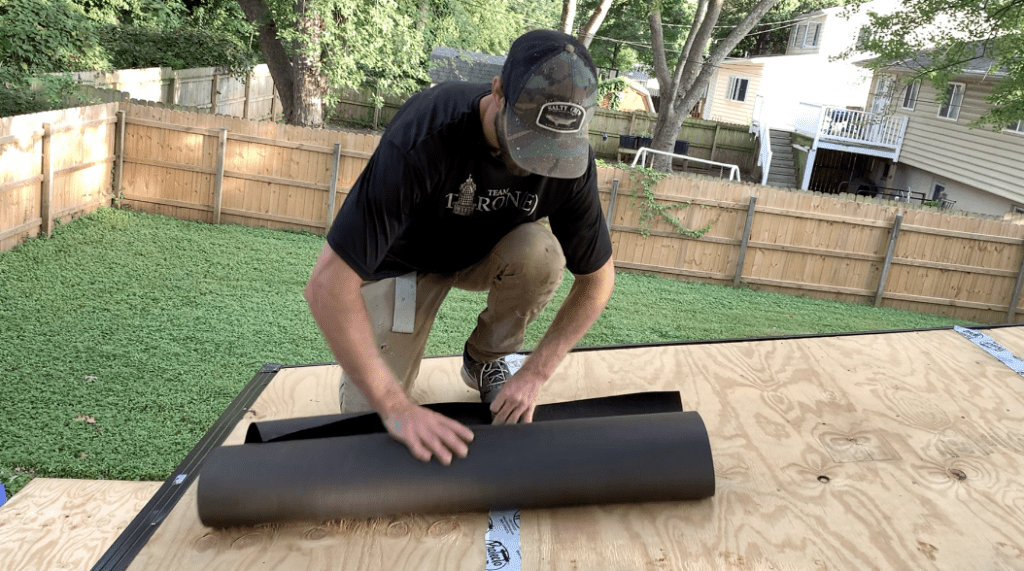
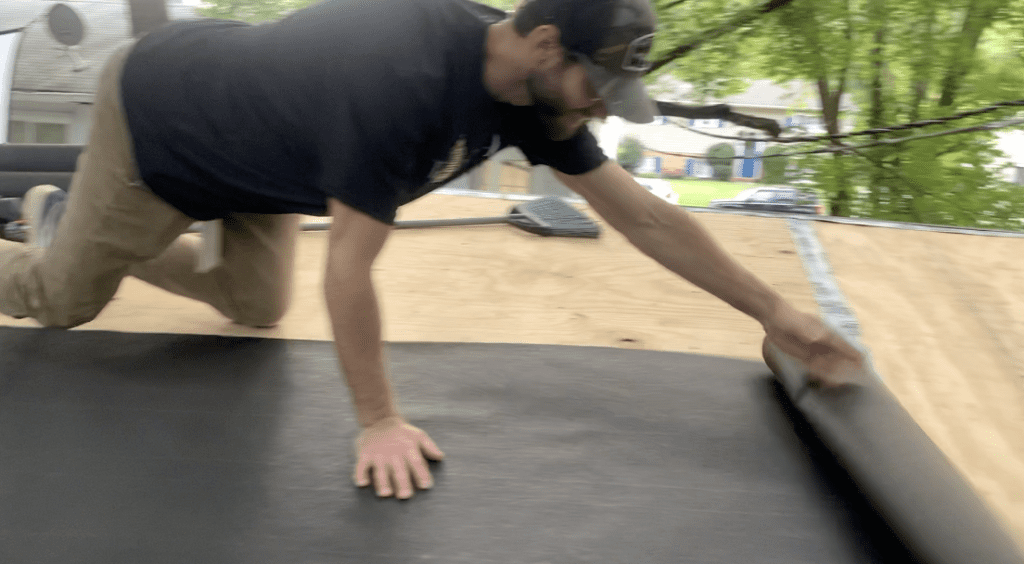
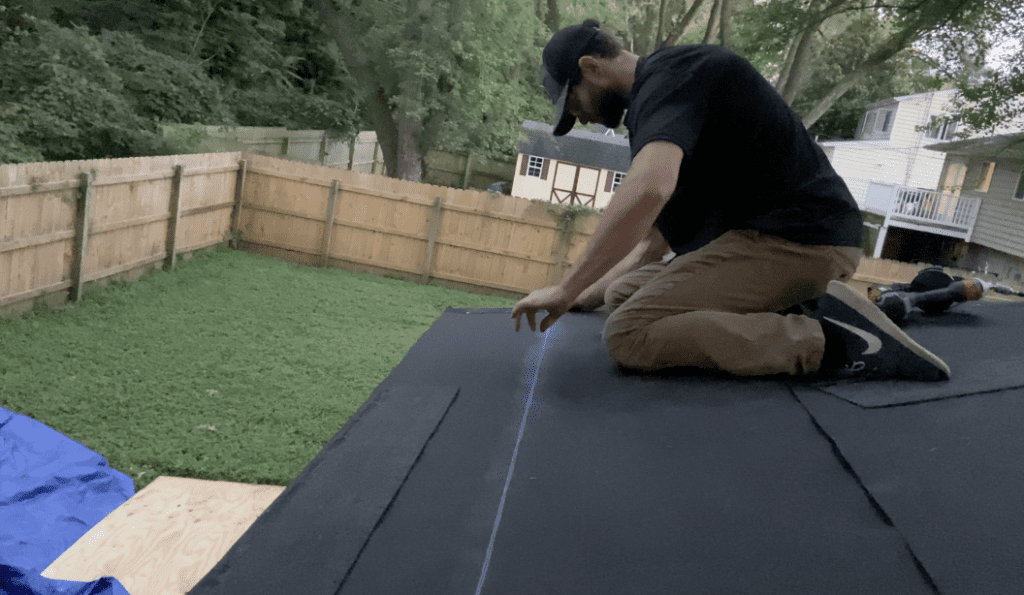
Install Tar Paper (Underlayment)
Tar paper is a thin layer of waterproof material that serves as waterproof barrier between the plywood roof decking (below) and the shingles (above).
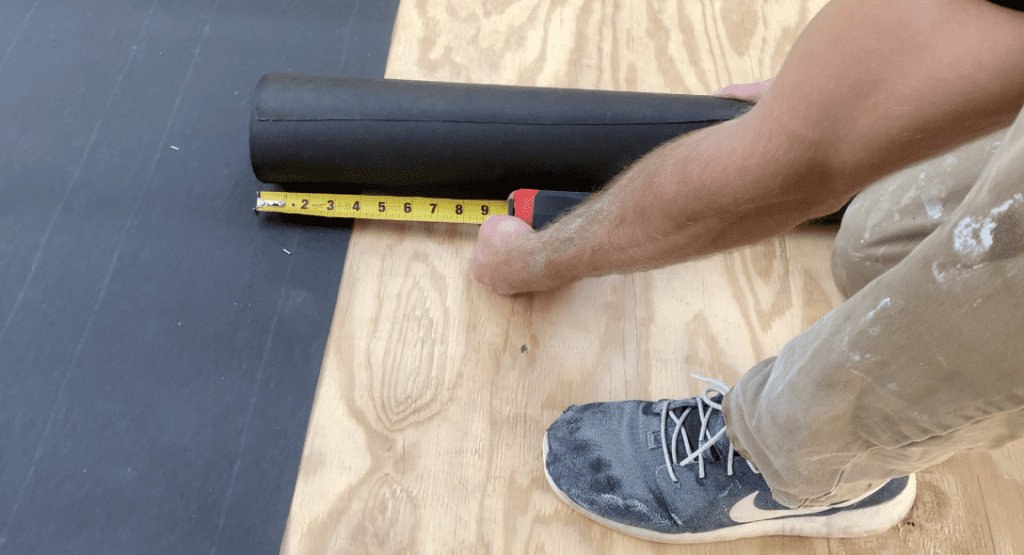
To install tar paper, start at the bottom of the shed roof (eave side) and place the tar paper such that there is a 1/8” overhang (1/4” max) past the previously installed drip edge on the eave of the shed roof.
PRO TIP – Leave a few inches of tar paper overhanging the rake edges of the shed roof. You can trim off any excess later with a utility knife.
Install the first row of tar paper within the tolerances listed above and attach the tar paper to the plywood decking below with staples or nails.
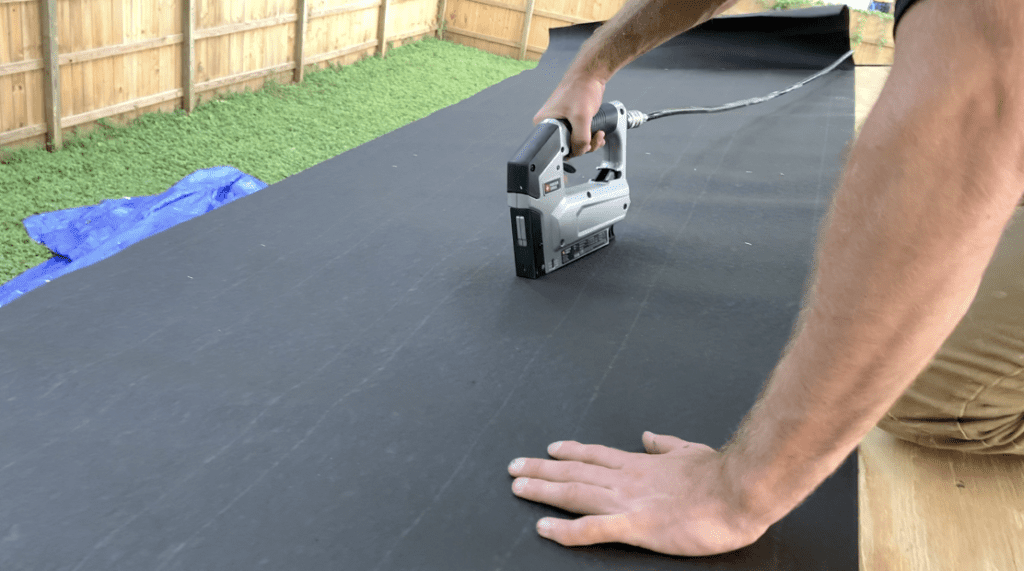
Install the next row of tar paper on top of the previously installed row – allowing for a 4-6” overlap.
This tar paper overlap will ensure that any moistures contacts the tar paper will be able to freely drain towards the bottom.
Repeat this tar paper installation process up the entire length of the roof.
Once you reach the top of the roof, trim the tar paper so that it is flush front fascia board at the ridge of the shed roof.
At this point, go back and trim any overhanging tar paper on the rake edges of the roof. Trim the tar paper on the rake edge of the roof so that it is flush with the fascia board.
After installing the tar paper over the entire shed roof plywood decking, you can begin to install the drip edge on the rake edges of the shed.
Install Drip Edge on the Rake Sides of the Shed
After installing all of the tar paper, Install the drip edge on the rake edges of the roof.
Remember – The drip edge is installed ON TOP of the tar paper on the rake edges and UNDERNEATH the tar paper on the eave edge.
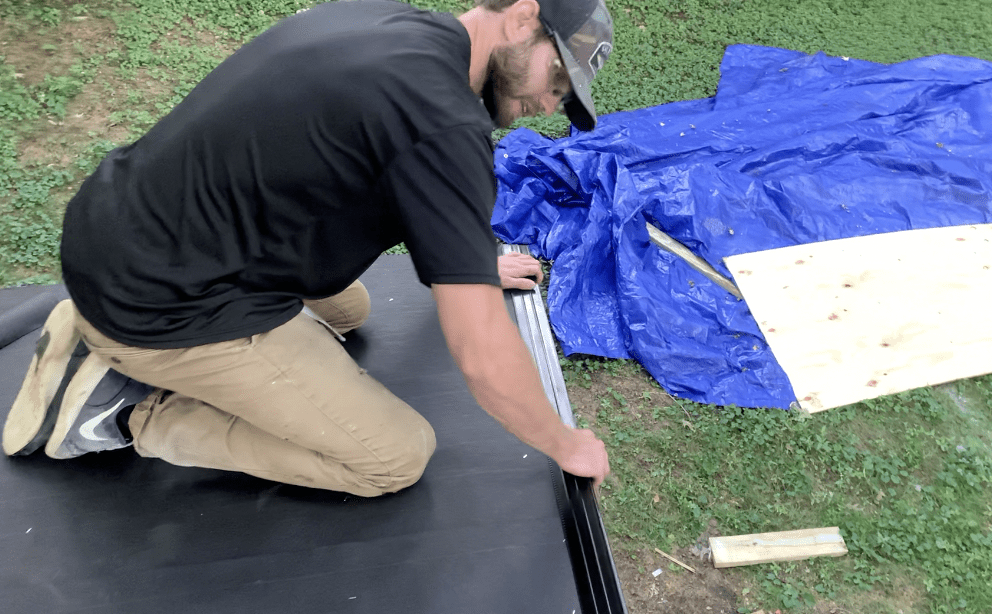
Similarly to the eave edge, install the drip edge on the rake edge of the shed roof – securing it to the tar paper and sheathing with roofing nails.

Again, if your shed side requires more than one piece of drip edge, overlap the bottom piece by the top piece of drip edge by a minimum of 4” to allow for correct drainage.
Overlap the drip edge of the rake with the angled piece of drip edge from the eave side that was cut at an angle.
Trim or position the drip edge as needed to that it is flush with the front fascia board at the ridge of the shed roof.
Once the drip edge has been installed at the eave and rake edges, you can install your starter strip of shingles.
Installing the Shingle Roof Starter Strip
Before you can begin installing the first course of asphalt shingles, you must install a starter strip (also called a starter row) on the Eave edge of the shed roof.
PRO TIP – In high wind areas it is sometimes advisable to install a starter strip on the Rake edges of the shed as well. You also have the option to secure the rake side shingles to the underlayment using asphaltic plastic cement. This will be discussed later in the article.
The starter strip (or starter row) is absolutely necessary for all shingle applications since it facilitates the roof’s water-shedding function by covering the joints left by the first row of shingles.
As mentioned previously, you can purchase pre-made starter strips or you can create your own starter strips using shingles.
Since a shed typically only requires a few linear feet of starter strip to cover the eave edge, it is often more economical to make your own starter strip using full shingles.
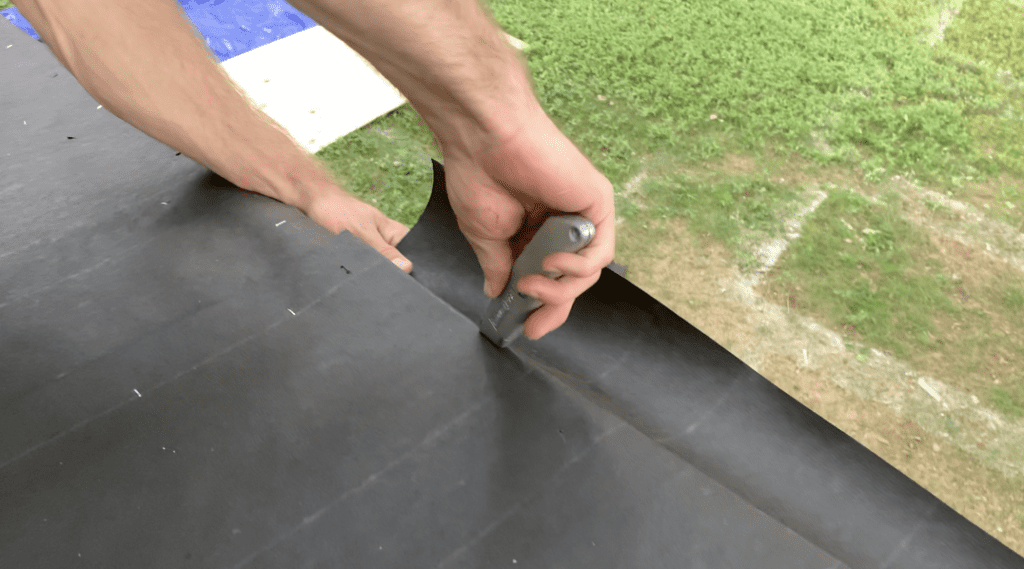
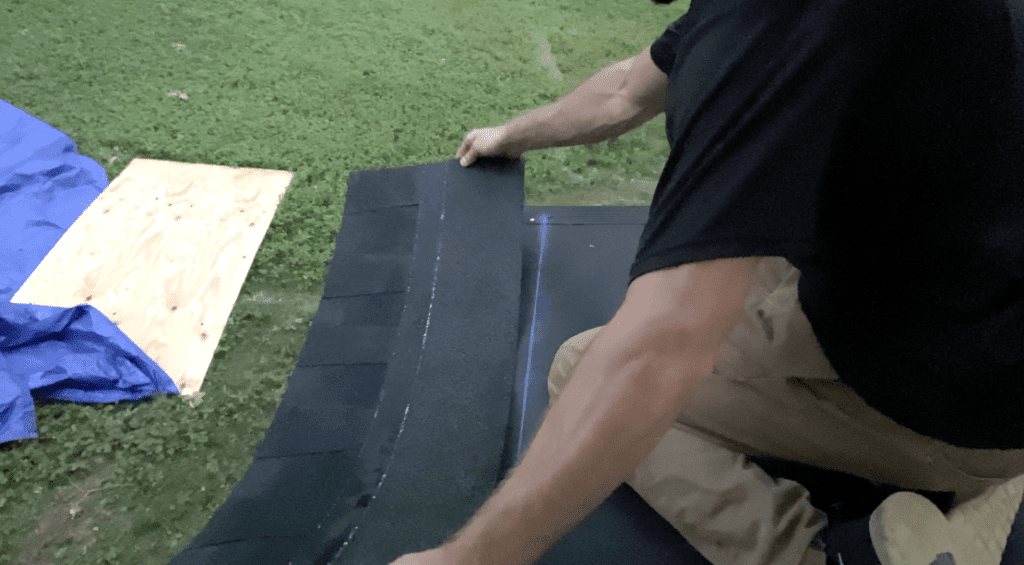
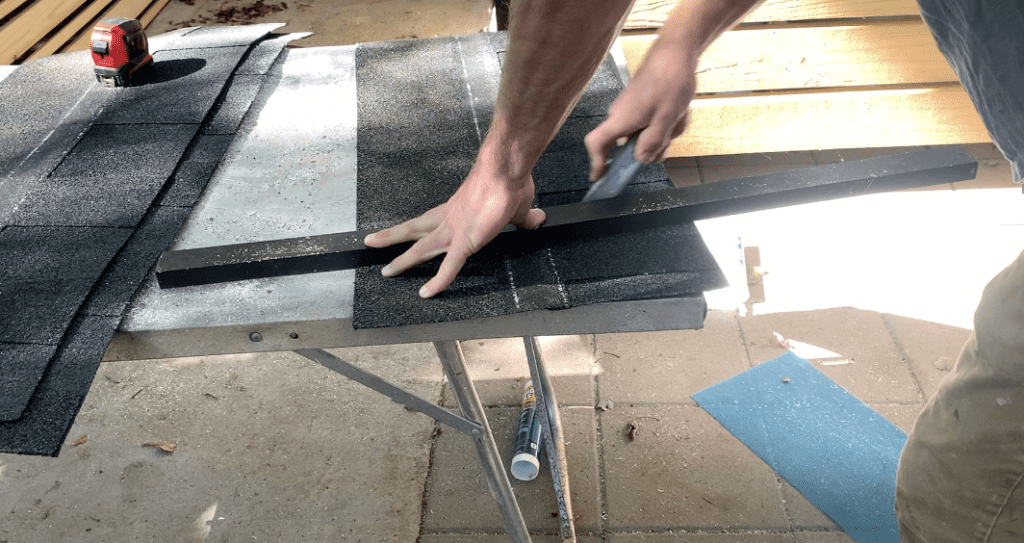
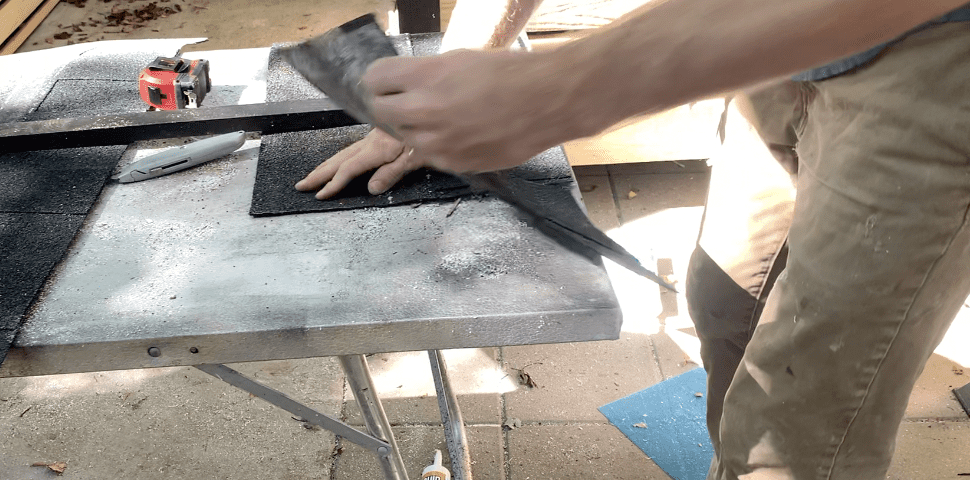
To create your own shed roof starter strip, cut the shingle in half (length wise) using a utility knife. It is often helpful to flip the shingle upside down and use a utility knife and a straight edge to accomplish this.
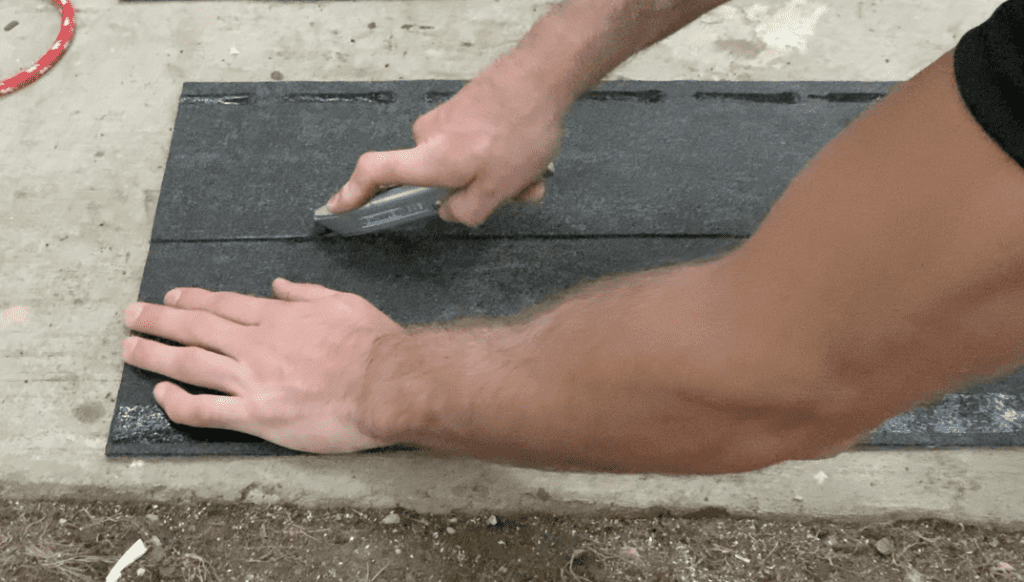
Repeat this process for as many starter strips you need to cover the eave edge of your shed. After cutting all of your starter strips, you can begin the installation.
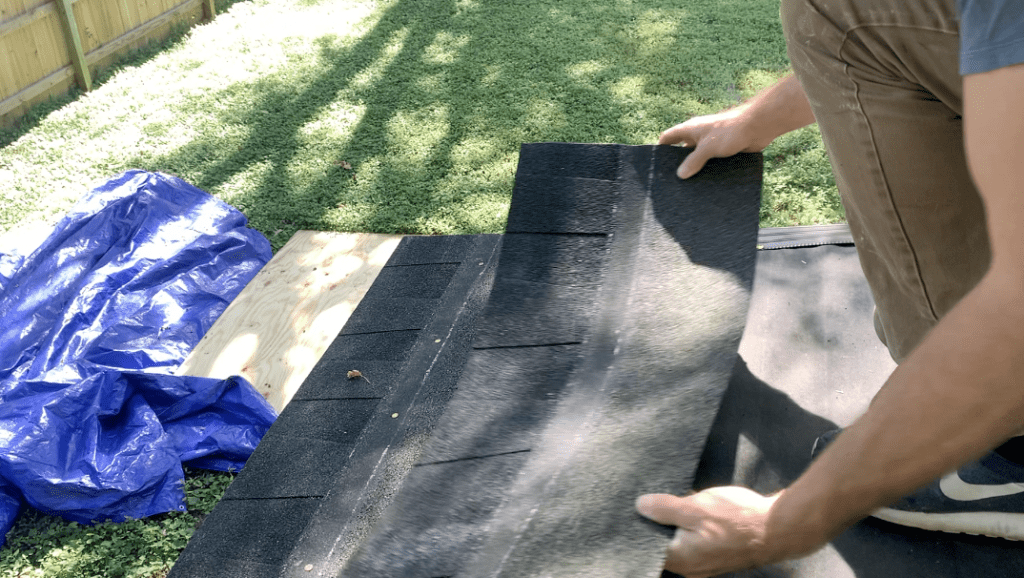
For the first starter strip, trim off approximately 4” from the length prior to installing. This will ensure that the joint from the full shingle installed on top of the starter strip (next step) will be 4″ away from the starter strip joint.

Place the starter strip so that it overlaps the eave and rake drip edges by approximately ¼” – ½”.
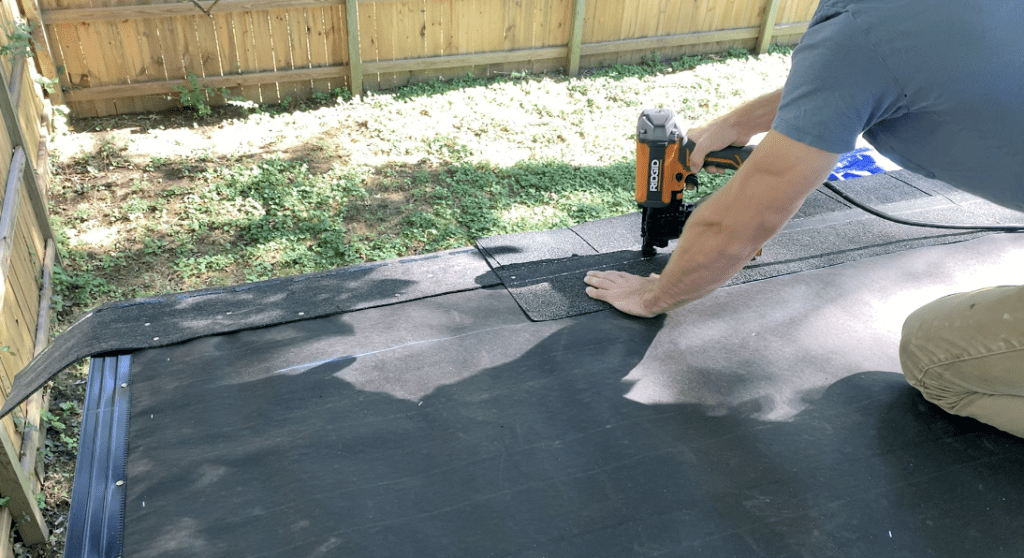
Next, secure the first starter strip segment in place by nailing it through the tar paper and plywood roof decking approximately 2.5” above the (bottom) of the starter strip. Ensure that the adhesive on the starter strip is oriented towards the bottom of the shed – as shown. This will adhere the shingles installed on top of the starter strip to the starter strip.
Continue installing the starter strip along the eave edge of the shed roof, butting each adjacent starter strip up flush to the adjacent starter strip and nailing them into place.
Continue positioning and nailing the starter strip in place along the eave edge of the shed until the entire eave is covered. It is acceptable to leave the starter strip overhanging the rake side of the shed. This will be trimmed off in later steps.
After the starter strip has been fully installed along the eave edge of the shed roof, you can begin installing the first row of shingles.
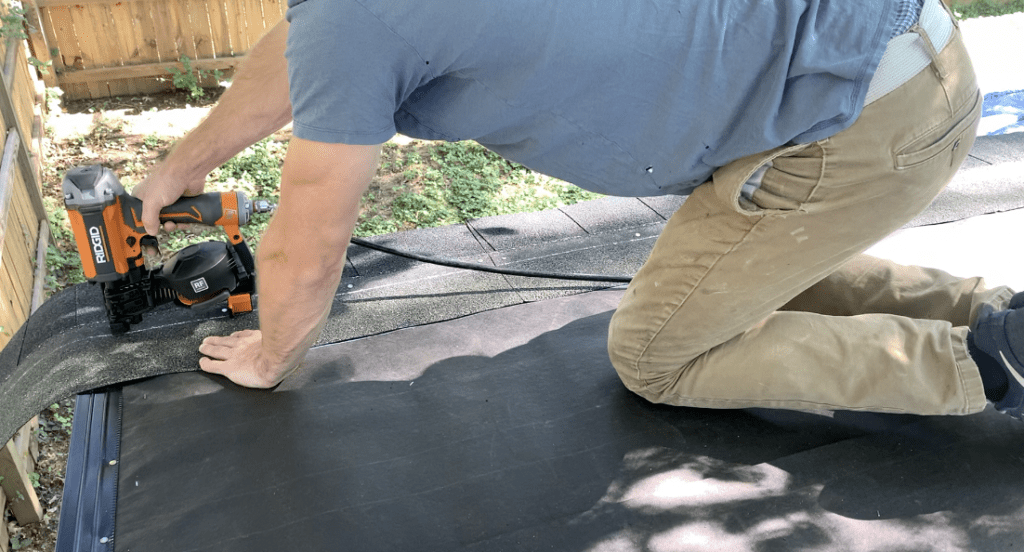
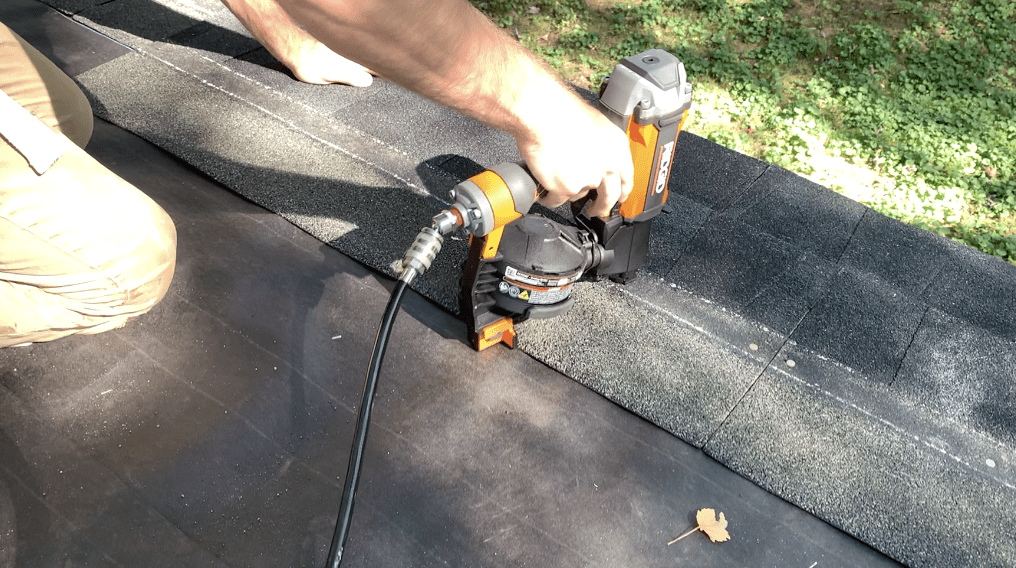
Installing Shingles on the Shed Roof
Install the First Course (Row) of Asphalt Shingles on the Shed Roof
Since the first starter strip was cut 4” short, we can use a full shingle when starting the first course of shingles.
Place your first full shingle in place such that it overhangs the drip edge by approximately ½” – ¾” on both the eave and rake edges of the shed.
PRO TIP – It is often advisable that you overhang your shingles approximately ¼” further than your starter strip. Therefore, if you installed your starter strip with a ½” overhang over the drip edge, it is recommended that you install your shingles with a ¾” overhang over the drip edge (which is the same as a ¼” overlap over the starter strip).
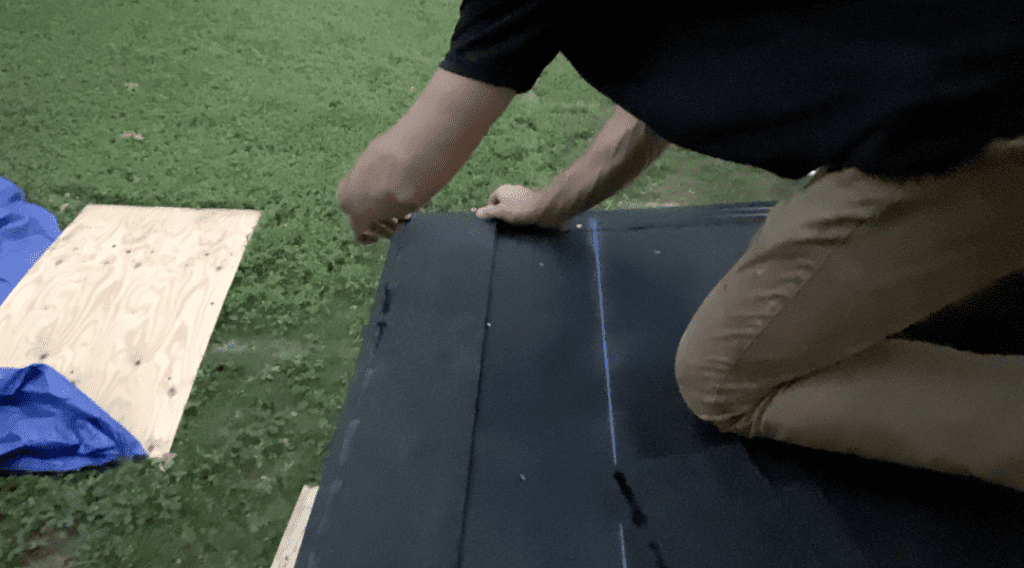
After determining your overhang, it is often helpful to establish is “shingle start line” using a chalk line.
To establish a shingle start line, take the shingle width (in this example case, the shingles are 13 ¼’ inch wide) and subtract your desired shingle overlap past the starter strip (in our case, ¼”) – which gives us a 13”. Take this measurement from the starter strip and mark the location on the tar paper on both ends of the shed roof.
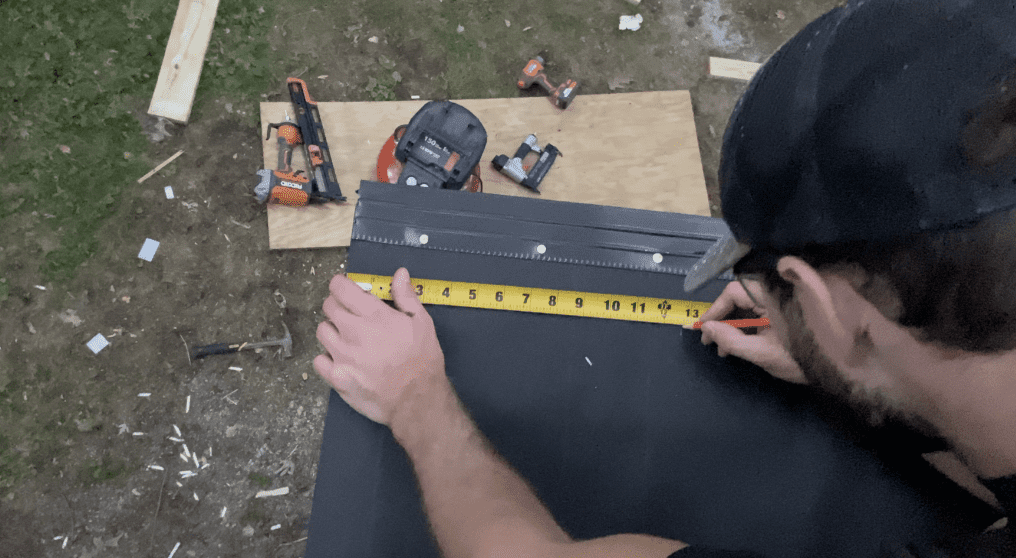
After marking both ends of the shed, use a chalk line to establish a mark. This mark will indicate the back line for the first course of shingles.
Now, when you line up the back of the first course of shingles with the chaulk line, you will have a ¼” overhang over the starter strip and a perfectly straight line of shingles to begin your second course.
Install the first shingle so that it overlaps the drip edge/starter strip on the rake and eave edges based on your slected overhang and so that the back of the shingle is even with the chaulk line.
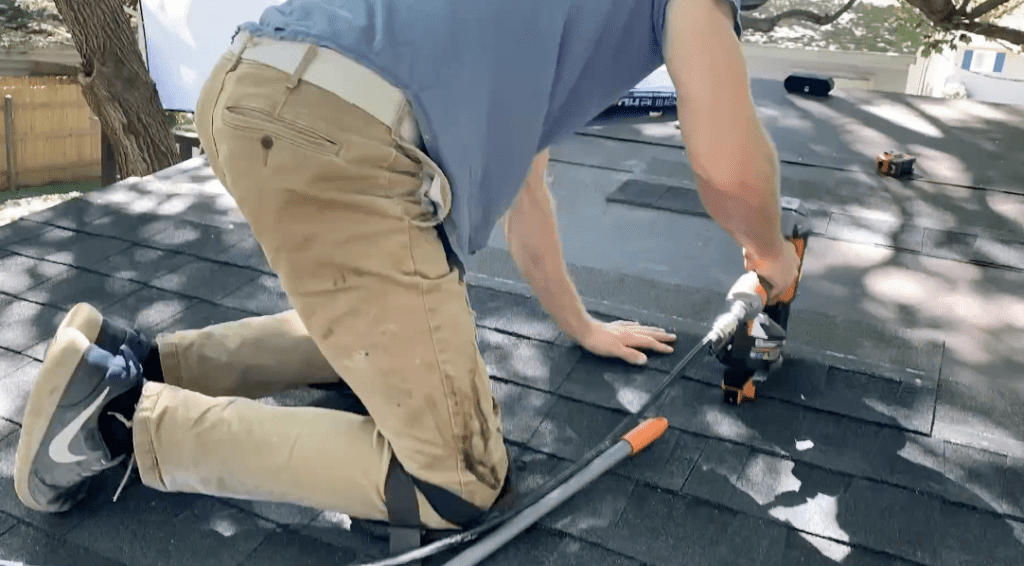
After positioning the first shingle in place, fasten it to the roof sheathing using 4 evenly spaced roofing nails. If you live in a high wind area, 6 roofing nails per shingle is recommended. Many shingles have a “target nail zone” marked on each shingle. Ensure that your nails are installed in this area. Refer to the Shingle Nailing Guide below:

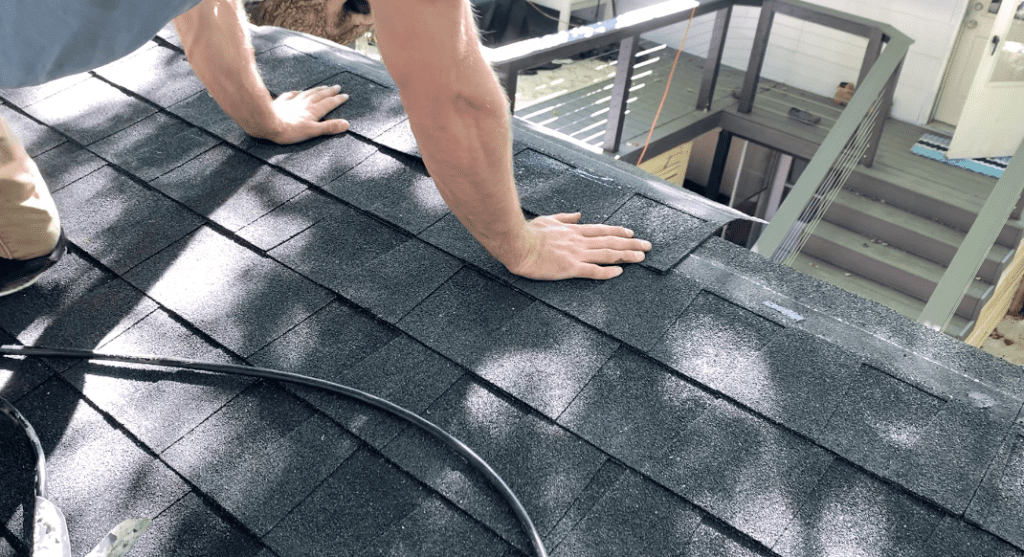
After securing the first shingle, install the next full shingle such that it is butted up flush against the first shingle.
Double check that the overlap is correct on the eave edge and that the top of the shingle is flush with the chaulk line. Once the orientation is confirmed, secure the shingle to the roof using roofing nails. Repeat this process for the remainder of the first course.
When you get to the last shingle in the first course, simply install it in place as you did for the other shingles. Any excess that hangs over the rake edge of the roof will be trimmed off later.
Installing the Second Course (Row) of Shingles
Since we installed a full shingle for the first course, trim off 6” (from the long side) for the first shingle to be used to start the second course.
Next, place the shingle so that it overlaps the rake (as necessary) and so that the bottom is flush with the tops of the wide cut-outs. See below:
This will typically result in 5 5/8” of shingle exposure (of the first row of shingles).
After positioning the shingle appropriately (e.g. maintaining the rake overlap and ensuring that the bottom of the shingle is lined up with the previous row), nail the first shingle in the second course in place.
Repeat this process for all of the remaining shingles in the second course. Leave an overhang over the rake edge (if applicable).
Installing the Third Course of Shingles
Installing the third couse is the exact same as the second course. The only difference is that you should trim 11” off of the first shingle (instead of the 6” that was cut off previously).
Installing the Fourth Course of Shed Shingles
Trim 17’ off the first shingle and install the row of shingles as was done for the other shingle courses.
Install the Remaining Courses of Shingles
After installing the fourth course of shingles, use a full shingle and repeat the process as was done for the first course of shingles.
Repeat these steps as needed until you get to the final row of shingles at the ridge of the shed roof.
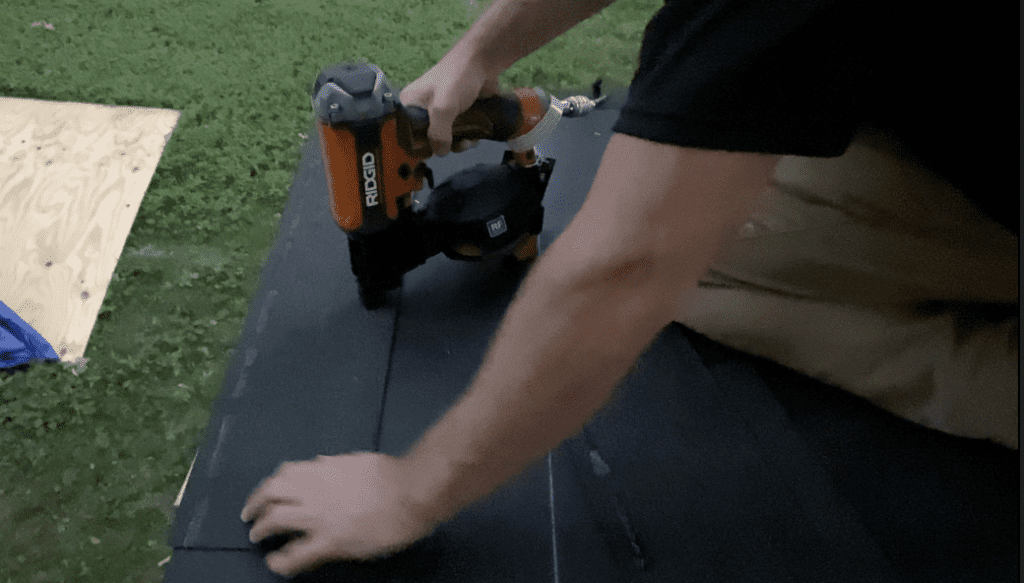
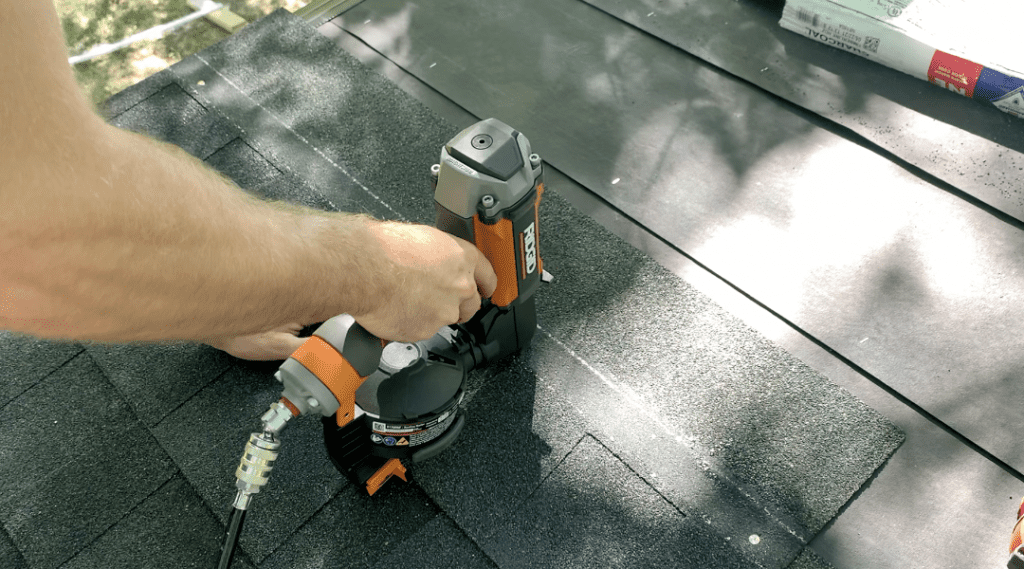
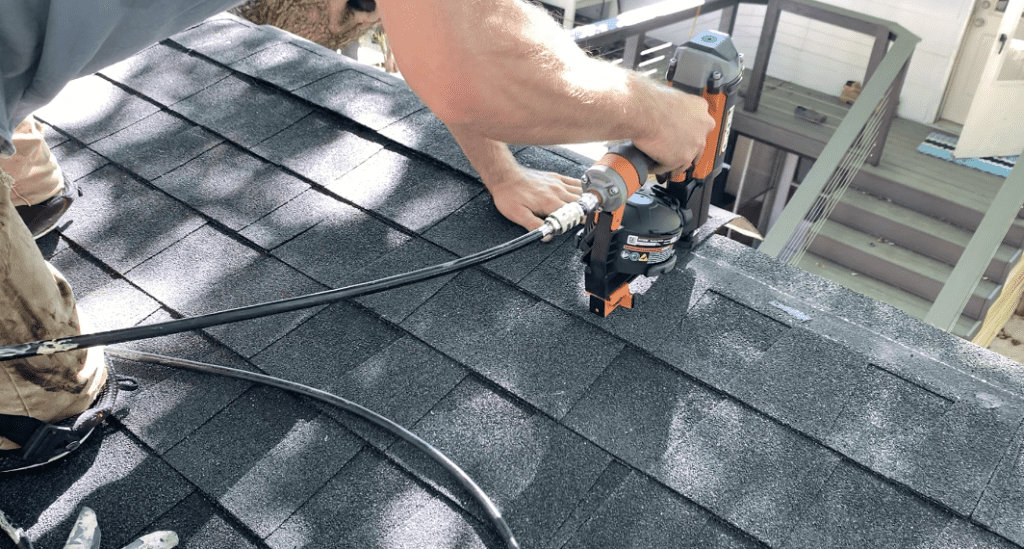
Installing the Final Row of Shingles
Installing the final row of shingles is typically the most difficult step in a lean-to style shed roof shingle installation. To complete the final row, continue to install your shingles by lining up the bottom of the shingle until is flush with the tops of the wide cut-outs on the shingle below. The last shingle will likely overhang the shed ridge in an awkward manner – but this is ok.
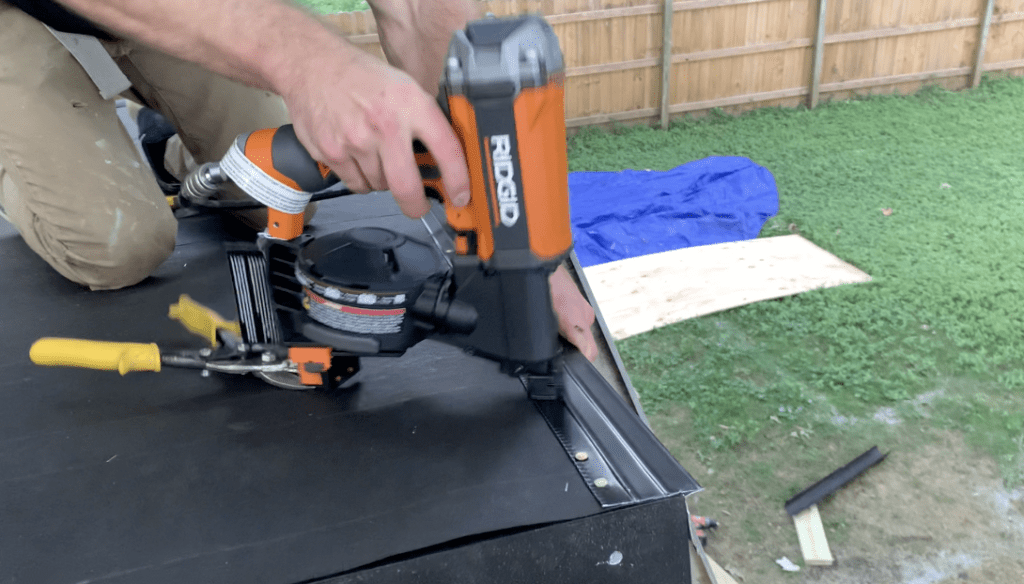
Install the the final shingles so that the bottom is lined up correctly and then nail the top part of the shingle to the shed’s plywood decking approximately 1” from the front of the shed ridge fascia board.
Install four nails (or 6 for high wind areas) per shingle all the way across the row.
Although these nails will be covered by the ridge flashing that will be installed as part of the final step, it is often good practice to cover the nail heads with roofing mastic.
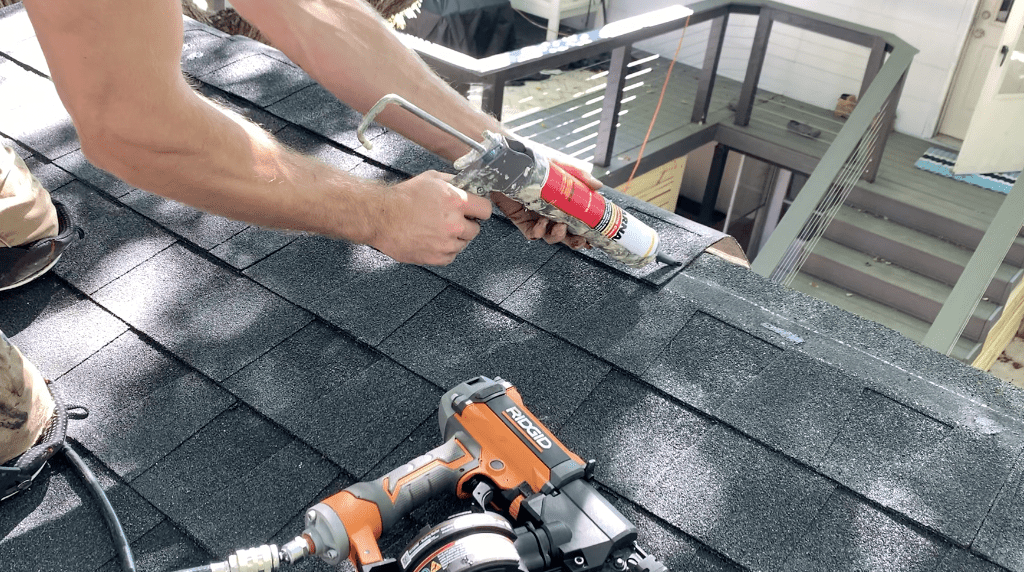
Additionally, consider applying roofing mastic beneath the final row of shingles to help aid in adhesion to the layer below – as shown:
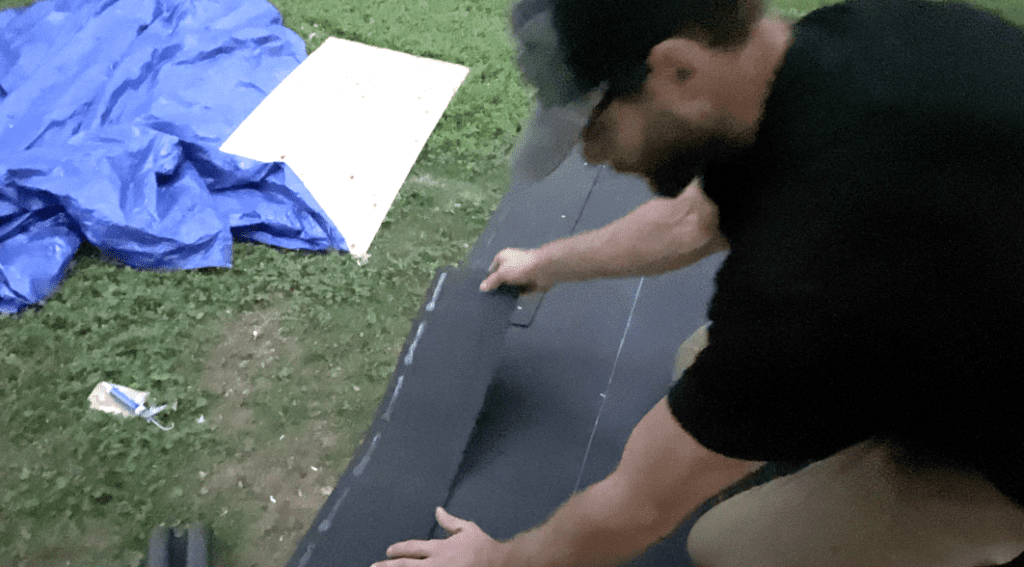
After installing the last row of shingles on the ridge of the shed roof, trim off all of the excess shingle with a utility knife such that the shingles are flush with the shed’s front fascia board.
Once you have trimmed off the excess shingle on the front of the shed, you can install your angled ridge flashing on the ridge of the shed roof.
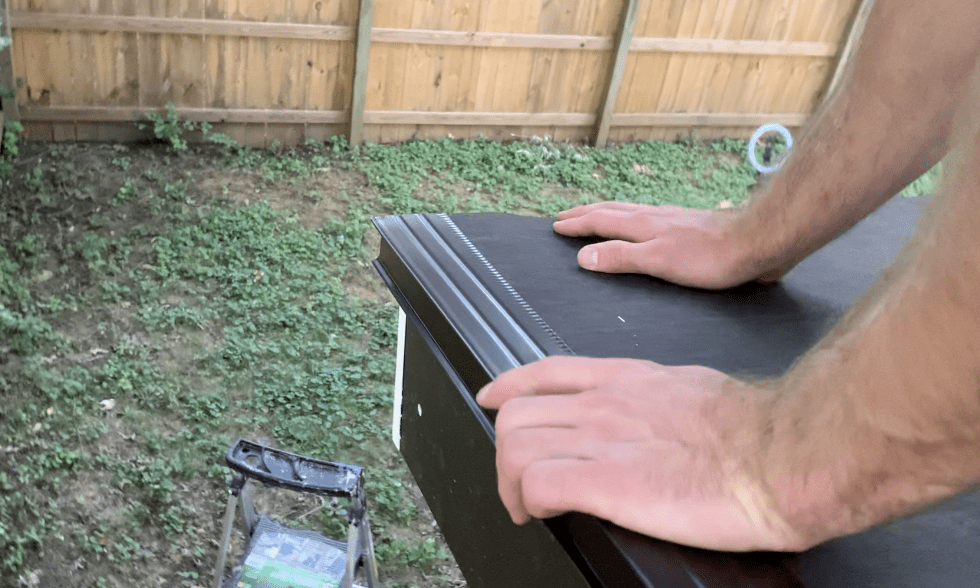
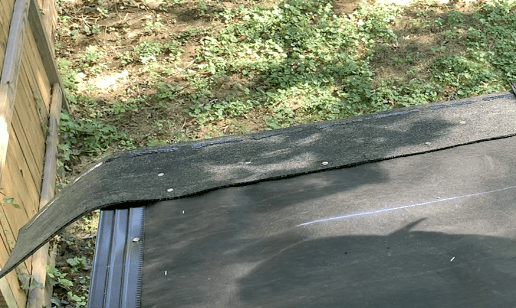
Install the Ridge Flashing
After trimming the last row of shingles flush to the front fascia board of the shed, install a piece of 90 degree angled ridge flashing over the ridge of the shed roof. This flashing will overlap the fascia board (vertically) and the previously installed shingles (horizontally).
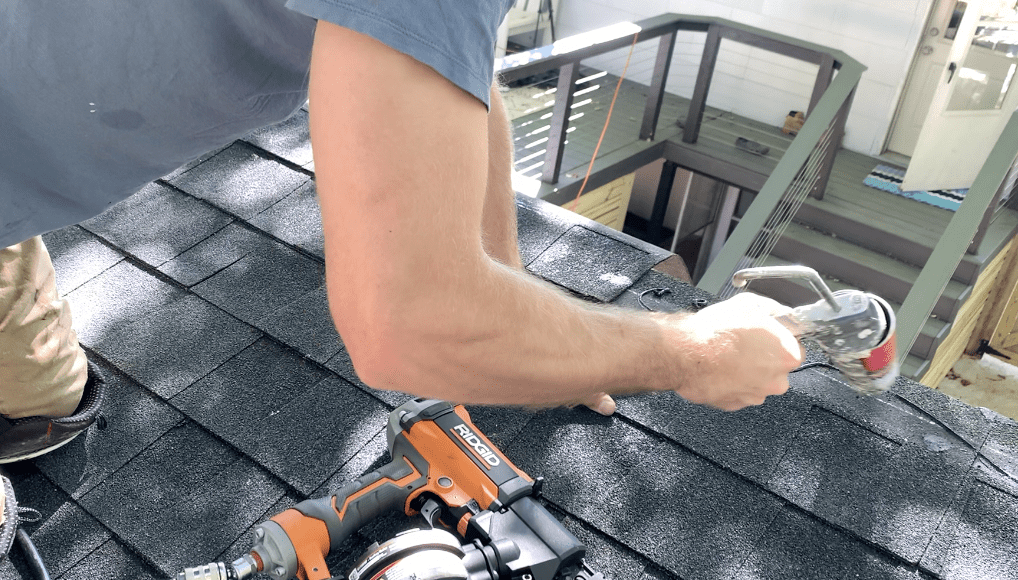
To install this angled ridge flashing, start by applying two beads of roofing mastic on both sides of the angled ridge flashing – as shown.
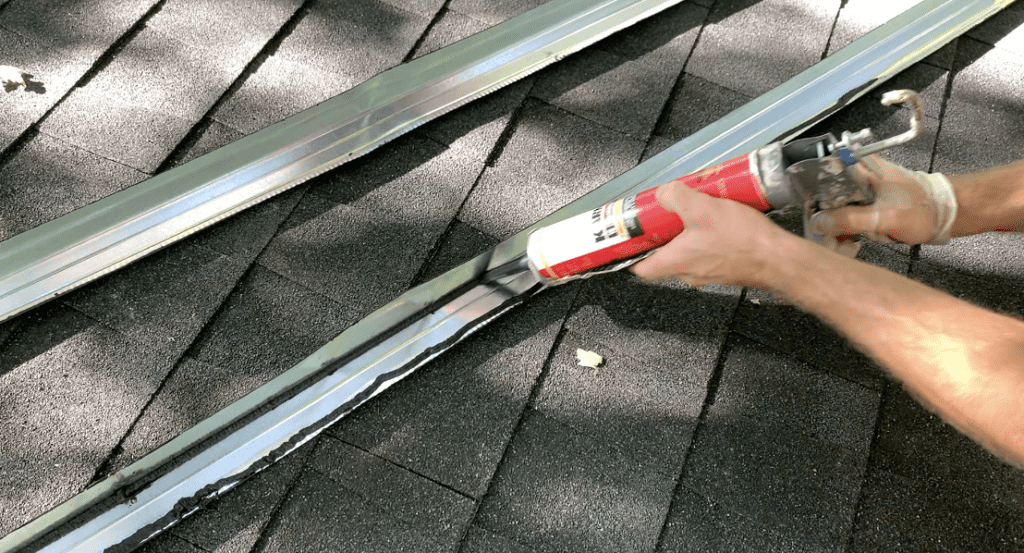
Next, position the flashing in place so that it accomplishes the following:
- Ridge flashing should extend further than the rake side drip edge by approximately ¼”.
- Ridge flashing should cover the previously installed nails in the shingles (that are exposed).
- Ridge flashing should prevent any water from getting underneath the shingles at the top of the shed.
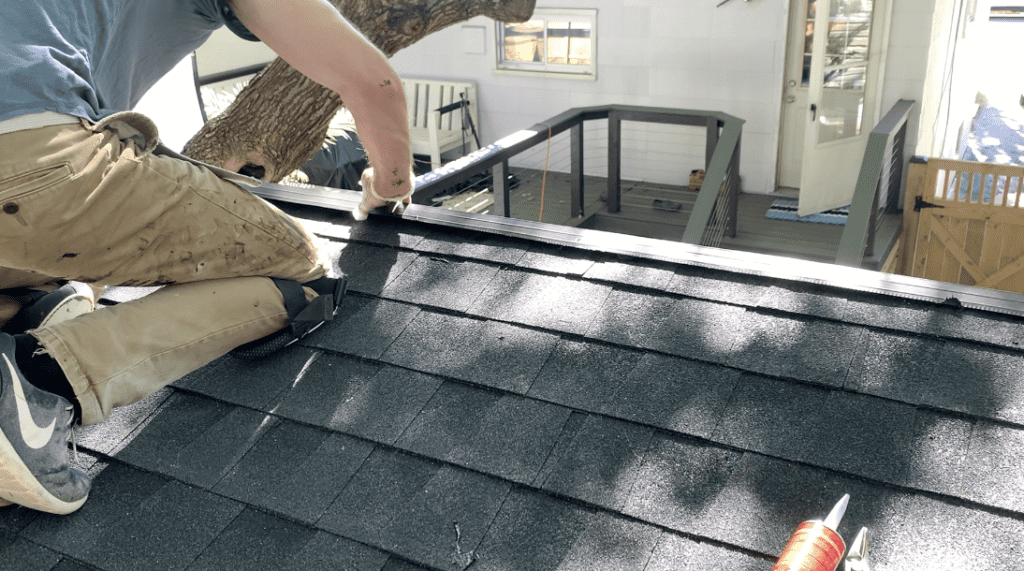
Once the ridge angle flashing is positioned appropriately, tack it in place with roofing nails every 12″.
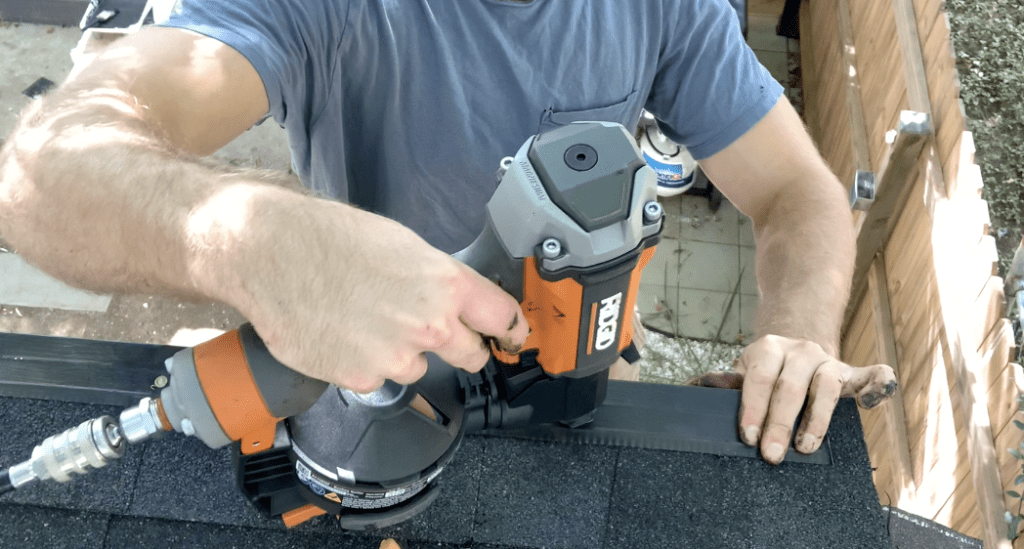
If your shed roof width requires more than one piece of ridge flashing, ensure that a 6” overlap is used to prevent water from infiltrating between the flashing intersection. It is also recommended that you apply roofing mastic at the ridge flashing intersection – as shown below.

Use roofing mastic to cover all exposed nail heads and to further waterproof the intersections between any two adjacent pieces of flashing.
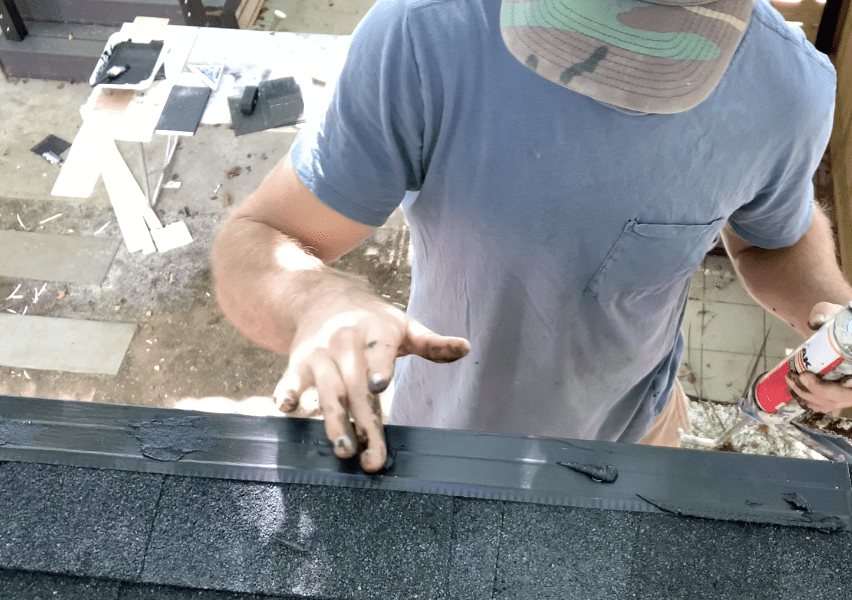
Finally, trim the ridge flashing as needed to leave a 1/4″ overhang over the rake side drip edge.
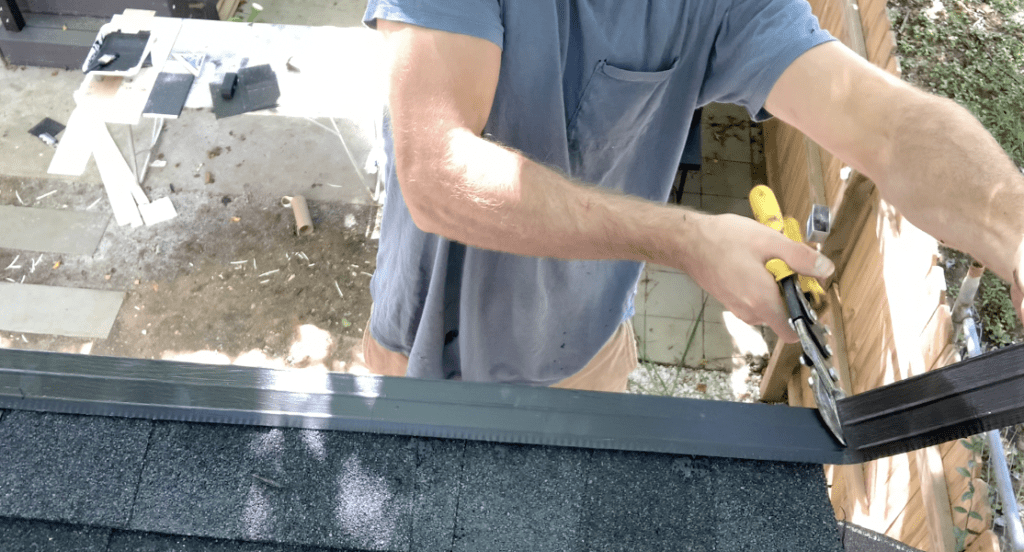
At this stage, your shed roof asphalt shingle installation is nearly complete.
Trim Off Any Overhanging Shingles on the Rake Sides of the Shed
At this stage, cut off any excess shingle that overlaps the rake sides of the shed. To do this, snap a chalk line along the top of the shingles by marking the desired overlap over the rake edge (likely between ¼” and ¾” passed the drip edge). Mark both the eave (bottom) of the shed roof and the ridge (top) of the shed roof and snap the chalk line.
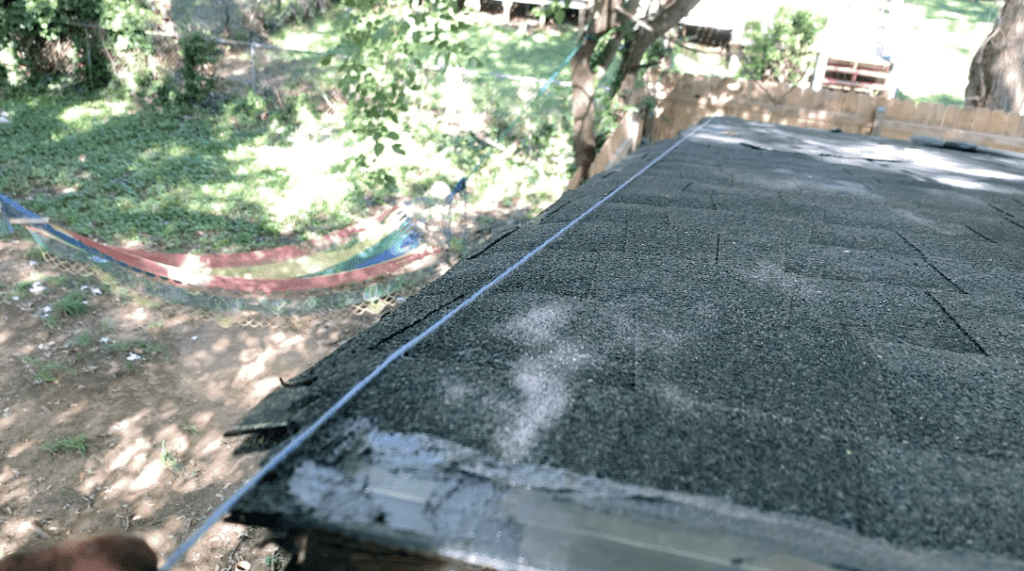
Use a utility knife to cut off any of the excess shingle along the chalk line.
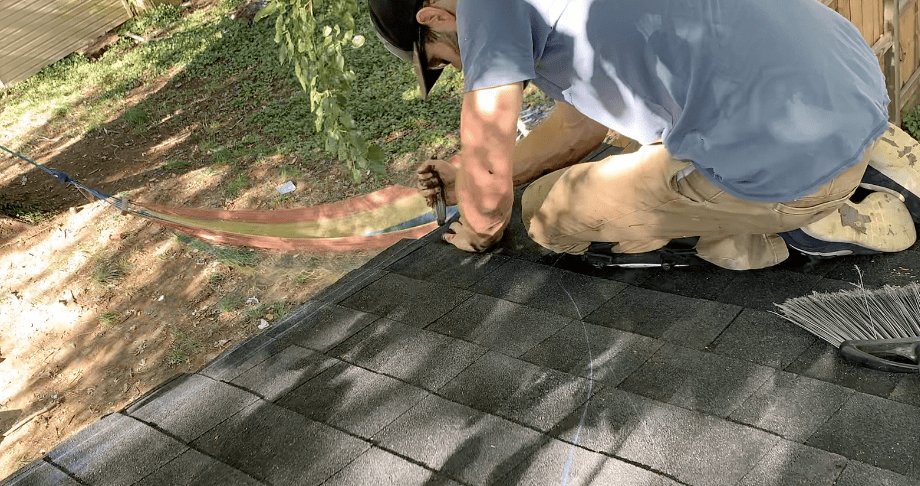
There is a specific type of “hooked” utility knife that makes cutting off the excess shingle a breeze.
At this point, your asphalt shingle shed roof installation is complete!
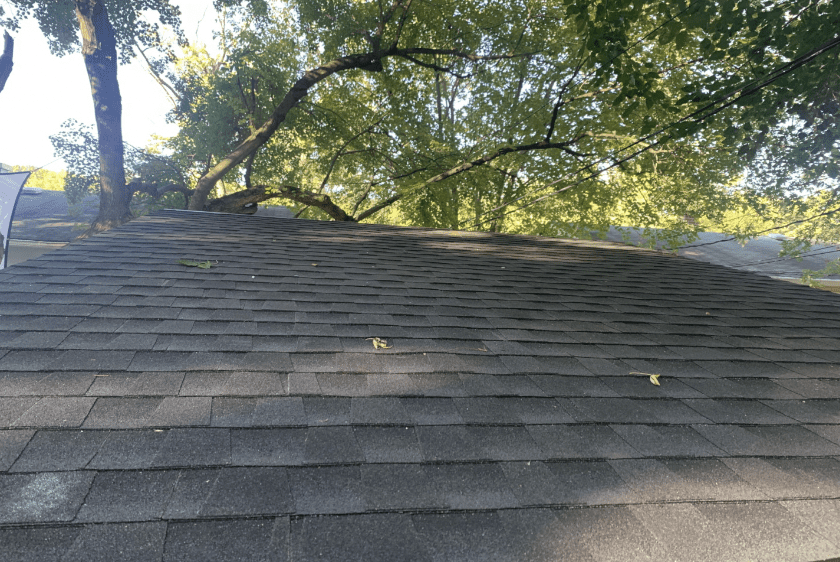
PRO TIP – Keep an eye on the shed during the next rain event to ensure that there are no leaks. If a leak is observed, apply roofing mastic to the problem area (once the shingles have dried).
How to Install a Roll Up Door On A Shed
A roll up door is a great option for any garage or shed door opening. Roll up doors are durable, secure, and easy to install, making them an ideal door option for many residential and industrial applications. However, there are also many other different shed door options that are suitable for a shed. Select a shed door style that works for your shed’s aesthetic and functionality.
In order to install a roll up door, you first need to measure your door’s rough opening and purchase a compatible roll up door. Next, position the frame guides (legs)of the roll up door at each end of the door’s rough opening and then lift the roll up door vertically into place. Confirm that the roll up door is level and plumb and then secure the roll-up door frame to the rough opening through the mounting holes. Finally, adjust the tension on the roll up door (as needed) and install hardware (handle, etc.).
Installing a roll up door is an easy project that the average homeowner can tackle. By following the tips and tricks presented in this section, you will learn how to install a roll up door step-by-step.
Purchase a Roll Up Door Suitably Sized for Your Rough Opening

Although this goes without saying, you need to purchase a roll up door that is suitable for your specific door rough opening application. To determine the rough opening, simply measure the distance from wall to wall (opening width) and Floor to Door Header Above (Opening Height). For the purposes of example, let’s assume that we have a 6′ rough opening width and a 7′ rough opening height.
Most Roll Up Doors are ordered based on the ROUGH OPENING. The Roll Up Door will be made slightly larger than the the rough opening such that the guide rails will mount on the rough opening frame. Therefore, for a 6’x7′ rough opening, you would order a 6’x7′ Roll Up Door.
PRO TIP – Roll Up Doors have a “headroom” requirement for the clearance needed above the Roll Up Door’s Barrel Curtain. Typically, Roll Up Doors will require approximately 16″ above the rough opening and 4″ of sideroom to either side of the rough opening. Confirm requirements with your specific Roll Up Door.
After establishing your roll up door rough opening, spend some time shopping around for an appropriate roll up door for your application.
Selecting a Roll Up Door Manufacturer and Model

There are many different Roll Up Door Manufacturer and Models Available. Some of the most common Roll Up Door manufacturers and Vendors are listed below:
I recommend that you spend some time researching the various Roll Up Doors Manufacturers to determine which manufacturer will be best for your application. After choosing a Roll Up Door Manufacturer, spend some time evaluating the various Roll Up Door Models and Features. Some things to consider when selecting an appropriate roll up door model for your application are listed below:
- Light Duty VS Heavy Duty Roll up Door
- Manual Operation VS Motorized Operation VS Chainwheel Operation
- Insulation VS No Insulation
- Interior Mount VS Exterior Mount
As shown above, there are a lot of options and door features available when selecting a roll up door for your application. Select a Roll Up Door based on your specific needs.
For this specific installation, we are installing a 6′ wide x 7′ tall Janus Model 650 Roll Up Door (exterior mount) in the silhouette gray color.
Connect the Roll Up Door Guides (Legs) to the Barrel and Curtain
After ordering your Roll Up Door, it will typically be delivered unassembled. However, assembly is very simple since there are only a few components and all the hardware (screws, bolts, etc.) is typically included.
The first step in the Roll Up Door Assembly process is to attach the Roll Up Door Guides (Legs) to the Barrel and Curtain.
PRO TIP – Assemble your Roll Up Door in the location and orientation in which it will be installed. This will prevent you from having to move the roll up door after it is assembled.
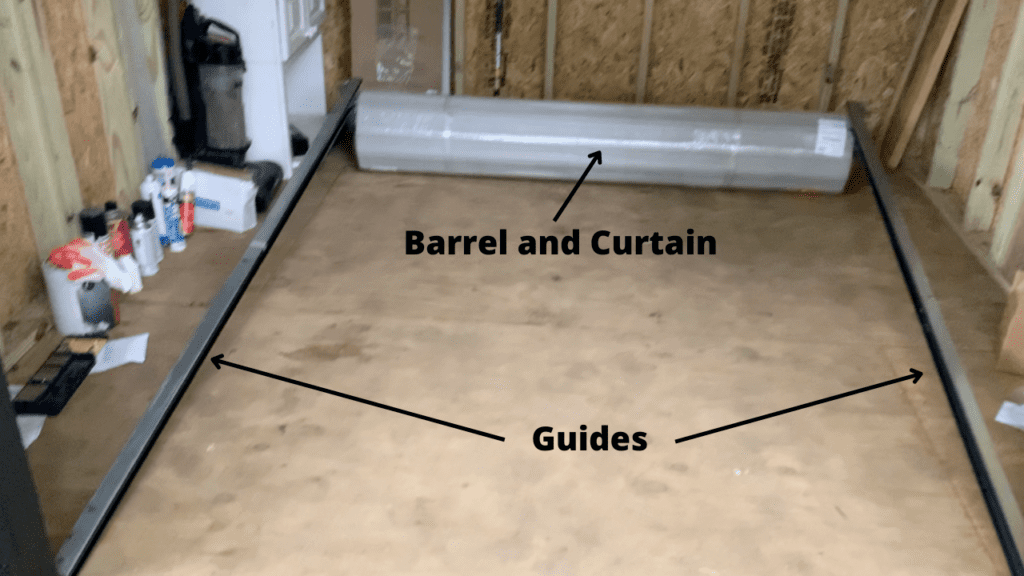
Use the provided hardware to attach the Guides to the to the Barrel Curtain. Below are the typical steps necessary for assembly. Refer to the manufacturer’s instructions for specific assembly instructions for your specific Roll Up Door.
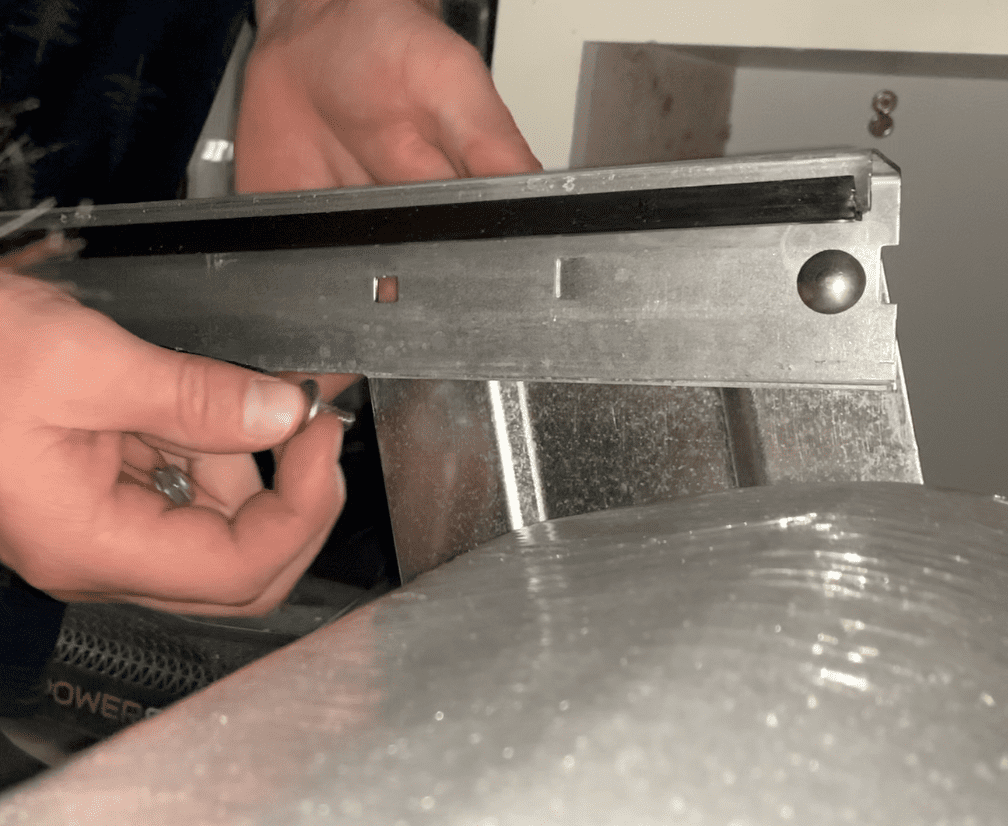
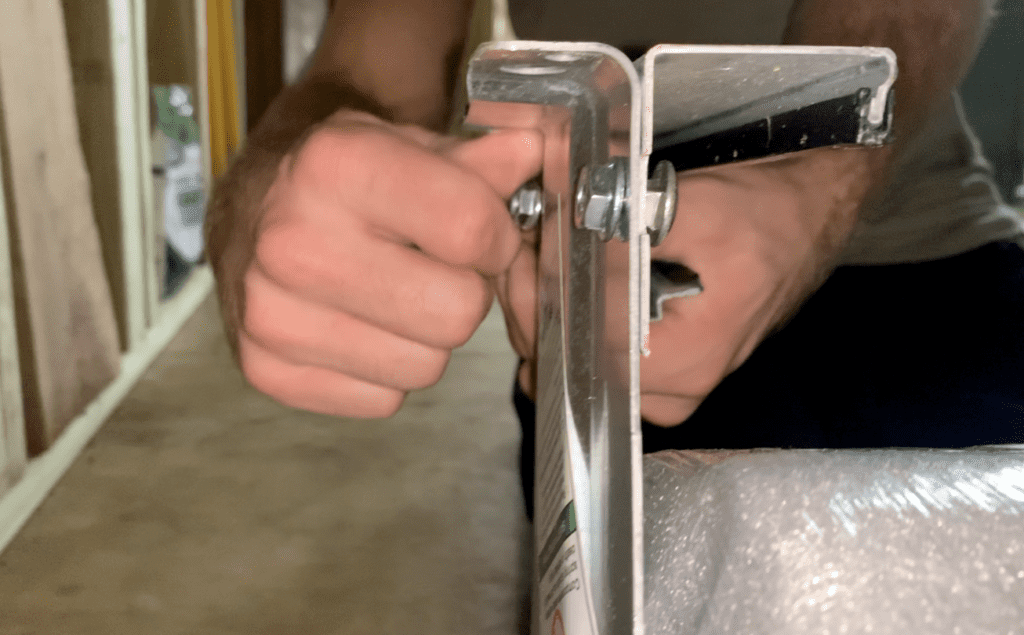
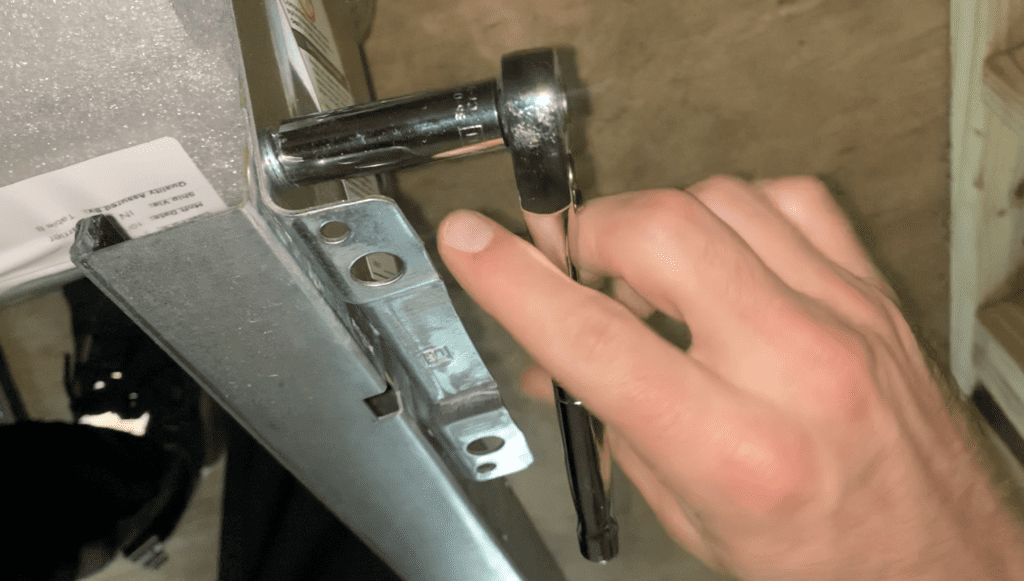
Once you have attached the Roll Up Door guides to the Barrel, you can move on to the next step in the Roll Up Door Installation.
Position the Roll Up Door Guides In Place at the Base of the Rough Opening
At this stage, you want to position the Roll Up Door in place near the rough opening. Basically, you want to have the base of the guides pushed up against the rough opening of the door, as shown:

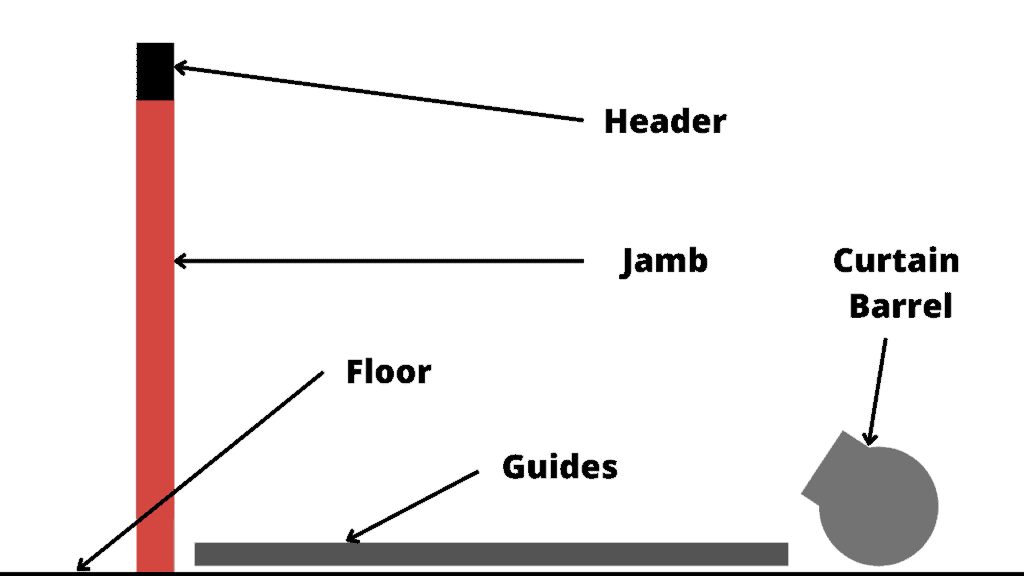
Lift the Roll Up Door into Place
After attaching the Guides to the Barrel and positioning the assembled Roll Up Door in place within the Rough Opening, lift the Roll Up Door vertically into place.
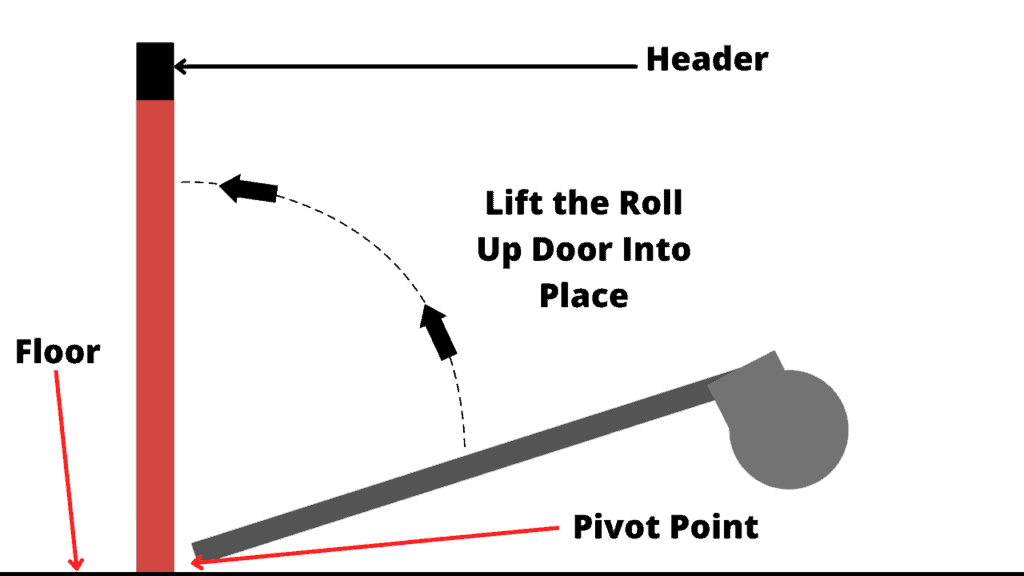
It is highly recommended that you get help lifting the roll up door into place to prevent damage (bending) to the guides.
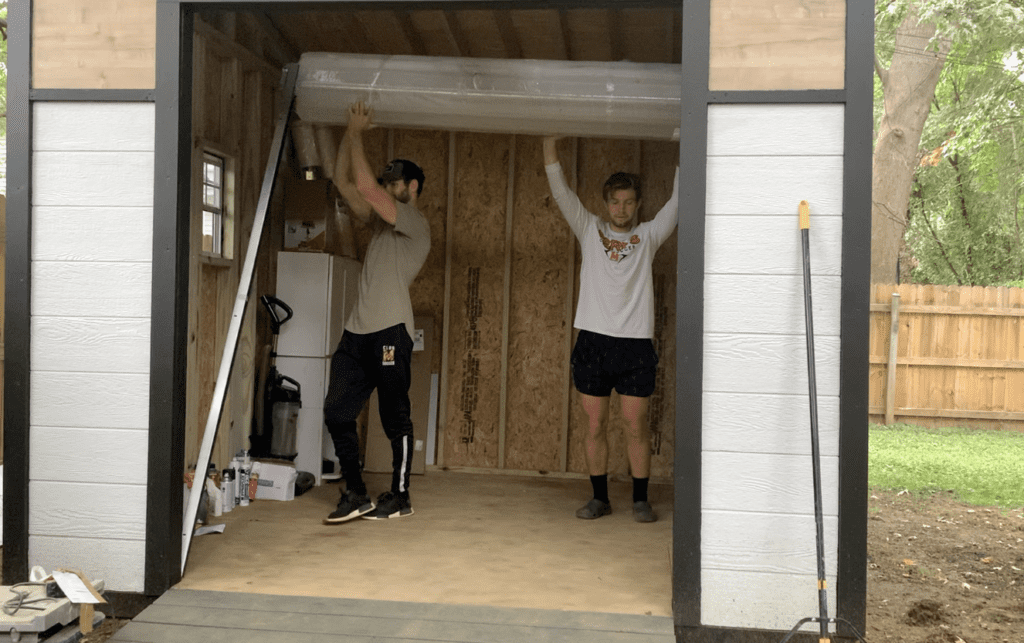
Continue to lift the Roll Up Door until the guides come into contact with the rough opening frame.
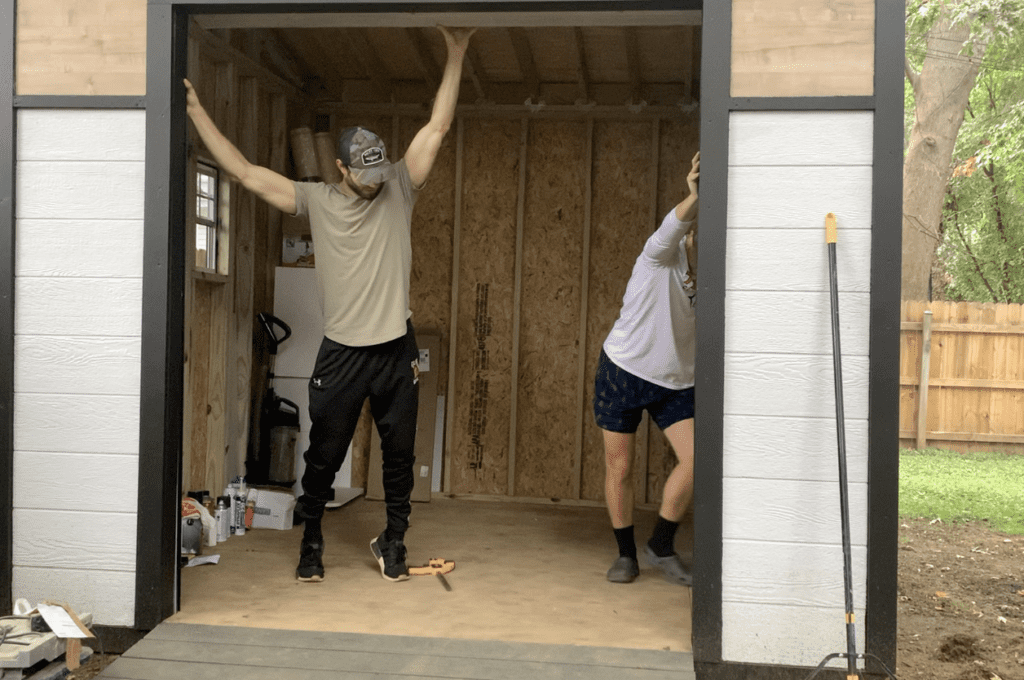
Consider using a bar clamp to hold the roll up door in place against the rough opening frame as shown:
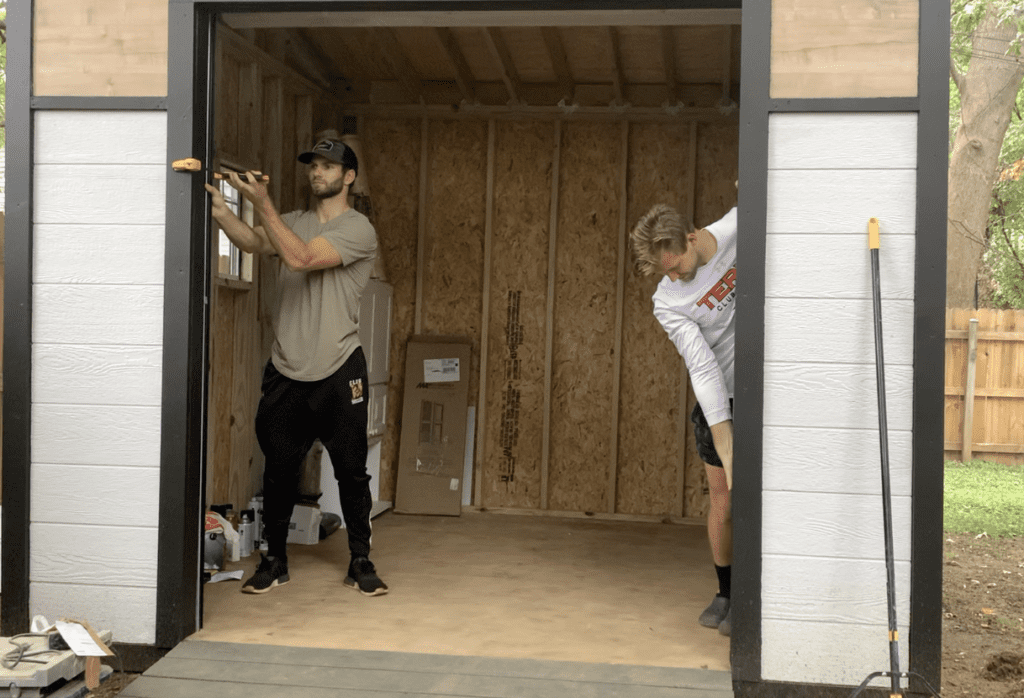
After lifting the Roll Up Door into place and temporarily securing it in place with clamps, you can move on to the next step of the Roll Up Door Installation Process.
Confirm Uniform Spacing Between the Roll Up Door Guides
Before securing your guides to the rough frame, you must ensure that the spacing between the guides is completely uniform over the entire height of the Roll Up Door.
To do this, measure the guide spacing at the top of the door near the Barrel. This measurement should be ~6′.

Next, measure the distance between Roll Up Door guides at the bottom of the door.
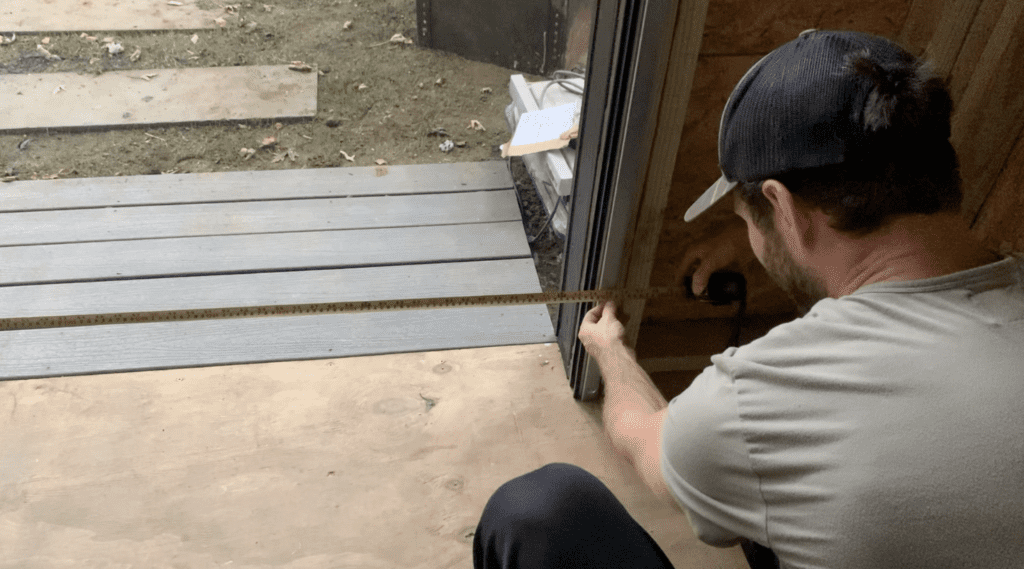
The distance between the guides at the top of the roll up door should be the same as the distance between the guides at the bottom of the door. If these measurements are not the same, make adjustments as needed.
PRO TIP – use a 6′ level against the Roll Up Door Guides to confirm plumb.
After confirming that the Roll Up Door guides are spaced evenly, you can proceed with fastening the guides to the rough opening frame.
Fasten the Roll Up Door to the Rough Opening Frame
After confirming uniform spacing between the guides, fasten the Roll Up Door to the rough opening frame using the provided hardware. You will usually install fasteners at the bottom, middle, and top of the guides – as shown below.
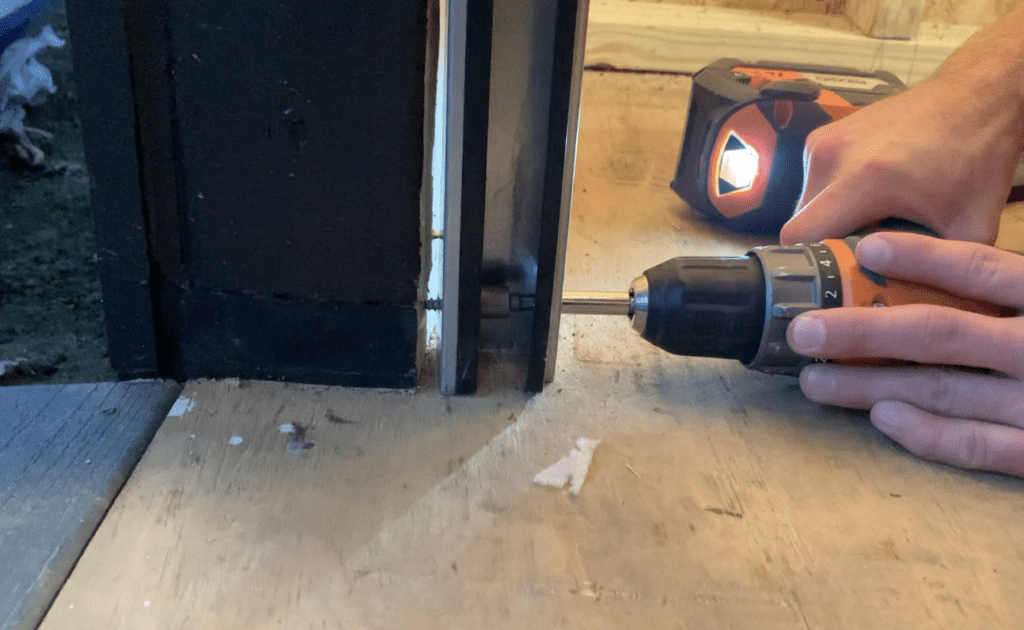
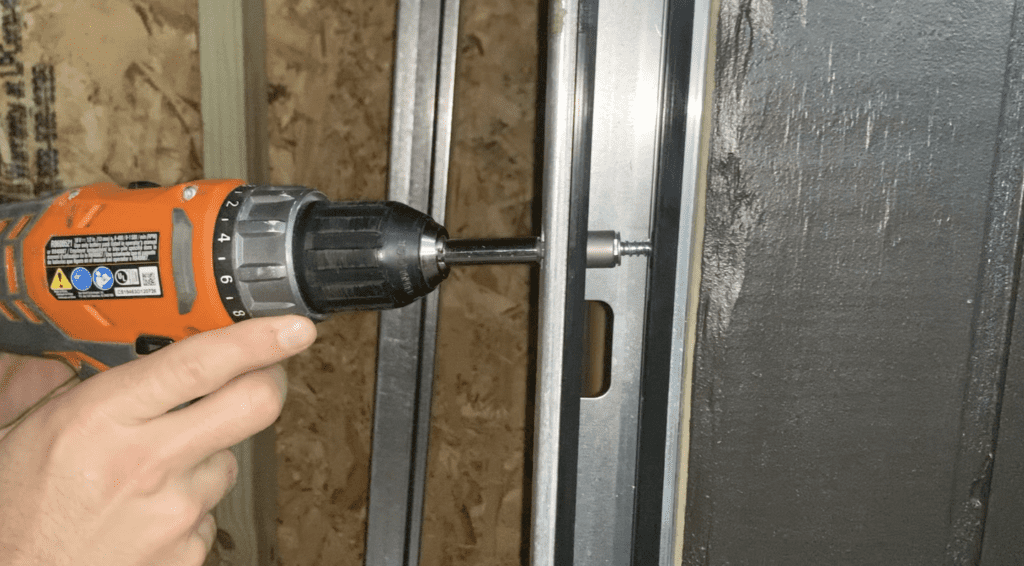
Additionally, there are usually two mounting locations on the roll up door Barrel as well.
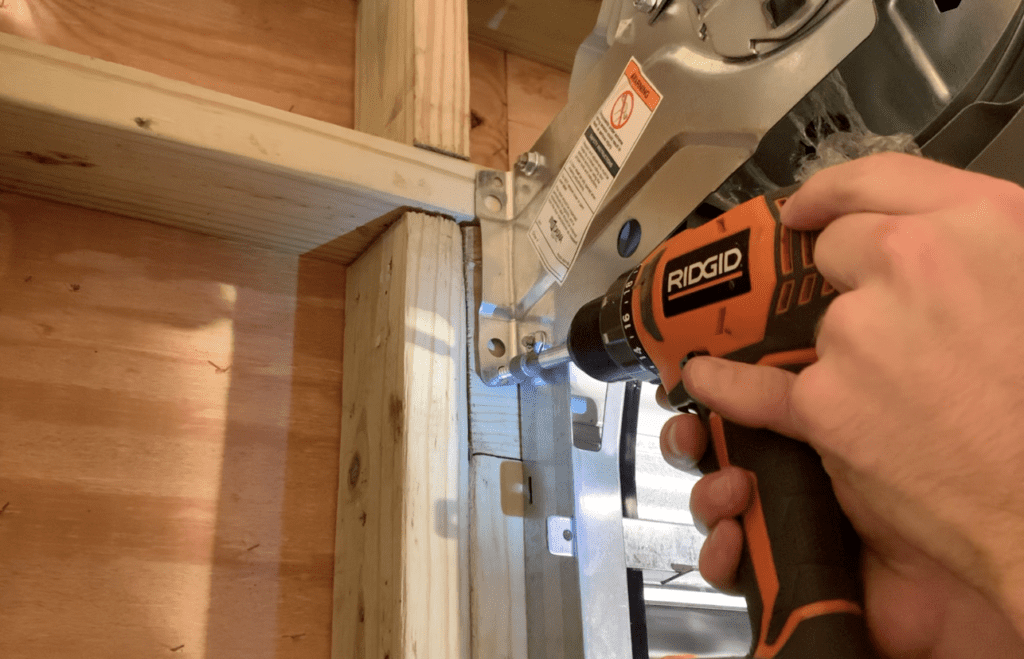
After Installing fasters through all of the mounting locations on the Roll Up Door guides and the Barrel, you can proceed to the next step of the Roll Up Door Installation.
Adjust Roll Up Door Spring Tension As Needed
At this stage, the Roll Up Door curtain will be pulled down within the guides. Before doing this, however, you need to set the initial spring tension.
Set Initial Spring Tensions for the Roll Up Door
To set the initial spring tension for the roll up door, simply rotate the barrel two (2) revolutions in the direction that would send the bottom bar of the curtain through the guides.
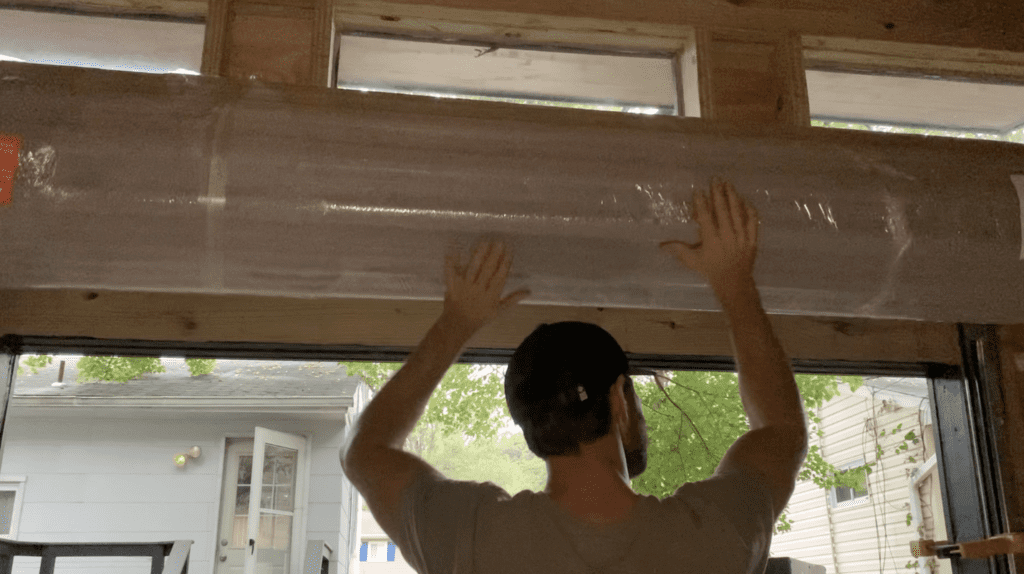
After pre-tensioning the barrel, pull the roll up door curtain down through the guides.

After pulling the curtain down through the guides, open and close the roll up door a few times to determine if tension needs to be added or removed.
Adjusting Roll Up Door Tension (if needed)
To adjust the roll up door tension, lift the tensioner prawl (left hand) and insert a screwdriver (or similar) into one of the openings in the tensioner ratchet wheel (right hand).
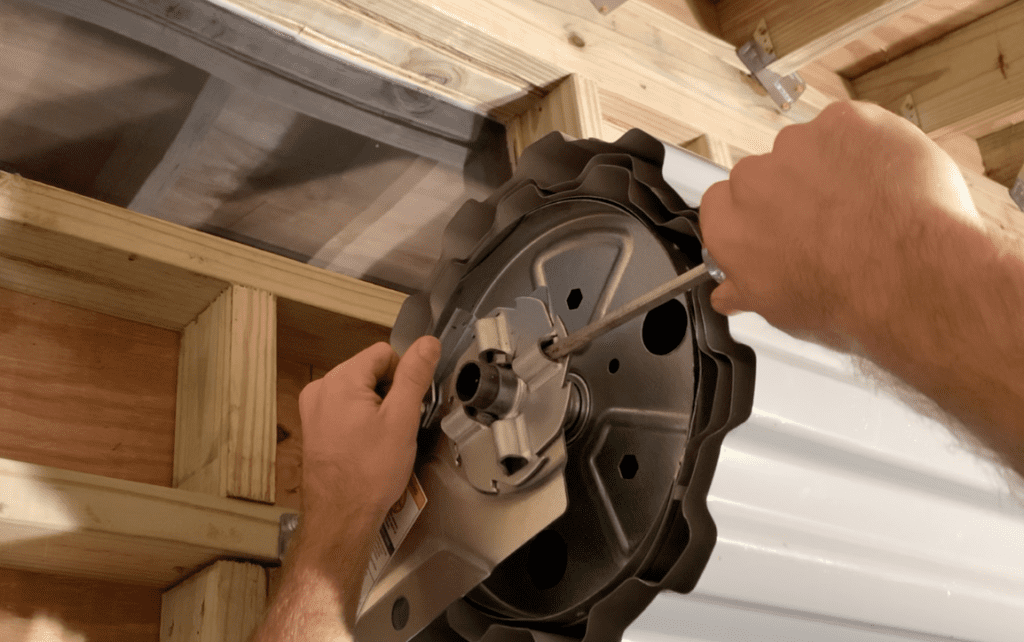
To increase the tension in the roll up door, rotate the tensioner wheel “downward”. To decrease the curtain tensions, rotate the tensioner wheel “upward”.
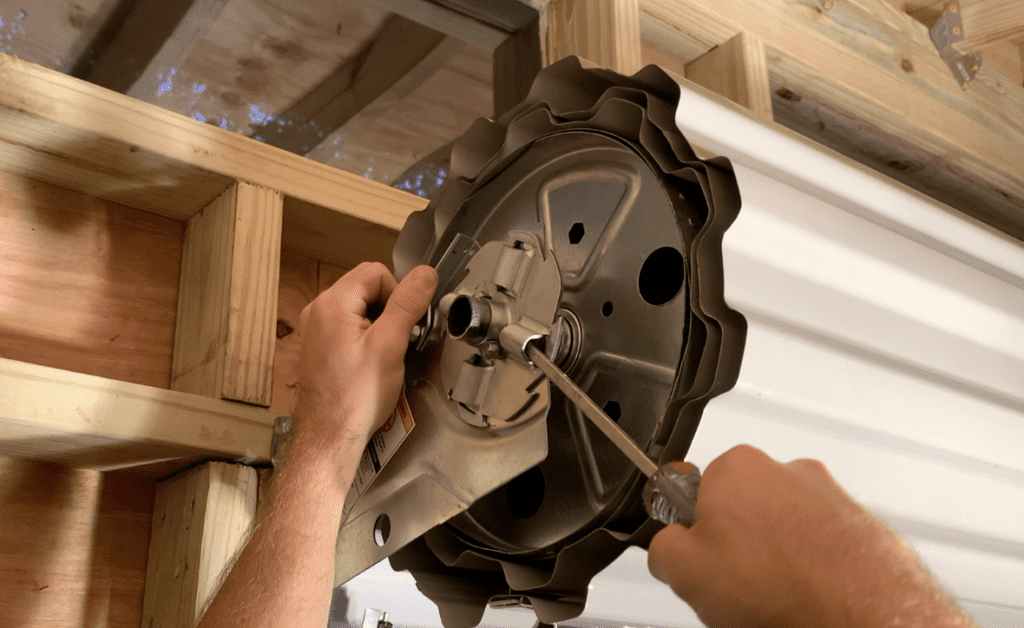
Continue to test your roll up door and make any adjustment to the tension as necessary. Once you have established the appropriate tension for your specific roll up door application, your roll up door installation is nearly complete.
Install Roll Up Door Hardware (Handle, Head Stops, Mini-Clip, etc.)
At this point, The only thing left to do is install the roll up door hardware.
First, install the door handle using the provided mounting hardware.
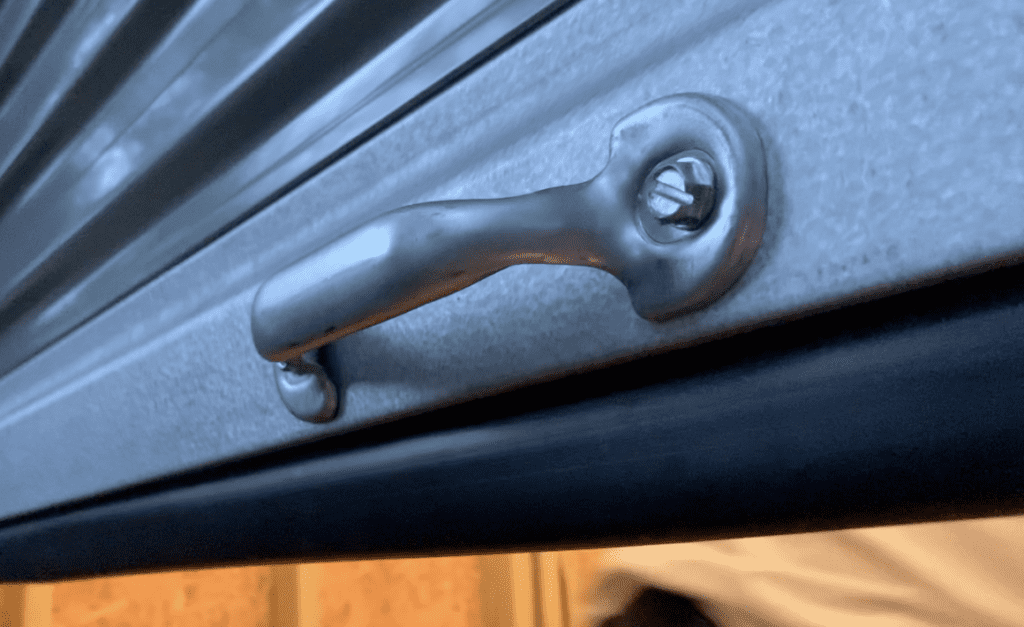
Next, install the head stops which will keep the roll up door from fully extending back into the barrel.
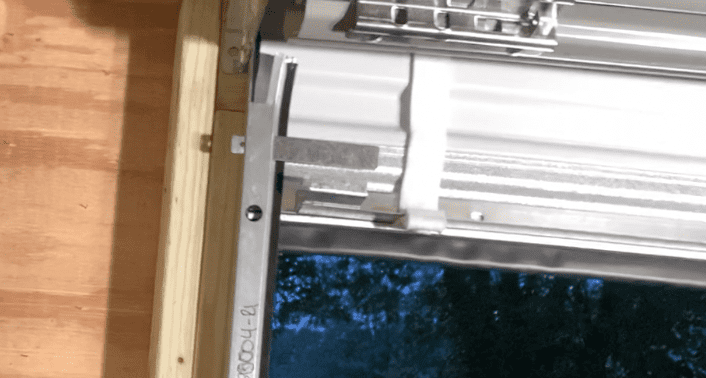
Next, install the mini-clips that will contact the head stops as the curtain is fully open.
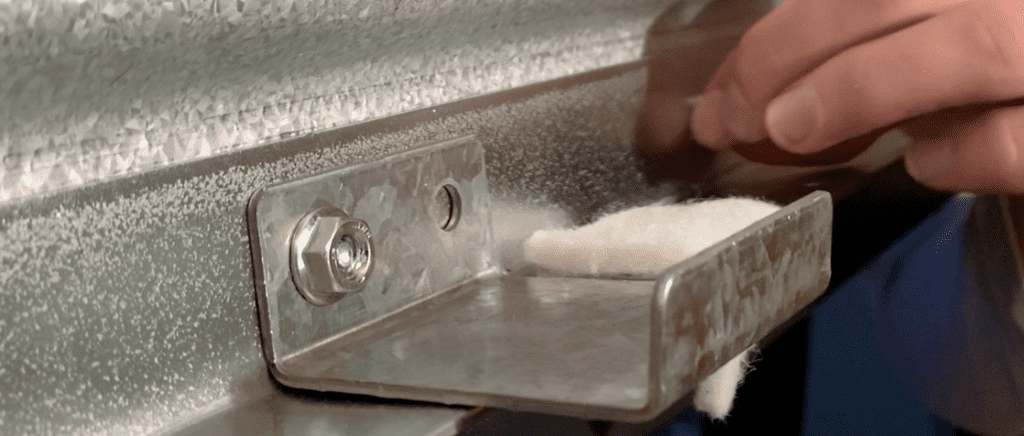
After installing the hardware, give your roll up door a few tests to make sure that everything is functioning properly.
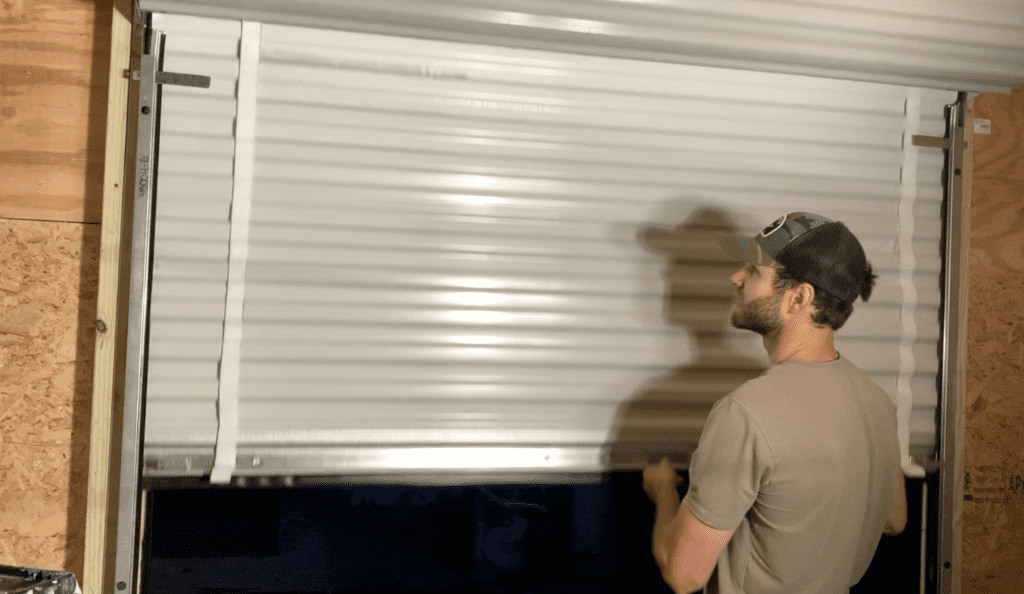
Lastly, if your roll up door height is greater than 6′, you may want to install a pull string to allow for you to reach the curtain when it is fully open.

At this stage, your roll up door installation is complete! For additional information on how to install a roll up door in a shed, check out my Youtube Video Linked below:
How to Install a Window in a Shed
If you are building your own shed, you will most certainly want to include a shed window in your design. Installing a shed window is not very complicated and this Section will show you exactly how to install a window in a shed, step-by-step.
To install a window in a shed, start by selecting your desired window size and frame your shed window accordingly. If you are replacing an existing shed window, simply measure the existing window rough opening. Next, apply flashing tape to the bottom and sides of the window rough opening and apply a bead of caulk sealant around the perimeter of the shed window’s rough opening. Install the window by pressing the window flanges against the shed and screwing through the window flanges and into the window’s rough frame. Confirm window is level and plumb. Finally, install a piece of flashing tape over the window flange at the top of the window. Finally, install window casing trim.
This Section will explain how to install a shed window, step-by-step.
Select the Shed Window Size
Before you can install a shed window, you need to frame the window’s rough opening in the shed wall. However, before you can frame the window’s rough opening, you need to decide what size shed window you are going to use.
There are many different styles and sizes of windows to choose from for your shed. Pick a shed window size that works for your specific shed installation.
For this guide, we will be installing 14″x21″ shed windows that were purchased from Amazon.
These windows include a window mounting flange (discussed later) that will be used to attach the window to the shed.
Apply Flashing to the Window’s Rough Opening
At this stage, apply a high quality flashing tape to the bottom of the shed window’s rough opening. Place the tape so that it overlaps the rough opening by approximately 1″, as shown:
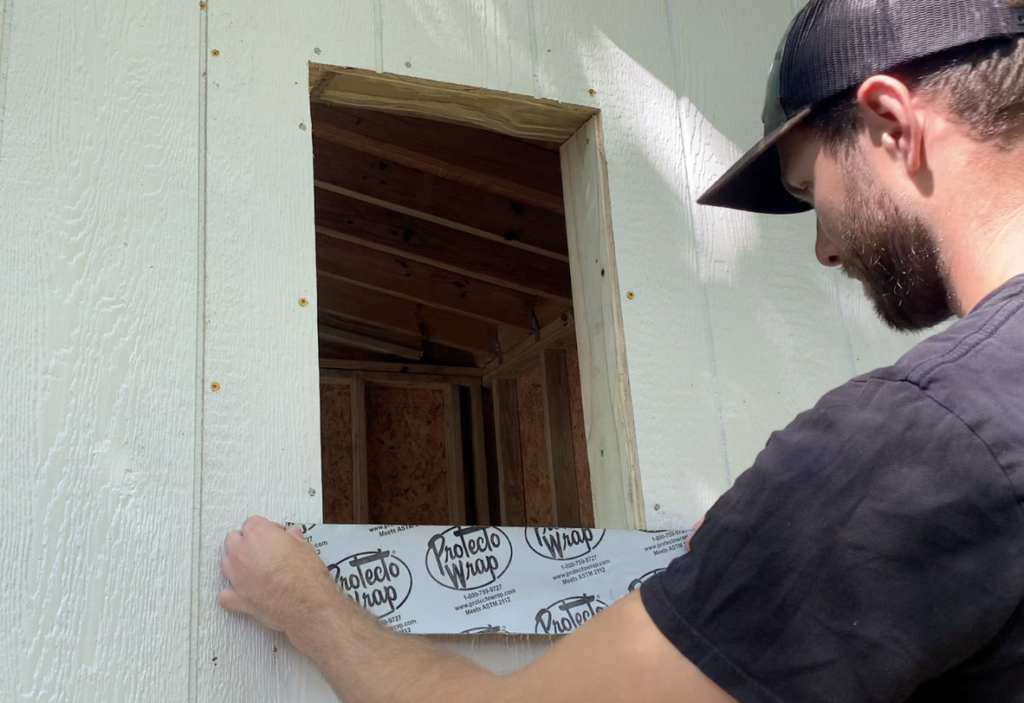
Next, use a utility knife to cut the sides of the flashing tape along the inside frame of the window’s rough opening as shown below:
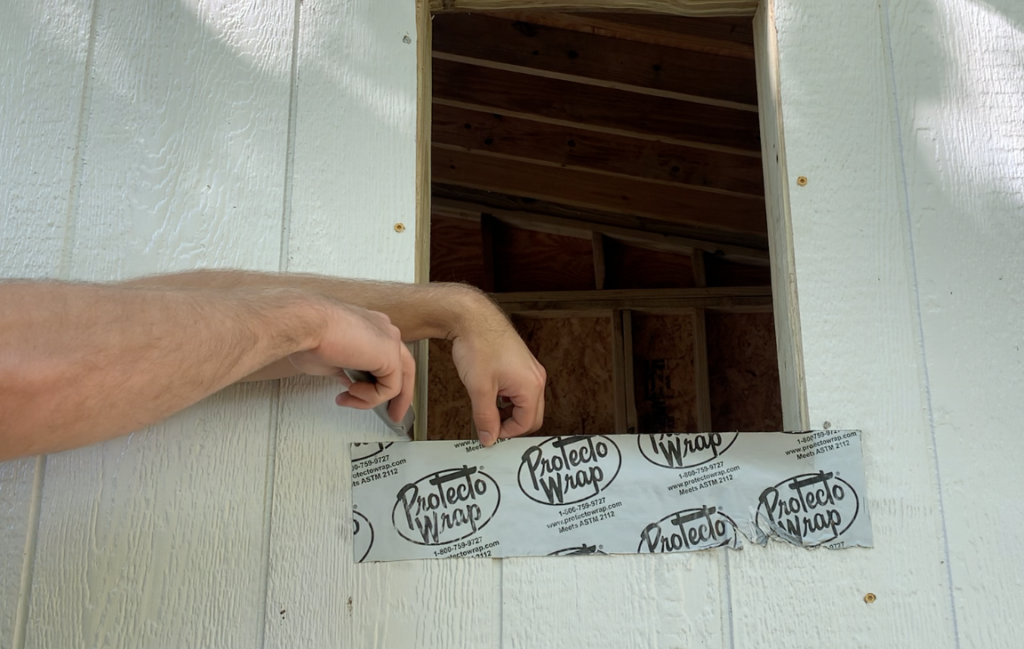
Fold the flashing tape over and secure it to the window’s sill plate, as shown.
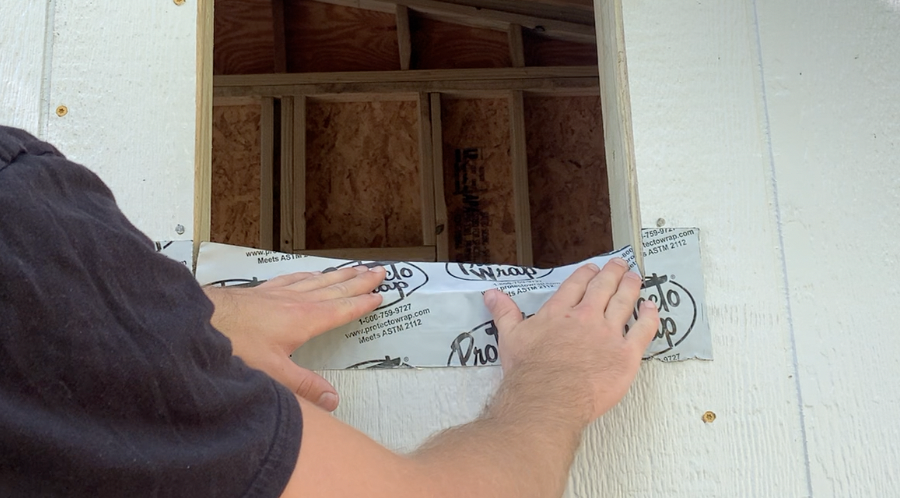
Next, apply flashing tape to the sides of the shed window rough frame. Again, overlap the window’s rough frame by 1″ and be sure to overlap the flashing tape installed at the bottom of the window.
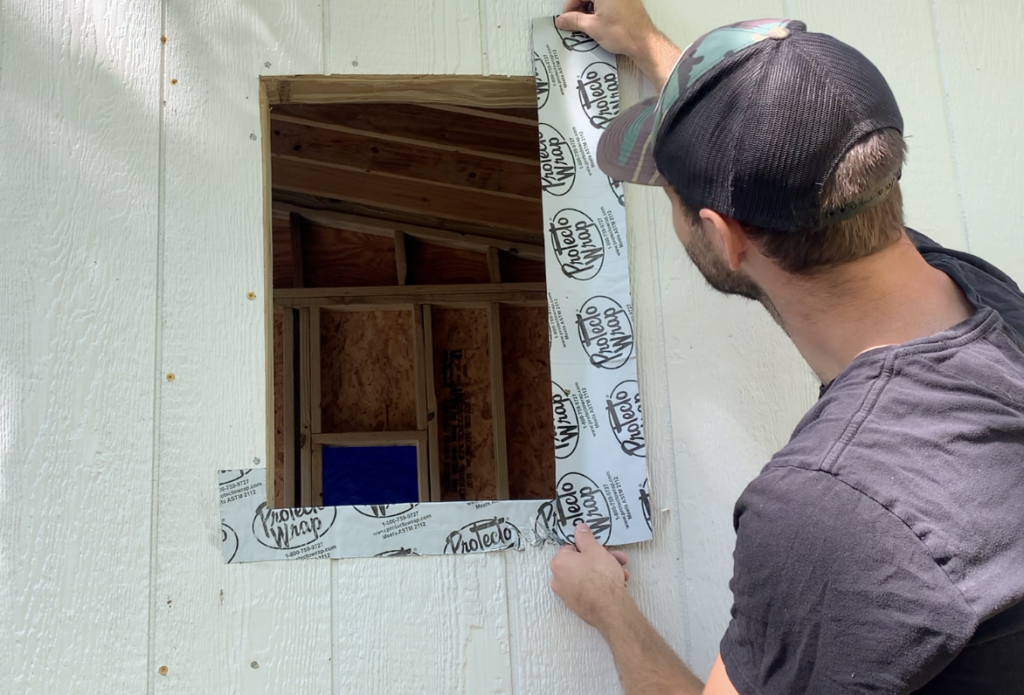
As done with the flashing tape on the bottom of the shed window, cut the flashing tape (as shown) using a utility knife.
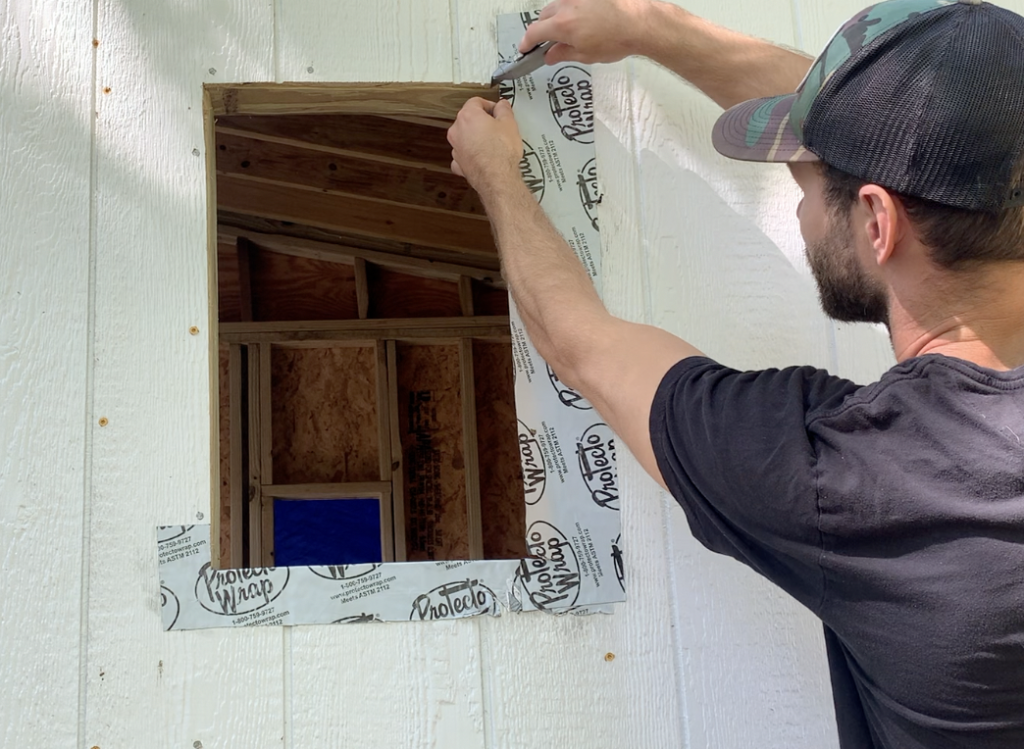
As done previously, fold the flashing tape against the inside of the window’s rough opening.
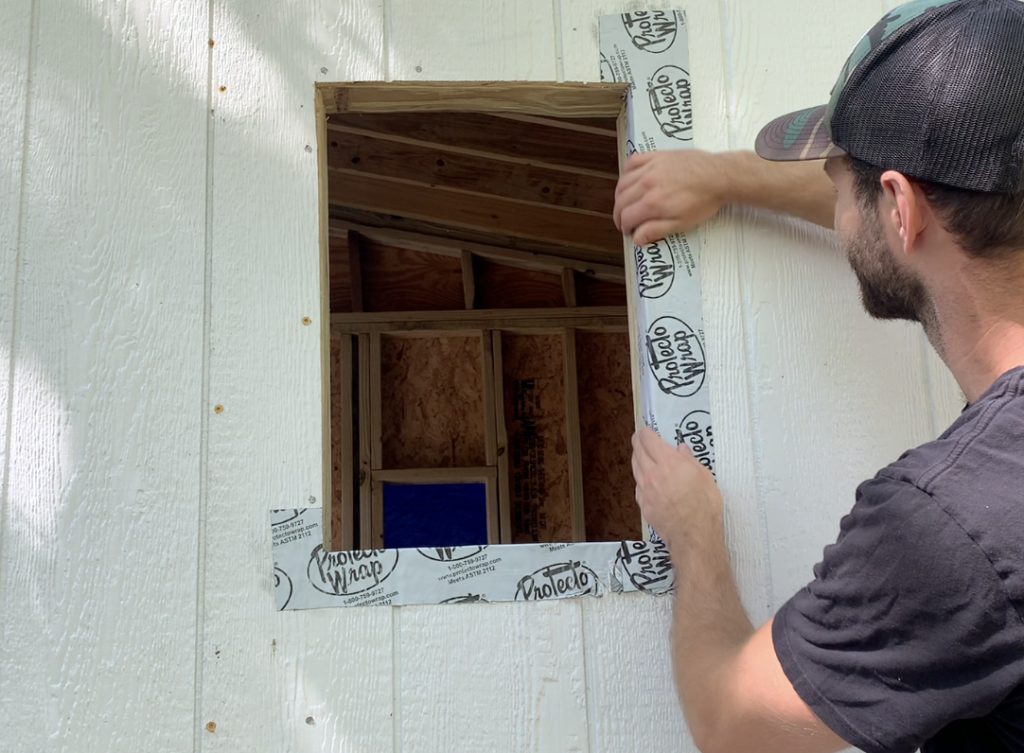
Repeat this process for the other side of the shed window’s rough opening. Below is a preview of what the shed window should look like after the flashing tape is installed on the bottom and sides of the shed window’s rough opening.
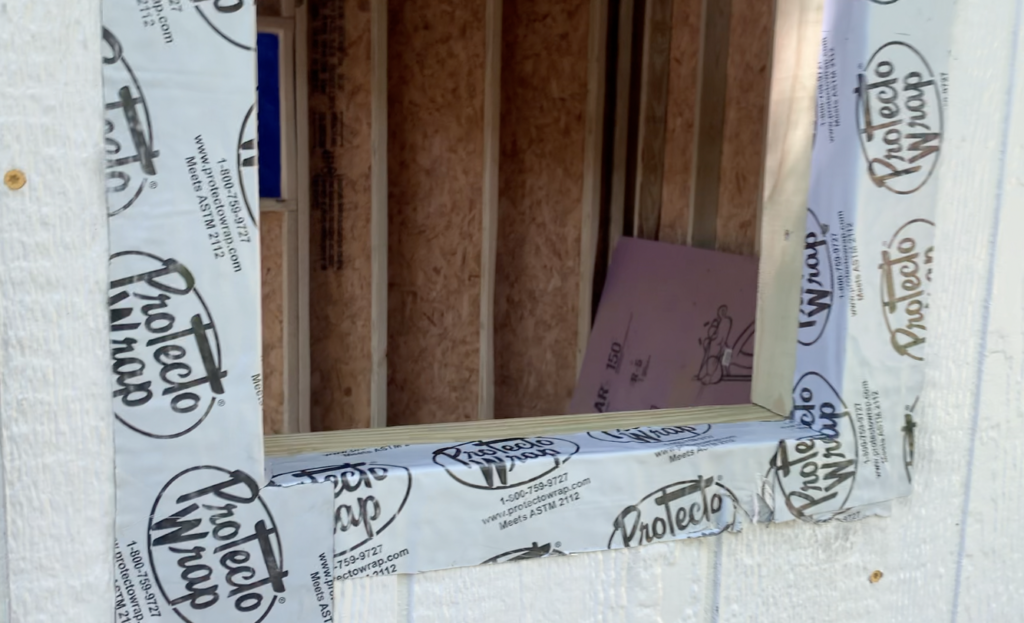
Apply Sealant Around the Window Perimeter
After applying flashing tape to the bottom and sides of the shed window rough opening, apply sealant around the entire perimeter of window. Be sure to apply a copious amount of sealant at the top of the window.
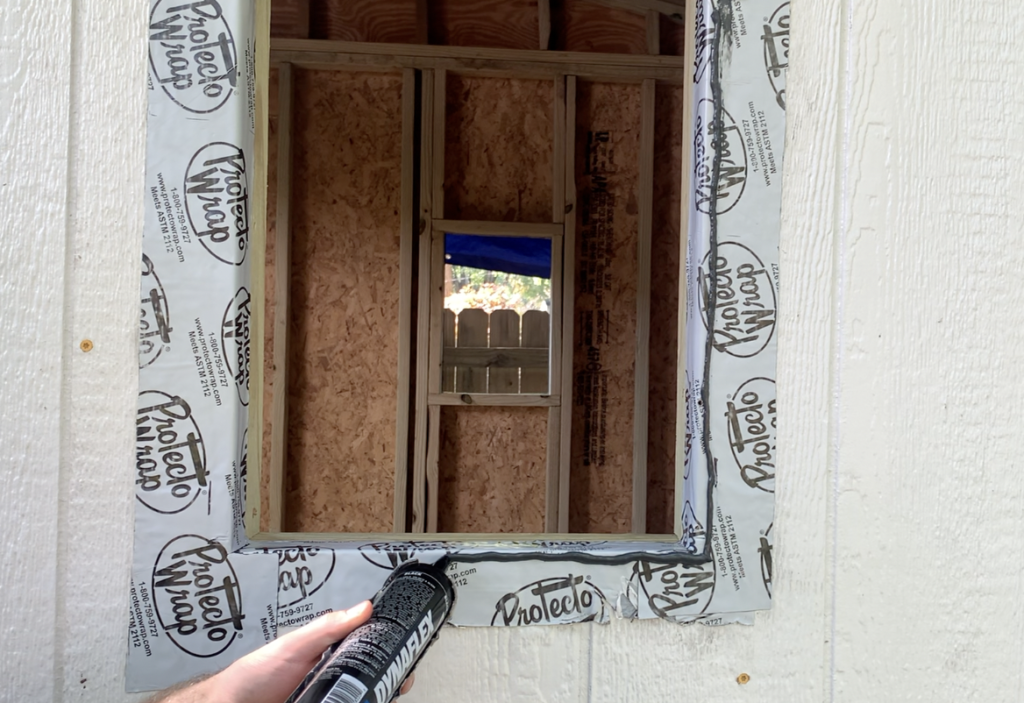
Install the Shed Window
After applying sealant around the entire perimeter of the shed window’s rough frame, install the shed window by placing it within the rough opening.
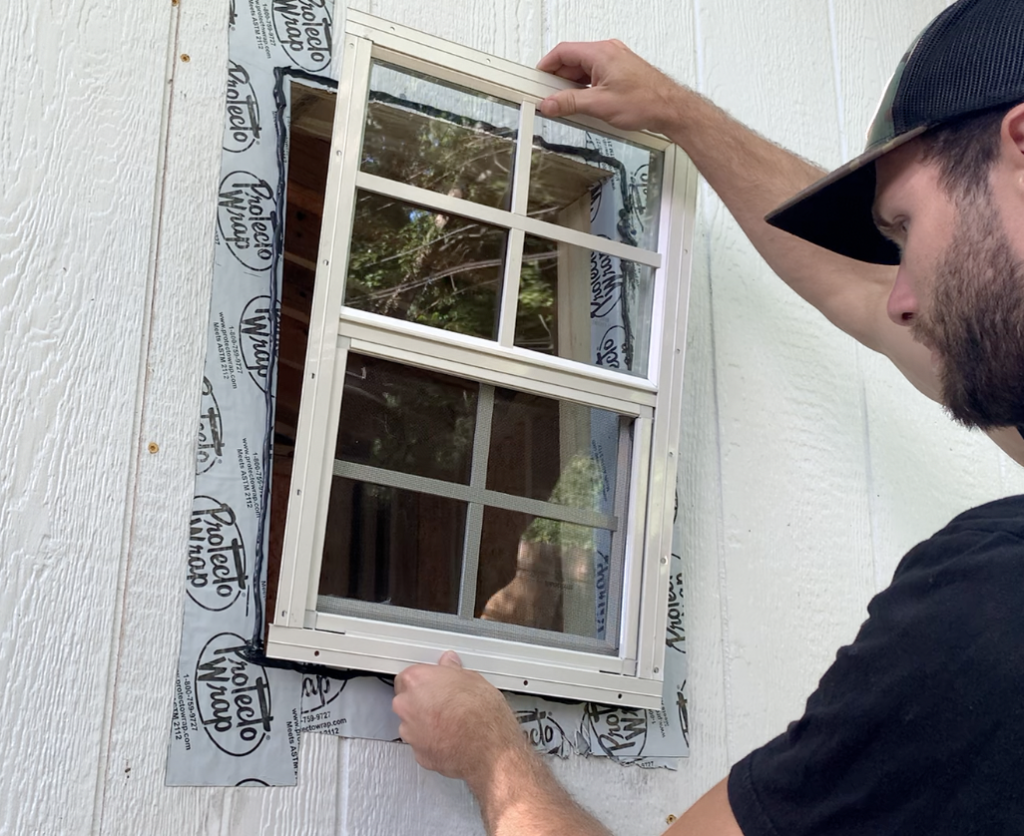
Firmly press the window into the sealant and center the window within the rough opening frame.
Once the window has been centered, check for level and plumb.
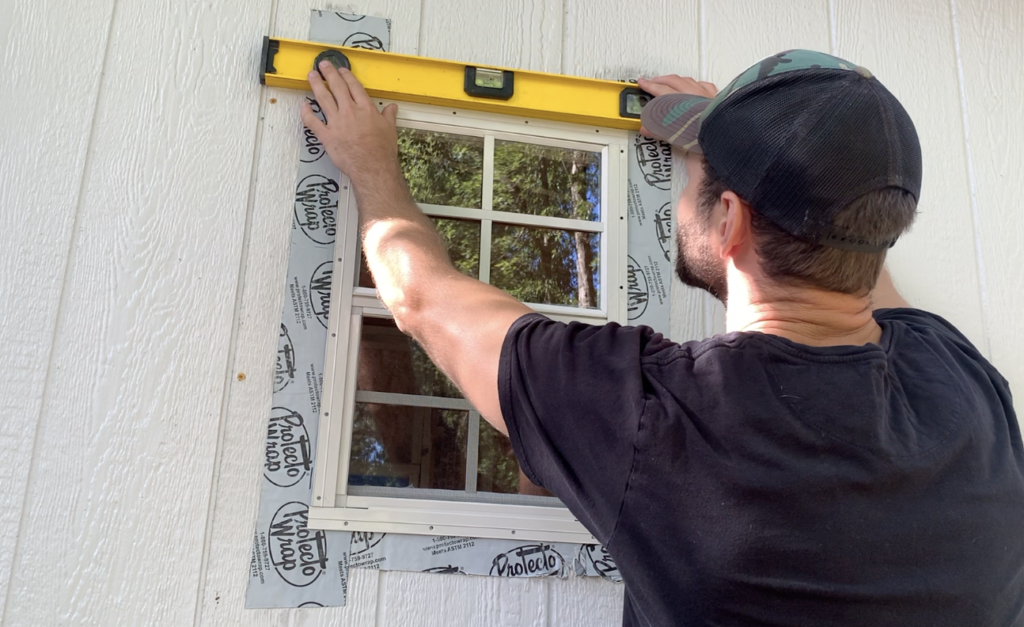
After confirming that the shed window is centered, level, and plumb, install fasteners through the window flange and into the shed’s framing as shown.
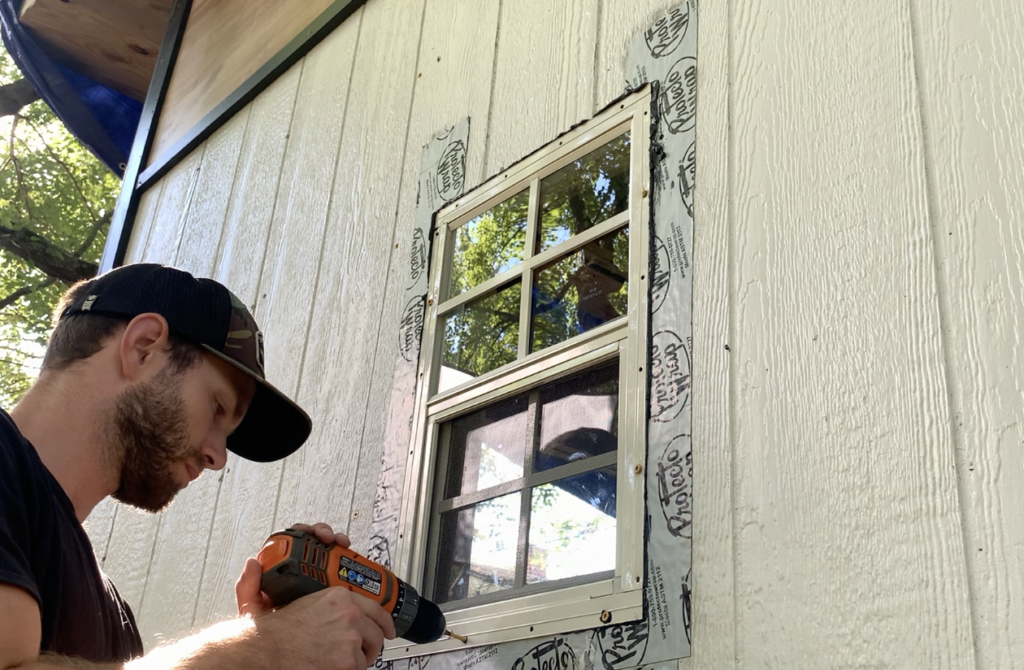
Install screws through each pre-drilled opening in the shed window’s flange. After securing the shed window to the shed’s framing, your installation is nearly complete.
Apply Flashing at the Top of the Shed Window
After securing the Shed Window to the Shed, apply a piece of flashing tape at the top of the shed window such that is overlaps the window flange. See below:
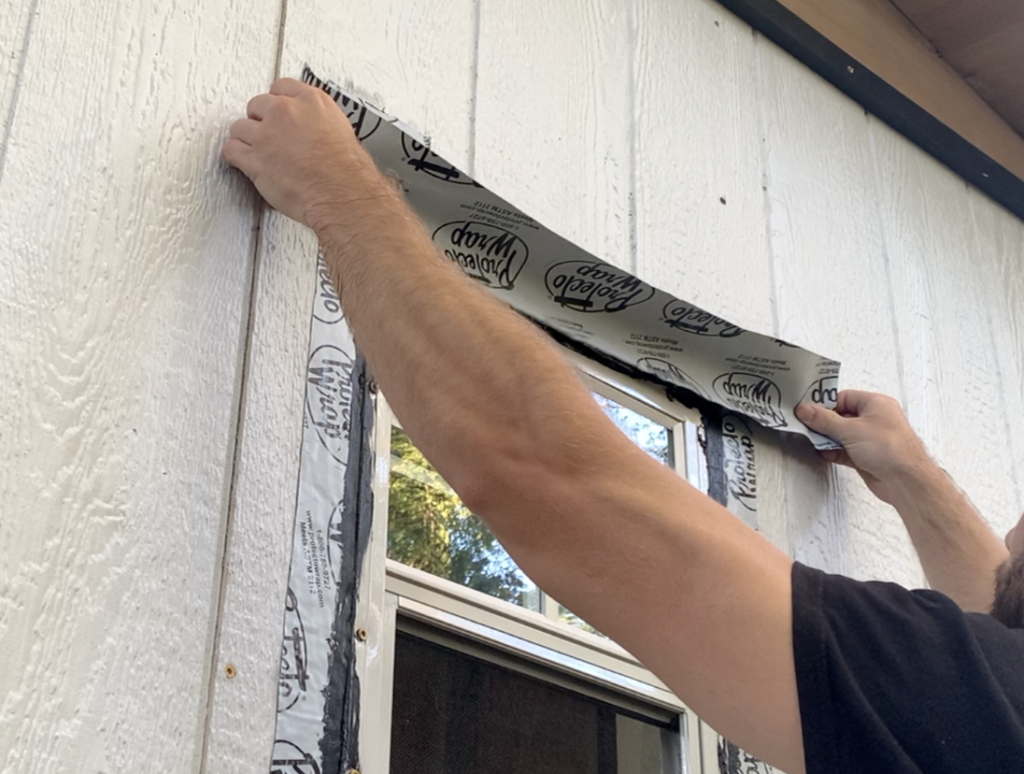
Refer to the Figure below showing how the window’s top flange is covered by the flashing tape.

Install Window Trim
Once the top strip of flashing tape has been installed, simply measure and cut you window trim casing to size. For this shed window installation 3/4″x4″ PVC trim was used for the window casing. Cut the trim to size such that the shed window’s mounting screws are completely concealed.
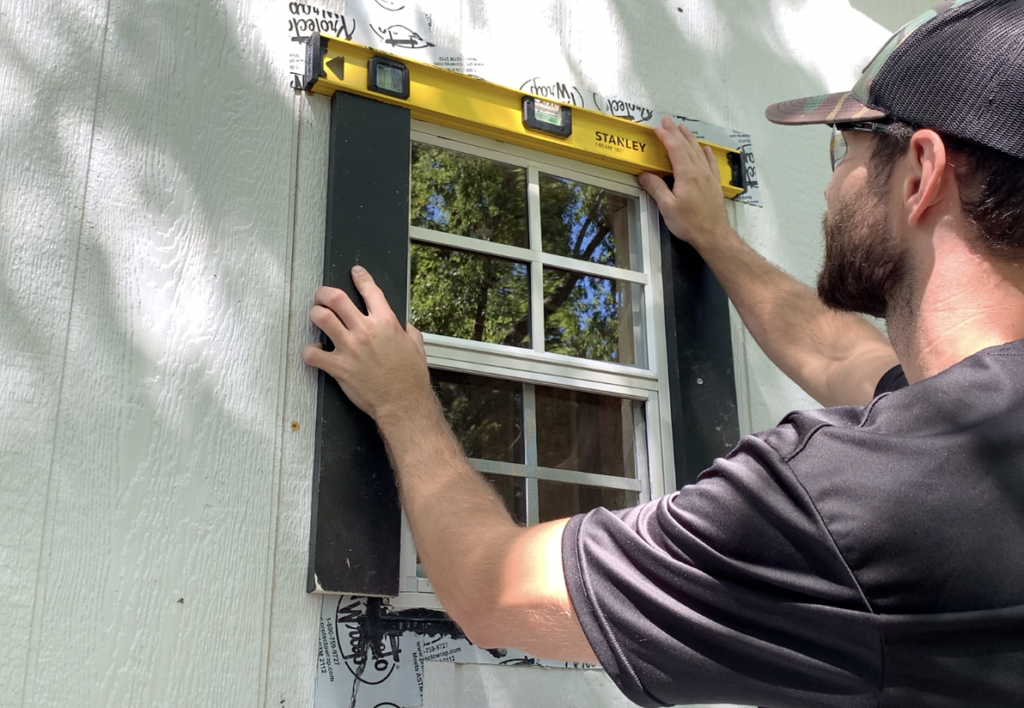
Secure the Shed Window casing to the shed using framing nails or brad nails (recommended).
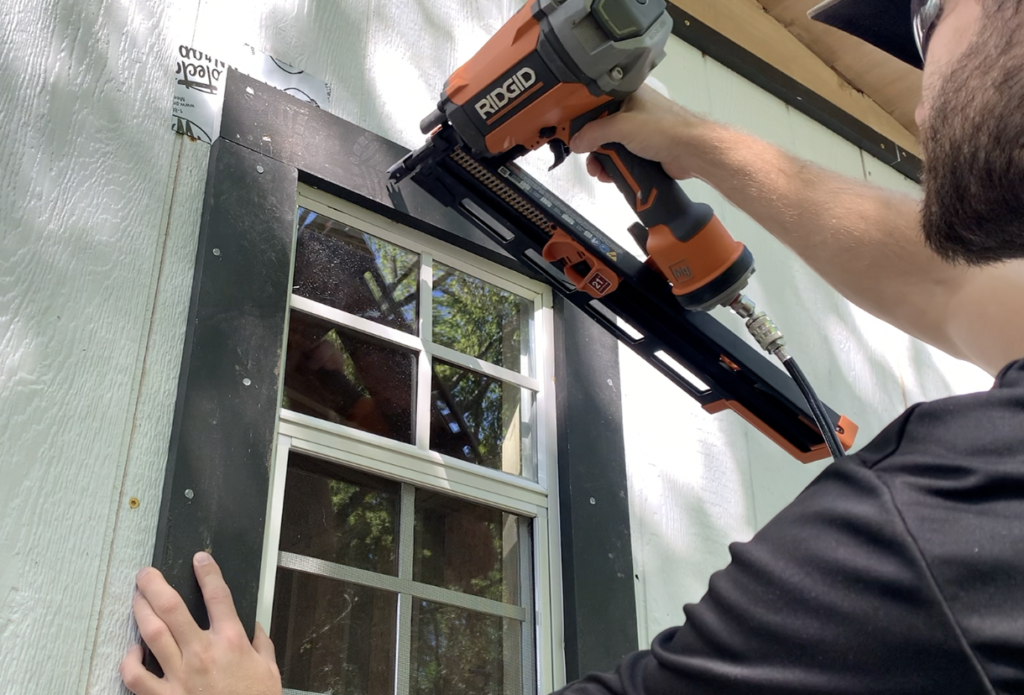
For more Information on How to Install Shed Trim, check out my Youtube Video Below. This video will cover window trim, base trim, fascia board trim, and outside corner trim.
Caulk Around the Window Trim and Paint
At this stage, trim off any excess flashing around the window trim casing with a utility knife.
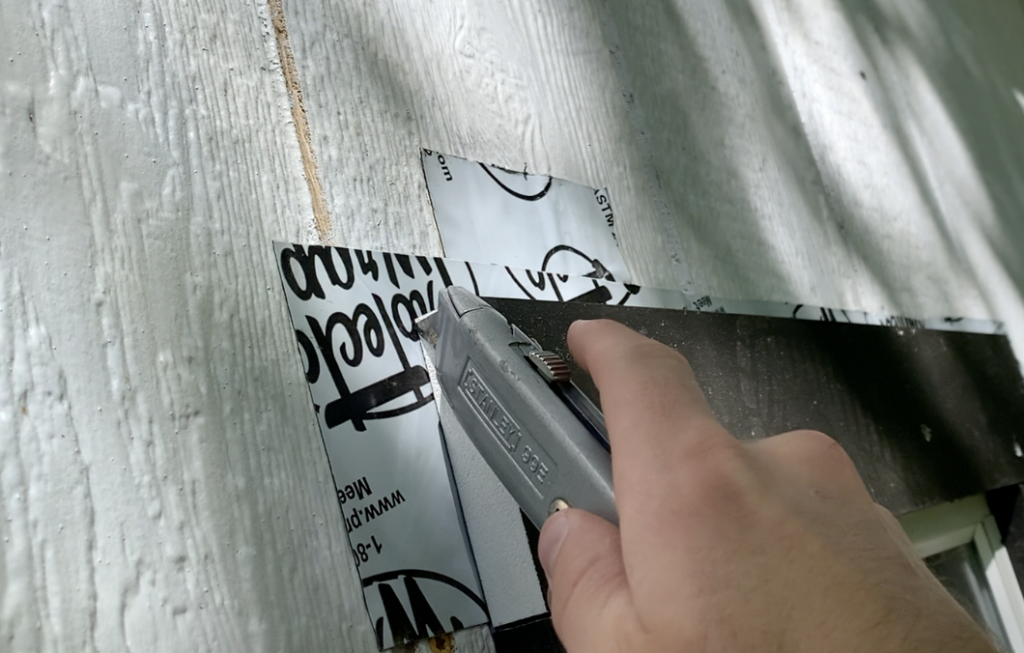
Next, apply a thin bead of sealant/caulk between the shed window trim casing and the shed’s siding to prevent any water from infiltrating behind the window. It is recommended that you do NOT apply sealant to the bottom of the window. This is to allow for any water that gets behind the window to have a way to drain out.
Finally, paint the shed window trim to your desired color. In this case, the shed window trim casing was pre-painted and only touch-up paint was required.
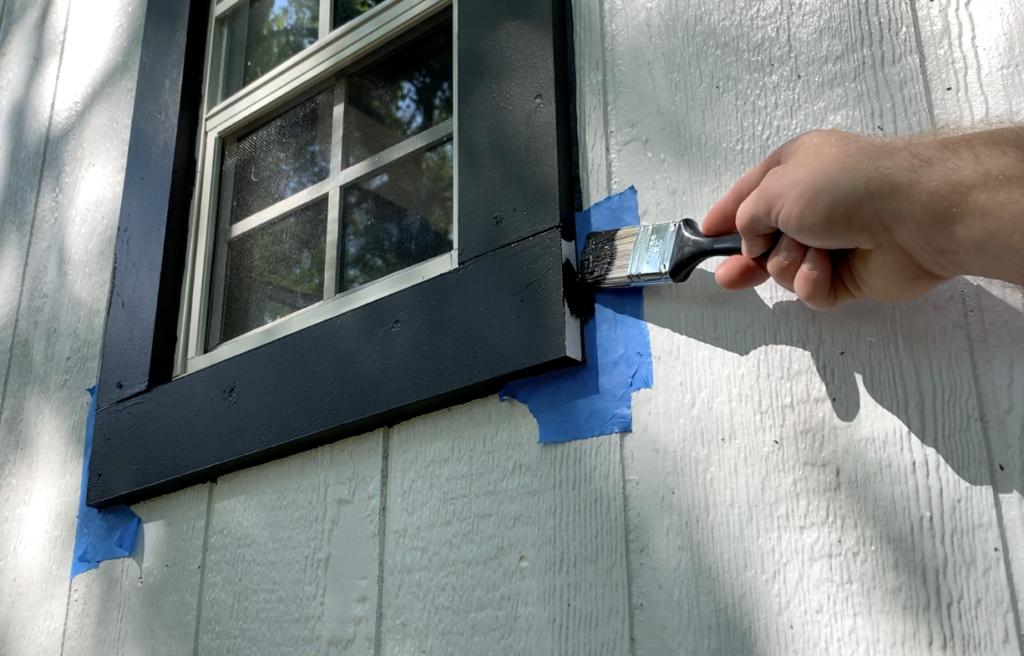
For a step-by-step shed window installation video, check out the resource below:
In the previous sections, we outlined all of the basic steps needed to build a shed. However, the best part of building your own shed is the ability to customize it to fit your needs. In this section, I will outline the additional features I added to my shed to take it to the “next level”.
Shed Bonus Features
One of the great things about building your own shed is that you can customize it any way want. Below are some of the “bonus features” that I added to my shed which, in my opinion, took it to the next level:
Shed Storage:
When building your own shed, optimizing wall storage is something that should be considered. Since my shed is only 10’x10’, I really had to optimize my shed wall storage. To accomplish this, I used a product called ProSlat Slatwall.
This product is basically an advanced “French Cleat” style system that mounts directly to wall studs.
For more information on the ProSlat Slatwall System and how to install it, check out my YouTube video linked here or my “How to Install ProSlat Slatwall” blog.
Adding Electricity to Your Shed
If you plan to be spending a lot time in your shed, you may want to consider adding electricity. Outlets, overhead lighting, etc. are features that can greatly enhance the functionality of your shed.
For more information on how to add electricity to your shed, check out my YouTube Video linked here or check out my “How to add electricity to a shed” Blog.
Note that ALL electrical work must be performed by a licensed electrician.
Building a Shed Ramp
If you plan on moving a lot of equipment in and out of your shed (lawnmower, etc.), you may want to consider building a shed ramp. Building a shed ramp is not 100% necessary, but it is a rather simple thing to construct.
For more information on how to build a shed ramp, check out my Shed Ramp YouTube video or my blog linked here.
Epoxy Flooring (This one is a bit “Extra”)
The last feature I installed in my shed was an epoxy floor coating. This flooring was installed purely for aesthetic reasons and I think it adds a lot of character to the shed.
For more information on how to install an Epoxy Floor Coating, check out my YouTube video linked here or read my blog article linked here.
Cost to Build your Own Shed (Is it Worth it?)
Now that you know how to build your own shed, you might be asking yourself the following question:
HOW MUCH DOES ALL OF THIS COST?
That is a good question – and it honestly depends on a bunch of different factors. The cost to build a shed can generally broken up into the following items:
- Framing Lumber Cost
- Plywood Sheathing and Siding Cost
- Window and Door Cost
- Shed Roof System Cost
- Trim Boards
- Paint, Caulk, etc.
- Hardware (Nails, Screws, etc.)
- Misc. Costs (Deliveries, Shed Ramp, Lighting, etc.)
I wrote a blog article that goes through the cost to build your own shed in detail, but a summary of the “low end”, average, and “high end” cost to build a shed (in my opinion), is presented in the table below:
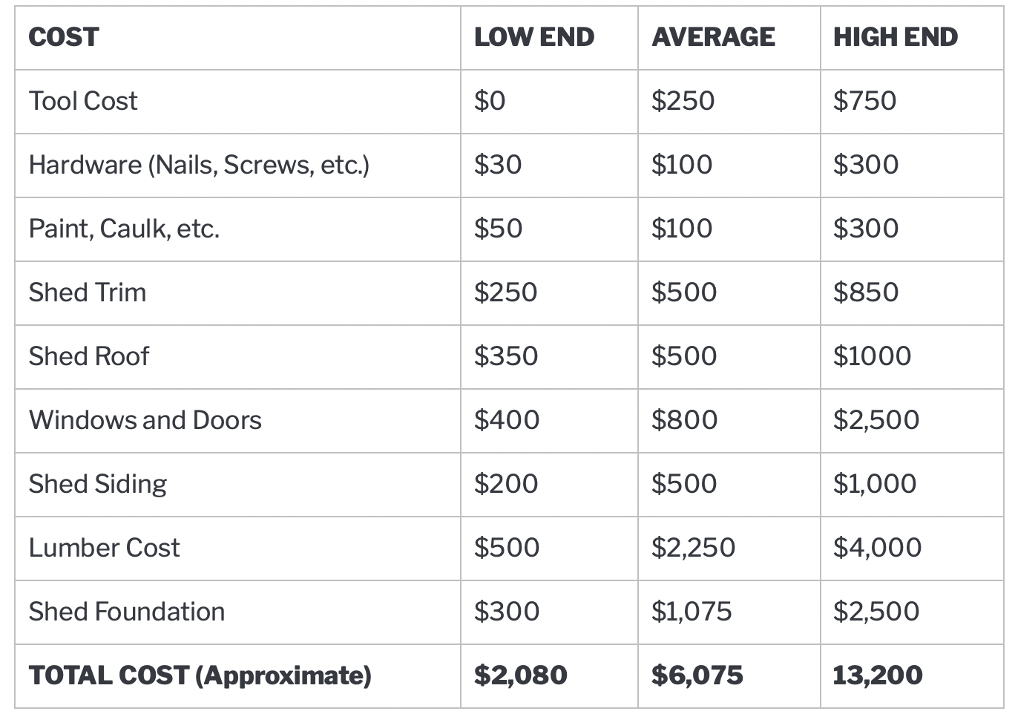
In my blog article, I compare the costs above with the typical costs associated with purchasing a pre-made shed – so check out that comparison if you are interested.
For reference, my 10’x10’ shed cost approximately $4,000. However, this cost does not include the additional features like the epoxy floor coating, electricity addition, ProSlat Slatwall, etc.
Conclusion
At this point, you have a basic overview of the entire shed building process. The next step is to simply go out there and build your own!
Building you own shed is a highly satisfying project that will allow you to practice and fine tune a lot of general skills. After building my shed, I had the confidence to finish my basement! I encourage you to view the shed building process as a great way to increase your overall DIY competency.
If this Article helped you out, I would sincerely appreciate if you would subscribe to my YouTube Channel and follow me on Instagram. I post DIY video tutorials and Home Improvement content practically every day and I promise you won’t regret it!
Lastly, if you want to learn how to build my exact 10’x10’ modern shed from start to finish, I highly encourage you to consider purchasing my Shed Building Course. This course includes a materials list, cut list, dimensional drawings, and detailed video instruction for every single step of the shed building process. Basically, it’s like you are building the shed alongside me.
If you want to see a construction time-lapse of the entire shed building process, check out the video below:
Thanks so much for checking out ATImprovements! If you learned something from this project, you might also like these other DIY Projects:
- How to Build a Concrete Slab Shed Foundation: https://atimprovements.com/how-to-build-a-shed-base-concrete-slab-step-by-step-diy-guide/
- How to Build a Fence: How to Build a Fence (DIY Guide) – AT Improvements
- How to Build a Fence Gate: How to Build a Fence Gate (7 Steps with Pictures & Video) – AT Improvements
- How to Install a DIY deck Wire Railing: DIY Cable Railing – How to Install Cable Railing Step-by-Step – (atimprovements.com)
- How to Build a Concrete Paver Patio: DIY PAVER PATIO – Easy DIY Paver Patio Ideas – (atimprovements.com)
Thanks!
DISCLAIMER: This is a reference guide only. Consult local code requirements. Links included in this article might be affiliate links. If you purchase a product or service with the links that I provide, I may receive a small commission. There is no additional charge to you! Thank you for supporting ATimprovements so I can continue to provide you with free content each week!