

Adding a gable porch roof overhang to an existing house is one of the best ways to add curb appeal. Rancher style homes in particular can benefit from this project since the gable porch overhang will help to break up the straight roof lines associated with so many ranch homes.
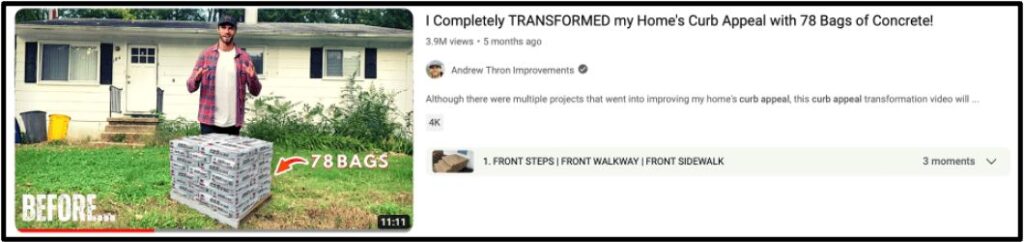
I personally added a gable porch overhang to my home and the boost to the curb appeal is quite outstanding. Check out the “Before” photo of my home without the gable:
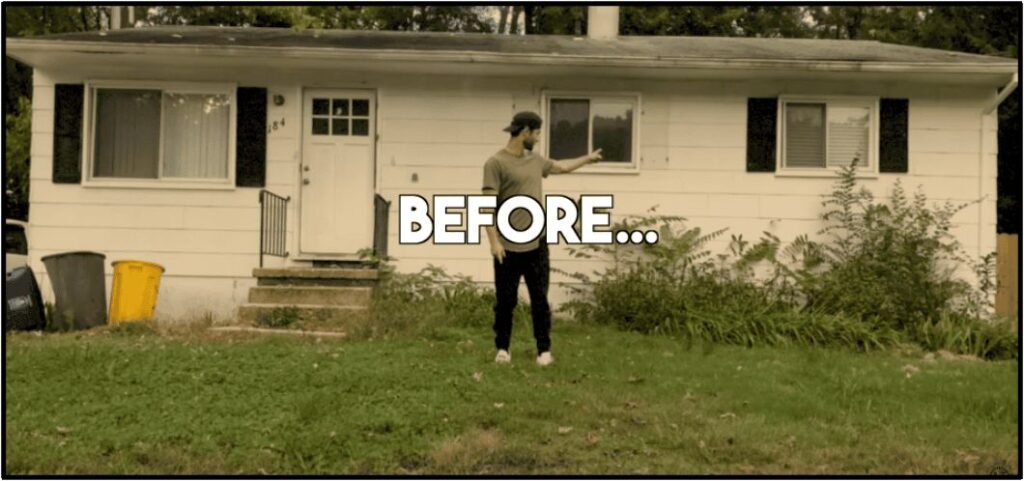
And now take a look at my home after I build a gable porch overhang over the front door.
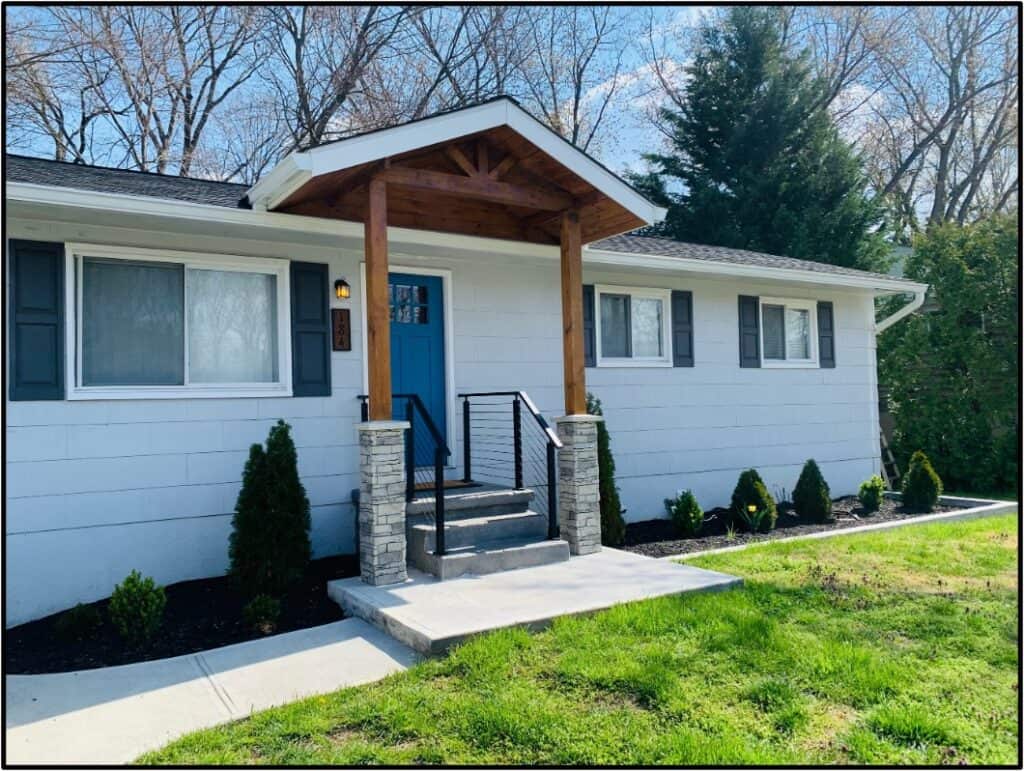
I call the gable porch overhang the “curb appeal antidote” because I truly believe it is one of the best ways to boost the curb appeal of a small, boring home. If I can build one, you might be able to build one too. I say “might” for the following reasons:
1. I am somewhat “advanced” when it comes to DIY experience, but this project was definitely a challenge. This involves carpentry skills, working up high on a roof and ladder, and some pretty heavy materials.
2. This is a “high risk” project. By that, I mean that you will need to demolish part of your home, roof, etc. in order to make this project happen. It my case, this meant that I had one or two “tarp” nights so that I could contend with some unexpected rain events that blew in.
3. This project will likely require permits, engineering, etc. When you build a gable porch overhang, you are essentially building a small “addition” on your house. Things like snow loads, support column size, overhangs, etc. need to be considered and you may need to have approved plans form a licensed engineer / architect in order to get the “go-ahead” from your City.
I don’t say all that to scare you, but I do want to “shoot you straight”. This project is not for everyone. But if it’s for you, you have the potential to completely transform the look of you home.
With that said, this is going to be a very detailed guide on how I added a gable porch overhang to my existing rancher style home. Please use the Table of Contents below to navigate to the various different sections of this article.
Planning out Your Gable Porch Overhang Addition:
Design Inspiration
Before you can begin constructing your gable porch addition, you first need to get inspired. When I say inspired, I mean that you need to find a design, style, etc. of gable porch that you are looking to replicate on your home. Fortunately, many people have undertaken “gable porch addition” projects before us – so we can draw inspiration from their work.
For my gable porch addition project, I drew inspiration from Pinterest. Pinterest is a great resource for gable porch addition ideas and it should be your first destination as your start to plan out your gable porch addition project. To make it easy for you, I have compiled Pinterest Board (linked here: (https://www.pinterest.com/andrewthronimprovements/gable-porch-overhang/ ) with various gable porch projects that may help to inspire your project.

On that Pinterest Board, you will also see a bunch of different photos of the gable porch overhangs that I drew inspiration from. You will also see a few photos of the Gable Porch I built 😎.
Once you find a design (or designs) that you want to replicate, you can begin the planning / modelling process.
Note: Feel free to be as creative as you want for your gable porch overhang project. You don’t need to replicate anything shown on Pinterest – it is just a helpful resource for getting the “creative juices flowing”.
Project Planning and Modeling
Although I don’t always plan out my DIY projects before building them, I definitely think that a gable porch overhang project is one that you want to plan out and model ahead of time. In all honesty, this might even be something worth calling an architect for…
In terms of framing, there are many different methods, materials, etc. that can be used to make up your gable porch addition. If you “Google” – How to Frame a Gable Porch Overhang, you will be bombarded with countless images, articles, videos, etc. showing how ‘Joe Schmoe’ framed his gable porch. Some people will use 8”x8” support columns while others will use 4”x4” columns. Some people will use 2’x4” rafters while others will use 2”x6” rafters. Some people will have a super steep gable porch (10:12 pitch), while others (like me) will have a rather shallow roof pitch (6:12). There is no “right” way to do this – but there are definitely a few wrong ways to do it.
There is a very helpful book that I used as a reference for my gable roof framing called “The Complete Visual Guide to Building a House” and it is a great resource to consult for this project (specifically, pages 138 – 141).

With that said, you should 100% get a licensed architect / engineer involved with this project to ensure that the gable porch overhang you design (or the one they design for you) meets all of your local code requirements for snow loads, etc.
After doing my own research, I decided to model my gable porch overhang on Sketchup. Sketchup has a free version (which I use) and it is a great tool for 3D modeling your projects. Although it takes a bit of time to learn, there are a lot of great resources on YouTube that will show you everything you need to know. How do I know that? Because I am 100% self-taught using Sketchup and I learned everything I know about the software from the Internet.
With that said, I am still far from an expert and my models are almost always for “illustration purposes” so that I can visualize what I am going to build.
Let me show you a few images of the model I created and then I will go through porch roof framing details:
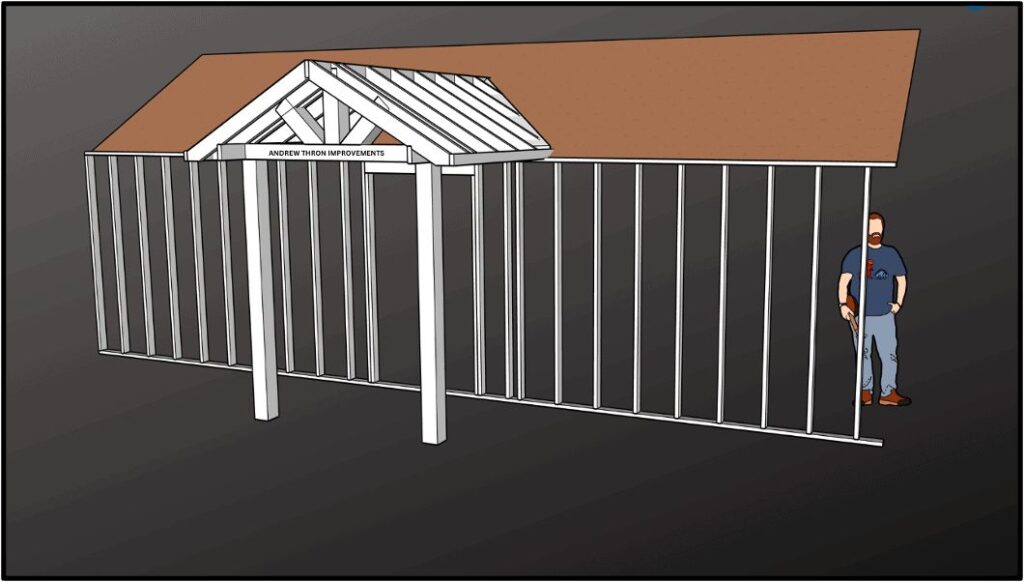

As you can see from the images above, I labeled all of the major components so that you will know what I am referencing later on in the build. I modeled my gable porch overhang with 6”x6” vertical support columns, a 6”x6” horizontal cross beam, and 2”x6” rafters. I modeled the gable porch overhang with a 6:12 roof pitch, but I knew that I wanted to decide on the final roof pitch after starting the project and seeing how the different roof pitches looked on my roof.
Now you might be asking yourself: “is this really” the best way to frame a gable porch overhang?”. Absolutely not. Is it ONE way to do it? Absolutely. With that said, you should not attempt to replicate this design without consulting with a licensed architect/engineer in your area to check for compliance with snow loads, wind resistance, etc. We will talk more about that in the next Section.
Project Planning and Permitting

Gable Porch Roof Planning
After you have planned and modeled your gable porch overhang (either in Sketchup or on graph paper) you will likely need to prepare a submittal package for City / County Review. I know, I know.. we all love a good bureaucracy..
Typically, you will need to develop scaled, dimensioned drawings for your gable porch overhang that can be used as the basis for your permitting application. Depending on where you live, they may also require you to have the gable porch overhang designed by an architect / engineer.
Permitting your Gable Porch Roof Addition
Because permitting requirements vary significantly from City to City, I am only going to provide a brief summary of the general permitting process. You will need to check with your local permitting department and city for the exact permitting requirements for your area.
Below is the most common permit that may be required for your Gable Porch Roof Overhang project:
Building permits: Most jurisdictions require a building permit for any modifications to your home (like a gable porch addition). A building permit is an official approval from the local government authorizing the construction or renovation of a structure. Building permits are in place to ensure that the work meets safety standards, building codes, and zoning regulations.
It’s important to note that failing to obtain the necessary permit(s) or not following the local building codes can result in penalties, fines, and even having to undo or redo the work. Ask me how I know…
It’s always recommended to consult with your local building department early in the gable planning process to understand the specific permitting requirements and ensure compliance with the regulations. They can provide you with the necessary information, guidance, and assistance to complete your gable porch project legally and safely.
If you watched my YouTube video on the gable porch overhand project, you know that this permitting section is a DO AS I SAY, NOT AS I DO teaching moment, but I digress….
Once you have submitted all of your permit applications to your city, you may receive comments that need to be addressed. If so, make the required changes and resubmit. Once your permits are approved, you can begin construction.
Building The Gable Porch Roof Overhang
Building the Foundation for the Gable Porch Support Columns
For most gable porch overhangs, the ‘back’ of the gable will be supported by the existing house / structure. The front of the gable (typically supported by 4”x4”, 6”x6”, or 8”x8” Vertical Support Columns) will need to be supported by a firm foundation.
Although some people/contractors will simply install concrete support columns (e.g. Sonotubes) directly beneath their vertical supports, I opted to build a frost protected concrete slab since I wanted it to function as a stair landing as well.
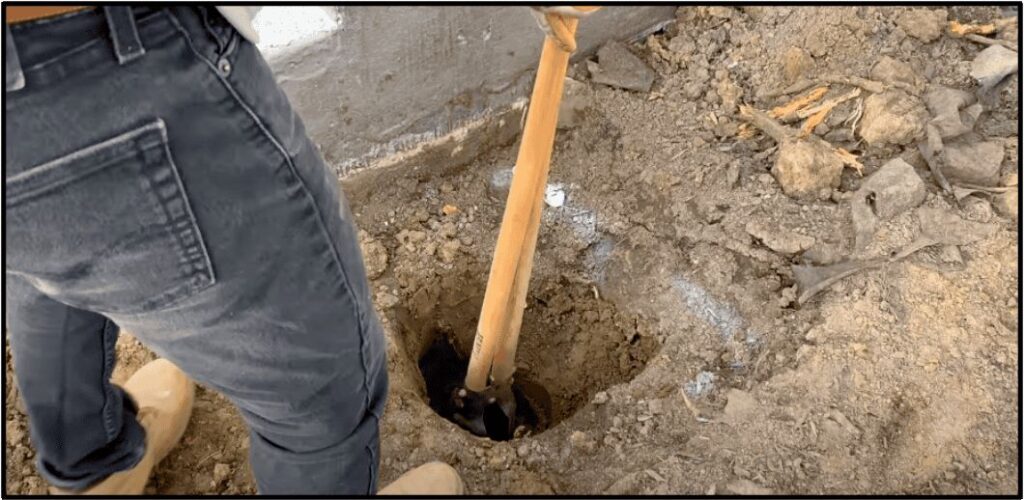
In my area, the frost depth is approximately 30”. Therefore, I dug a deep footing (approx. 3’ deep) at each corner of this slab. For applications like a shed slab, you typically do not need frost protection since the entire slab, shed, etc. will be floating. As a result, small thaw / freeze shifting is not a huge deal.
For a gable porch project, however, one side of the gable will be attached to a fixed structure (your house). As a result, you need to ensure that the front vertical support columns are frost protected so they are not subjected to freeze / thaw heaving.
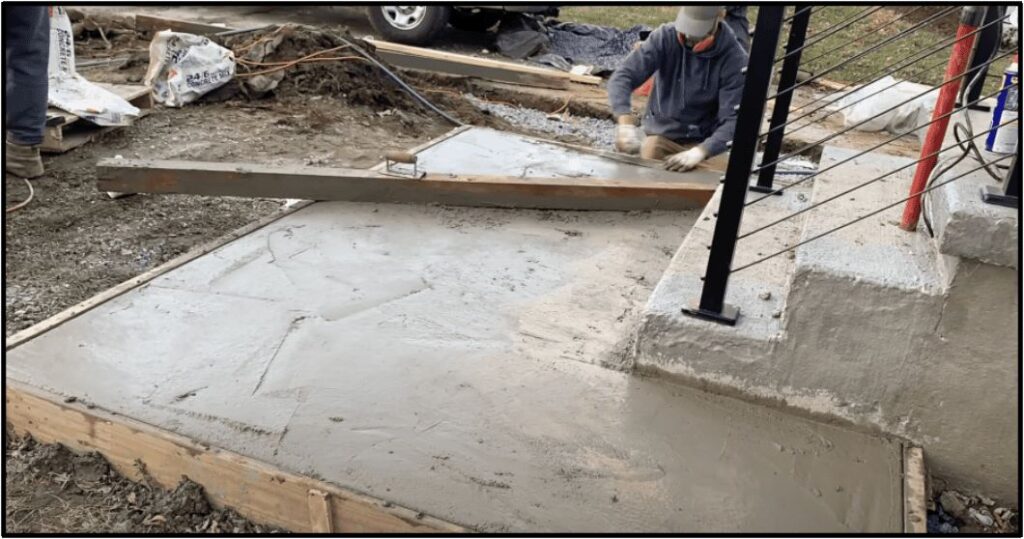
As you can see in the image above, I dug a deep footing in each corner of the slab. Next, I built the concrete forms and poured the concrete by hand (not recommended).
For additional information on how I built the stair landing / foundation for my gable porch overhang, check out the YouTube video linked below:
Demolition Work on the Existing House
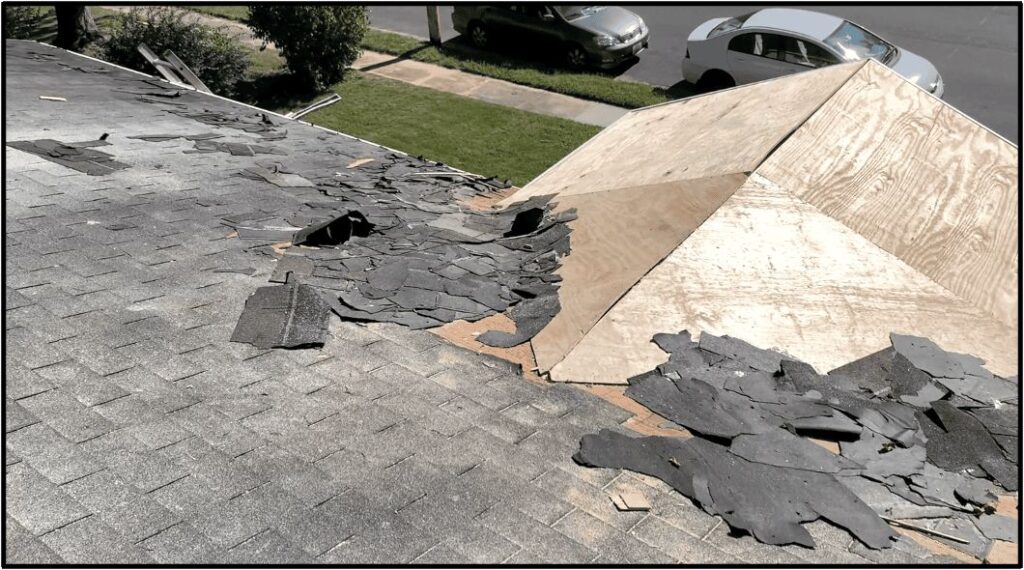
In order to have the ability to anchor your new gable porch overhang to your existing house, you will likely need to perform some sort of demolition (e.g. shingle removal, roof decking removal, etc.) on your home. The extent of demolition will depend on your specific project, but for my project I had to perform the demolition work shown below:

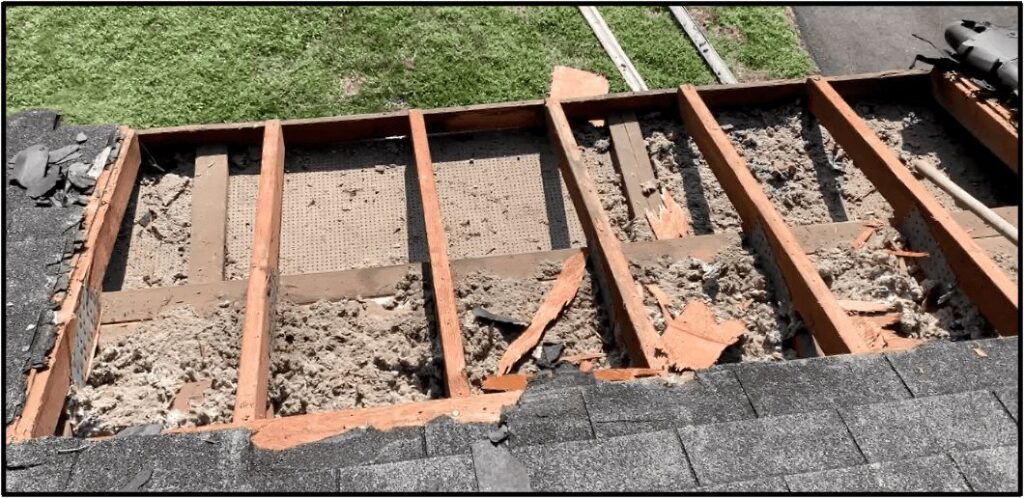
Ripping off your roof is scary… Also, you should 100% check the weather to make sure you have a few days of “no rain”. Basically, I just needed to expose the front wall of my house so that I could anchor the gable joists to it in the next step.
Framing the Gable Porch Overhang
Installing and Anchoring the Gable Porch Support Columns
The first step in actually building the gable porch overhang is to determine the location for the vertical support columns. The spacing between columns will depend on how wide you want your gable porch overhang to be. For mine, I simply centered the vertical support columns between the steps and the edge of the concrete landing (this also was exactly where my deep concrete footer was placed).
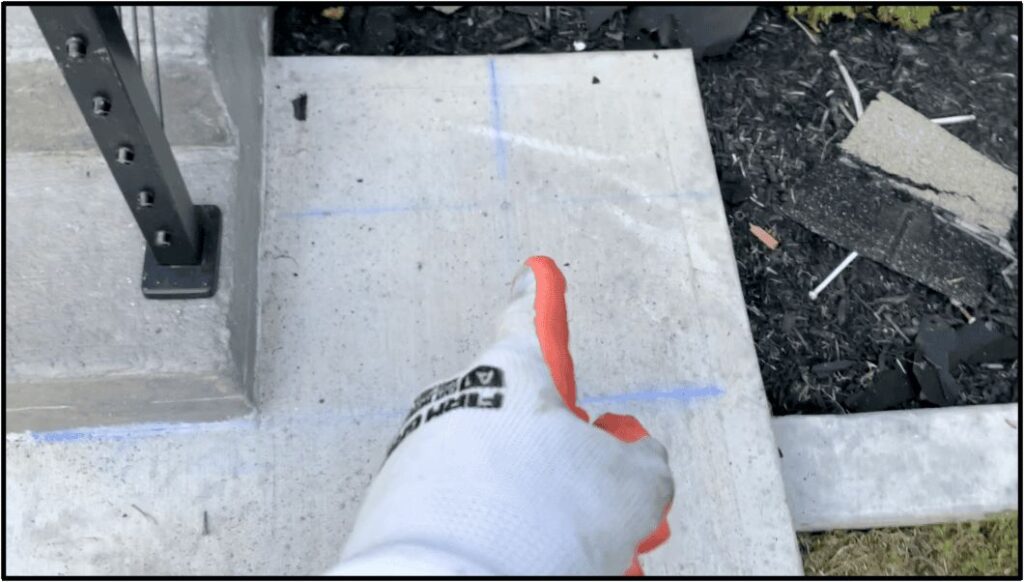
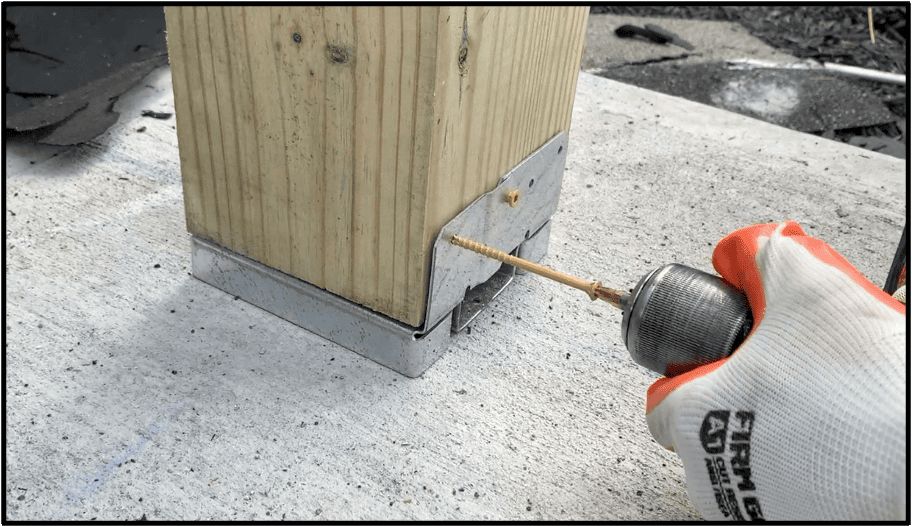
Once you have determined the location for the vertical support columns, you will need to install your post base / anchor. For my Gable porch, I decided to use 6” x 6” pressure treated vertical support columns, so I needed to use 6” x 6” post anchors that are designed to be attached to concrete. To attach these post anchors to the concrete, I used a heavy duty concrete wedge anchor.
I used a Hammer Drill and an SDS drill bit to drill the hole in the concrete for the wedge anchor.
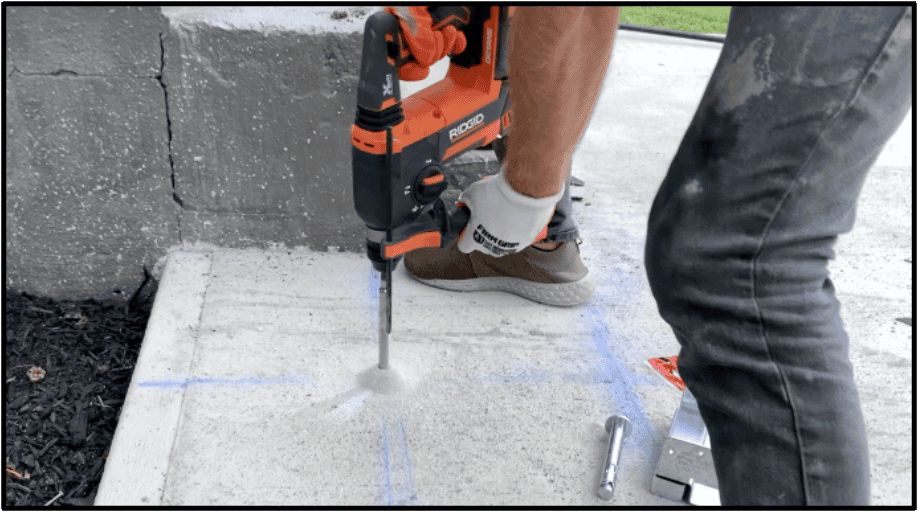
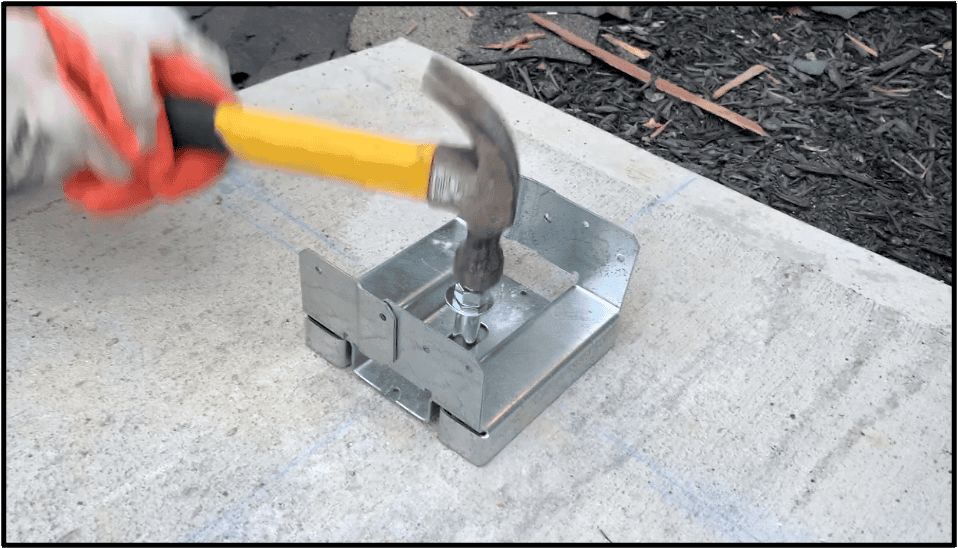
After drilling the hole, I placed the post anchor in place and inserted the wedge anchor – hammering it into the predrilled hole.
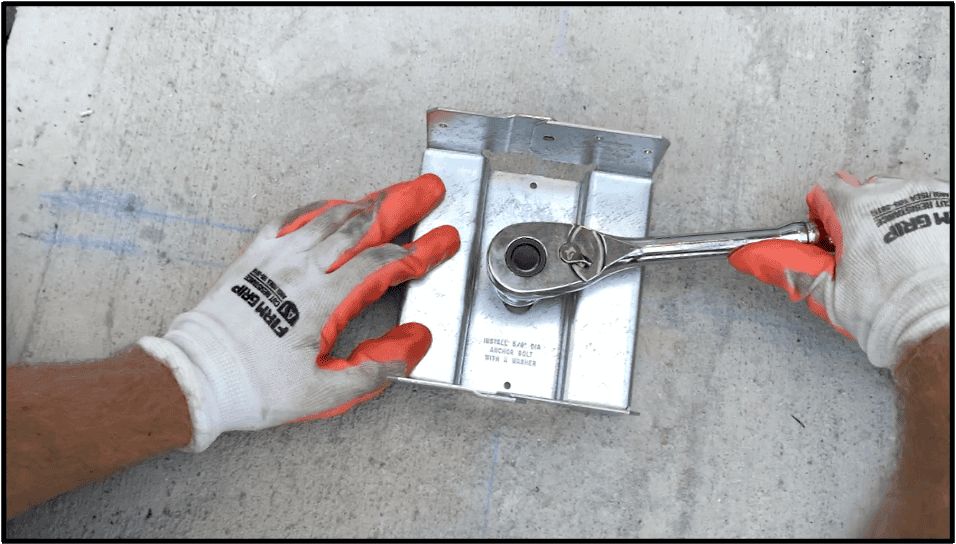
Finally, I ensured that the post anchor was in the right location and I tightened the wedge anchor using a socket wrench.
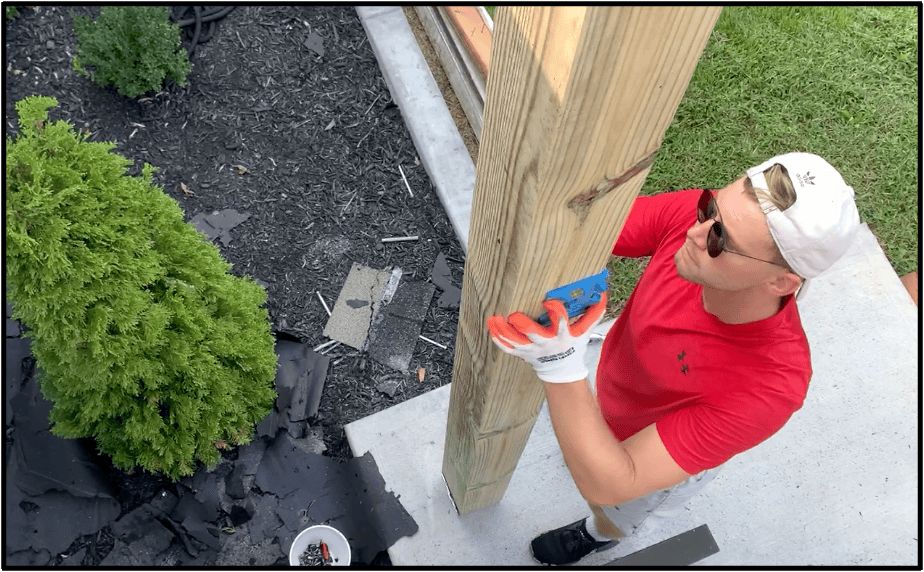
With the post anchors in place, I cut the 6”x6” lumber to the correct height (so that it would be perfectly level with my home’s wall. After that, I placed the 6”x6” column within the post anchor, ensured that it was plumb (using a post level), and I secured it to the post anchor with screws.
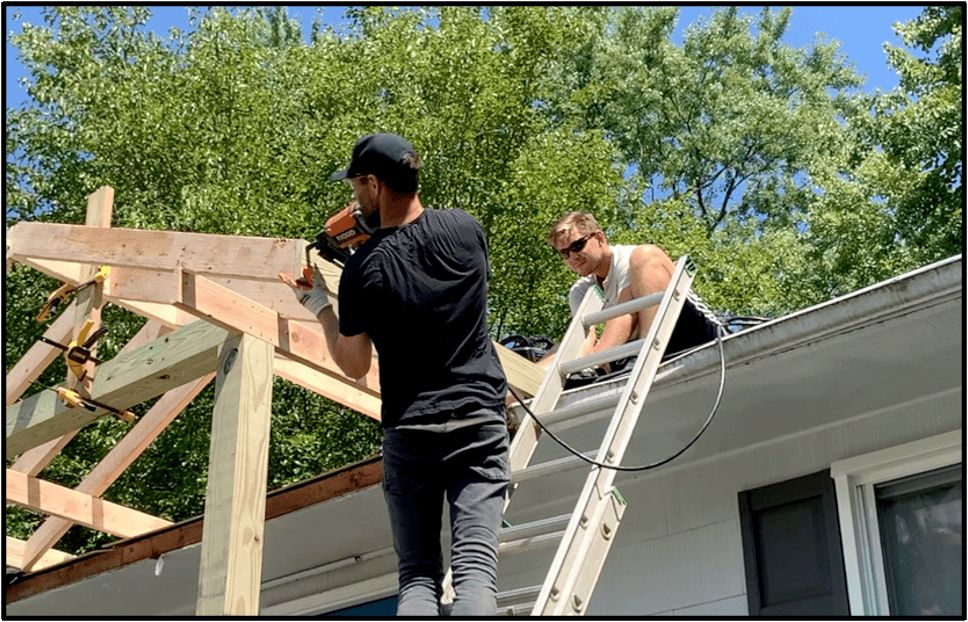
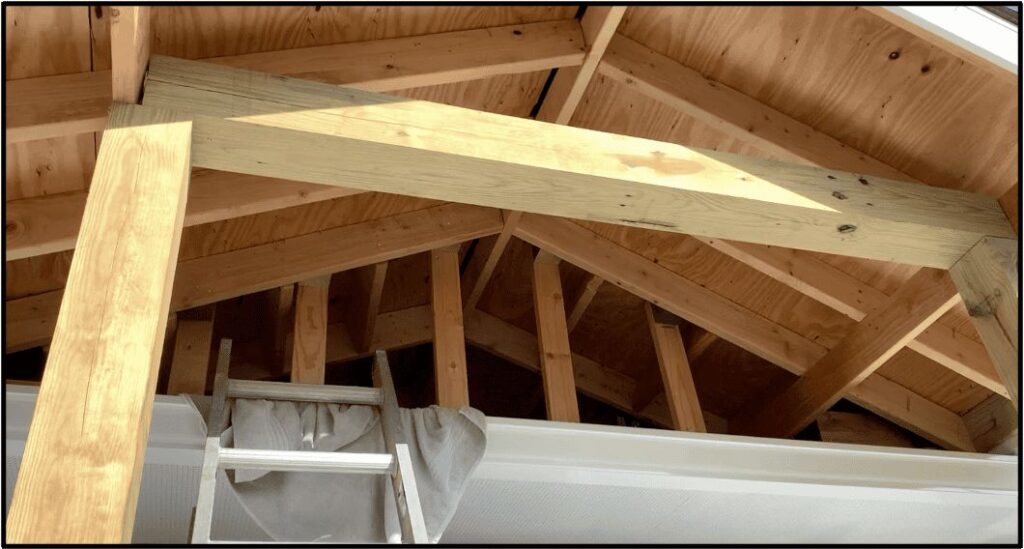
Framing the Ridge and Common Rafters
After installing the vertical support columns, they will be very unstable and you should install the perpendicular joists immediately (you should also use a temporary brace). For my joists, I used 2”x6” lumber and I anchored one side to the house using hurricane ties.
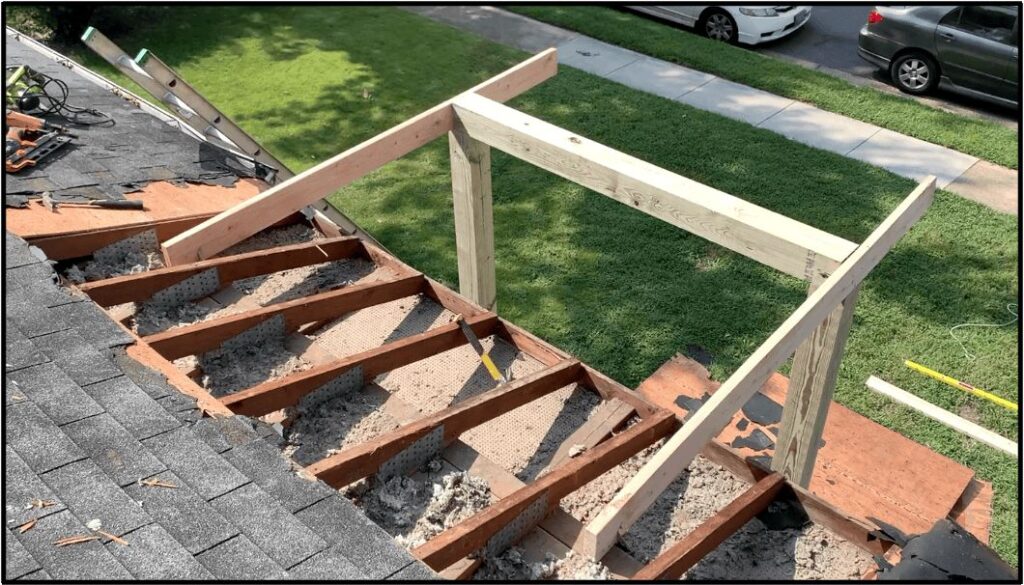
For the other side, I toe-nailed the 2”x6” joists to the 6”x6” vertical columns to give the structure a bit of strength. Then, I cut the 6”x6” horizontal brace that goes between the joists and lifted it into place. Lifting the 6”x6” was very difficult, but my brother and I eventually got it figured out. Next, I simply anchored the 6”x6” horizontal brace to the 6”x6” vertical columns using some long (8”) structural screws and then I screwed the 2”x6” joists to the 6”x6” horizontal brace.
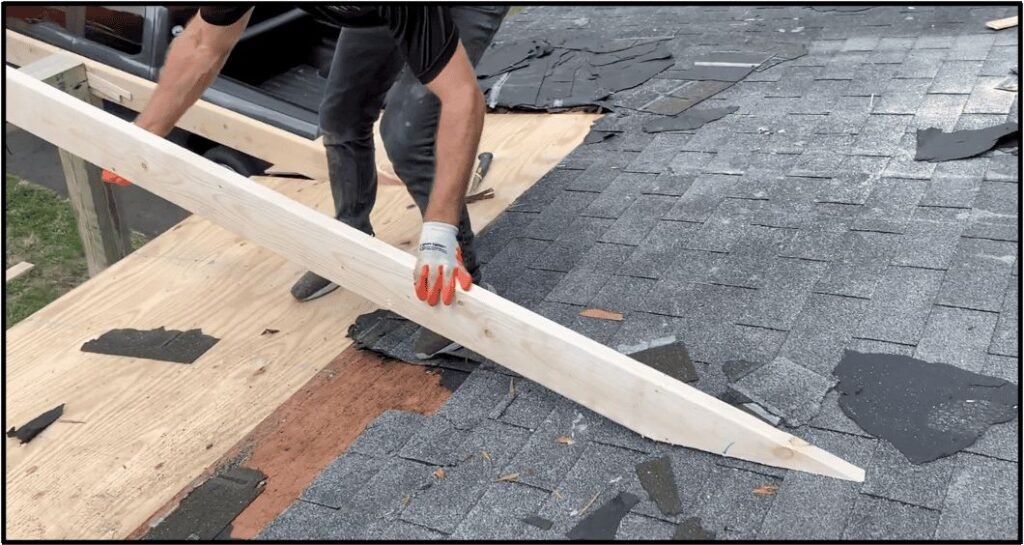
After getting the frame in place as shown above, I installed some new plywood decking to give us a safe walking surface for the rest of the build.
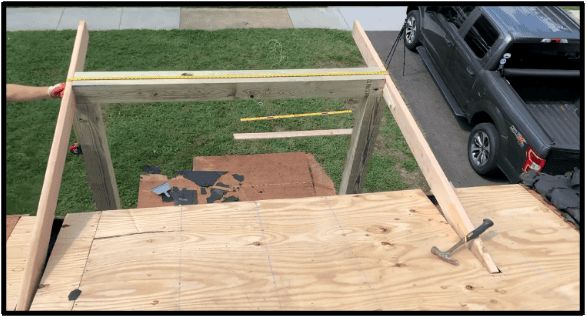
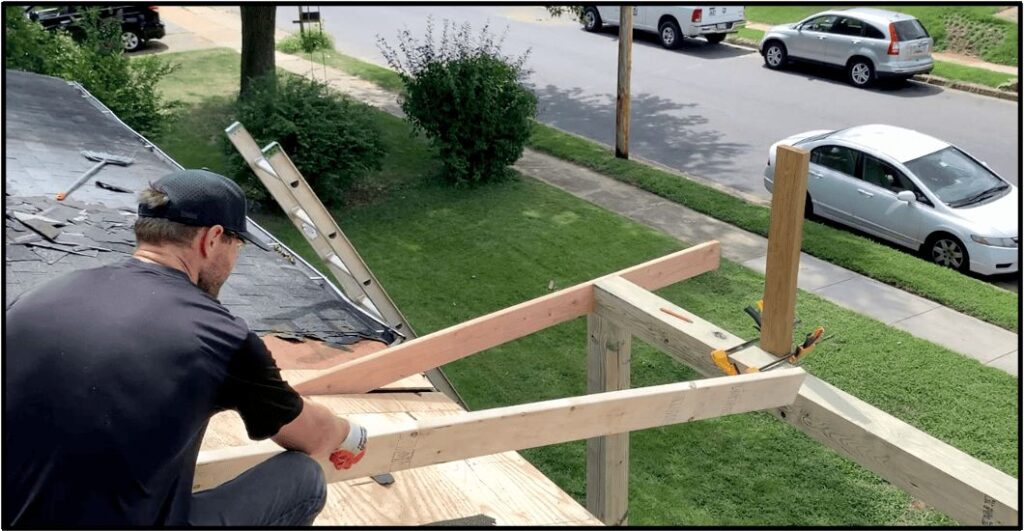
Next, I found the mid-point of the gable and then attached a vertical “story pole” / board to that location using clamps.
In hind sight, I should have used a few temporary screws to hold the “story pole” in place instead of clamps. Next, we are going to install the ridge board and mount it to the story pole (at the “level” location) – see below.
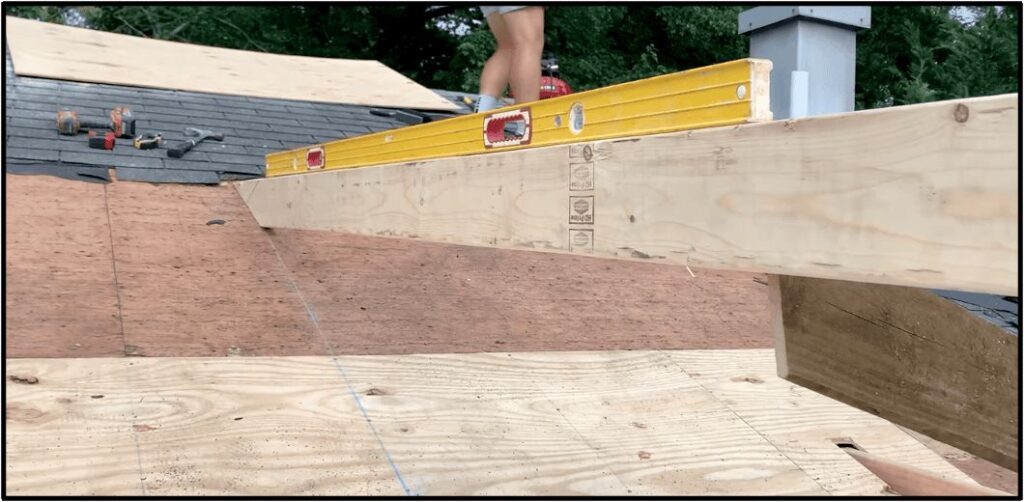
But before we can do that, I need to cut the opposite end so that it matches the roof pitch of my house. To determine the pitch of your home, use a level and a tape measure. Establish the 12” line on your level and then rest one side of the level on the roof and adjust it until it is perfectly level. Next, take a tape measure and measure the vertical distance from the roof to the bottom of the level (at the 12”) mark.
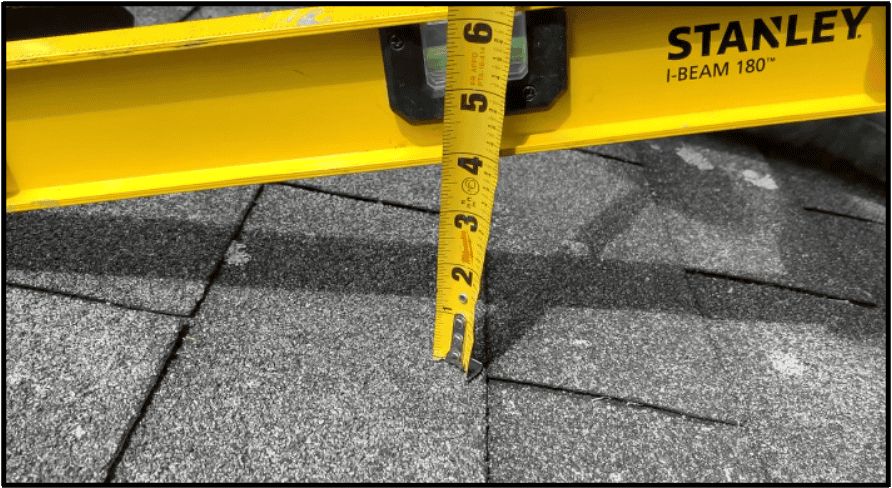
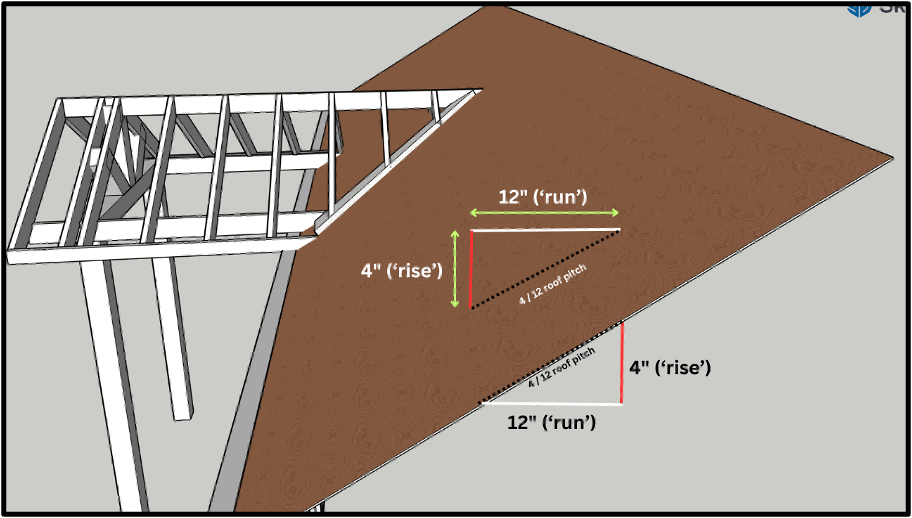
As you can see from the image above, at 12” over (run), the vertical measurement (run) is 4”. Therefore, I have a 4/12 roof pitch. You can also determine the roof pitch from within the attic. Refer to the image below that gives you the “cheat sheet” for determining your roof pitch:
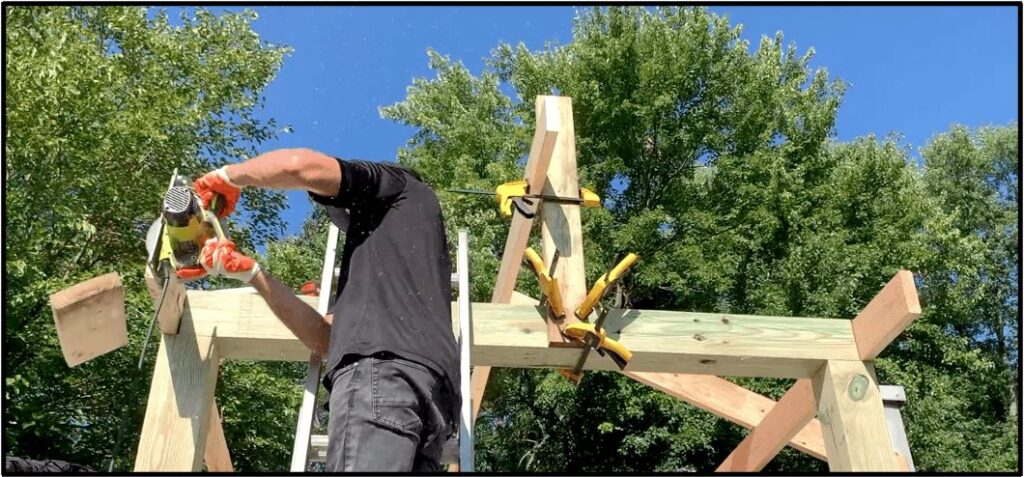
Once you know the pitch of your roof, you will need to cut that angle on the back of your ridge board.
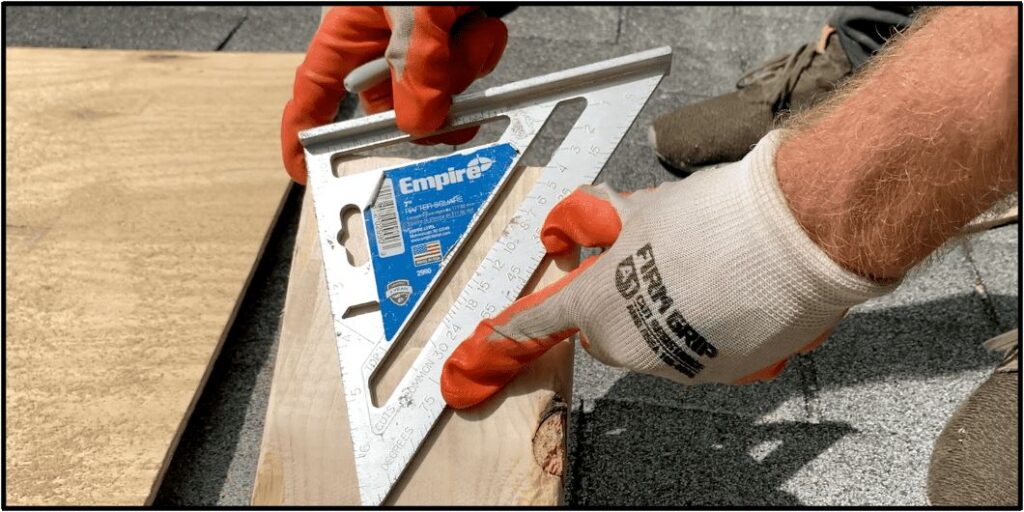
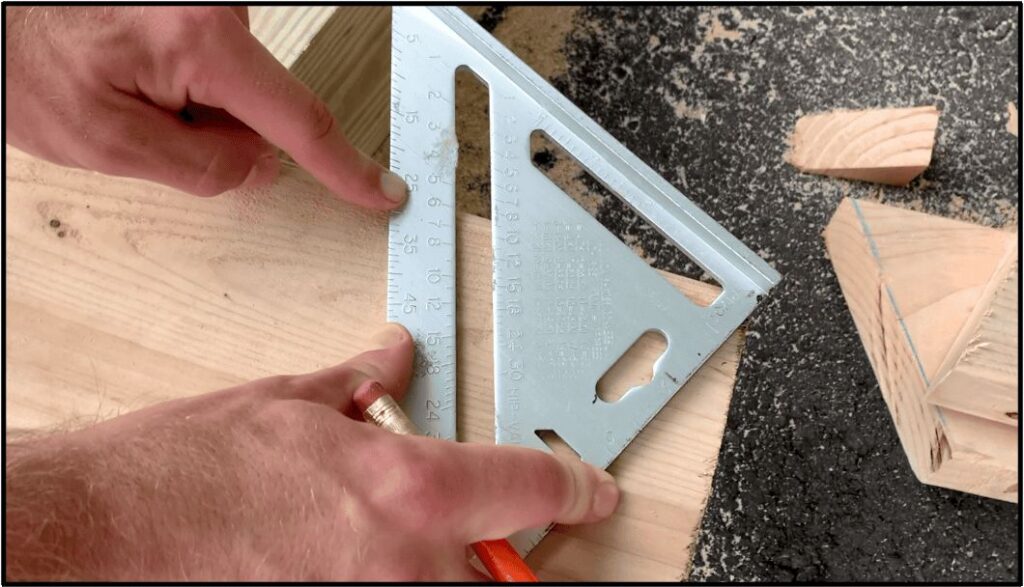
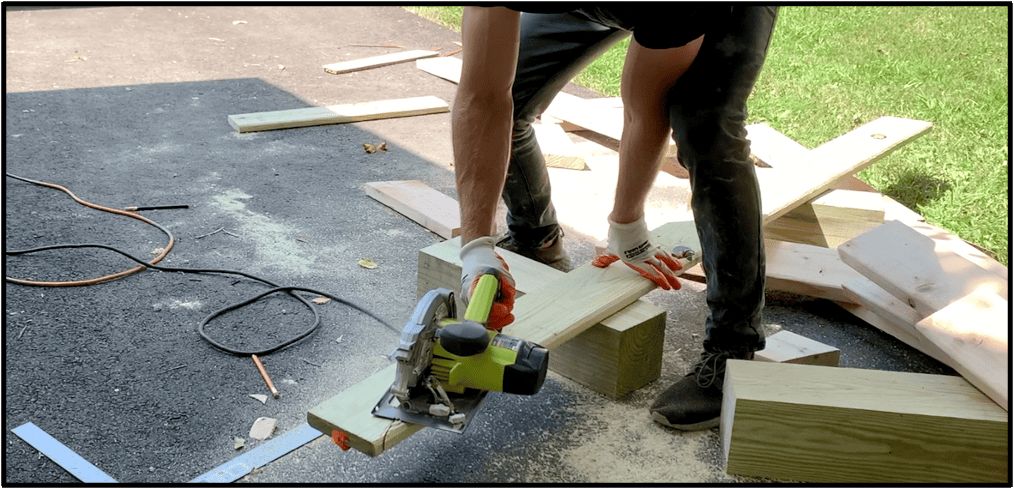
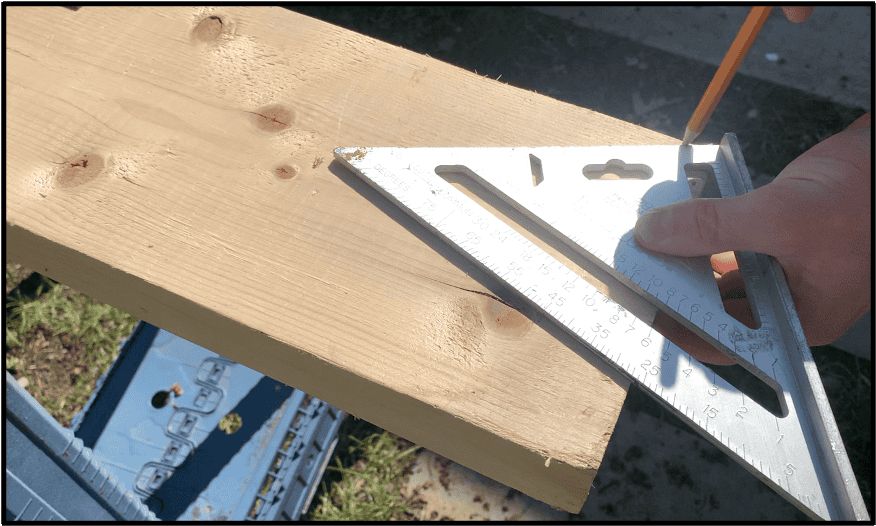
Use a “common rafter” line on your framing square to mark the cut line for a 4/12 roof pitch (or whatever pitch your home’s roof is):
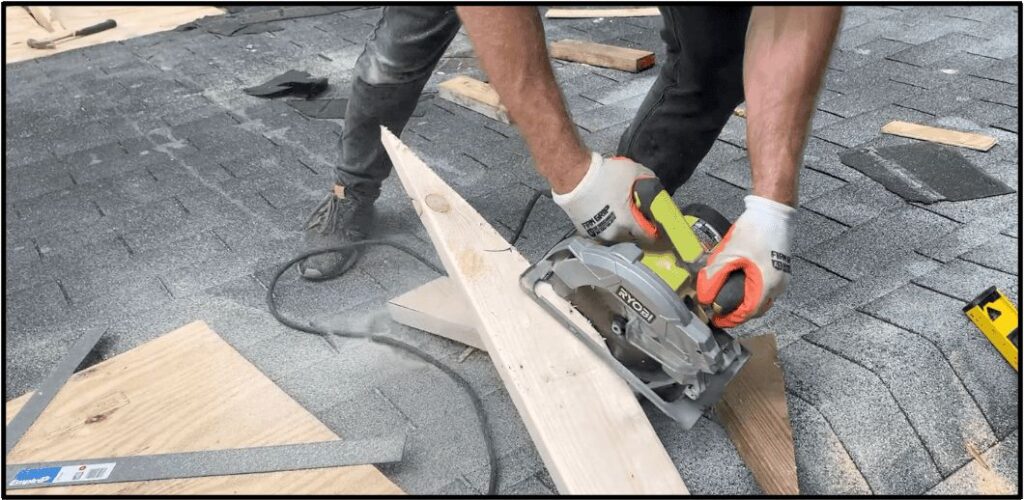
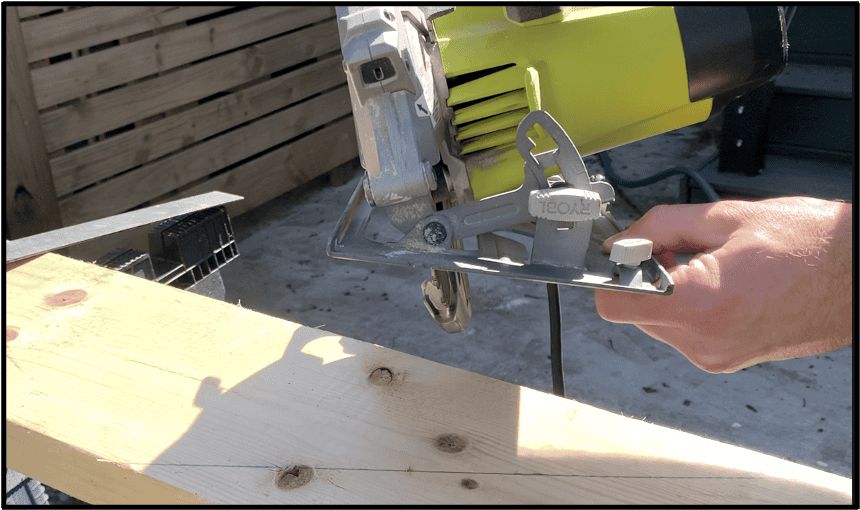
Next, make the cut using a circular saw.
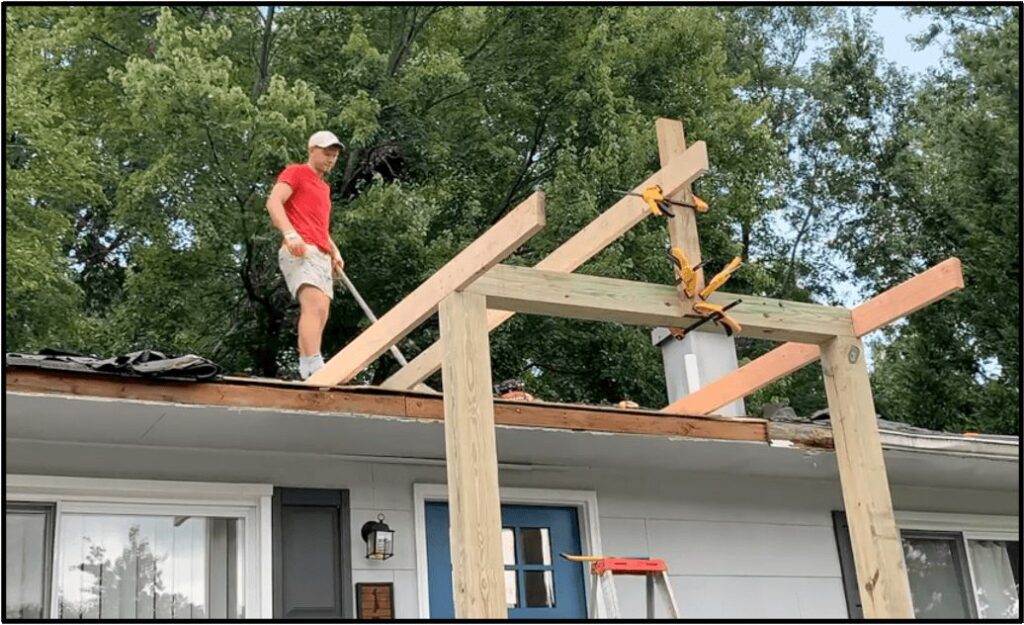
After making the cut, position the cut angle of the ridge board on your home’s roof and secure the other end to the story pole. Note that I will go back later and remove the shingles that are currently in the way.
Make adjustments as needed to get the “look” and pitch of the gable porch that you want. I adjusted the height of the ridge board to give my gable porch overhang a 6/12 pitch.
After getting the ridge board level at the right height, temporarily secure it to the story pole using screws and then anchor the cut edge of the ridge board to the roof sheathing.

I intentionally left the ridge board and joists long. As a result, I went back at this point and cut all three so that they had a uniform 12” overhang over the front.
After this step, it was time to cut and install the common rafters.
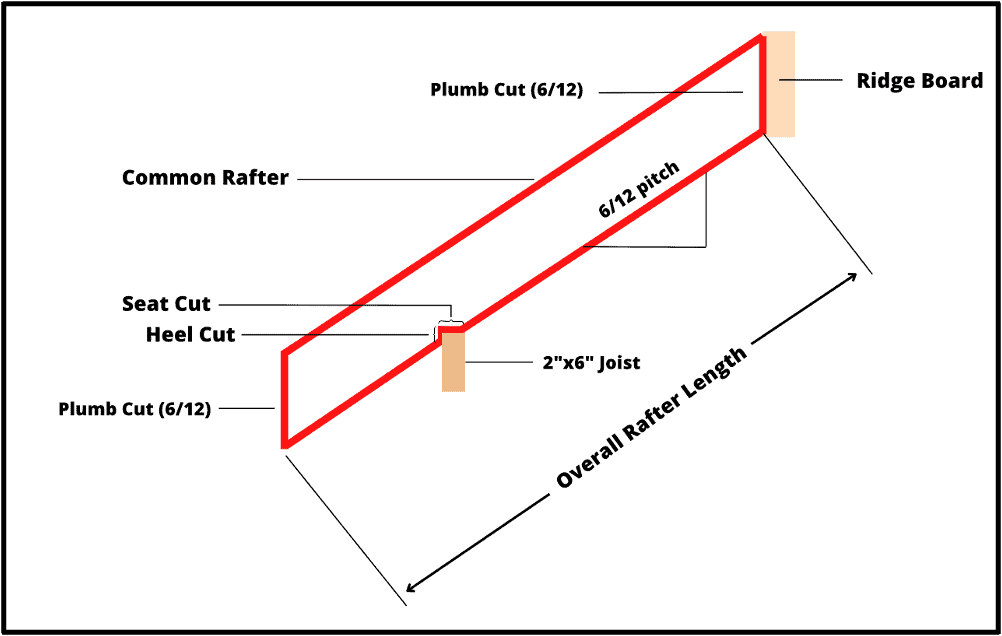
Refer to the figure below that outlines the “Anatomy” of the Gable Porch Overhang common rafters:
For my gable porch, I used 2”x6” lumber for my common rafters. As mentioned before, the gable roof is at a 6/12 pitch. As a result, I made all of my plumb cuts based on a 6/12 pitch using my framing square.
I wanted to have a 12” overhang over the joists, so I cut my overall rafter length accordingly. Next, I measured the distance from the ridge board to the joist and marked the location for the birdsmouth cut. Using my framing square, I marked the birdsmouth cut location by scribing a 6/12 line at the start of the birdsmouth, measuring over 1.5” (to account for the joist width) and scribing another 6/12 line, and then connecting the lines with a perpendicular line as shown. If this is a bit confusing, please refer to the my YouTube video showing the process.
When it comes to framing, I almost always consult “The complete visual guide to building a House” book that I purchased a few years back. This book (particularly pages 138-141) will be VERY helpful for any gable porch overhang framing project. If you do a lot of home renovation, you will 100% not regret buying this book.
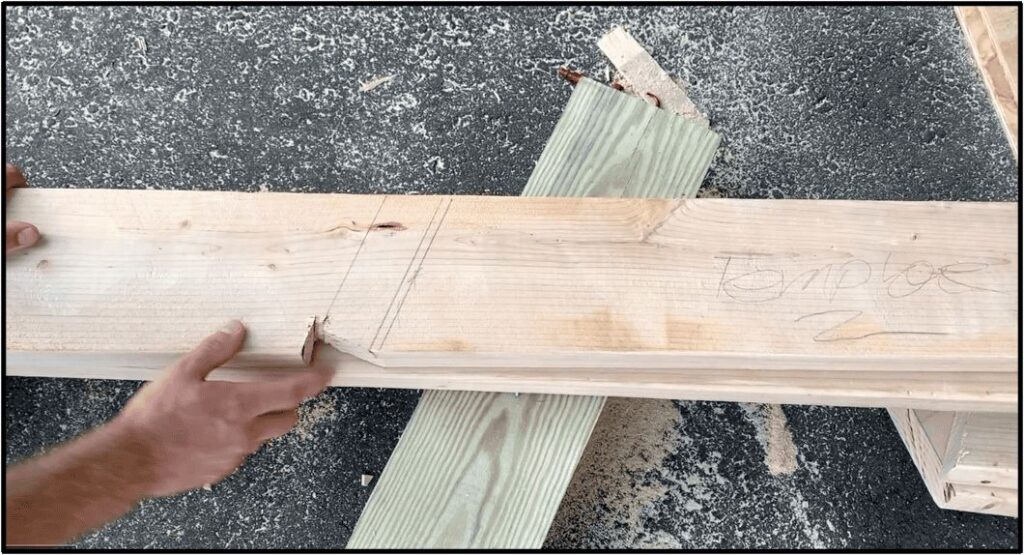
I used a circular saw to make the plumb cuts and birdsmouth cuts and then I testing the fit on the gable. After confirming fit, I used the common rafter I just cut as a template to cut the rest of the common rafters.
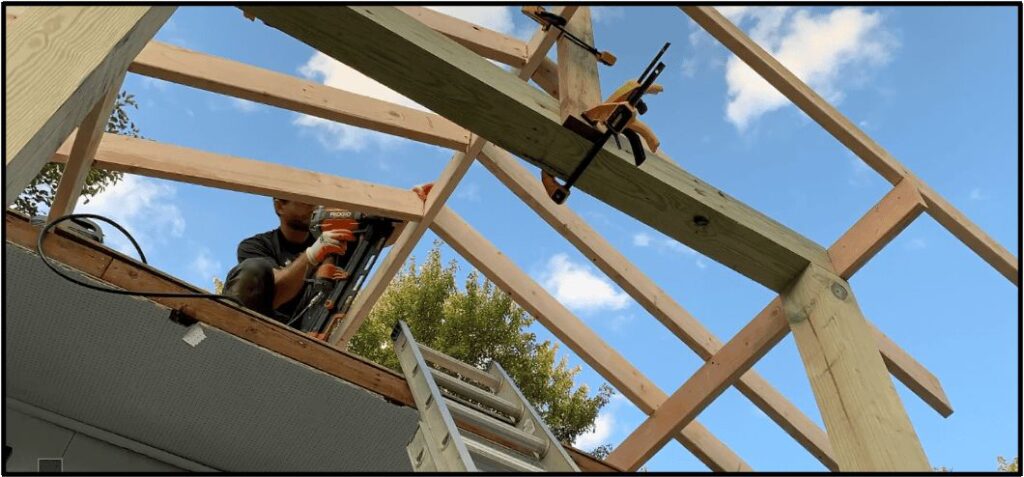
Next, I spaced the rafters 16” On Center (O.C), and toe nailed them into the ridge board and the 2”x6” joist.
After attaching all of the common rafters in place, I cut a pressure treated 1”x8” board to match my home’s roof pitch (4/12). This will be used as the fascia board at the end of the rafters:
Next, I lifted the fascia board in place and attached it to the ends of the rafters.
Then, I secured the end (that was cut to a 4/12 pitch) to my home’s sheathing.
With the common rafters and the fascia boards installed, I reached the point in the build where I had to install the valley rafter (“sleeper”) on my house so that I could install the jack rafters. This was a bit intimidating since there is a lot going on for this step – but I will try to explain it as best as I can.
First, let’s revisit the gable porch framing “anatomy” for the valley plate (also known as a “sleeper”) and the jack rafters:
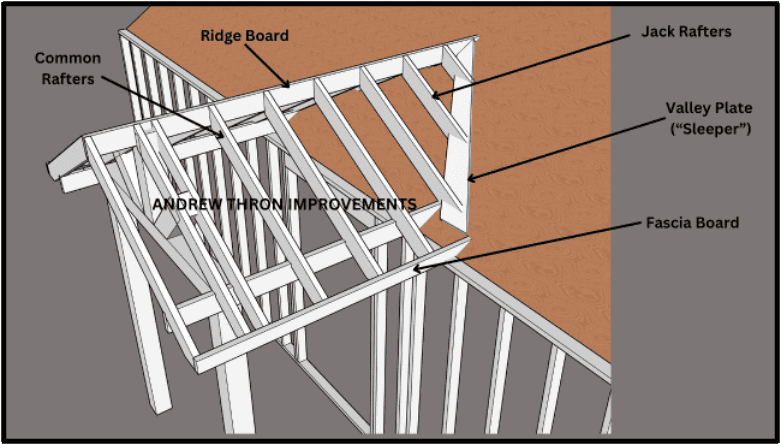
As you can see from the image above, we will need to attach the valley plate to the house so that the jack rafters have a firm base to be attached too. Additionally, we will have to cut the bottoms of the jack rafters at TWO angles – the 6/12 pitch for the gable and the 4/12 pitch of my home’s roof. Let’s get into it!
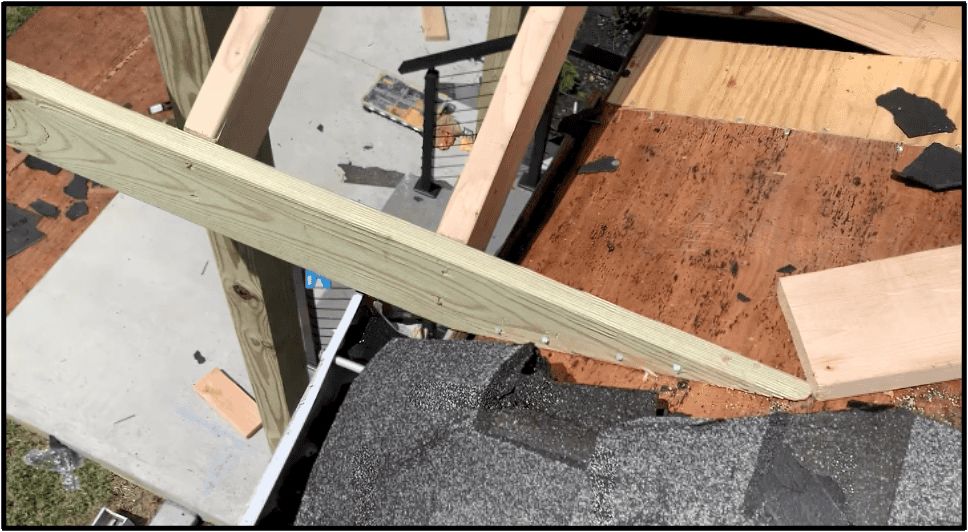
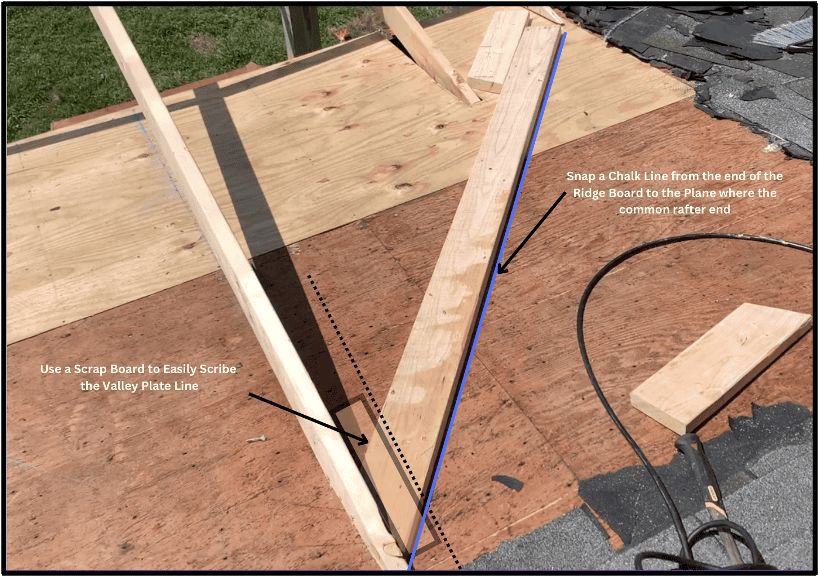
First, use a scrap board along the ridge board to mark the cut line on the valley plate. Next snap a chalk line from the end of the ridge board to the same place where the common rafters terminate:
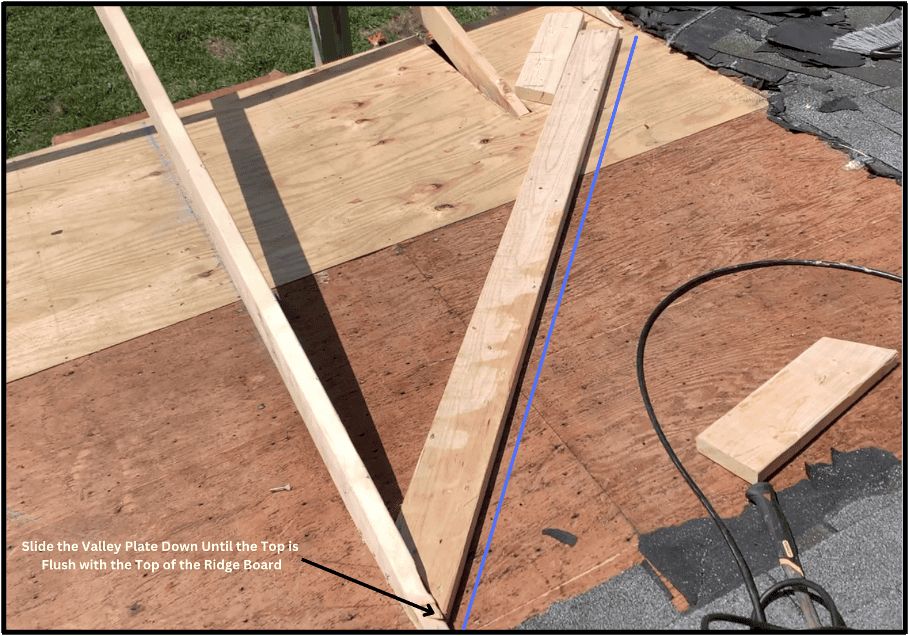
Next slide the valley plate (sleeper) down so that the top of the valley plate is flush with the ridge board – as shown below.
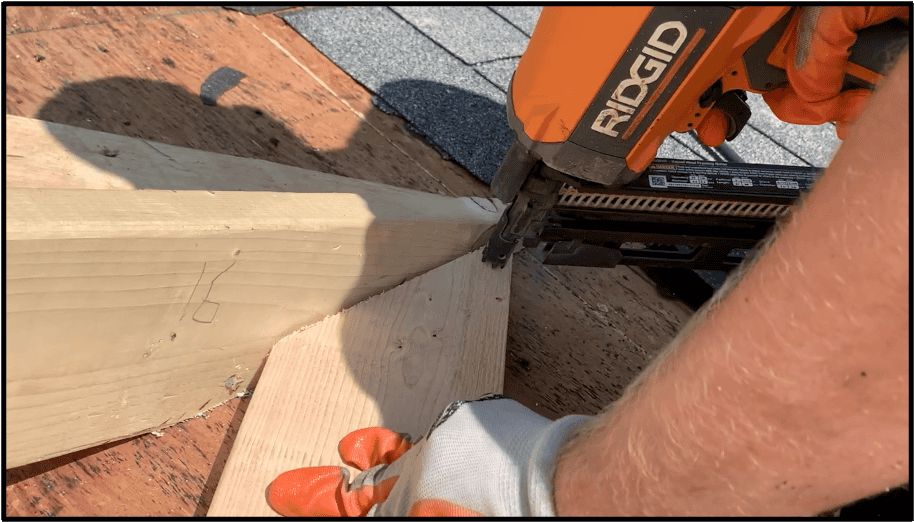
Once it is positioned properly, attach the valley plate (sleeper) to the roof sheathing with a framing nailer.
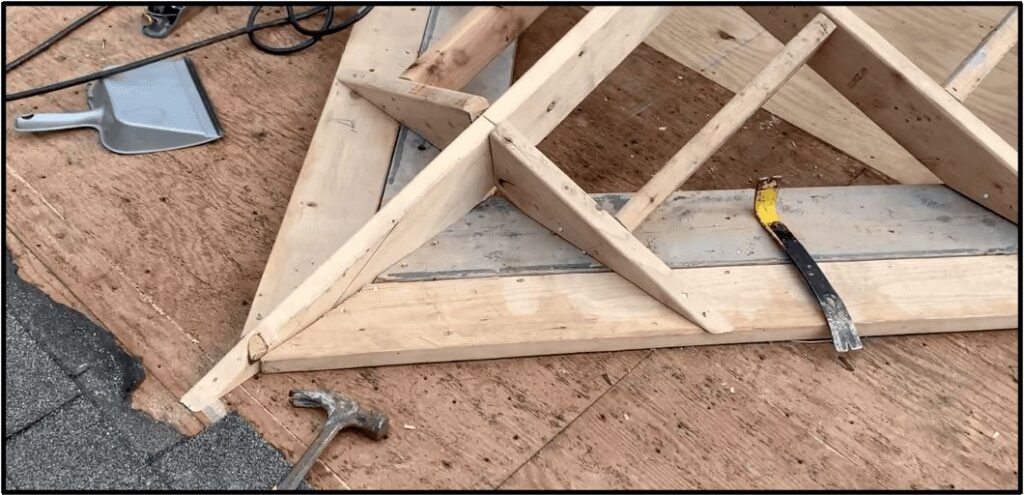
For the 2”x6” jack rafters I am using, I will need a 2”x10” piece of lumber for the valley plate (sleeper). However, I just used two pieces of 2”x6” lumber side by side as shown:
For the jack rafters, I should have continued my 16” on center spacing like I did for the common rafters. Yet, for some reason, I switched to 24” O.C. spacing and I just installed additional blocking in between…I don’t recommend this.
Where the jack rafters attach to the ridge board, I used a framing square to mark the 6/12 pitch of the gable (just like we did for the common rafter).
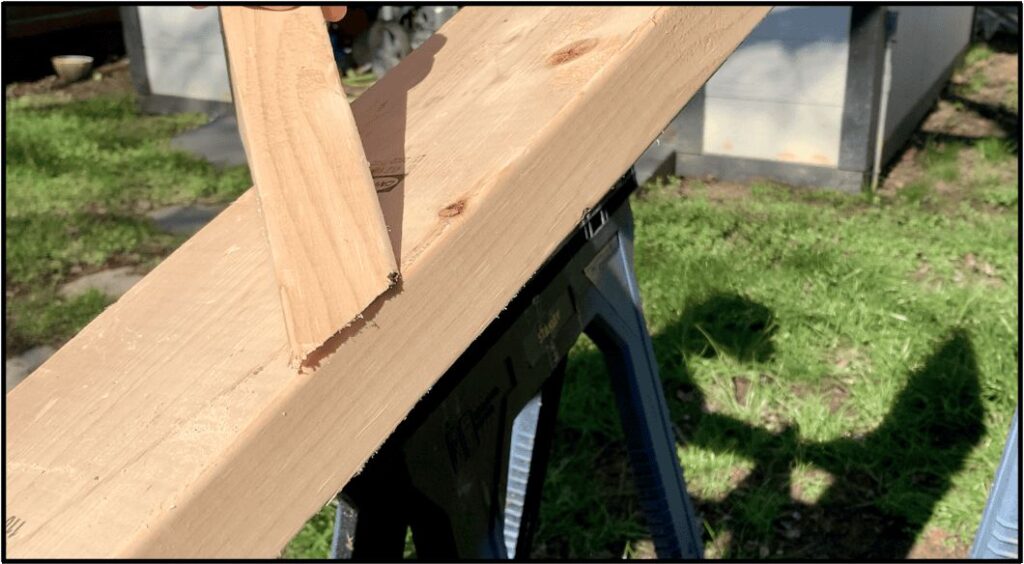
At the bottom of the jack rafters, you will first want to mark the cut line for the 6/12 pitch of the gable.
Instead of making a straight cut, however, you will want to adjust the angle of your circular saw to the pitch of your house (4/12 in my case). A 4/12 roof pitch equates to an 18.4 degree miter angle (use an online calculator for this) on the circular saw, so I made that angle adjustment and made all of my cuts.
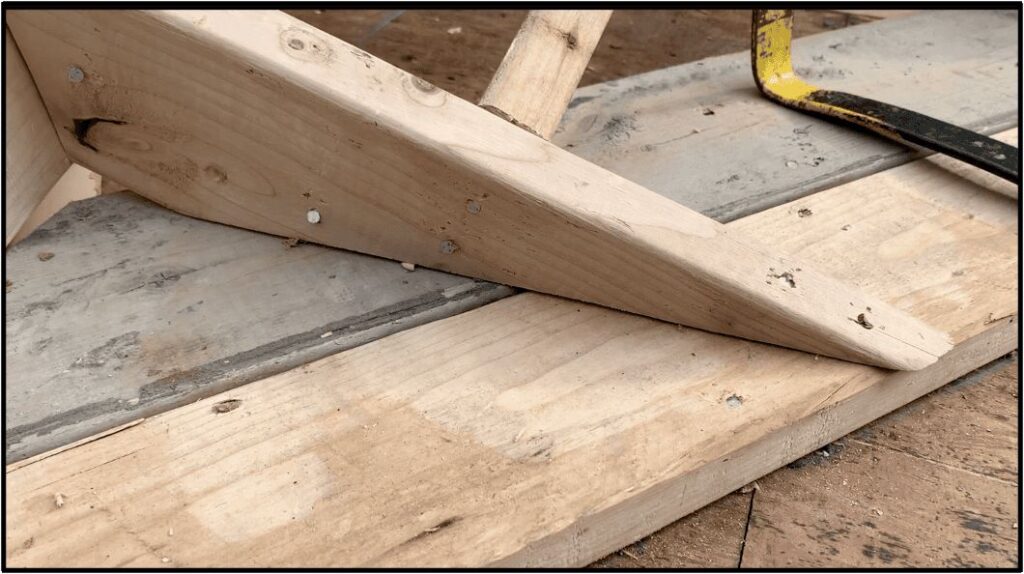
Now, the bottom of the jack rafters will be rest flush with the 6/12 pitch of the gable and the 4/12 pitch of the house. I hope that makes sense!
After cutting all of the jack rafters to size and spacing them 16” O.C., attach them to the ridge board and the valley plate using a framing nailer.
At this point, the gable roof frame looked like this and we can begin the roof decking process.
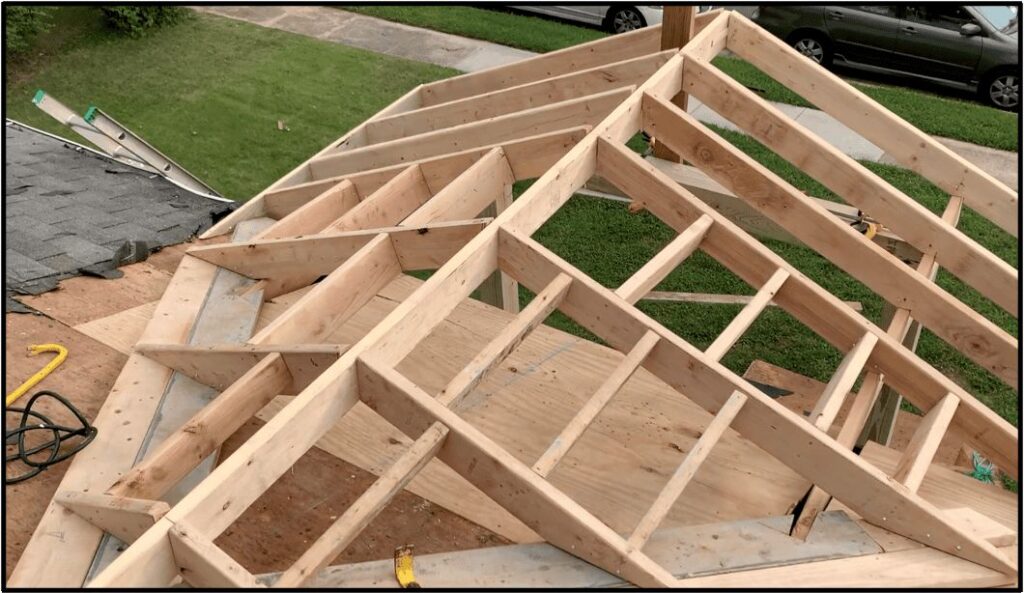
To install decking over the gable porch, we simply positioned full 4’x8’ sheets of plywood in place and then cut off any excess using a circular saw. We then attached the plywood to the gable frame using a framing nailer – placing nails every 16”.
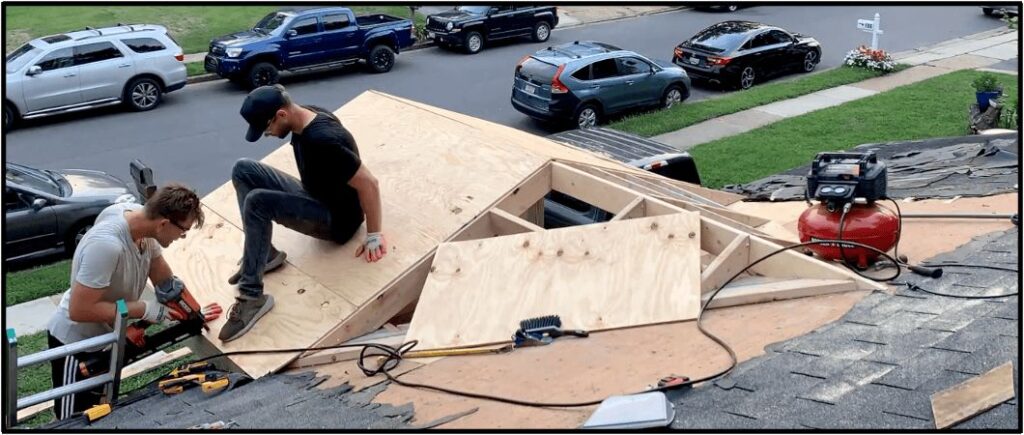
Once we attached the last few pieces of roof decking, the framing portion of the gable porch overhang project was complete.
Finishing Touches on the Gable Porch Project (Soffit, Trim, Shingles, Stain, etc.)
After the gable porch overhang was framed, we installed PVC Fascia Trim boards on the front and sides of the gable.
Although I have done a lot of roofing in my day, my ENTIRE roof needed to be replaced. As a result, I hired a contractor to rip off all of the existing shingles and to replace the roof on my house AND new gable. This was costly, but I think it was well worth it. 6” gutters were also included for the main house and the gable porch. Here is a look at my roof before it was replaced:
And here is a look at the new roof.

They went with a closed valley shingling procedure where the new gable met the existing house.
On the underside of the gable, I decided to install a tongue and groove soffit. In order to install the tongue and groove boards at the back of the gable, I first installed some 2”x4” blocking which would serve as a mounting surface for the tongue and groove boards.
Next, I picked up some 1”x6” pine tongue and groove boards and used construction adhesive and brad nails to attach them to the mounting blocks.
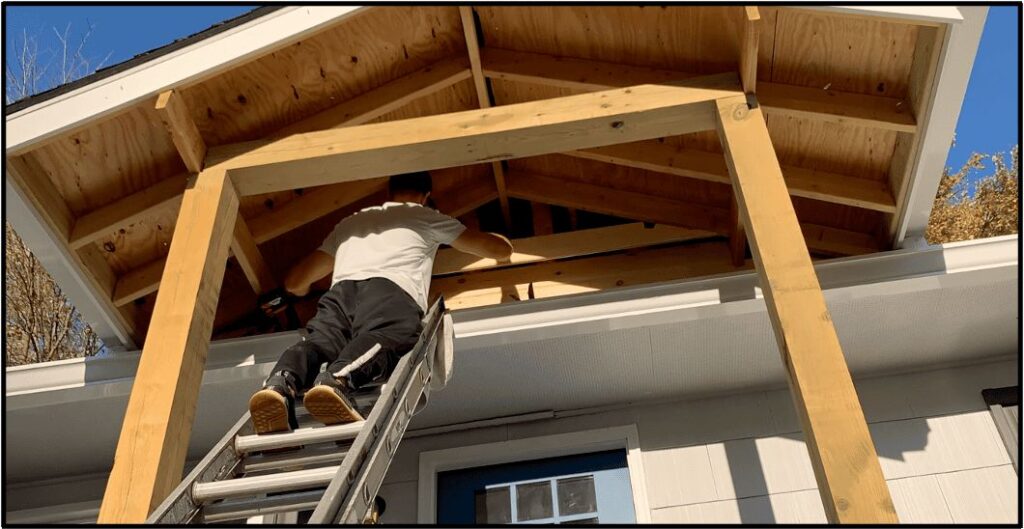
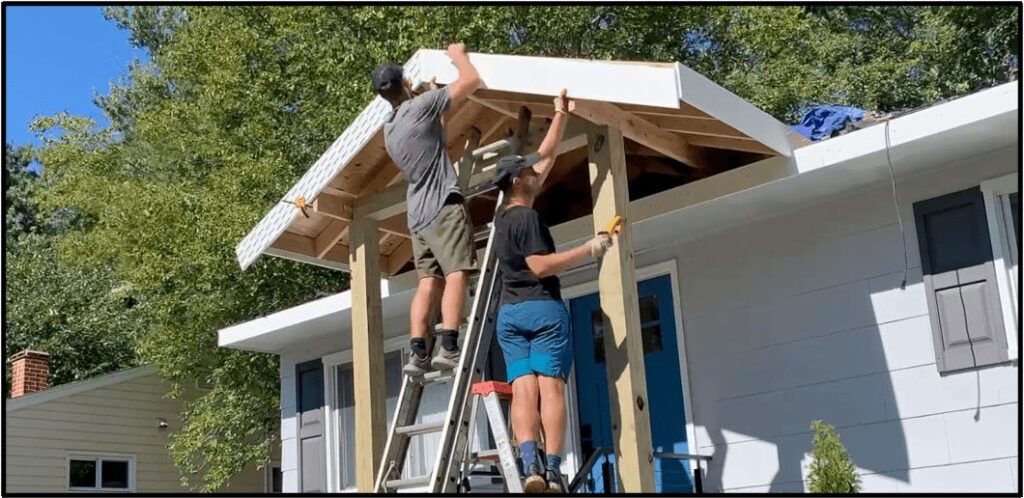
After installing the tongue and groove boards at the back of the gable, I began to install the tongue and groove boards on the underside of the gable.
Don’t let these photos deceive you, installing these boards on the underside of the gable while on a ladder was VERY difficult. Eventually, however, I got it done.
At this point, I decided to add some decorative 4”x4” lumber at the front of the gable as shown below. This was purely for decoration / aesthetics.
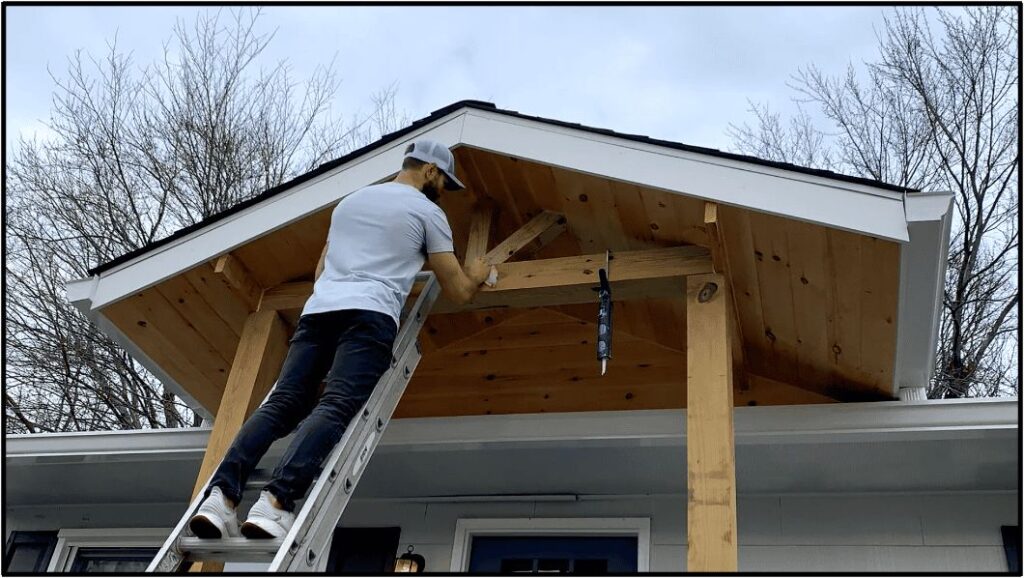
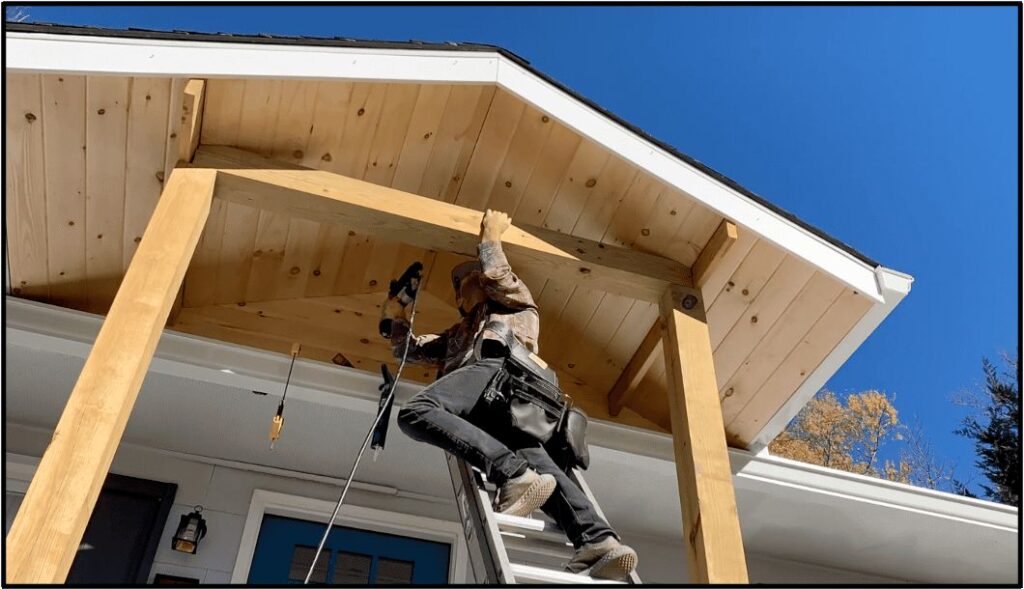
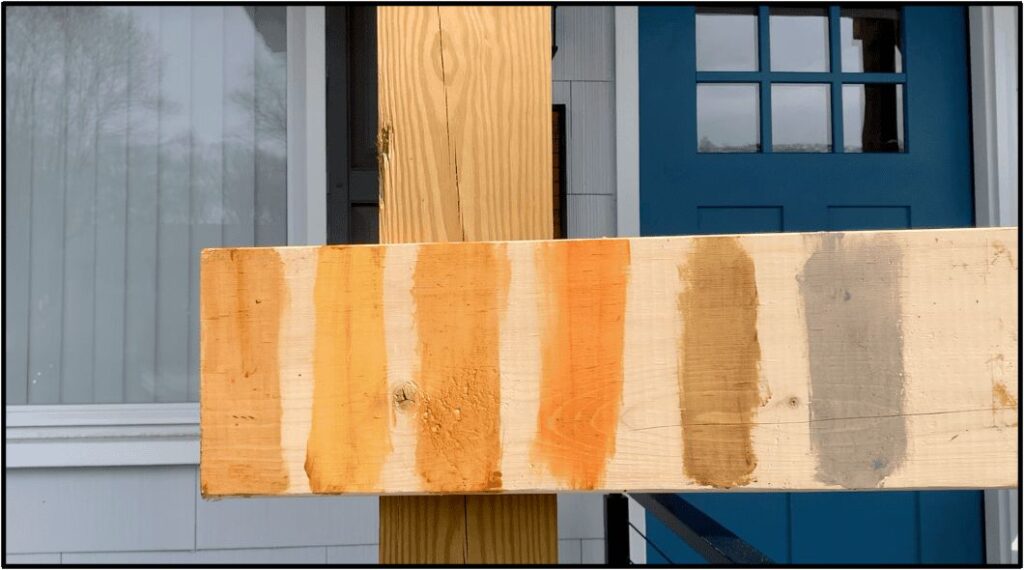
Although I liked the look of the Gable Porch Overhang “as is” I received quite a bit of feedback that I should stain the lumber to give the gable a more “finished” look. As a result, I ordered a “Stain Sample Kit” from Defy Wood Stains and determined that I wanted to stain my gable the Light Walnut Color.
To apply the stain, I used a paint brush and a cloth.
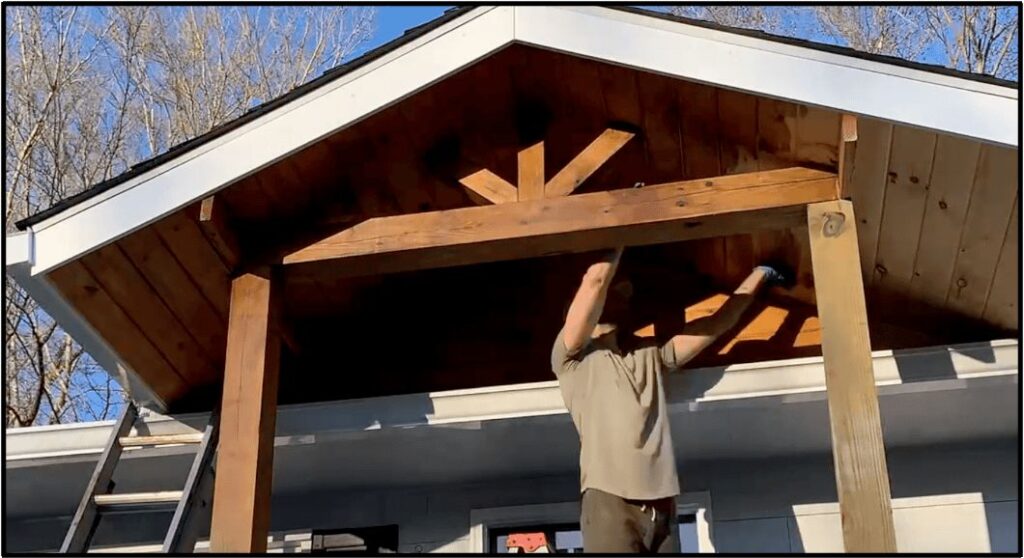
Again, don’t let the photos deceive you. Staining upside down while on a ladder was not easy.
As the final step of this project, I installed the faux-stone column wraps at the bottom of the support posts to give the gable porch a more “sophisticated look”. If you want to see a detailed installation video of the Genstone Pillar Wraps I installed, check out my YouTube video linked below:

Here is a look at the finished product with everything completed:
Lessons Learned and Conclusion
Lesson(s) Learned
Before wrapping up, I wanted to note one major lesson learned that I would likely do different in the future. If I was doing this project again, I would increase the pitch of the gable to an 8/12 (or similar) and then extend the common rafters so that the fascia would seamlessly connect to my existing home’s fascia. The way I did it caused the two different “roof / fascia” lines and I had to install a gutter drop to connect them.
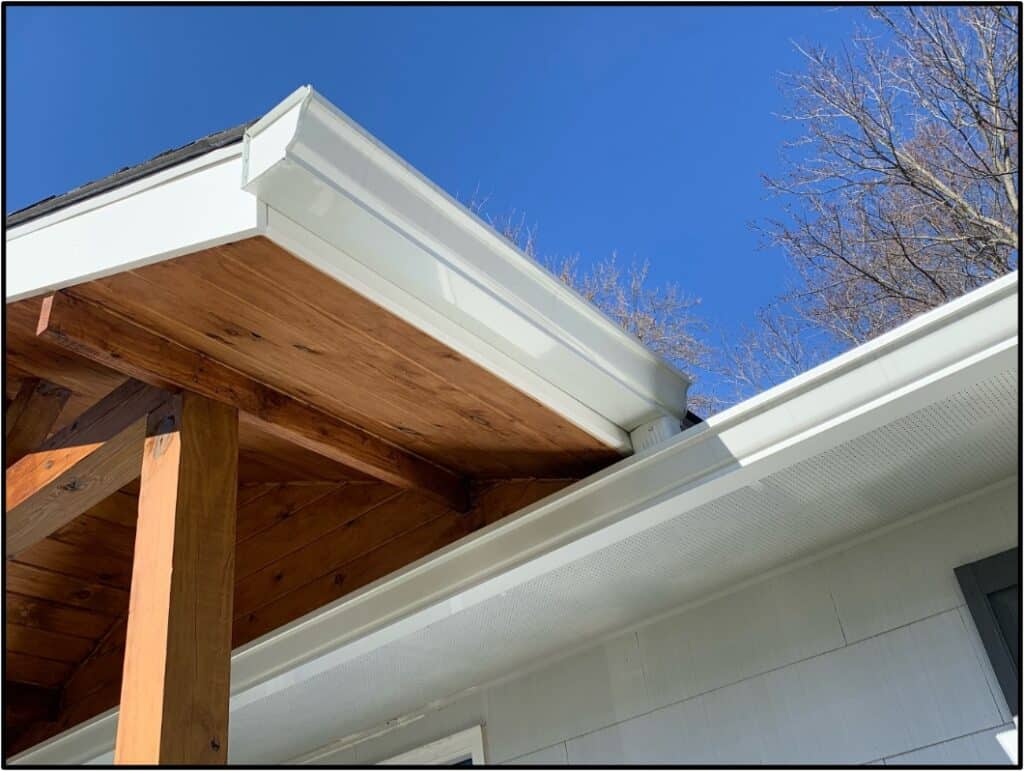
Not ideal, but it still works. I just wanted to share this for your benefit.
Conclusion
I hope this guide was helpful as you consider the possibility of improving your curb appeal with a gable porch overhang. As noted throughout this article, I have a detailed video on YouTube that you can check out that goes through the entire Gable Porch construction process.
If you are curious about how much it cost me to build this gable porch overhang, you can download my FREE “How to Build a Gable Porch Overhang Ebook” which goes through the costs in detail.
If this article provided you with value, I really would appreciate if you would consider following me on Instagram @Atimprovements and please subscribe to my YouTube channel @Andrew Thron Improvements. Thanks for reading and good luck with your project!
Disclaimer: This Article is a reference guide only for entertainment purposes and should not be used as the basis for any construction without first consulting with all local building codes and with an engineer, architect, etc. All work should be performed by a licensed professional in accordance with all applicable code and permitting requirements. Links within this Ebook may be affiliate.