
Floating Mantles and floating shelves have become increasingly popular in recent years – and it’s easy to see why! The hidden hardware/brackets make the mantel look more sophisticated and the look of the mantel below a TV or above a fireplace can really help to improve the look and feel of any room.
If you plan on purchasing a floating mantel, you are looking a typical price point of around $200. However, with this DIY floating mantel guide, you will learn how to build a floating mantel for less than $50!
To build a DIY floating mantel, you will need to create a casing using mitered boards and then install it over a mounting bracket. This Article will outline every step of the project so that you can learn everything you need to build your own floating mantel. Also, if you are more of a visual learner, I have linked my “How to build a Floating Mantel / Shelf” YouTube video at the end of this article.
Purchase Tool and Materials Needed to Build the Floating Mantel
To build a floating mantel, you will need the following tools and materials:
- Two (2) 1″ x 8″ x 6′ Pine Common Board (or similar): https://go.magik.ly/ml/1znfw/
- One (1) 1″ x 6″ x 8′ Pine Common Board (or similar): https://go.magik.ly/ml/1zng0/
- One (1) 2″ x 4″ x 8′ board: https://go.magik.ly/ml/1zng1/
- Brad Nailer: https://amzn.to/41OFc33
- Circular Saw: https://amzn.to/48GWDEM
- 1″ Brad Nails: https://amzn.to/4aLT9ml
- Wood Glue: https://amzn.to/3tNQkk5
- Sandpaper: https://amzn.to/3vxJ7W4
- Orbital sander (optional): https://amzn.to/47nUtZO
- Orbital Sand Paper (optional):https://amzn.to/3Sddb26
- Respirator (for sanding): https://amzn.to/3NRHSY4
- Stain (optional): https://go.magik.ly/ml/1zng5/
- Dust Mask: https://amzn.to/3Te9Qz9
These are the materials that I used to build the floating mantel pictured herein, but feel free to purchase alternate materials as you see fit. For example, if you want a larger floating shelf, you may want to purchase 1″x12″x8′ pieces of lumber instead of a 1″x8″x6′ piece. Also, hardwood like oak or cedar will give you a more durable floating mantel than pine, but these species of wood are much more expensive.
With the materials purchased, you can begin the floating mantle construction process.
Build the Floating Mantle “Carcass”
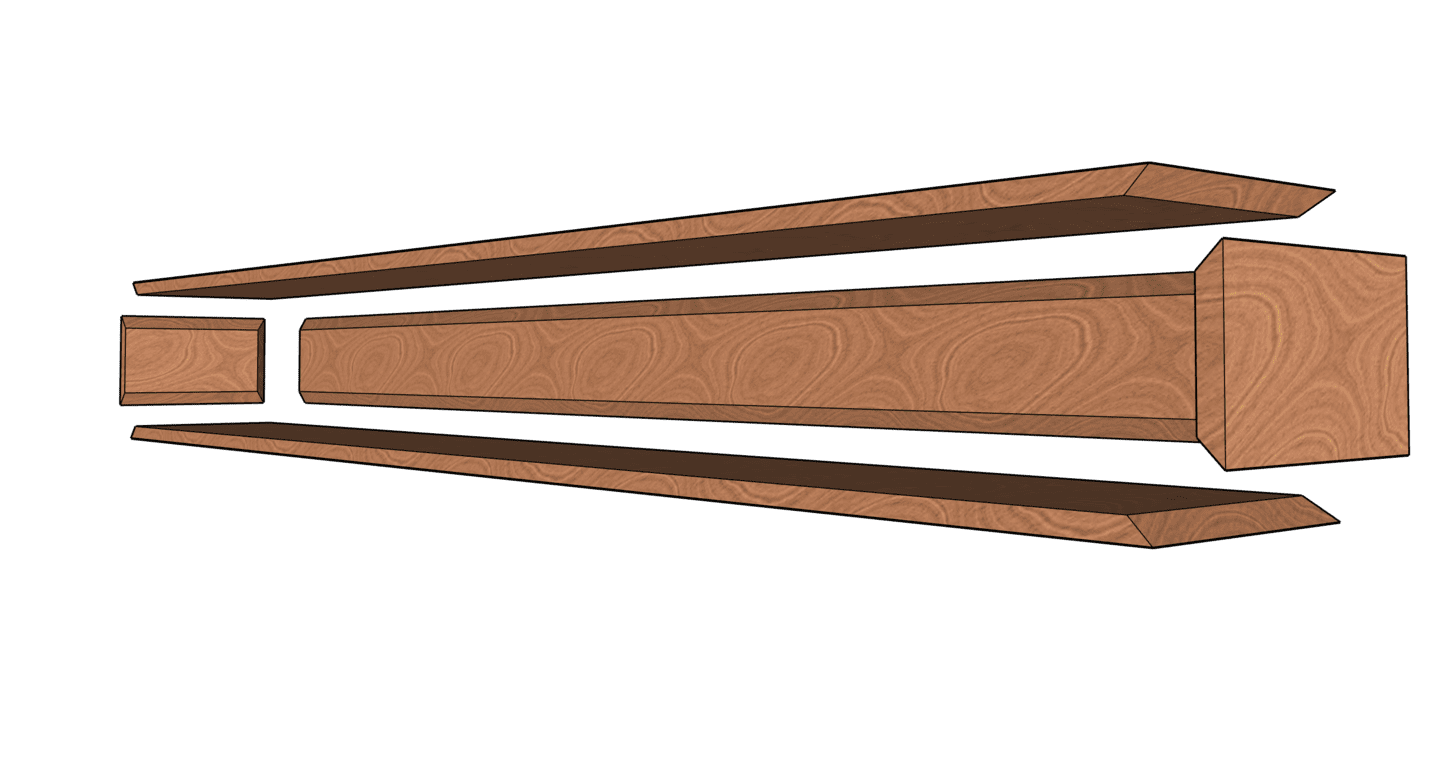
In order to make the floating mantel look like one, large beam, we will need to miter the individual boards to 45 degree angle and then attach them to each other to create a “carcass”. Refer to the exploded view of the mantel below which illustrates how the raw pieces of lumber will need to be cut in in order to assemble the mantle:
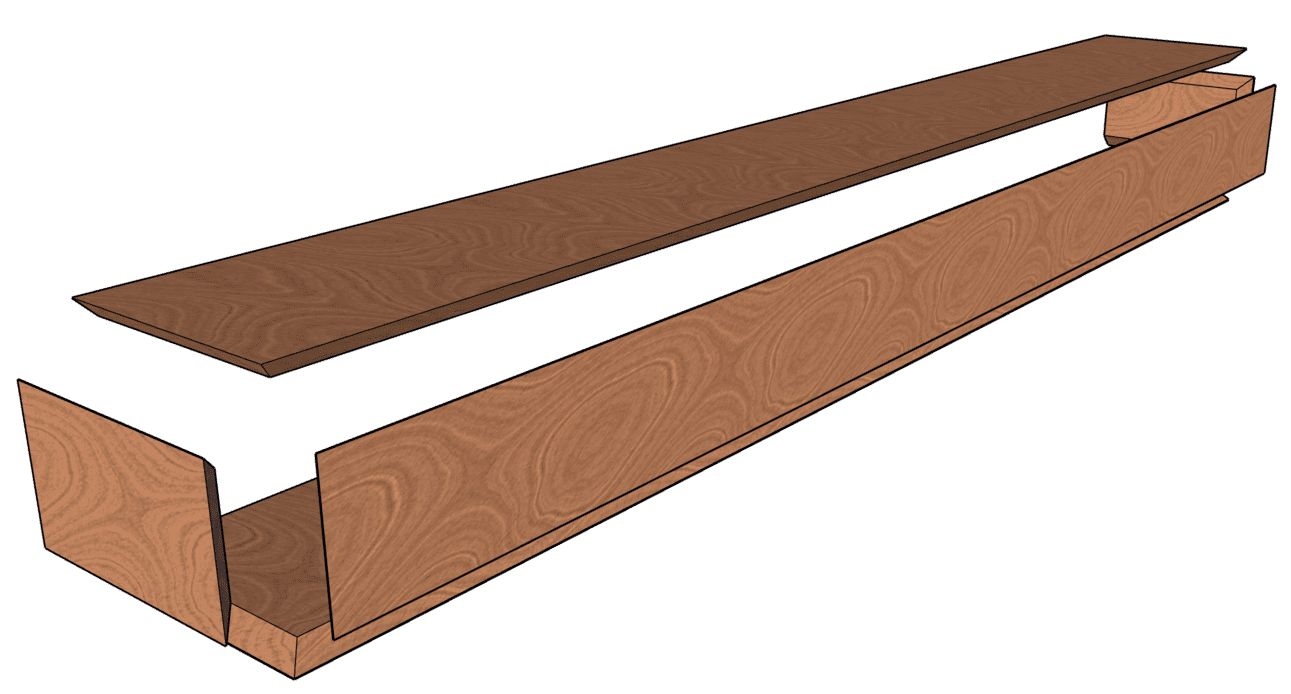
As you can see from image above, the floating mantel will be constructed using 1″ x 8″ x 6′ piece of lumber at the top and bottom. These pieces will be mitered as shown and will be identical. However, they will be mirrored during the assemble process. The front and sides of the mantel are constructed using mitered 1″ x 6″ x 8′ lumber, cut as shown below:
To cut the 45 degree miters, I used a circular saw set at a 45 degree bevel. However, a table saw is a much better and more precise method for cutting miters.

After setting the 45 degree miter on the circular saw, you can begin “ripping” down the long side of the lumber to create the 45 degree mitered angle.

After cutting the miters on the long edges of the lumber, repeat the process on the short edges.

After cutting all of the 45 degree miters as shown in the exploded view of the floating mantel above, you can begin the mantel assembly process. Also, before we get any further, you can download the FREE plans for this floating mantel that will give you dimensions, cuts, materials etc. below:
Assemble the Floating Mantel Carcass
After cutting all of the pieces of lumber to size and ensuring that all of the 45 degree miters cuts have been performed properly, you can begin the assembling the floating mantel carcass.
To assemble the floating mantel, take the top, front, and bottom pieces and position them next to each other on the floor with the miters facing down. Next, use painters tape to tape all three of the pieces together as shown:

One the pieces are held together with the tape, flip the boards over and apply a generous amount of wood glue between the mitered edges:

After applying wood glue between all of the joints, “fold” the mantel boards into place. The tape will help to ensure that the miters are aligned and the glue will help to hold the boards together once it starts to dry.
Next,ensure that the everything is square and use a few additional pieces of painter’s tape to hold hold the mantel in place so that it does not lose its shape.

Once the top, bottom, and front of the mantel are positioned properly and held in place with tape, apply wood glue to short sides and position the small end pieces of lumber in place. Align the miters and then use a piece of painter’s tape to hold the end caps in place.

Finally, use a brad nailer to give the entire mantel assemble a bit more strength. I used one brad nail through the mitered joint every 16″ or so in order to hold the mantle together while the wood glued hardened overnight.

After giving the glue time to harden, remove the tape and inspect the mantel. Since we used a circular saw to cut the miters, there were quite few areas that needed to be filled with wood filler. Clean up any holes or miter gaps using wood filler and then allow the wood filler time to dry.
Sand the Floating Mantel
At this stage of the project, use 120 grit sandpaper to sand off any of the excess wood filler or any wood glue that way have adhered to the face of the wood. I like to use an orbital sander, but you can sand by hand as well.

Additionally, I used the orbital sander to give the corners of my mantel a slightly rounded edge.
Be sue to use a respirator when sanding your floating mantel. I recommend this dust face mask by Base Camp, but any respirator will do.
After sanding the mantel, clean off any saw dust in preparation for staining.
Stain or Paint the Mantel as Desired
After sanding, stain or paint the mantle to achieve your desired look. For my floating mantel, I applied a “weathered oak” stain. To apply this stain, I used dipped a cloth into the stain and then wiped the stain all over the mantel. Be sure to apply a uniform amount of stain over the entire application area.

After applying the stain to the mantel, allow 12-24 hours for the stain to cure.
Mount the Floating Mantel
In order to mount the floating mantle, you first want to want to build a mounting bracket using 2″x4″ lumber. Cut the mounting bracket to length so that it will fit within the mantel carcass. Next, cut small pieces of blocking and attach them to the 2″x4′ as shown:

I installed one piece of blocking at either end of the mounting bracket and a few intermediate pieces of blocking spaced every 16″ or so. I attached the blocking to the main 2″x4″ mounting bracket using two screws per connection.
Once the mounting bracket has been constructed use a level (or a laser level in my case) to establish the mounting height for the floating mantel.
Typically, floating mantels are hung approximately 4″-12″ below a TV. If you are mounting the mantel above a fireplace, note that the “proper” height for a fireplace mantel is around 54” above the hearth’s floor.
After determining the mounting height and establishing a level line, I identified the stud locations in my wall.
Once the studs were identified, I lifted the mounting bracket into place, ensured that it was perfectly level, and then attached the mounting bracket to the studs using three inch screws.

If you are hanging your mantel on brick, you will need to pre-drill the mounting holes using a carbide tipped masonry bit and you will want to use Masonry Screws (Tapcon, etc.) to attach the mounting bracket to the brick.
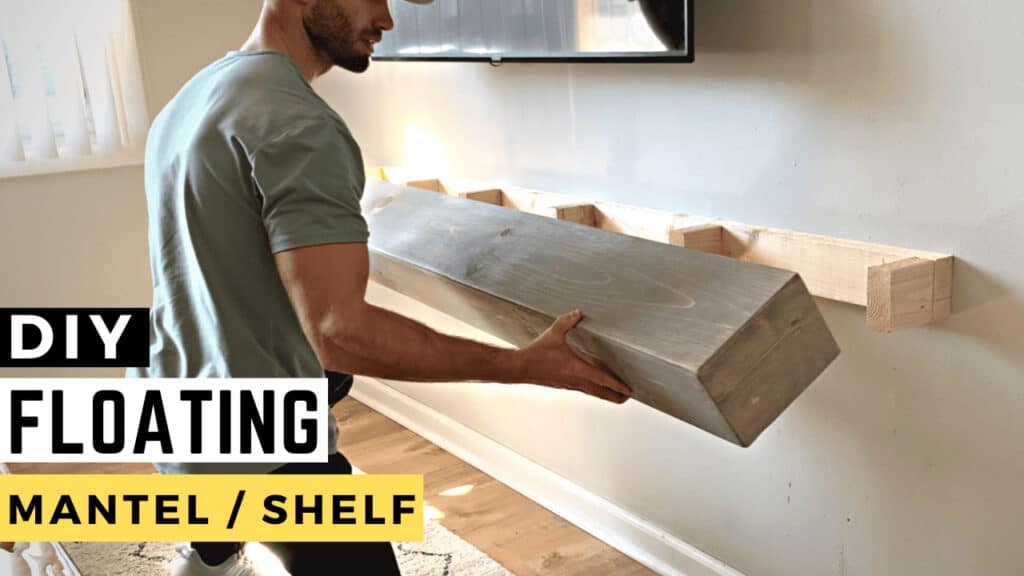
Once the mounting bracket is attached to the wall, lift the floating mantel into place and slide it over the mounting bracket.

Push the mantel so that it is in contact with the wall, check for level, and then secure the mantel to the mounting bracket using a few brad nails.

Conclusion

At this point, your floating mantel is complete! If you followed the direction in this guide, you should have a floating mantel / shelf that looks something like this:
If you are more a visual learner, check out my “how to build a floating mantel” YouTube video below or download the FREE Plans which will show you every miter cut in detail.
Thanks so much for checking out ATImprovements! If you learned something from this project, you might also like these other DIY Projects:
- How to Install Rigid Foam Insulation in a Basement: https://atimprovements.com/how-to-install-rigid-foam-insulation/
- How to Frame Basement Walls: https://atimprovements.com/how-to-frame-a-basement-wall/
- How to Frame Around HVAC Ducts or Pipes in a Basement: https://atimprovements.com/how-to-frame-around-ductwork/
- How to Install Luxury Vinyl Plank in a Basement: https://atimprovements.com/lvp-flooring-installation/