
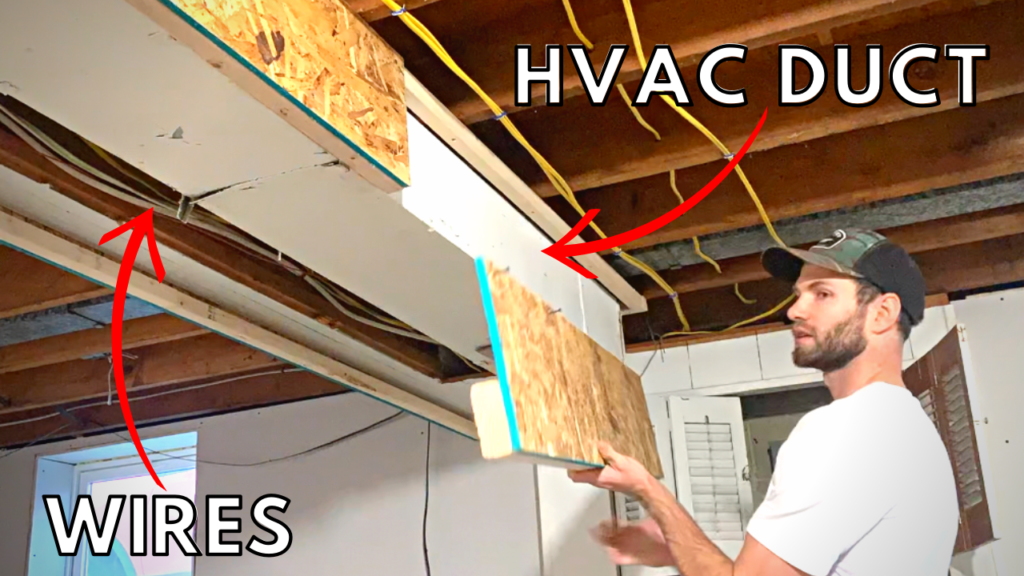
If you are in the process of finishing your basement, you likely have ductwork or pipes that you will need to frame around in order to conceal them with drywall. Although there are many different ways to frame around a HVAC ducts and pipes in a basement, there is one method of framing a soffit drop that is both easy to construct and highly functional.
To frame around HVAC ductwork (or pipes) in a basement, start by mounting a 2″x4″ piece of lumber on each side of the duct by attaching it the joists with nails or screws. Next, cut a piece of OSB lumber to a length that is slightly greater than the height of the duct and attach a 2″x4″ piece of lumber to the bottom of the OSB with screws. Take the piece of OSB with the 2″x4″ attached to the bottom and attach it to the 2″x4″ piece of lumber attached to the joists. The 2″x4″ piece of lumber attached to the bottom of the OSB will serve as the mounting surface for the drywall beneath the duct. Attach drywall directly to the OSB for the vertical sections of the soffit.
This article will explain how to frame a soffit drop with OSB around HVAC ducts (or pipes) in detail through the use of pictures and videos.
Additionally, if you are more of a visual learner, you can check out my “How to Frame Around Ductwork in a basement” YouTube video linked at the end of this article.
Below are the tools you will need to complete this project:
🧰 TOOLS AND MATERIALS NEEDED TO FRAME AROUND DUCTWORK (OR PIPES):
- Drill: https://amzn.to/3PXN6kI
- Miter Saw (or circular saw): https://amzn.to/3I8231z
- OSB Lumber (or Plywood)
- 2″x4″ Lumber
- Screws
Now that you know what tools and materials you will need, here are the steps needed to complete the project.
Plan out your Framing Layout

Before you can frame around ductwork (or pipes) in a basement, you first need to spend some time thinking about the framing layout. Basically, you will want to install your framing in a way that completely surrounds the ductwork, pipe, or obstruction and so it provides a suitable mounting surface for drywall.
Some things to consider when planning out your HVAC duct (or pipe) soffit framing are:
- locations of vents or clean-outs (coordinate access)
- Height restrictions
- Code requirements
After spending a bit of time planning how you want to frame around your obstruction, you can move on to the next step.
Explanation of the Framing Method
Before explaining how to actually build a soffit drop frame around HVAC ducts (or pipes) in a basement, let’s talk about the way this framing will be constructed.
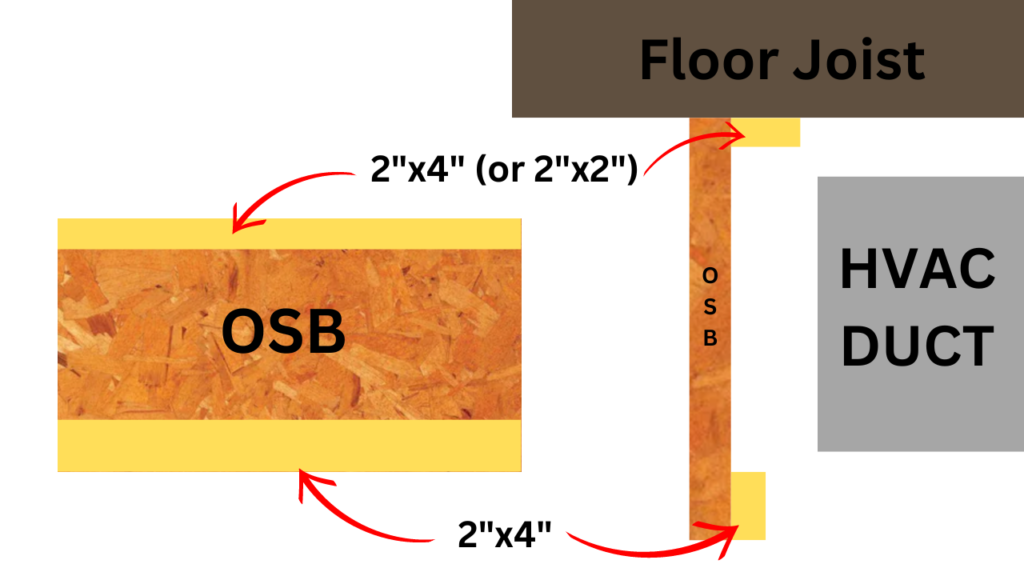
To frame around an HVAC duct in a basement, I recommend that you use OSB as the vertical mounting surface with 2″x2″ or 2″x4″ lumber at the bottom and top to provide rigidity. Basically, you will be cutting or “ripping” a piece of OSB or Plywood to a height slightly greater than that of your HVAC duct. Next, you will attach a piece 2″x2″ or 2″x4″ lumber to the “top” of the OSB that will allow you to attach it to the floor joists above (as shown in the figure above). You will then attach a piece of 2″x2″ or 2″x4″ lumber to the bottom of the OSB to serve as a mounting surface for the drywall.
In the next steps, we will explain how to construct this system in detail.
Attach the “Mounting Rail” to the underside of the floor joists
The first step in framing around ductwork (or pipes) in a basement is to attach the 2″x4″ mounting rail to the underside of the floor joists – as shown below:
I recommend that you use a tape measure, chalk line, or a laser level to make sure that the mounting rail is installed perfectly straight.
Attach the mounting rail to the floor joists above on both sides of the duct (running parallel) to the duct.
Cut the OSB or Plywood Drywall Backing Surface to size
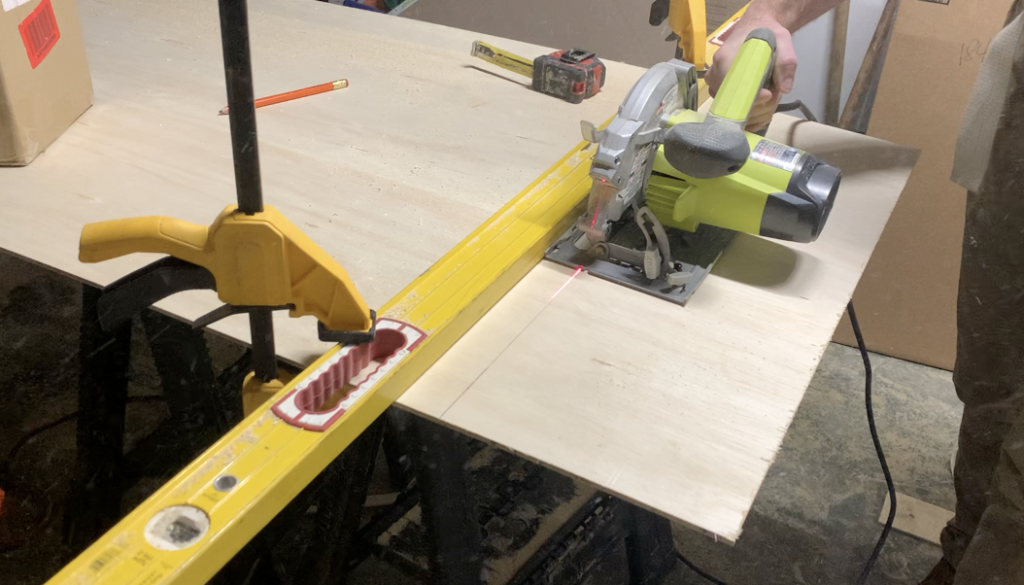
After attaching the mounting rail, you will want to “rip” your OSB (or plywood) do a height that is just greater than that of the duct you are trying to conceal. For example, if you HVAC duct extends 12″ below the floor joists, you will likely want to “rip” your OSB to an approximate height of 13″.
To “rip” the OSB to correct height, I recommend that you use a table saw. However, you can also use a circular saw with a straight edge as a guide – as shown below:
Install the 2″x4″ Drywall “Mounting Stud” at the Bottom of the OSB
After cutting your OSB to size, attach a 2″x4″ “Mounting stud” to the bottom of the OSB – as shown below:
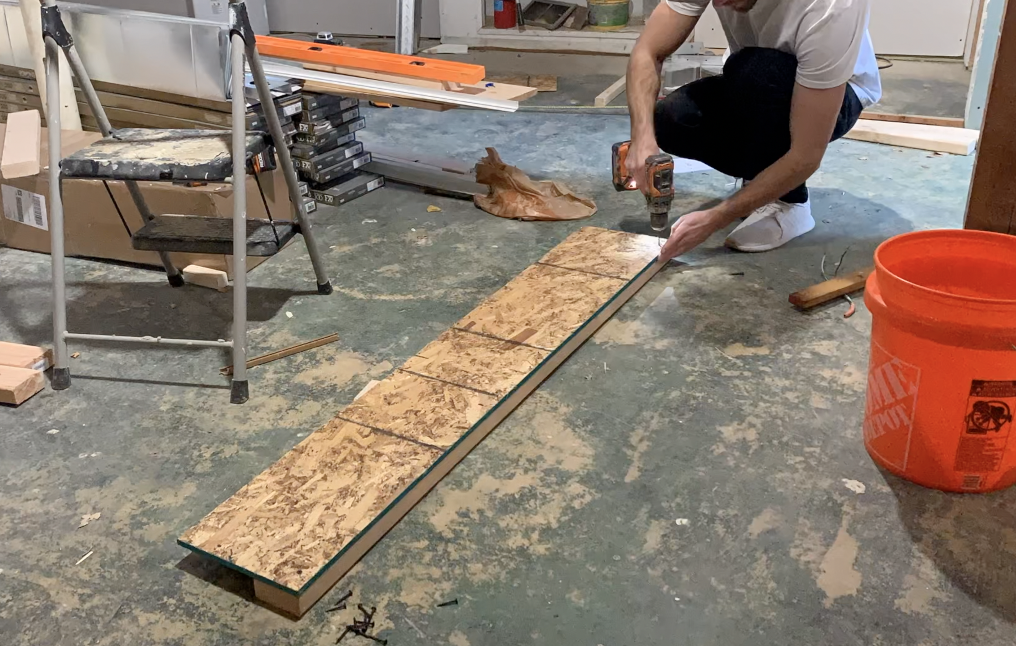
Attach the mounting stud to the bottom so that it is perfectly flush with the bottom of the OSB. Use 1″ or 1 1/4″ in screws to attach the stud to the OSB.
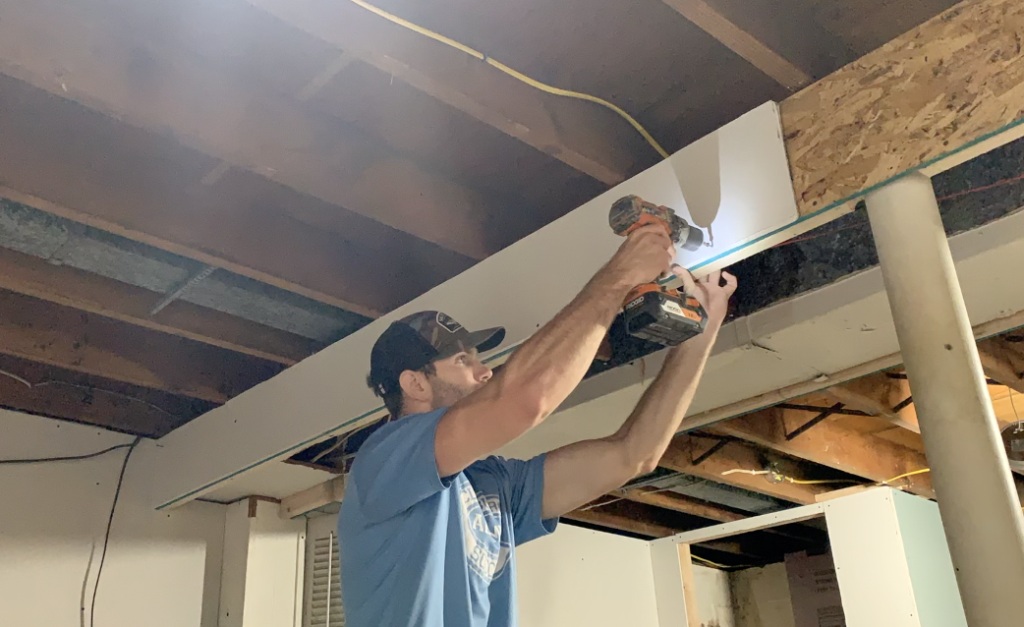
Attach the OSB (with the Mounting Stud Attached) to the 2″x4″ Mounting Rail
At this stage, simply take the piece of OSB with the mounting stud attached to the bottom and screw it into the “Mounting Rail” that was installed previously.
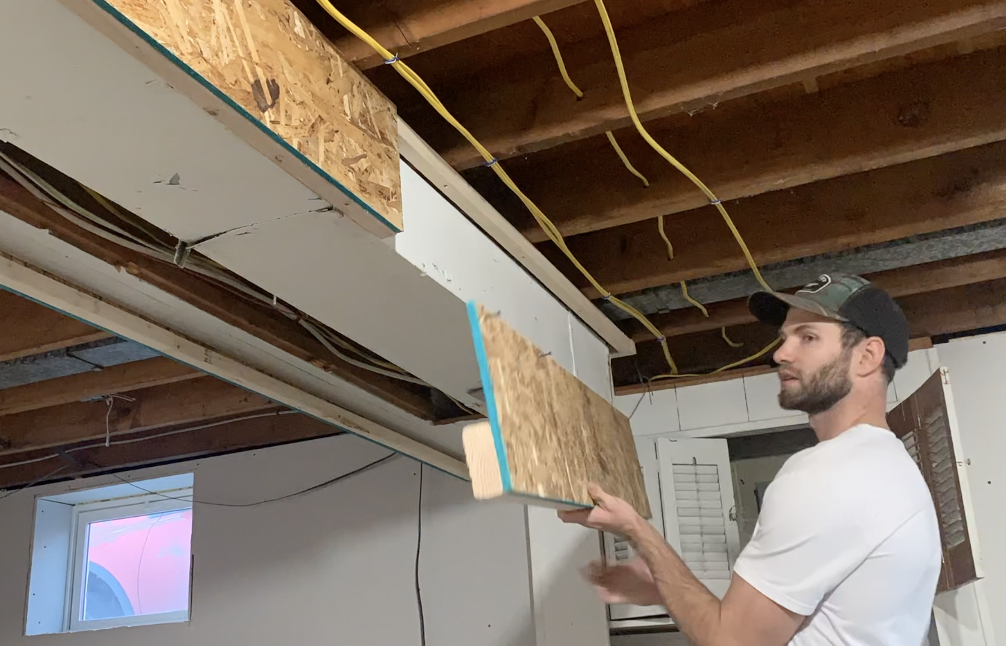
Ensure that the bottom Mounting Stud is perfectly flush with piece installed previously. You may also need to create corners around bends in the HVAC as shown below:
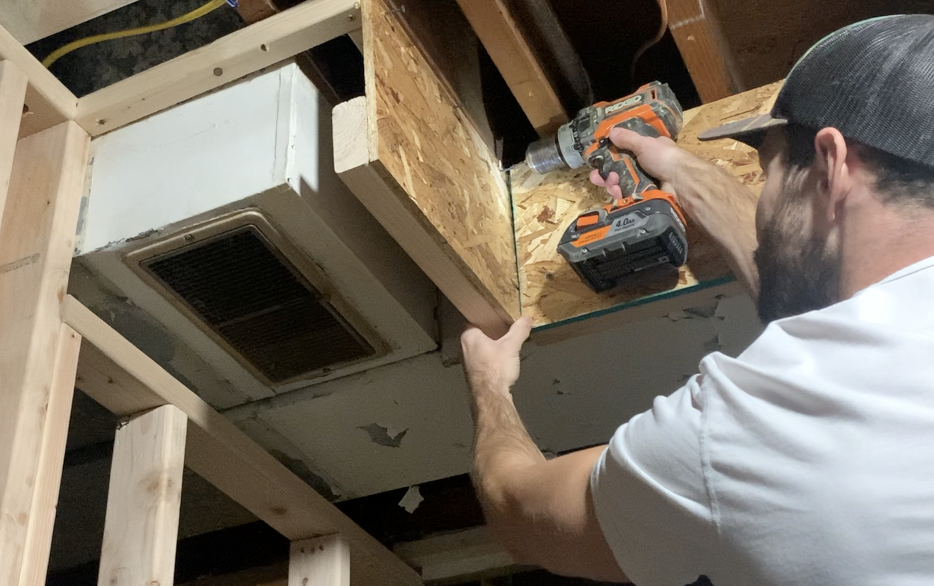
Continue to install the OSB (with the mounting stud attached) to the mounting rail along the entire length of your duct run.
Ensure that the Framing is installed level and plumb
As you install the OSB, it is highly recommend that you use a level to ensure that the height is perfectly the same on both sides of the duct – as shown below:
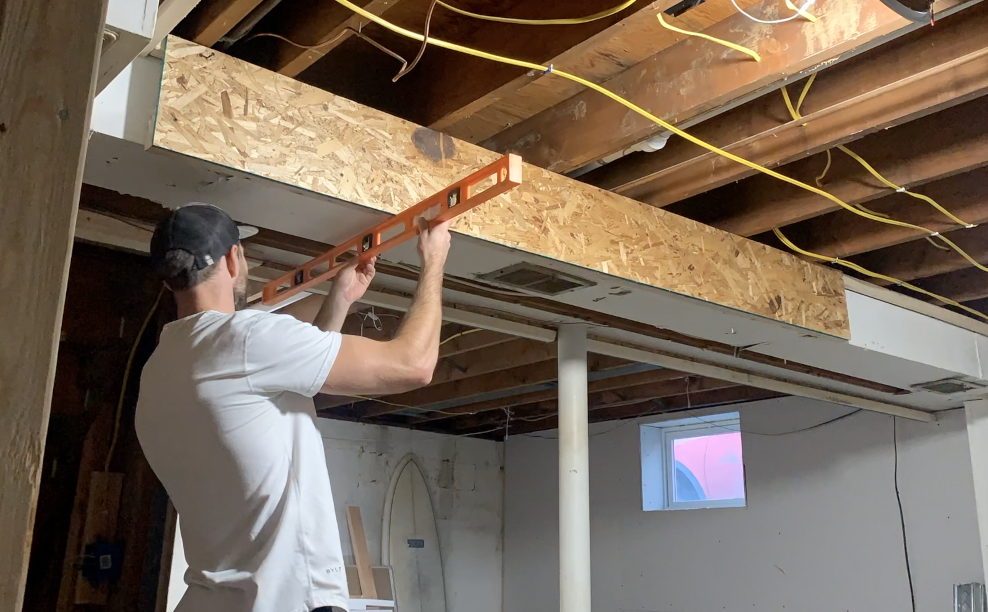
After checking that the height is appropriate on both sides of the ductwork (or pipe), you can move on to the next step.
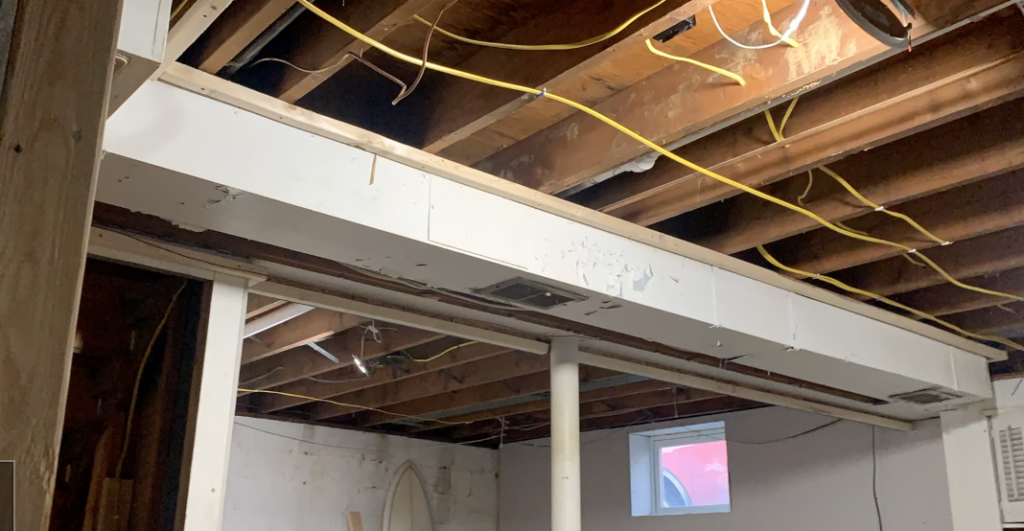
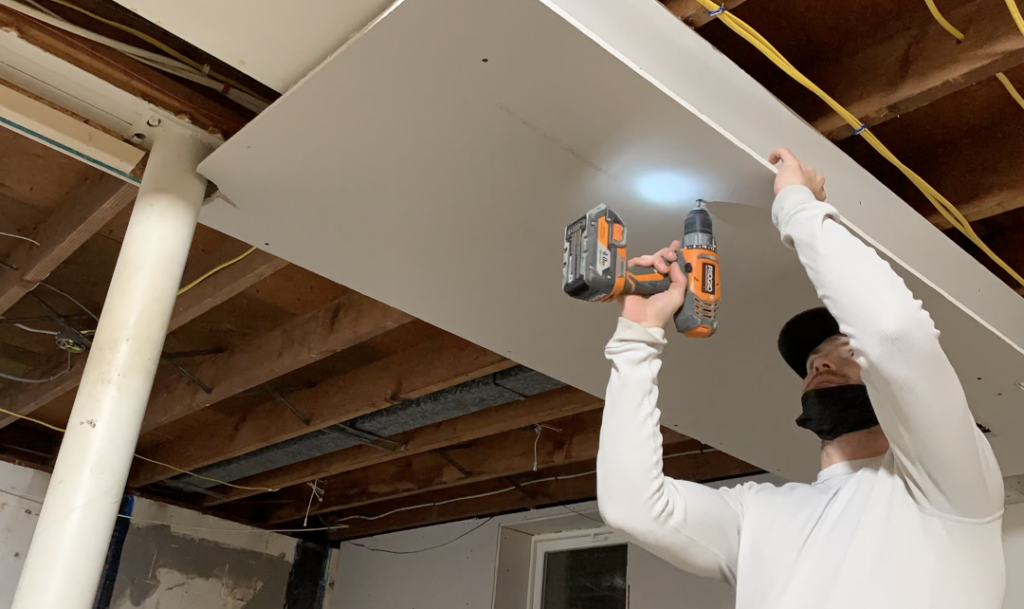
Install drywall, paint, etc.
After attaching the OSB to the mounting rail, the last step is to install drywall. Attach the vertical sections of drywall directly to the OSB board as shown below.
On the underside of the soffit drop, you will attach the drywall to the mounting studs on either side of the duct.
After installing drywall, all that is left to do is finish the drywall (install corner bead, joint compound, tape seams, etc.) and paint.
Alternate Ways to Frame Around Ductwork
Although framing around HVAC ductwork with the method above is my favorite, there are many other suitable ways to frame around ductwork or pipes. For example, if you are using metal studs, you simply frame around a duct in a manner similar to what is shown below:
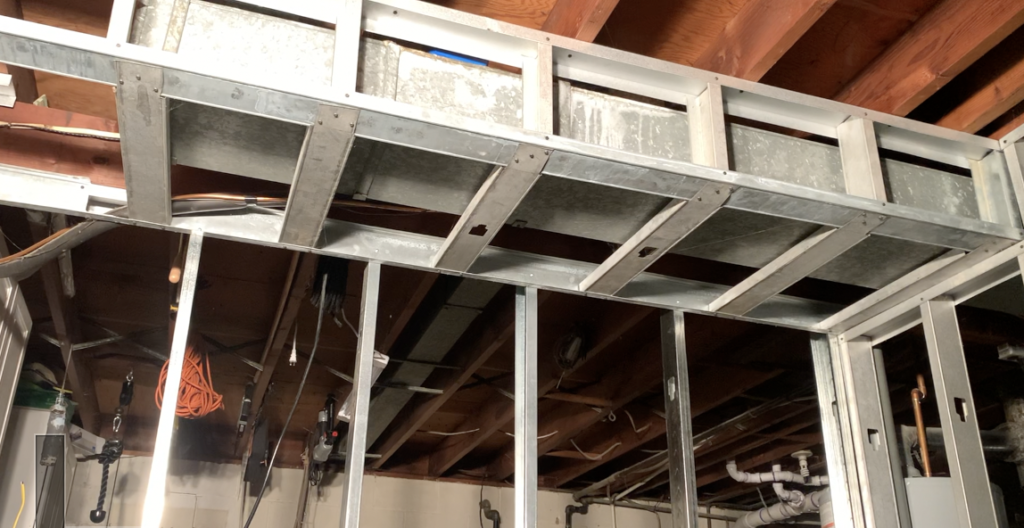
This method is perfectly acceptable, it just takes long to construct (in my opinion). Ultimately, how you frame around HVAC ductwork (or pipes) in your basement is up to you. Good luck!
Also, if you are more of a visual learner, you can check out my “How to Frame Around HVAC Ductwork” YouTube Video below:
Thanks so much for checking out ATImprovements! If you learned something from this project, you might also like these other DIY Projects:
- How to Install a DIY deck Wire Railing: DIY Cable Railing – How to Install Cable Railing Step-by-Step – (atimprovements.com)
- How to Build a Concrete Paver Patio: DIY PAVER PATIO – Easy DIY Paver Patio Ideas – (atimprovements.com)
Thanks!
DISCLAIMER: This is a reference guide only. Links included in this article might be affiliate links. If you purchase a product or service with the links that I provide I may receive a small commission. There is no additional charge to you! Thank you for supporting ATimprovements so I can continue to provide you with free content each week!