
Building your own DIY Fire Pit Table can be an inexpensive and rewarding project that can greatly improve your outdoor deck/patio experience. By following the 6 steps below, you will be able to quickly build your own DIY fire pit table so you can start enjoying the outdoors:
- Step 1: Build the Concrete Fire Table Form.
- Step 2: Apply Concrete to the Fire Table Form and let it cure.
- Step 3: Construct a base for your Fire Pit Table Top.
- Step 4: Remove the concrete from the Form and seal the concrete table top.
- Step 5: Install the propane tank, fire pan insert, valve key and then connect hoses.
- Step 6: Place fire glass in the fire pan and light it!
Additionally, feel free to check out my detailed Youtube Tutorial Video if you are more of a visual learner:
Step 1: Build the Concrete Fire Table Form
Whenever you pour concrete, you will need to construct a “form”. For this project, I used 3/4 Inch Melamine to construct my form to the dimensions shown below:
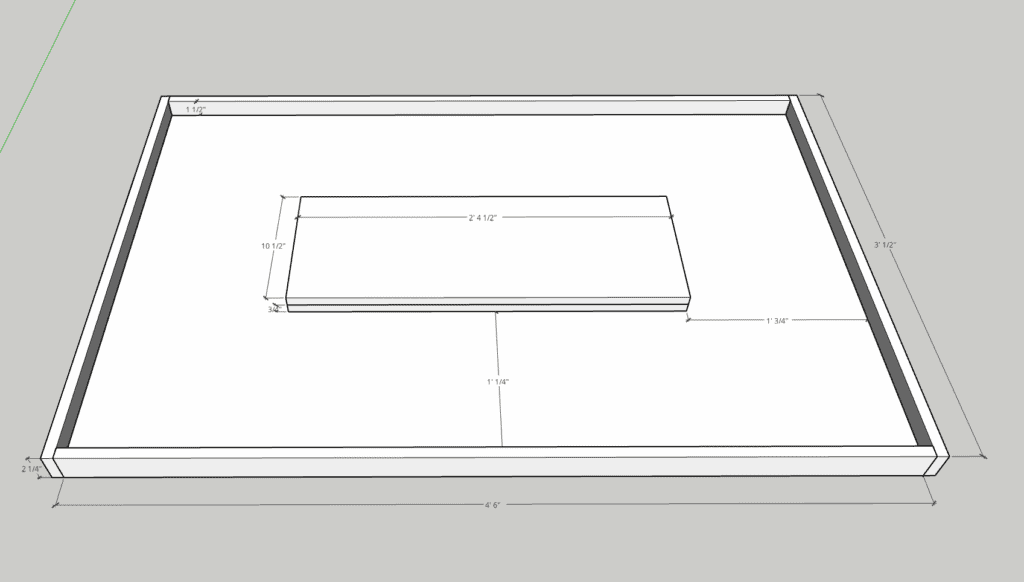
The size of the concrete form will depend on the size of your fire table and also the fire table pan insert that you purchase. We will talk more about the fire pan insert in Step 6.
Cut your melamine to the necessary lengths and widths and then screw it all together to create your form. Once the form is built, I recommend that you apply a bead of caulk on the inside corners so that the finished concrete top has rounded edges. I have some additional tips on caulking the corners within my Youtube Video!
Next, I recommend you apply some kind of “form release” to the melamine so that you can remove the forms easily once the concrete has cured. I used WD-40, but there are a lot options.
With the form built, let’s move on to Step 2!
Step 2: Apply Concrete to the Fire Table Form and Let it Cure
Once the form is build, Mix up your concrete according to the manufacturer’s instructions. I used a little bit of concrete dye to “darken” my concrete for a more charcoal look. Next, simply fill up the form with concrete! I highly recommend that you use some type of steel reinforcement or rebar in your concrete for added strength. I used wire mesh and simply placed it in the center of the concrete as I was filling the form.
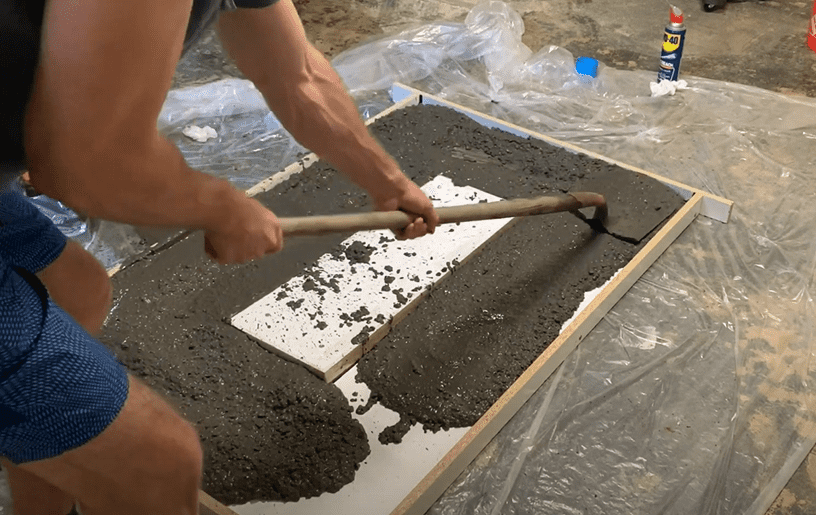
Once the form is full of concrete, use a piece of scrap lumber to screed the surface smooth. Use a concrete finishing trowel to make remove any imperfections.
I recommend using something to vibrate the concrete to ensure that all voids are filled and that there are no air pockets. I used a Sawzall with no blade to accomplish this.
Once you are happy with the finish, cover the concrete table top with plastic (to help retain moisture) and let it cure for a few days. While you are waiting for the concrete to cure, we will work on Step 3.
Step 3: Construct a base for your Fire Pit Table Top
While your concrete cures, you will want to construct a base for your fire pit table top to rest on. You can do this SO MANY different ways. Building the base really depends on the look and style you are going for. I have seen people build the base out of 2×4’s and pallet wood, metal studs, and even out of concrete. There is really no RIGHT way to do it. There are probably a few wrong ways, but I digress…
For my table, I built the the base using metal studs. I created a small rectangle at the bottom and built a larger rectangle on top, securing everything with self-tapping metal screws. The reason for two different sizes is that it will allow for easy lifting of the base. One large rectangle base would have been pretty awkward to move.
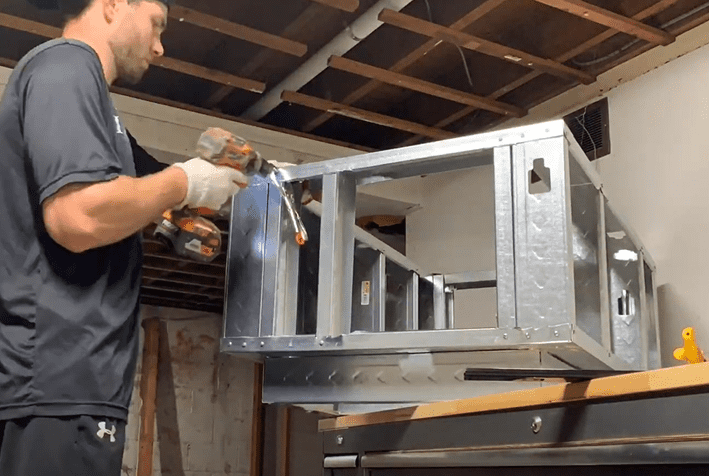
I also added a sliding access door to my base using drawer slides to allow for easy installation and removal of the propane tank.
For the “veneer” of my base, I initially was going to wrap the whole base in cement board and then use mortar to apply a stone veneer. However, I was a little worried about weight. The concrete table top already weighs around 200 pounds and all of that stone and mortar easily would have added another 200 pounds. So, to reduce weight (and because I got a killer deal at Home Depot), I used LVP flooring as my “veneer”. Might not have been the most practical option, but it worked for me!
I used this angle molding to hide the ugly corners: https://amzn.to/3e3777N
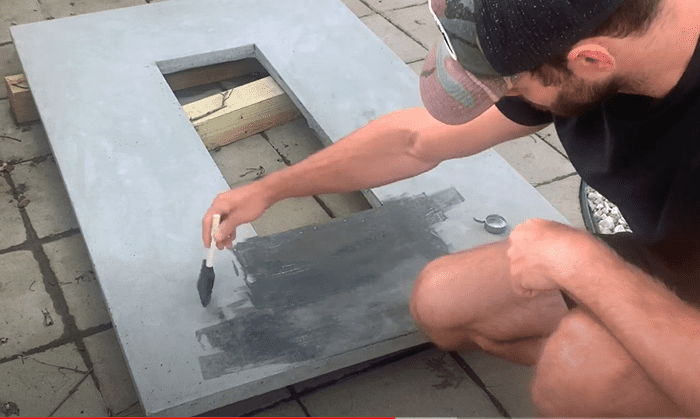
Step 4: Remove the concrete from the Form and seal the concrete table top
Once you have given your concrete enough time to cure, remove the mold as gently as possible to minimize chipping the concrete. If you used a form release, this should go pretty quickly. Hopefully, you are happy with the way your concrete is looking. However, if you have large voids, cracks, or holes in the concrete, you may want to mix up a “slurry coat” of concrete and fill in any imperfections.
You can use concrete sanding pads to wet sand your concrete fire table top to give it a more polished look.
Next, I recommend sealing the concrete fire table top. I used a wet-look sealer by BEHR, but there are plenty of other products out there.
Once the concrete table top has been sealed, go ahead and place the fire table on top of the base you built in Step 3.
Step 5: Install the propane tank, fire pan insert, valve key and then connect hoses.
Selecting the propane fire pit kit and fire pan for your DIY fire pit table should really be done as part of Step 1. The reason for this is that the size of your fire pan insert will dictate the size of your form. For my DIY fire pit table, I went with the Easyfirepits.com ITCK+ Kit which is for a propane tank within the table. Additionally, I used the PAN28x10 which is 28″x10″. I also decided to use a wind screen both for aesthetic and functionality. I had a great experience with Easyfirepits.com and I recommend that you check them out when selecting the kit for your table.
To hook everything up, you will need to:
- Connect the Propane Tank to the Regulator
- Connect the Propane hose from the regulator to the valve key
- Connect the hose from the valve key to the burner
Check out the image below from Easyfirepits.com which shows the general arrangement. Also, note that flared compressions fitting do not require PTFE tape but threaded connections do.
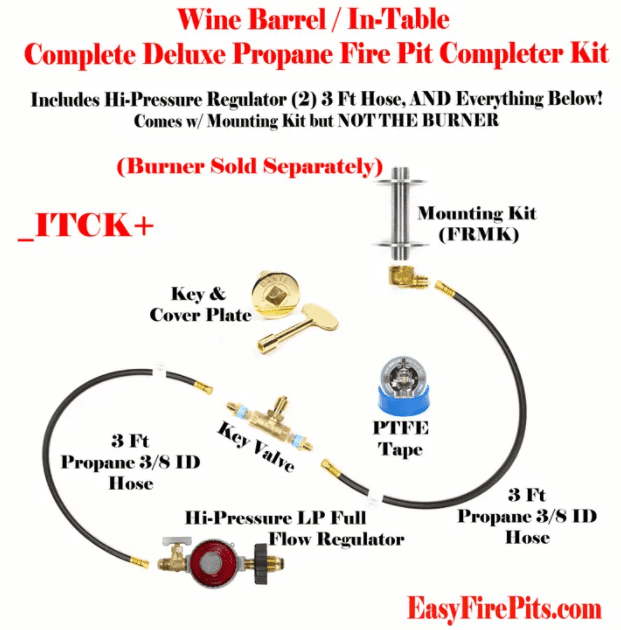
**It is highly recommended that you leak test all connections using soapy water.
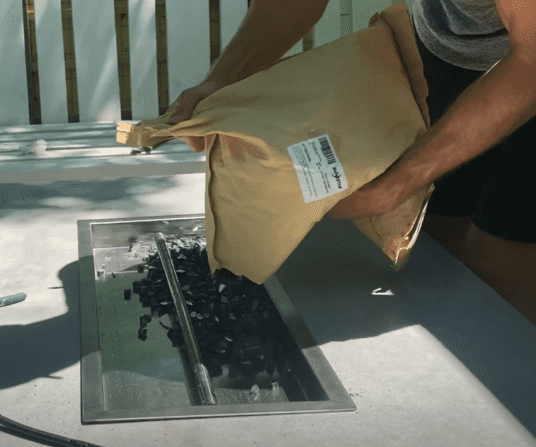
Step 6: Place fire glass in the fire pan insert and light it!
Once all of your connections have been made and leak tested, it’s time to insert the fire table pan into the concrete penetration. Next, I recommend that you place some fire glass in the fire pan to cover up the burner (for aesthetic reasons).
Now, open the propane valve, adjust the flame size with the key valve, and light it up!
I love my fire table and it definitely creates a great backyard environment. This article and my associated Youtube video are meant to serve as a guide only. There are SO MANY different ways that you can construct this table. Thanks for reading and happy building!
If you liked this project, consider checking out my other Project Blogs on ATImprovements.com and also on Youtube:
- How to Install a DIY deck Wire Railing: DIY Cable Railing – How to Install Cable Railing Step-by-Step – (atimprovements.com)
- How to Build a Concrete Paver Patio: DIY PAVER PATIO – Easy DIY Paver Patio Ideas – (atimprovements.com)
Check out all of my other projects on Youtube: Andrew Thron Improvements – YouTube
Disclaimer: This article and the associated Youtube video are for reference only. Build at your own risk and please be safe!