

Building a DIY floating vanity was one of the creative ways I was able to save space in my half bath to full bathroom renovation project. Because space was at a premium, I didn’t want a bulky vanity that that would obstruct the walkway. To solve this problem, I built my own DIY floating vanity that is both stylish and inexpensive.
To build a floating vanity, start by installing your support brackets directly to the wall studs. Next, attach your floating vanity to the support brackets and ensure that the vanity is level. Finally, install your vessel sink and hook up your plumbing as needed.
This article will show you exactly how I built the DIY floating vanity you see above, step-by-step!
1. Install Floating Vanity Support Brackets
The key to a successful floating vanity installation begins with the support brackets. For my DIY floating vanity project, I had access to the wall framing and was able to install heavy duty support brackets that are screwed directly to the studs.
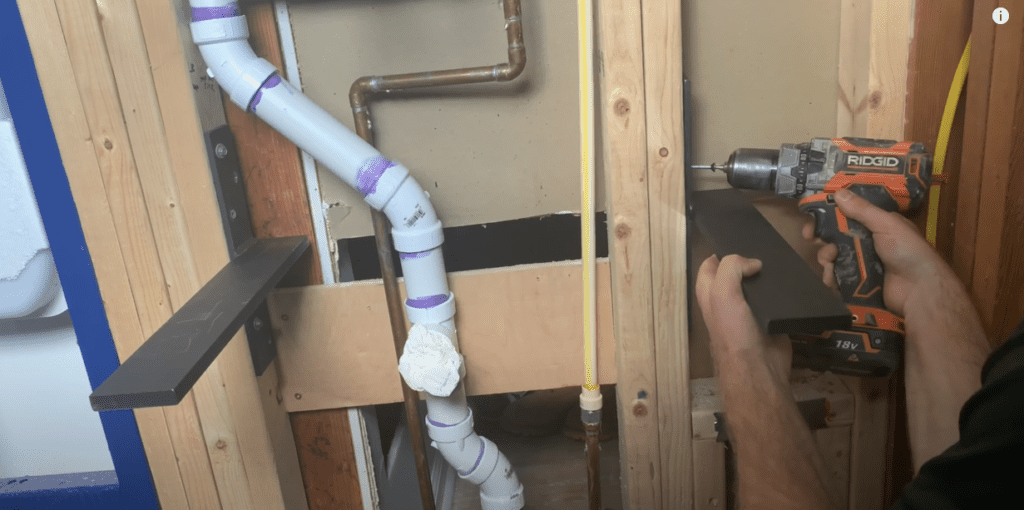
Use a level to ensure that your support brackets are installed at the exact same height. After confirming level, secure all remaining screws.
When determining your floating vanity bracket height, keep the following in mind:
- Most Vessel Sinks have a top elevation of 34″-36″
- You will likely want to have your floating vanity top at approximately 30″ (to account for a 6″ high vessel sink).
- Keep in mind the thickness of your floating vanity shelf when determining your bracket height.
After installing your support brackets, you can finish your bathroom walls with tile or drywall. For more information on how to install wall tile or how to cut tile around the floating vanity support brackets, check out my wall tile installation article linked here:

2. Build Your Floating Vanity
One of the major benefits of building your own floating vanity is that you get to customize it however you want. You can build a large floating vanity complete with drawers and storage or you can keep in simple with a basic floating shelf.
For my floating vanity installation, I chose to go with a very simple floating vanity shelf.
Initially, I wanted to use a live edge slab for my floating vanity. If you want to use a live edge slab for your floating vanity, you typically have a few purchasing options.
- Big Box Stores (e.g. Home Depot and Lowes) usually sell live edge slabs (at least online), but these are usually limited in size and species.
- There are typically local “boutique” live edge slab suppliers (brick and mortar stores) that can usually be found through a quick Google search.
- Craigslist. Craigslist is one of the best ways, in my opinion, to source live edge slabs.
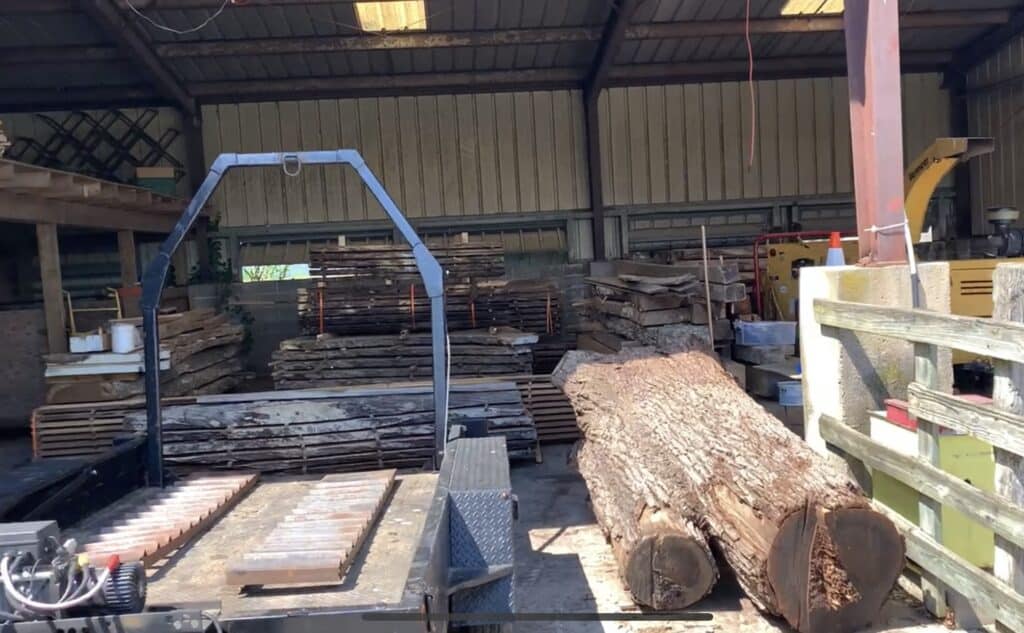
For my floating vanity, I found a local guy on Craigslist who mills his own slabs. However, after visiting his warehouse (see below), I opted to go a different route.
Instead of purchasing a live edge slab for my floating vanity, I purchased a 3/4″ pine board from Lowe’s for under $10.
Next, I customized the floating vanity board to fit my needs.
In my bathroom, the floating vanity is positioned right at the entry. As a result, I chose to give my floating vanity a curved look as shown below:

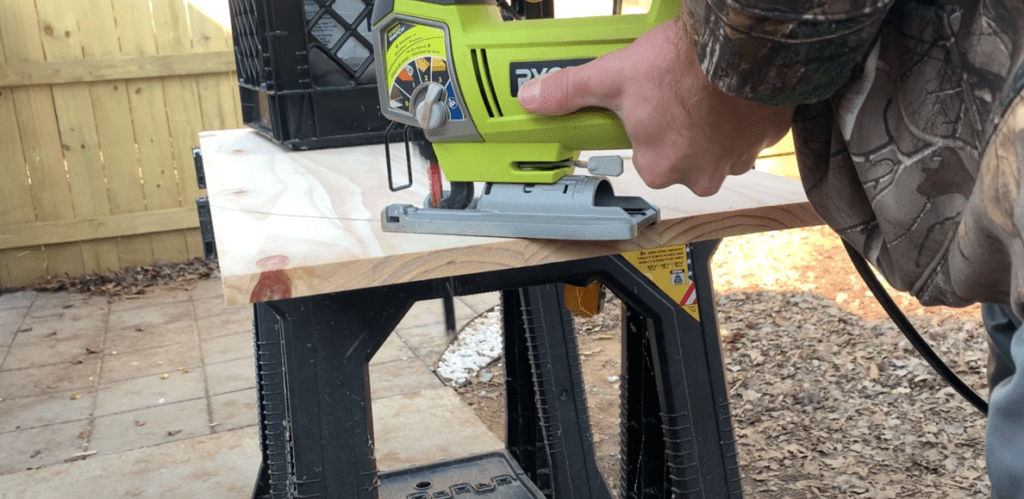
In order to cut my floating vanity board, I marked the cut line with a pencil and made my cut with a jig saw.
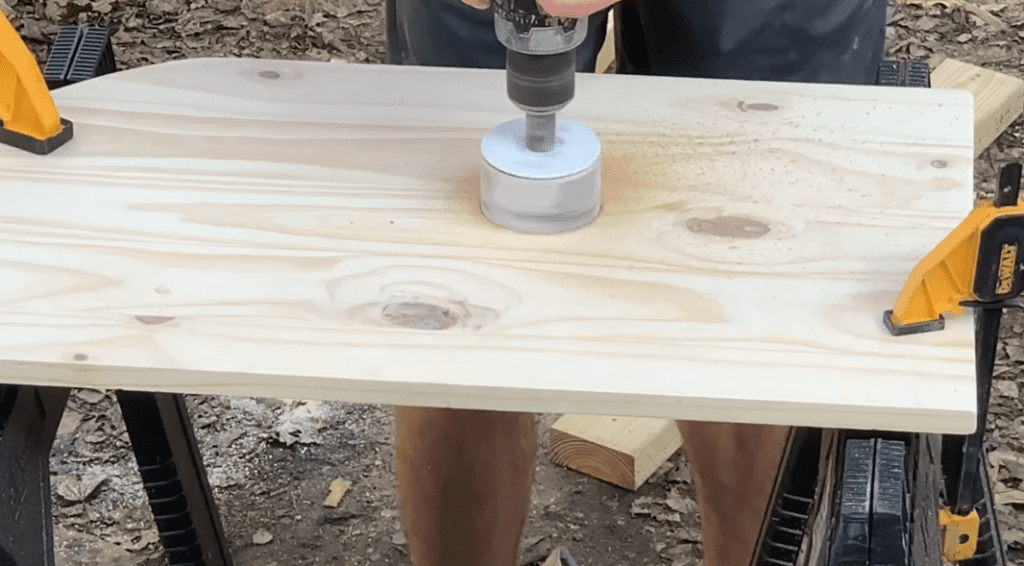
Next, I preliminarily placed the floating vanity board on top of my brackets and established the position of my vessel sink. After establishing the location of the sink, I marked the drain hole location with a pencil on my floating vanity board.
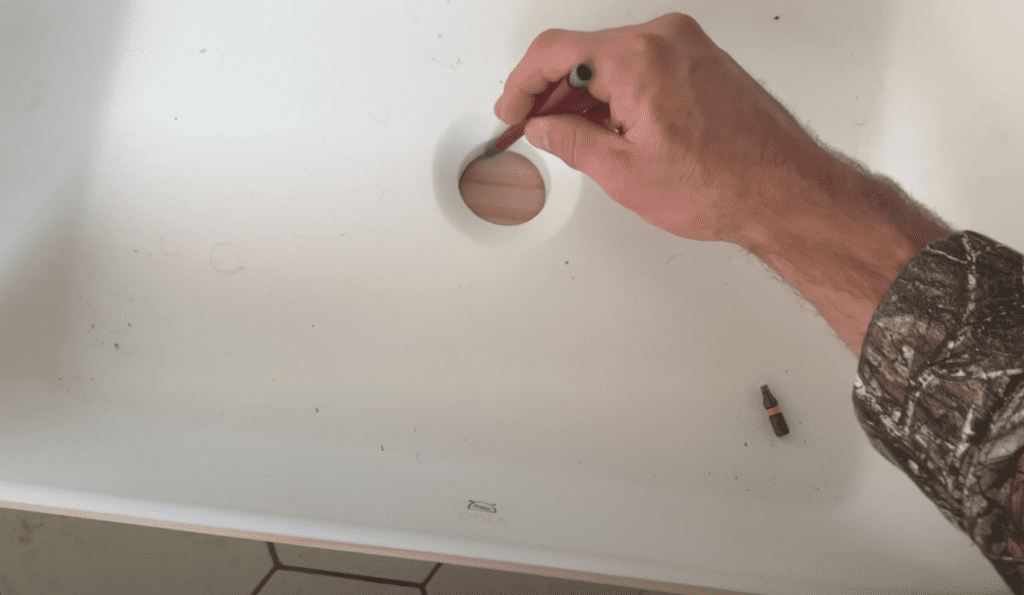
After marking the drain hole location on my floating vanity, I cut the drain hole using a drill and a 2″ hole saw bit as shown below:
Finally, sand down all of the cut edges using 120 grit sandpaper to give your floating vanity smooth edges.
3. Waterproof Your Floating Vanity
There are numerous methods for waterproofing a floating vanity. Although options like polyurethane and Shellac are suitable for protecting and waterproofing surfaces that will experience occasional moisture, I recommend that epoxy be used to waterproof your floating vanity.
Epoxy coatings offer the best waterproofing protection for bathroom floating vanity installations and are simple to apply.
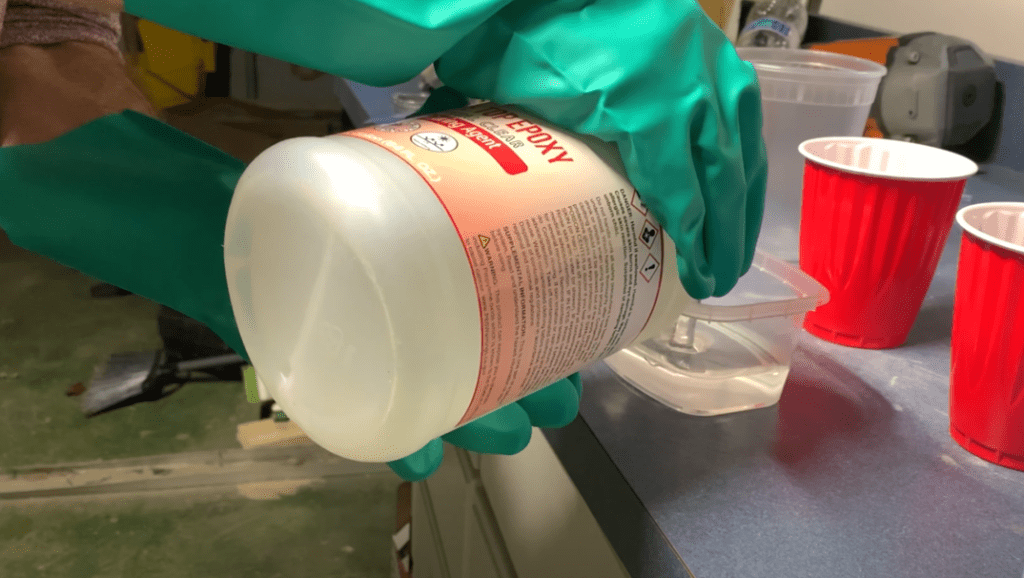
To begin your epoxy application, start by mixing up your Epoxy and Resin System according to the manufacturer’s recommendations. The epoxy I used for this floating vanity project calls for a 1:1 mix ratio of epoxy and curing resin.
After thoroughly mixing up the epoxy coating according to the manufacturer’s instructions, apply the coating to the floating vanity using a foam brush.
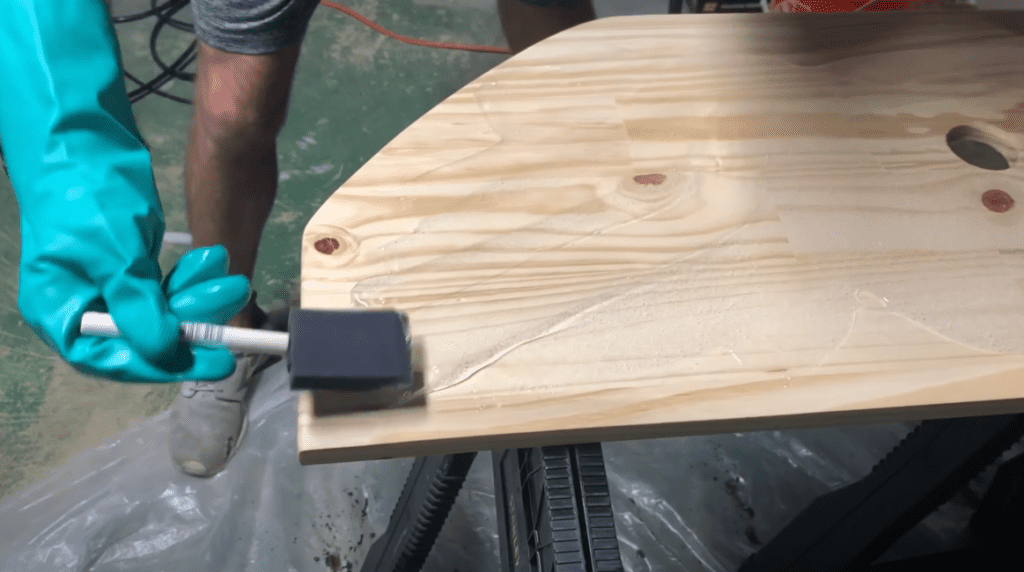
After applying epoxy to the top of the floating vanity with a foam brush, ensure that the coating is spread evenly over the entire floating vanity surface. Epoxy is self leveling, so simply apply a 1/8″ of epoxy over the entire surface of the floating vanity board and allow the epoxy to level out.
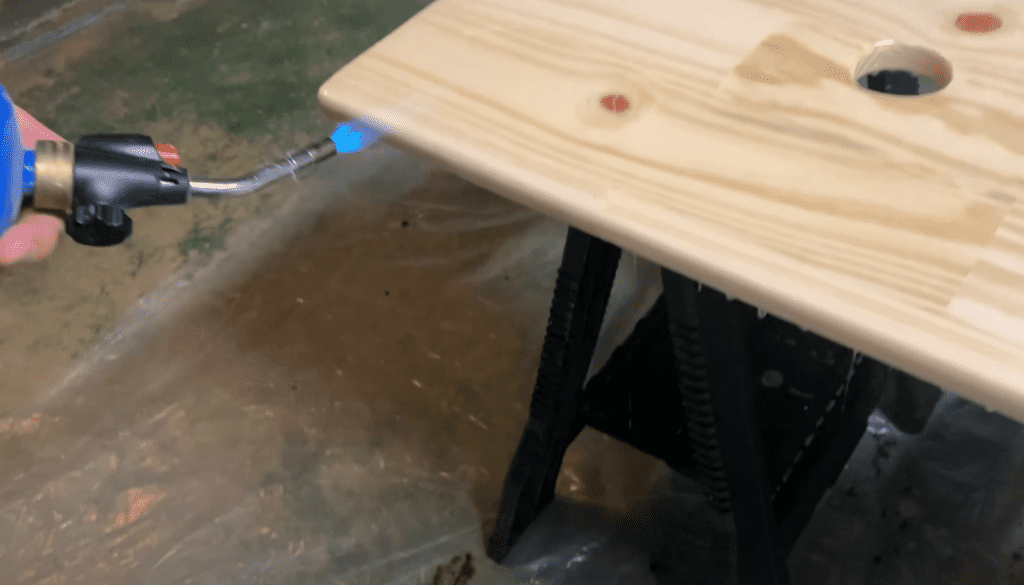
When applying epoxy to your floating vanity, it is common that air bubbles will form within the layer of epoxy. To remove the air bubbles, use a heat gun or torch to apply heat to the epoxy surface. The heat will cause the air bubbles to rise to the surface of the epoxy and pop.
PRO TIP – Ensure that you do not keep the heat in one location for too long.
Lastly, it is common for epoxy drips to form at the bottom of the floating vanity board as shown below. To remove these drips, allow them to epoxy to cure for a few minutes until it becomes slightly tacky to the touch. Then, use a foam brush to remove all off the drips.
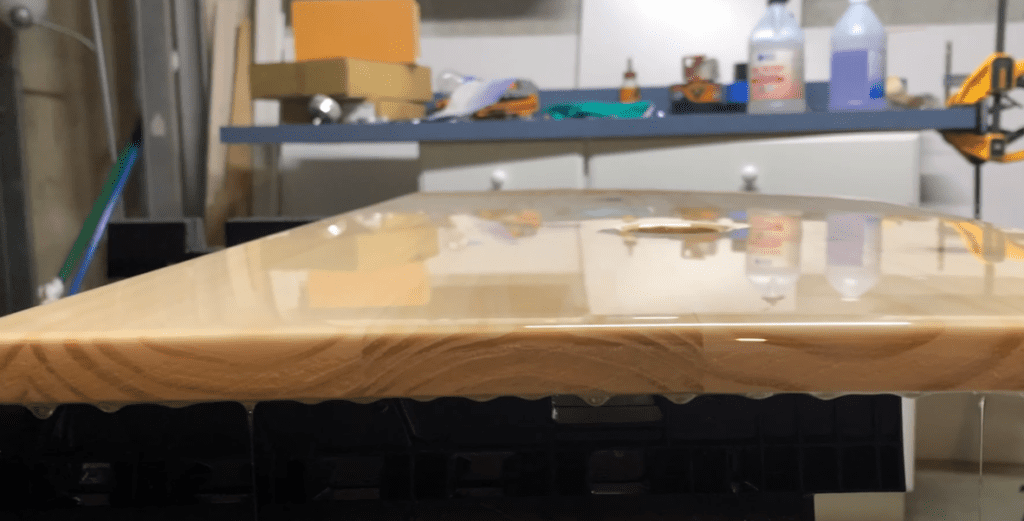
You also have the option to apply painter’s tape to the bottom of the floating vanity prior to pouring the epoxy resin. By doing this, you can remove the tape (and the drips stuck to the tape) from the bottom of the floating vanity.
If you allow for the epoxy drips to fully harden and cure on the bottom of the floating vanity, you have the option to sand them off. However, sanding off fully cured epoxy drips is much more difficult than removing the epoxy drips before they have cured.
Give your epoxy coating approximately 48-72 hours to fully cure, and then proceed with your DIY floating vanity installation.
4. Attach Floating Vanity to Support Brackets
After giving your epoxy resin time to fully cure, it’s time to attach the floating vanity to the brackets. To do this, apply construction adhesive to the top of the floating vanity brackets.
After applying construction adhesive to the top of the floating vanity brackets, place your floating vanity board on top of the brackets and firmly press the floating vanity board into the construction adhesive.
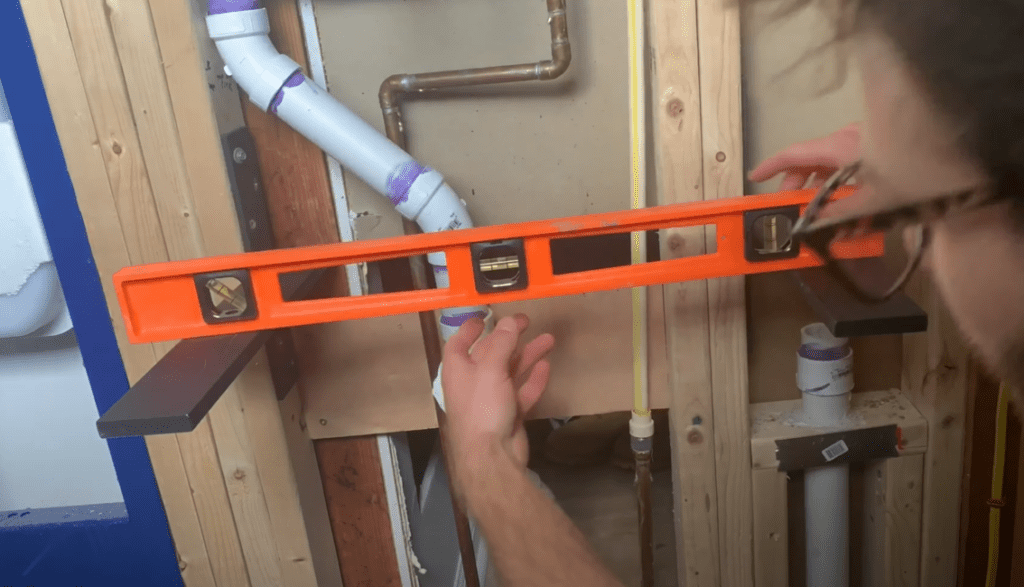
Once the floating vanity is in place, use a level to ensure that the floating vanity is perfectly level.
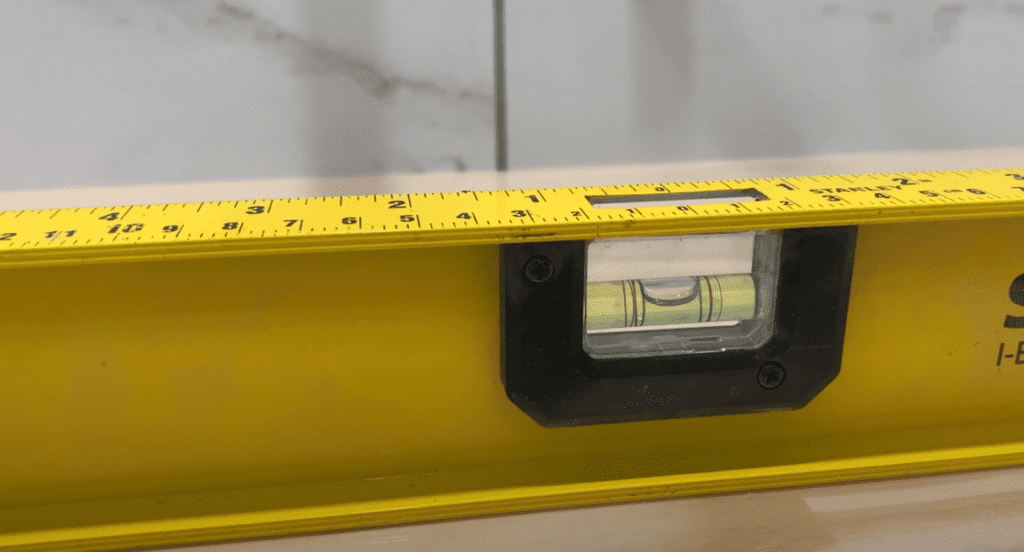
Once you have confirmed that the floating vanity is perfectly level and positioned where you want it, use towels and weights to hold the floating vanity in place while the construction adhesive dries.
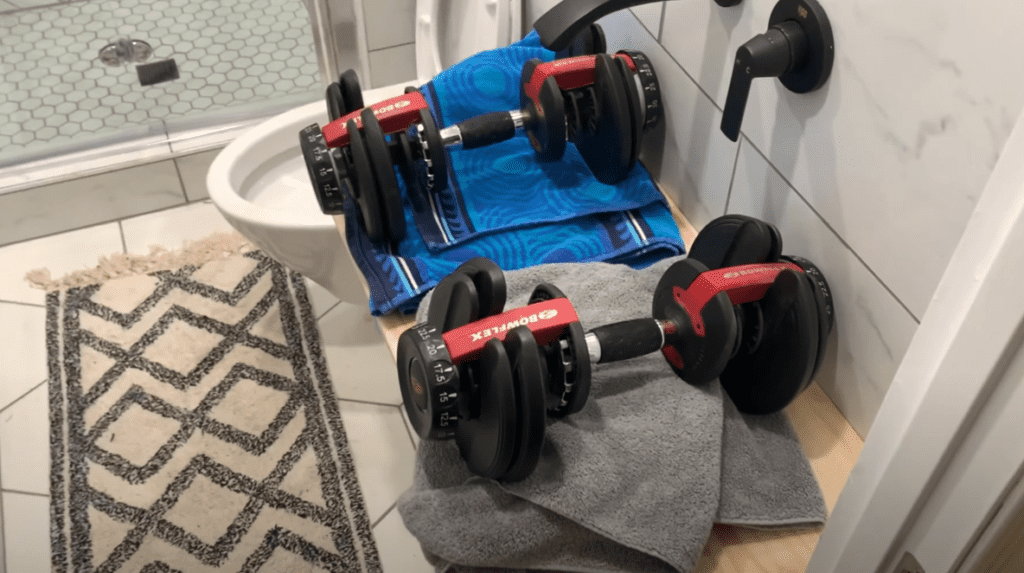
After giving the construction adhesive approximately 24 hours to dry, remove the weights and prepare for the next step in the floating vanity installation process.
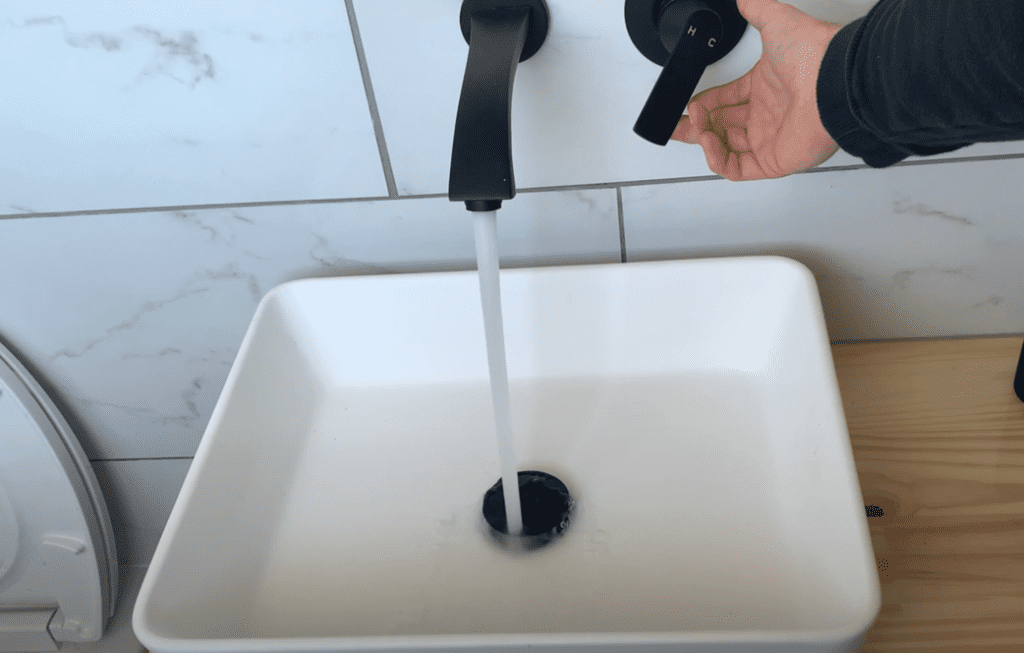
5. Install Vessel Sink
Once your construction adhesive has had time to dry, remove the weights from the floating vanity and begin preparation for you vessel sink installation.
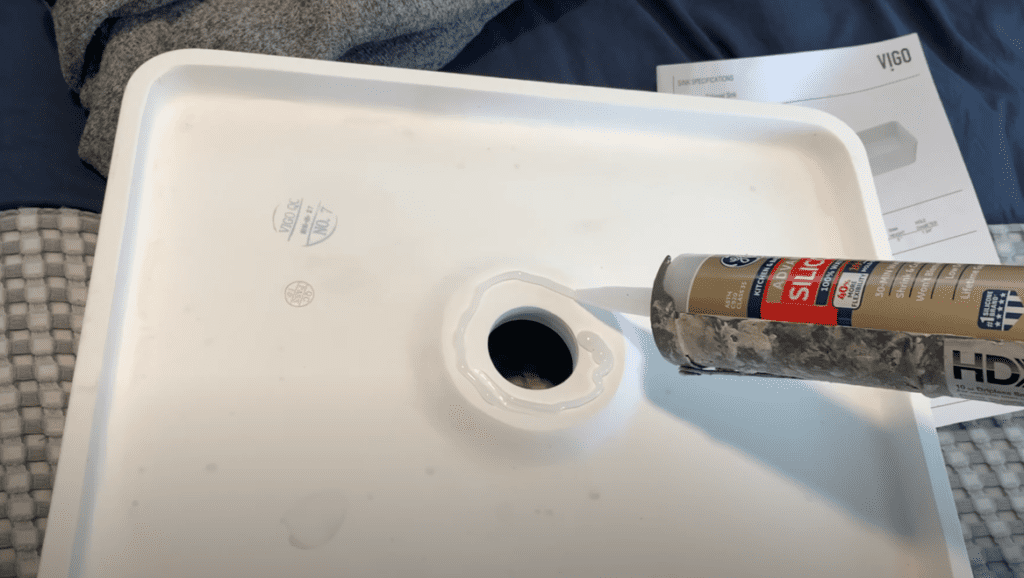
For my installation, I chose to go with a Vigo Vessel Sink and Faucet Set from Wayfair. To install a vessel sink on top of your floating vanity, start by applying a bead of silicon to the bottom of the vessel sink. Run the bead of silicone around the drain hole and around the perimeter of the vessel sink. Basically, apply silicone to every part of the vessel sink that will be in contact with the floating vanity. The silicone will will keep water from infiltrating underneath the sink.
After applying silicone to the bottom of the vessel sink, place the vessel sink in place on the floating vanity – adjusting it as needed.
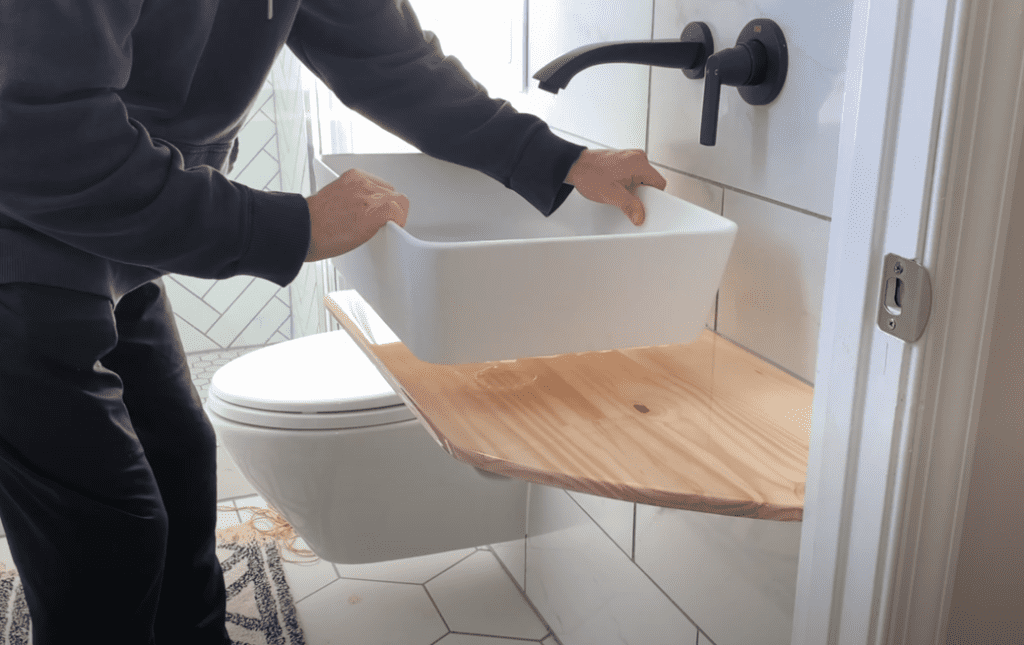
After positioning the vessel sink on the floating vanity, it’s time to install the drain piping.
6. Install Plumbing
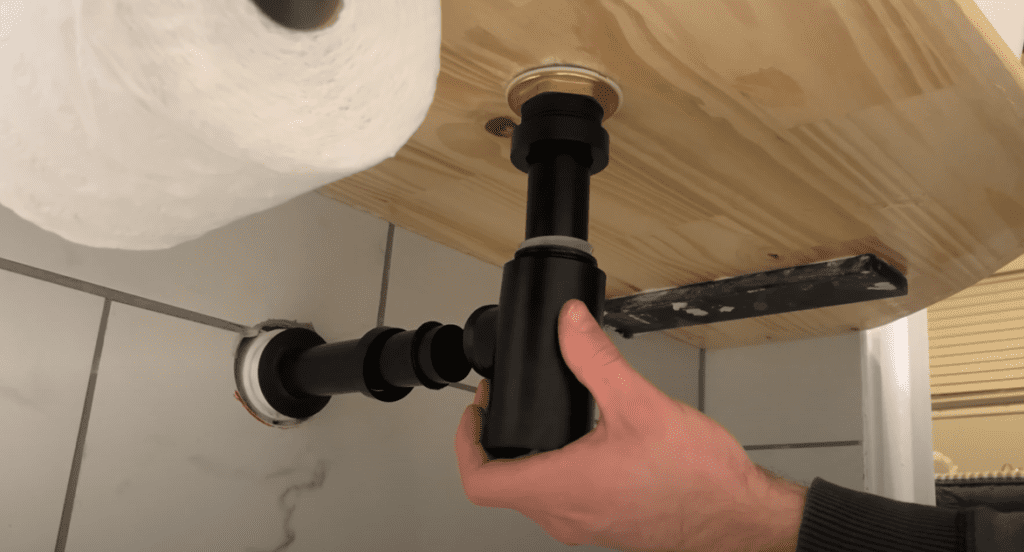
After setting the vessel sink in place on the floating vanity, install your drain piping. Whether you go with a P-trap or a Bottle trap (as shown below), this drain piping will help to secure the vessel sink to the floating vanity. After attaching the drain piping, allow 24 hours for the vessel sink silicone to dry.
After allowing the silicone to set up on the bottom of the vessel sink, you can install the the supply piping, faucet, etc.
Once all of your drain piping and supply piping has been installed, you can proceed to the final step of the floating vanity installation.
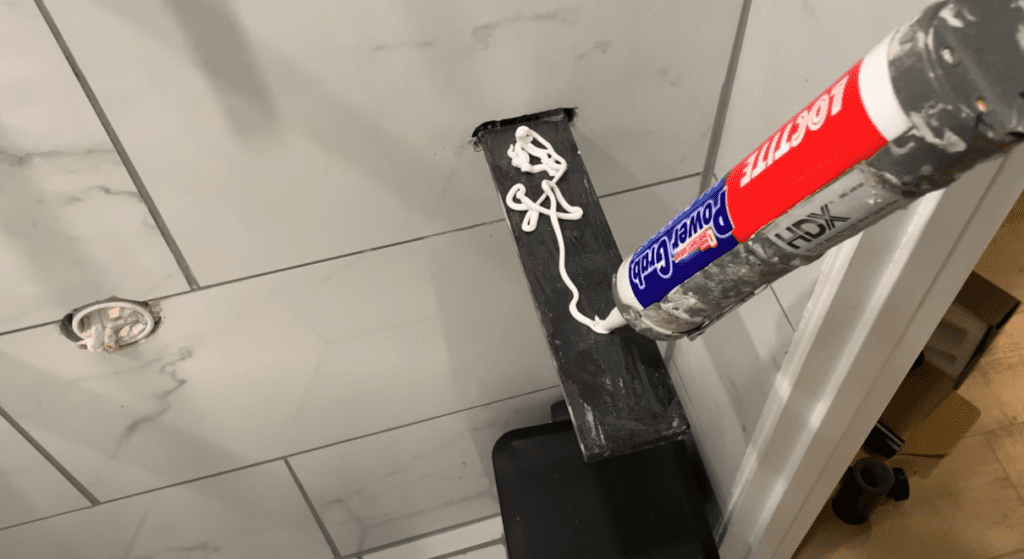
7. Caulk the Floating Vanity
The last step in the floating vanity installation procedure is to caulk the seams between the floating vanity and the walls. To do this, use a high quality silicone and run a bead of silicone along the seam between the floating vanity and the wall. If desired, you can use painter’s tape to ensure that your caulk line is perfectly straight.
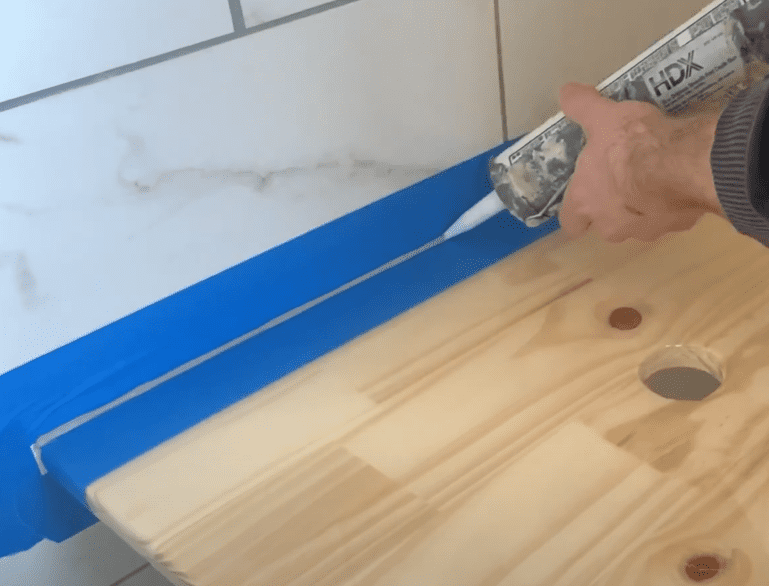
You may also choose to apply silicone to the floating vanity prior to installing the vessel sink. This approach will allow you to install the bead of caulk between the wall and the floating vanity more easily.
After applying silicone, your DIY floating vanity installation is now complete!
For a detailed demonstration of every single step of the DIY Floating Vanity installation process, check out my Youtube Video below:
Thanks so much for checking out ATImprovements! If you learned something from this project, you might also like these other DIY Projects:
How to tile a Shower Pan: How to Tile a Shower Pan (Kerdi Shower Pan Tile Installation) – AT Improvements
How to Install the Schluter Kerdi Shower System: Schluter Kerdi Shower Kit Installation (Everything you Need to Know) – AT Improvements
How to Install Hexagon Floor Tiles: How to Install Hexagon Floor Tile – AT Improvements
To see the full bathroom transformation time lapse, click here!
Thanks!
DISCLAIMER: This is a reference guide only. Links included in this article might be affiliate links. If you purchase a product or service with the links that I provide I may receive a small commission. There is no additional charge to you! Thank you for supporting ATimprovements so I can continue to provide you with free content each week