
Replacing a shower is one of the most common bathroom remodel projects. Because of the simplicity of DIY waterproofing systems like the Schluter Kerdi Shower Kit, replacing a shower and tiling a shower pan have become easier than ever. Tiling a Kerdi Shower Pan can be easily accomplishing by the average homeowner by following the tips presented within this article.
To tile a Kerdi Shower Pan, dry fit the tiles within the shower pan to ensure that each tile fits appropriately. Next, mix up thinset mortar and apply it to the shower pan using an appropriately sized trowel. Allow thinset mortar to dry and then fill tile grout lines with grout.
This article will explain every part of the Kerdi Shower Pan tile installation process in detail. However, in addition to reading the tips in this article, I also recommend that you watch my Shower Pan Tile Installation video below:
1. Prepare the Shower Pan for Tile
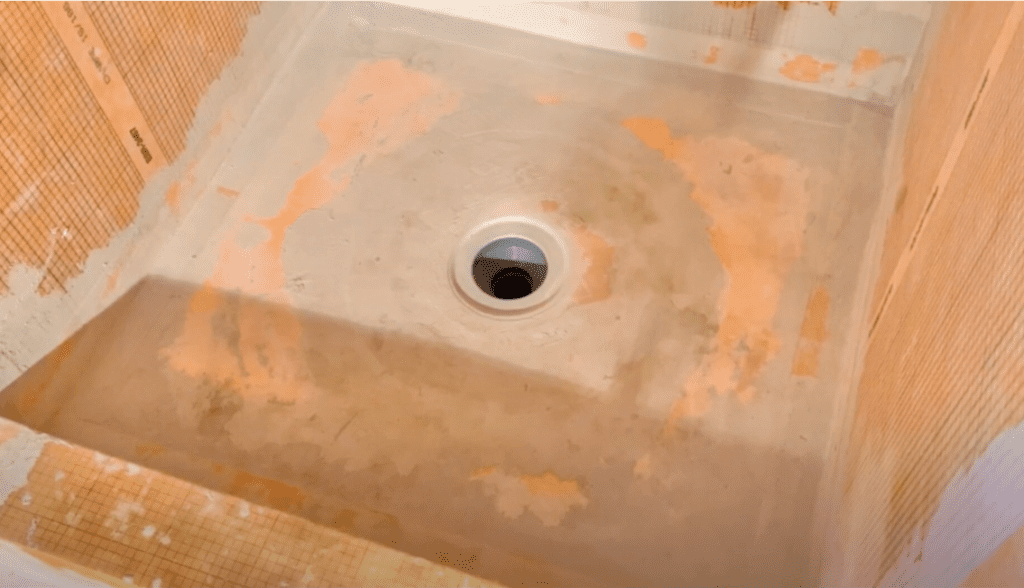
Before you can begin tiling your shower pan, you need to ensure that your shower pan is completely waterproof and prepared for tiling. Although there are many different types of shower pans available on the market, this article will specifically focus on the Schluter Kerdi Shower Pan. The Schluter Kerdi Shower pan makes for a great DIY installation since it is already pre-sloped toward the shower drain.
For detailed Schluter Kerdi Shower Kit installation instructions, check out my article linked here. This article will outline exactly how to install the Schluter Kerdi Shower Kit so that you can be prepared for tiling.
After you have installed your Schluter Kerdi Shower Pan, it is highly recommended that you perform a water test (also known as a shower leak test) to ensure that there are no leaks.
To perform a water test, use a test plug to seal the drain. Next, add water so that the shower pan is completely submerged. Mark the water surface elevation within the shower pan and let the water sit in the Shower Pan overnight.
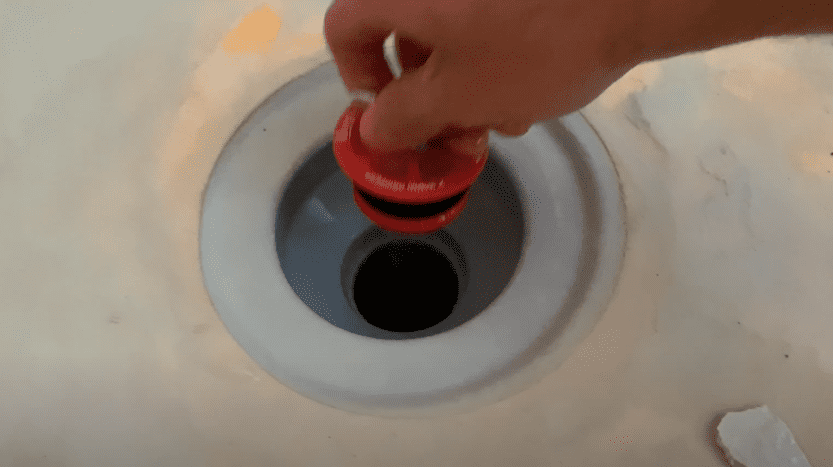
After 24 hours, check the water level in the shower pan. If the water level did not drop, your water test was successful. Drain remaining water from the shower pan and prepare for tiling.
For detailed instructions on how to perform a water test, check out my article linked here.
Once you have verified that your Shower Pan is completely waterproof, you can proceed with tiling your shower pan.
2. Plan out your Tile Layout
Before installing any tiles in your shower pan, it is recommended that you spend some time thinking about your tile layout.
Because there are so many different tile patterns and tile sizes, there is no “best” way to layout tile. However, there are a few things you should keep in mind when establishing your layout:
- Try and maximize the amount of full tiles in your layout. This will make the installation process simpler and reduce the amount of tile waste.
- Stagger your grout lines. Having grout lines that are tastefully staggered gives tile installations a more cohesive look.
- Avoid having small “slivers” of tiles on one side of the room and full tiles on the other. When measuring for your tiles (be sure to account for the tile spacers!) determine if you will be left with a small “sliver” of tile. If so, consider cutting the full tile on the other side so that there is a larger tile on the opposite wall.
- Take into account where the shower drain will be installed.
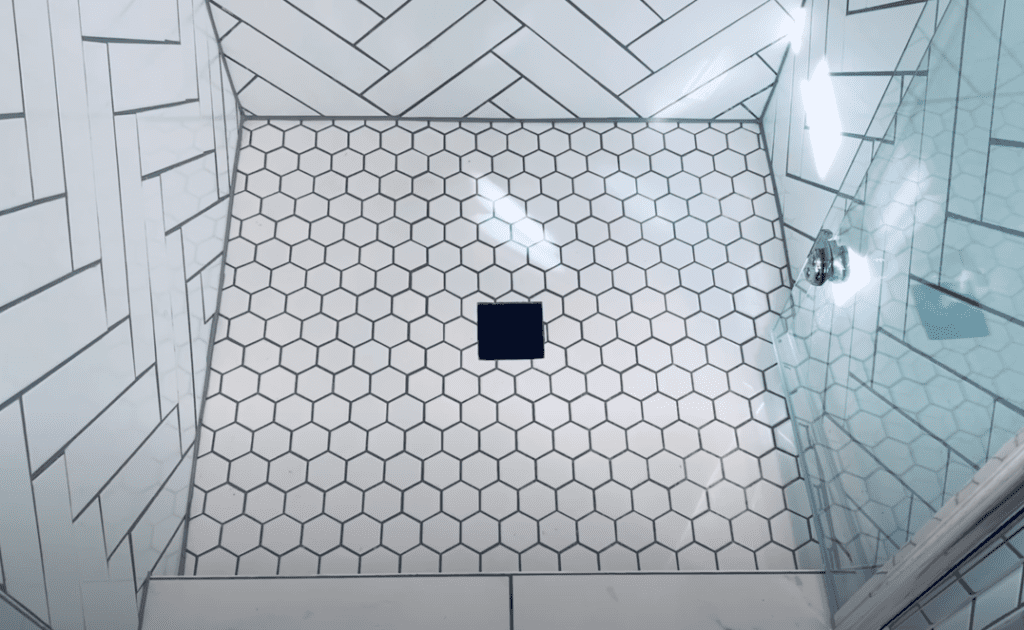
Typically, mosaic tiles are the most common type of tile for shower pans. Mosaic tiles consist of many small tiles that are held together with a mesh sheet. Mosaics come in many different styles and sizes, making them a great choice for most shower pans.
Once you have decided on your tile layout, it is time to start dry-fitting the tiles in the shower pan.
3. Dry Fit Tiles Within the Shower Pan
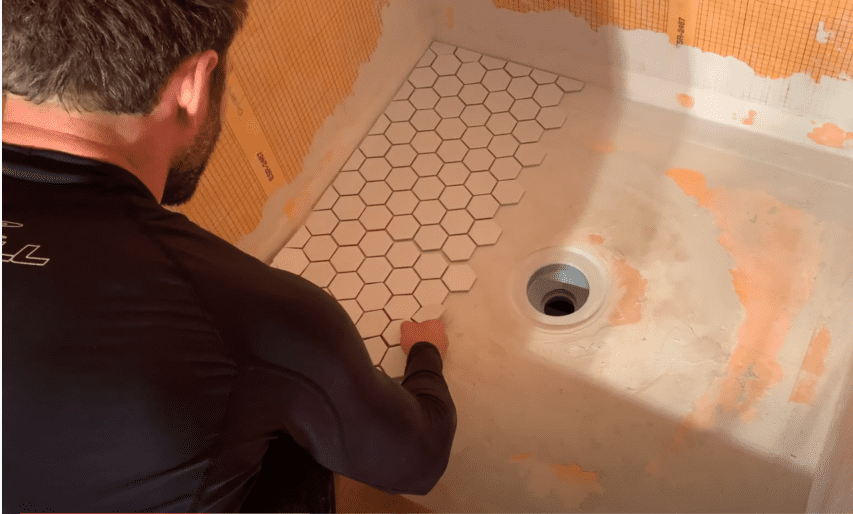
As with other tile installations, the most important part of tiling a shower pan is the planning and dry-fitting process.
At this stage, begin placing your tiles in the shower pan and making sure that everything fits in place. It is very likely that you will need to cut some of your tiles in order to make sure that everything fits appropriately.
Although there are many different methods for cutting tiles (tile saw, angle grinder, etc.) it is recommended that you use a dry tile cutter if possible.
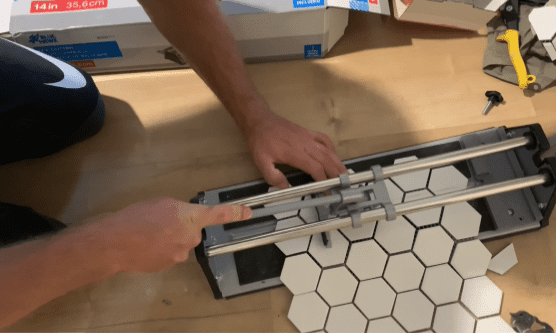
To cut tiles using a dry tile cutter, pass the cutting wheel along the cut line by applying firm pressure across the face of the tiles. Next, snap the tiles along the cut line. Although you may need to use an angle grinder (with a diamond wheel) to make some of the more intricate cuts, the dry tile cutter is a fast, easy way to cut tile without any dust.
Continue to dry fit your tiles, cutting them as necessary to ensure a proper fit.
4. Cut Tiles Around the Shower Drain
Unlike the shower pan perimeter tiles that may only require straight cuts, cutting your tile around the shower drain requires more precision.
Although there are many different methods for cutting tile around the shower drain, it is recommended that you begin by marking the exact shower drain location on the face of the tile.
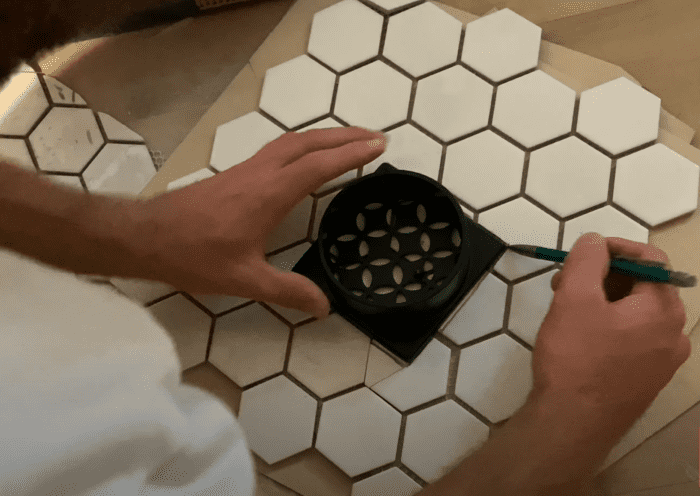
After marking the location of the shower drain on the tile, you can begin to cut the tile. In order to perform the precision cuts necessary for your shower drain, It is highly recommended that you use a Dremel tool equipped with a diamond cutting wheel.
Use the Dremel tool to cut the face of the tile along the marked cut-line. Take your time and apply even pressure to avoid chipping or breaking the tile.
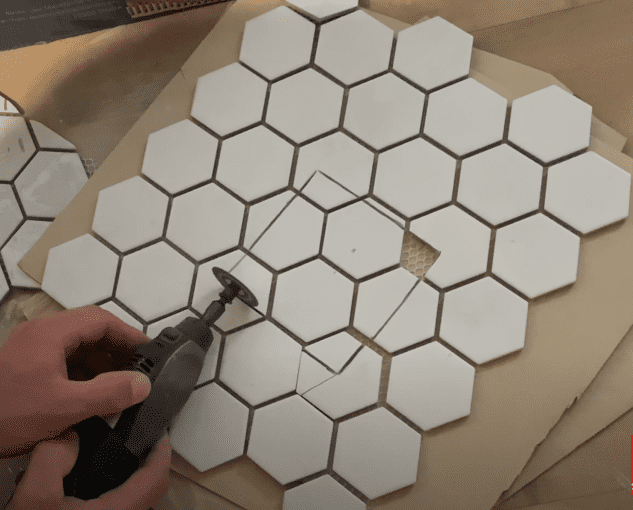
Continue cutting the tiles around your traced cut-line until the entire shower drain outline is cut out.
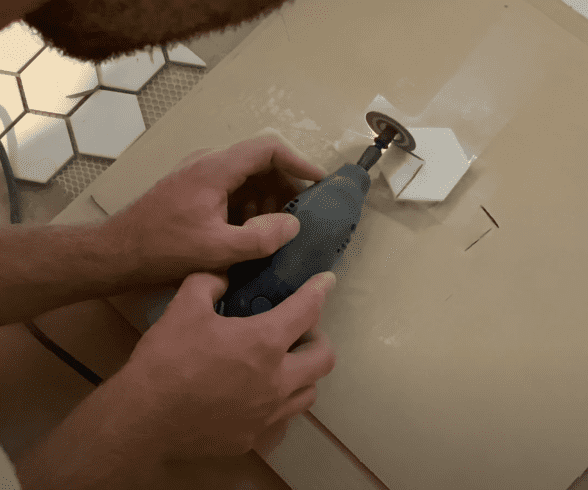
When cutting these small tiles, it is not uncommon for them to break. If you happen to break a tile during the cutting process, don’t worry – this can be easily fixed.
To replace a broken mosaic tile, simply remove the broken tile and place a new tile in it’s place. If you need to cut an individual tile, it is recommended that you tape the tile to a backer board (cardboard is fine) and then cut the individual tile with a Dremel Tool.
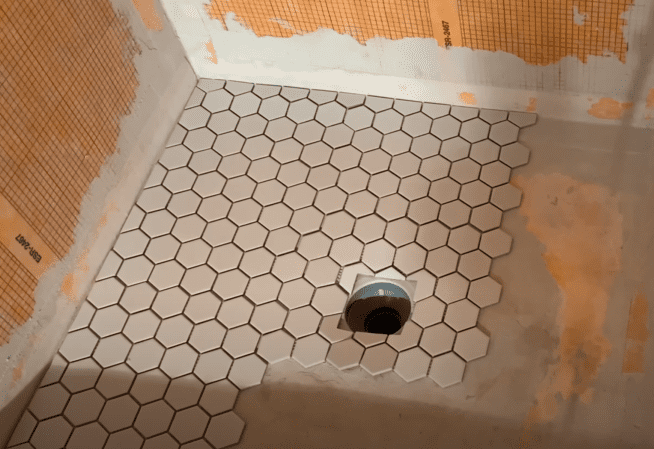
After successfully cutting out the tiles to accommodate the shower drain, you should be left with opening in your tile that looks like this:
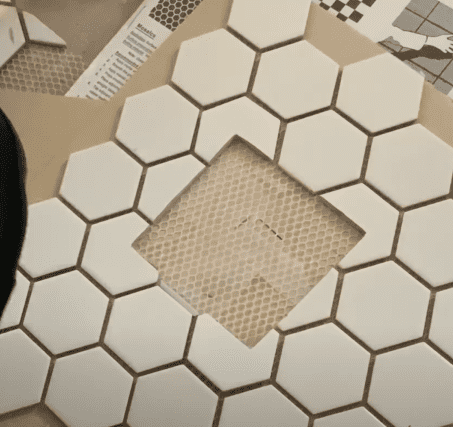
If you are using a mosaic tile with a mesh backing, you will need to cut out the mesh with scissors before placing the tiles over the shower drain.
Once you have cut the tile around the shower drain and completed your dry fit of the remaining tiles in the shower pan, we can begin the actual tile installation process.
5. Mix Up Thinset Mortar and Apply it to the Shower Pan
Once you have successfully planned out your tile layout and performed a dry fit, it is time to mix up thinset mortar and permanently install the tiles within the shower pan.
Before mixing up thinset mortar, remove the tiles from the shower pan in a systematic manner (so you can replace them in the proper location) and vacuum the shower pan to remove and dust or debris that may impact the tile installation process.
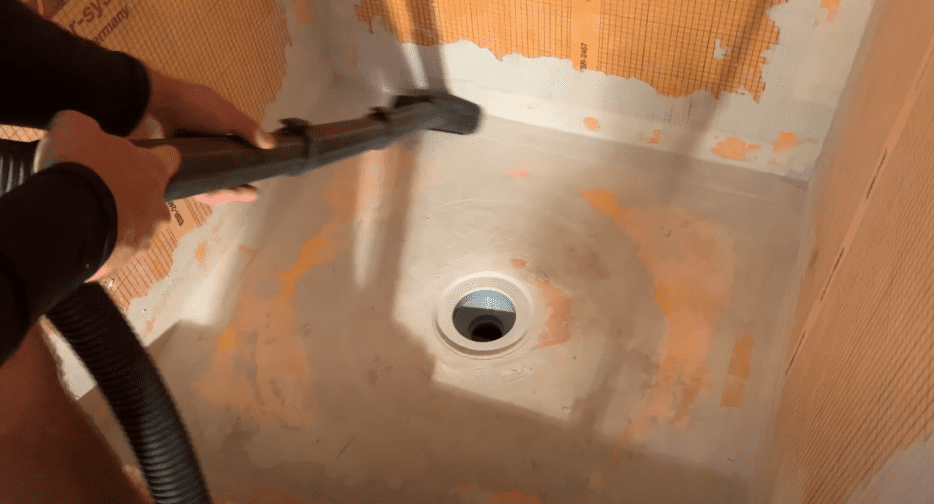
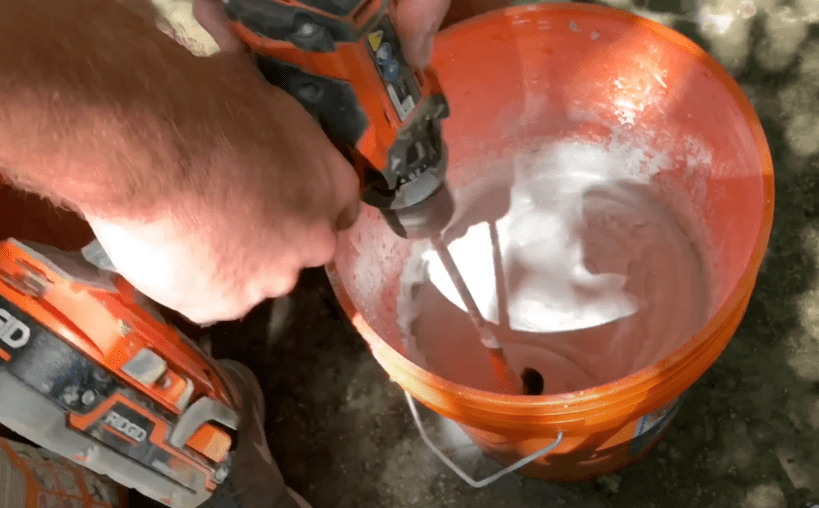
Once you have vacuumed the shower pan, select and mix up your thinset mortar.
In order to maintain the Schluter Warranty, it is recommended that you use one of the following Schluter Thinset Mortar types:
You also have the option to use any unmodified thinset mortar, but this will void the Schluter Warranty. After selecting your thinset mortar, mix it up according to the manufacturer’s instructions using a drill and a paddle mixer.
Once the thinset has been mixed up, apply the mortar to the shower pan using a trowel. The trowel size needed will depend on the type of tile you are using for your shower pan tile installation. However, a 1/4″ x 3/16″ V-notch trowel is typically adequate.
It is recommended that you begin applying thinset mortar to the shower pan using the flat side of a trowel to ensure good coverage of the shower pan. Next, comb notches into the thinset mortar using the notched side of the trowel. Apply thinset mortar to the shower pan using “directional troweling” – meaning that all trowel lines run in the same direction.
Once you have applied enough thinset mortar for one row of tiles, it is time to move on and begin the permanent tile installation process.
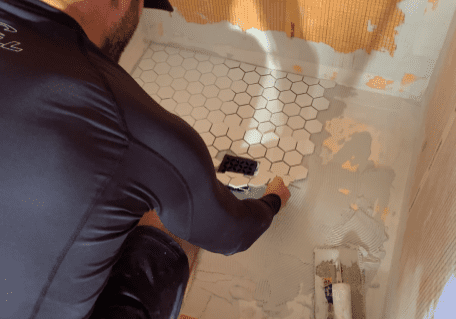
6. Install tiles in Shower Pan
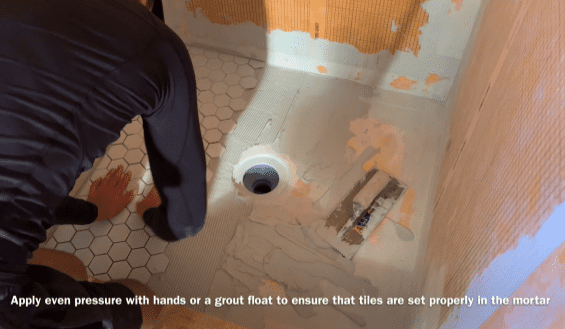
Starting in the back corner of your shower pan, begin to install the shower pan tiles by firmly embedding them into the thinset mortar. Apply firm, even pressure with your hands and press the tiles into the thinset mortar, ensuring that you have a good bond. Continue to apply the tiles to the shower pan in this method until you get to the Shower Drain.
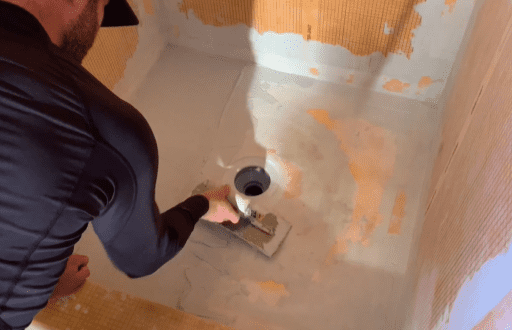
7. Set Shower Drain to Appropriate Height
At this stage, position the Kerdi Shower Drain in place, firmly embedding the drain collar within the thinset mortar.
For detailed instructions on how to set the Kerdi Shower Drain, skip to 5:35 of my Shower Pan Tile Installation Video linked here.
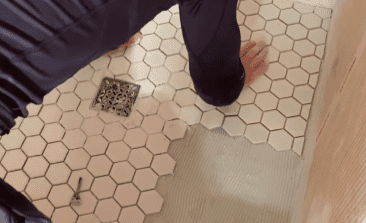
Once you have positioned the shower drain, place your tiles around the shower drain as show below:
Firmly embed the tiles around the shower drain, ensuring a good bond in the thinset mortar. One the tiles around the shower drain are in their final position, adjust the height of the shower drain grate so that it is even with (or slightly below) the face of the adjacent tile.
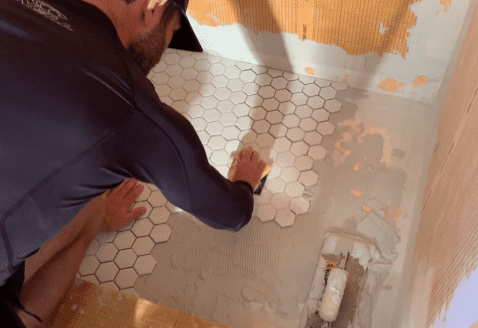
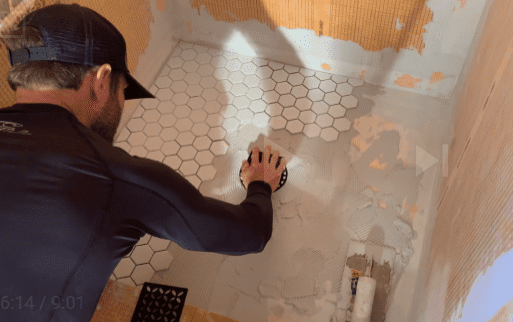
Once the Shower Drain grate has been positioned at the right height, continue to install the remaining tiles in the Shower pan as described in Step 6. Be sure to maintain consistent spacing between all tiles. If necessary, use tile spacers.
Once all of the tiles have been installed within the shower pan, you can proceed to the next step.
8. Clean up any excess thinset mortar
Although often overlooked, cleaning up the excess thinset mortar (as you go) is extremely important for a successful shower pan tile installation. If you allow for thinset mortar to dry on the face of your tiles or within the grout lines, it will be incredibly difficult to remove later.
To avoid this, use a wet sponge to remove the any excess grout from the face of the tile before it dries.
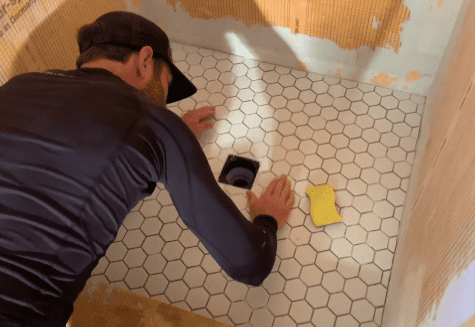
Additionally, be sure to remove any thinset mortar from the grout lines while it is still wet. Allowing thinset to dry within the grout lines will result in hours of clean up work later.
Once all of the excess thinset mortar has been removed and the tile installation has been sufficiently cleaned, perform a final check to make sure that all of the tile spacing is perfect. Finally, allow the thinset mortar to dry for 24-48 hours before moving on to the grouting step.
9. Apply Grout

Once you have given your shower pan tiles sufficient time for the thinset to dry (usually 24-48 hours) you can apply grout to your shower pan tile. Although there are many different types of grout, it is recommended that you use Epoxy grout for your shower pan tiles since epoxy grout is fully waterproof and stain-resistant.
To apply epoxy grout to your shower pan, mix up the epoxy according to the manufacturer’s recommendations. Next, apply the epoxy grout to the shower pan using a grout float.
Force the grout into the grout lines by applying pressure with grout float. Once grout has been applied to all of the grout lines, remove the excess grout immediately.
Clean the face of the tiles using a wet sponge and grout haze remover and allow the grout to dry.
For detailed epoxy grout installation instructions, check out my “How to Install epoxy Grout” video below:
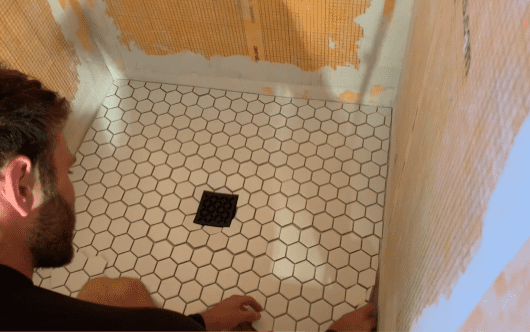
Once your grout has dried, your Shower Pan Tile Installation is complete. Congratulations!
For additional videos that explain how to tile shower walls, shower curbs, shower niches, etc. check out my Youtube Channel or feel free to watch the videos below:
If you want to see how the Final Bathroom Transformation turned out, Check out the time lapse video below:
Thanks so much for checking out ATImprovements! If you learned something from this project, you might also like these other DIY Projects:
How to Install Hexagon Floor Tiles: How to Install Hexagon Floor Tile – AT Improvements
Schluter Ditra VS Cement Board (Which is better?): Schluter Ditra VS Cement Board (Which is better?) – AT Improvements
Thanks!
DISCLAIMER: This is a reference guide only. Links included in this article might be affiliate links. If you purchase a product or service with the links that I provide I may receive a small commission. There is no additional charge to you! Thank you for supporting ATimprovements so I can continue to provide you with free content each week!