

A lean to style shed roof is one of the simplest and most durable shed roof options available. Learning how to build a lean to shed roof is very simple overall – but the birdsmouth cut (described herein) can make lean to shed roof framing seem intimidating to some.
To build a lean to shed roof, start by determining the length of your roof rafters and the desired overhang at the front, back, and sides of the shed. Next, determine your shed roof pitch. Make your birdsmouth cuts on the front and back of the rafter which will allow the rafter to sit flat upon the shed wall’s top plates. Next, plan out your lean to shed roof rafter spacing and position the rafters in place. Finally, fasten the rafters to the to shed walls with rafter ties and install the plywood roof decking on top of the lean to shed roof.
By following the steps within this guide, you will be able to build and frame a lean to shed roof like a pro. Additionally, if you are more of a visual learner, you can check out my “How to Frame a Lean to Shed Roof” YouTube Video linked at the end of this article.
Tools and Materials Needed to Build a Lean to Shed Roof

To successfully frame and construct a lean to shed roof, you will likely need the following tools and materials:
- Safety Equipment (Glasses, gloves, boots, etc.)
- Tape Measure
- Drill
- Exterior Screws
- Circular Saw OR Miter Saw
- Air Compressor
- Framing Nailer
- Exterior Framing Nails (for nail gun)
- Rafter Lumber (typically 2″x4″ or 2″x6″)
- Plywood Roof Decking
- Rafter Ties
With all necessary tools and materials on hand, you can now begin framing and constructing the lean to shed roof.
1. Frame the Shed Walls
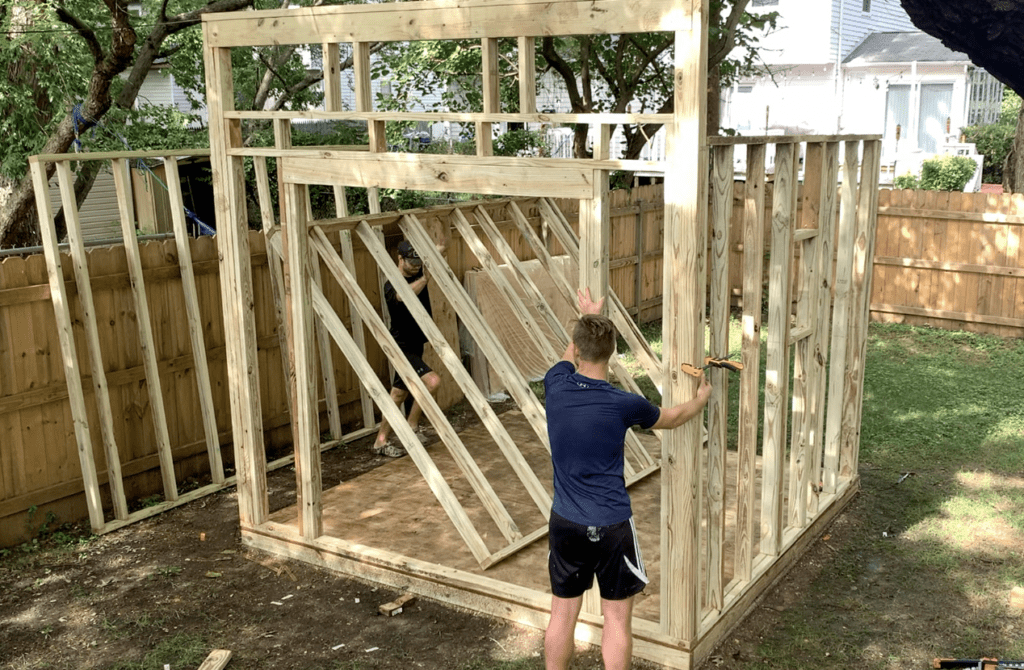
Although this goes without saying, you will need to have constructed your shed walls before you can build a lean to shed roof.
When framing walls for a lean to style roof, the sides and back of the shed will typically all be the same height. The front wall of the shed, however, will usually be taller than the other three walls, creating the “lean” or “pitch” of the roof.
When framing your shed walls, spend some time planning out the front wall height in order to achieve your desired roof pitch. We will discuss the lean to shed roof PITCH in more detail in the following section.
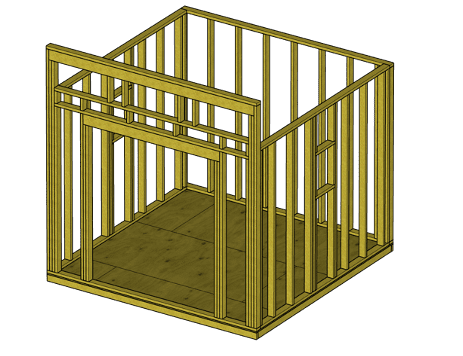
For a detailed guide on how to to frame lean to shed walls from start to finish, check out my “How to Frame a Shed” guide linked here. You can also watch my “How to Frame a Shed” Youtube Video below:
The guide above includes detailed instructions on how to frame each shed wall, including sample dimensions – as shown below:
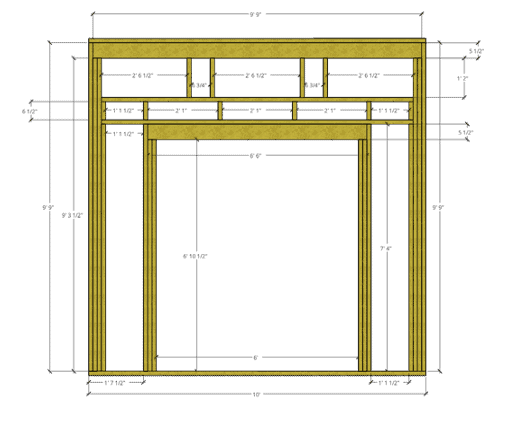
Once your lean to shed walls have been framed, you can determine the lean to shed roof pitch.
2. Determine your Lean to Shed Roof Pitch
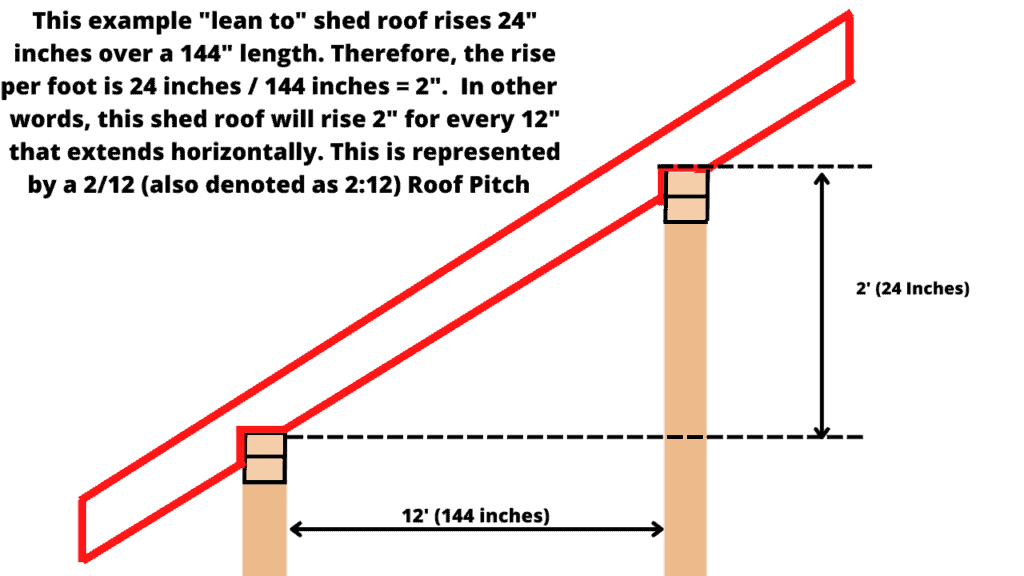
The pitch of your shed roof is determined based on the number of inches the shed roof rises vertically for every 12″ the roof extends horizontally. Refer to the figure below:
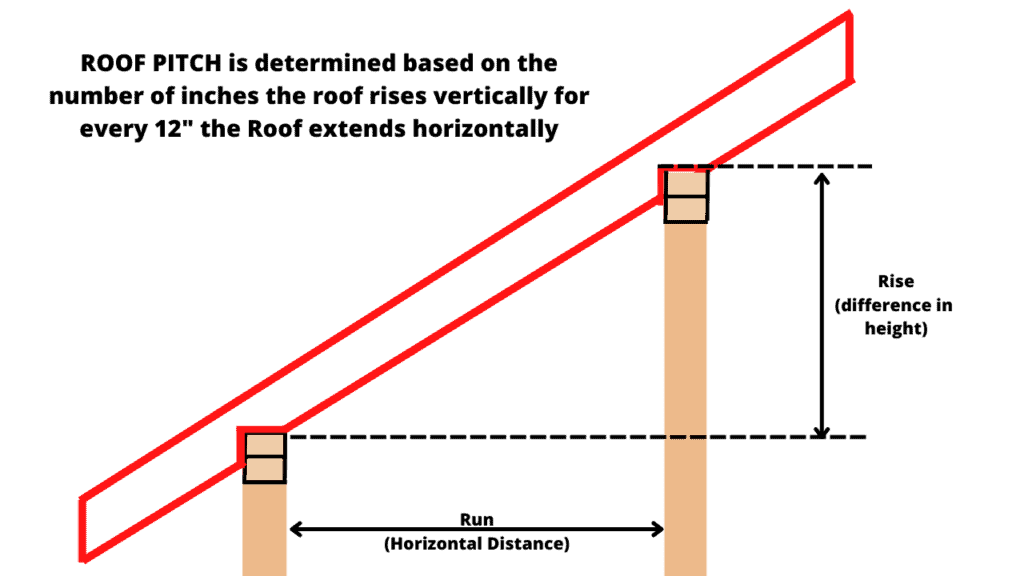
When determining the Roof pitch of a lean to shed, it is usually customary to measure the delta (rise) between the back wall top plate and the front wall top plate. Then, simply take that number (rise) and divide it by the distance between the front and back wall (horizontal distance) to get your roof pitch. Refer to the example below:
After determining the pitch of your shed roof, you can move on to the next step of the lean to shed roof framing process.
Although there is no “best pitch” for a lean to shed roof, the minimum roof pitch for asphalt shingles is 2:12. Additionally, if your shed roof pitch is too steep (e.g. 12:12), it may be more dangerous and difficult to install the roof decking and roofing in later steps. I recommend a 2:12, 4:12, or 6:12 roof pitch for lean to sheds. For reference a 2:12 roof pitch is 9.46 degrees, a 4:12 roof pitch is 18.43 degrees, and a 6:12 roof pitch is 26.57 degrees.
3. Determine the Desired Rafter Overhang at the front, Back, and Sides of the Shed
After determining the the roof pitch, spend some time thinking about your desired shed roof rafter overhang at the front, back, and sides of the shed. Having an overhang is usually desired to keep rainwater from running down the shed’s siding.
Typically, you will have a longer overhang at the front of the shed with a shorter overhang (~ < 12″) at the sides and back. Pick an overhang that works for your specific shed application.
After deciding on the rafter overhang, you can then cut your roof rafters to size.
Although a lean to shed roof does not REQUIRE an overhang, it is recommended for the following reasons:
1. An overhang gives the shed greater visual appeal and architectural interest.
2. An overhang helps to prevent rainwater from landing directly underneath the shed’s foundation.
3. An overhang helps make the lean to shed look more professional.
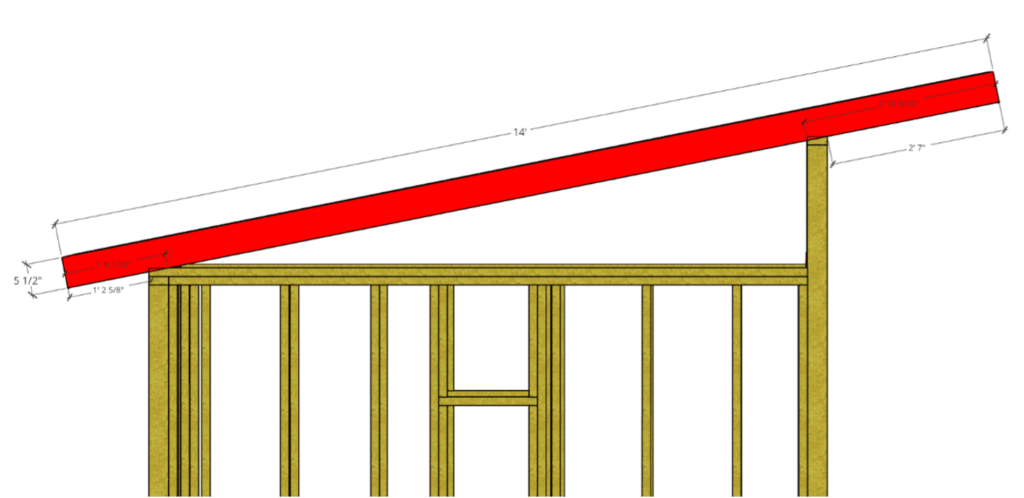
Cut the lean to shed roof rafters to size based on distance between the front and back walls PLUS the desired overhang at the front and back. For example, if you have a 10′ shed (front wall to back wall), and a desire a 3′ overhang on the front, and a 1′ overhang on the back, cut your roof rafters to 14′.
When considering what size lumber to use for your lean to shed roof rafters, consider the span from front wall to back wall of the shed. For spans 4′ – 6′, 2″x4″ rafters should be fine. For spans ranging from 4′ – 10′, 2″x6″ roof rafters are recommended. For spans larger than 10′, consult a rafter span chart.
Yes – However, 2×4 rafters should only be used for spans less than 9 feet (assuming a 12″ o.c. rafter spacing)
Important Note: Consult with local code requirements regarding roof rafter sizing and span requirements. Areas with high snow loads will likely require larger roof rafters.
4. Determine Your Shed Roof Rafter Spacing
After determining the length of the lean to roof rafters, spend some time thinking about your shed roof rafter spacing. Roof rafters are typically spaced 12″, 16″, or 24″ O.C. (On center). However, you want to make adjustments as needed to ensure that the edges of your plywood roof decking will land in the center of a roof rafter.
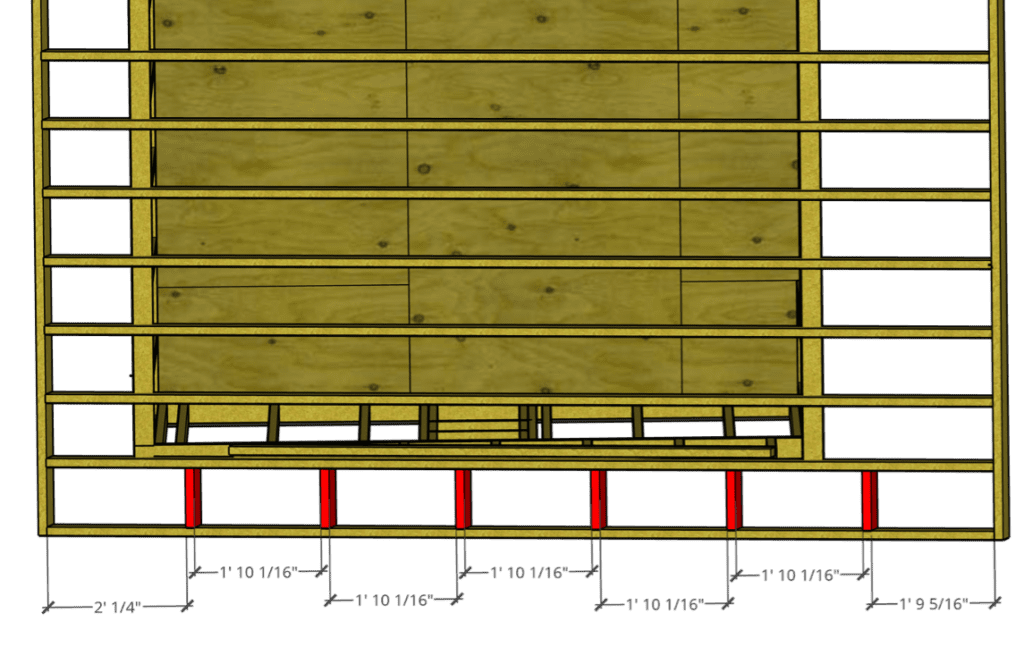
For the 10’x10′ lean to shed roof that was constructed as the example for this article, the following rafter spacing was used.
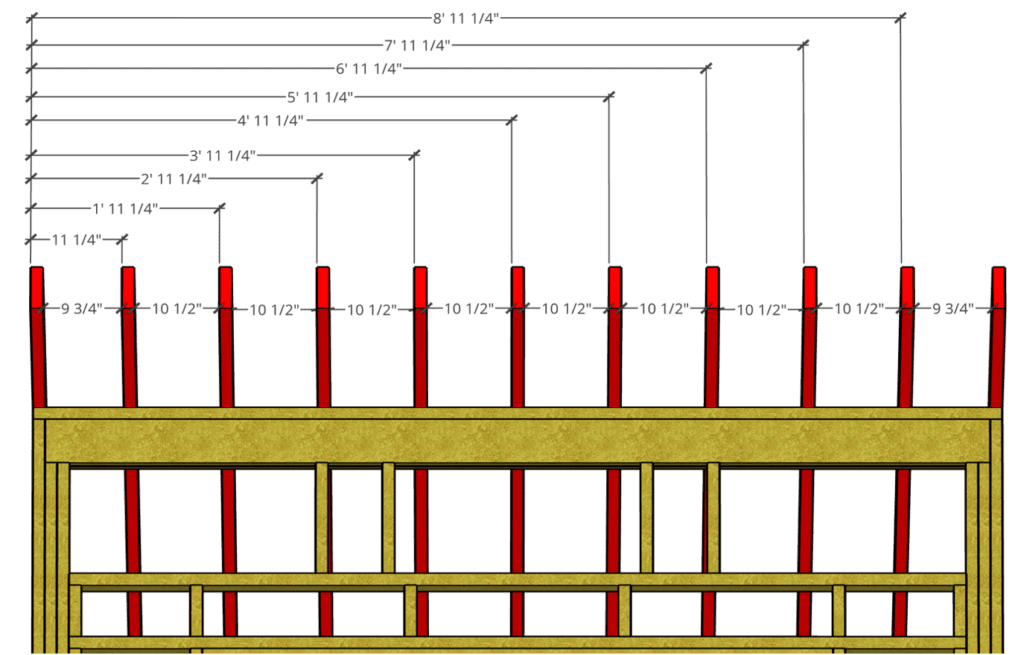
In order to frame the lean to roof example displayed above, thirteen (13) pieces of 2”x6”x16’ lumber were needed. Determine the shed roof rafter spacing based on the size and desired rafter overhang for your specific lean to shed.
5. Make your Birdsmouth Cuts
At this stage, birdsmouth cuts will be made for all of the lean to roof rafters that will rest on the shed walls.
A ‘birdsmouth’ cut is small triangular cutout/nothch in the bottom (and also the top for lean to style roofs) of a rafter that provides a flat area so that the rafter can rest flat and securely on the wall top plate. See example of a birdsmouth cut below:
Refer to the figure below for the “anatomy” of a birdsmouth cut:
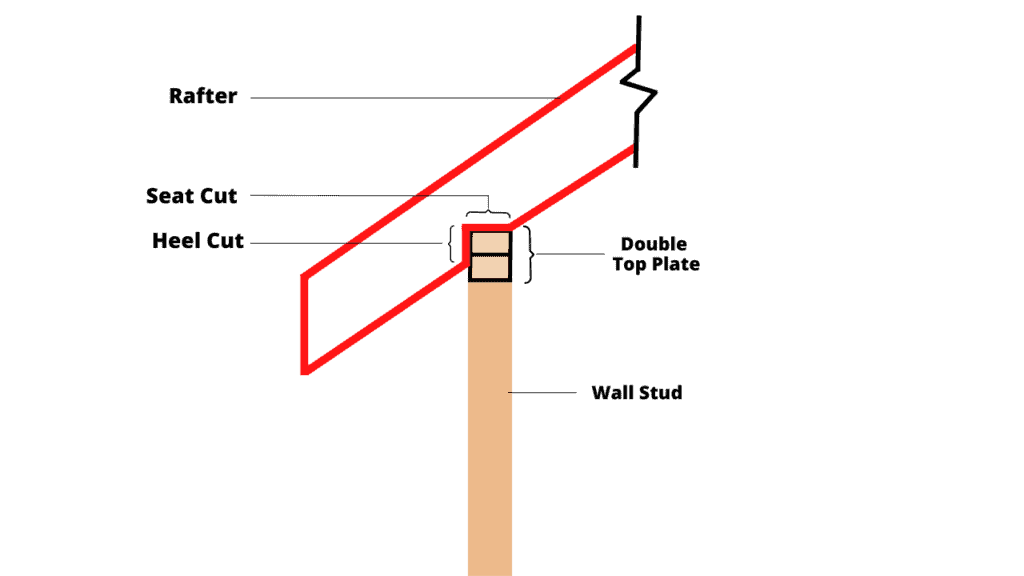
Your birdsmouth cut will be dictated by the shed roof pitch established previously.
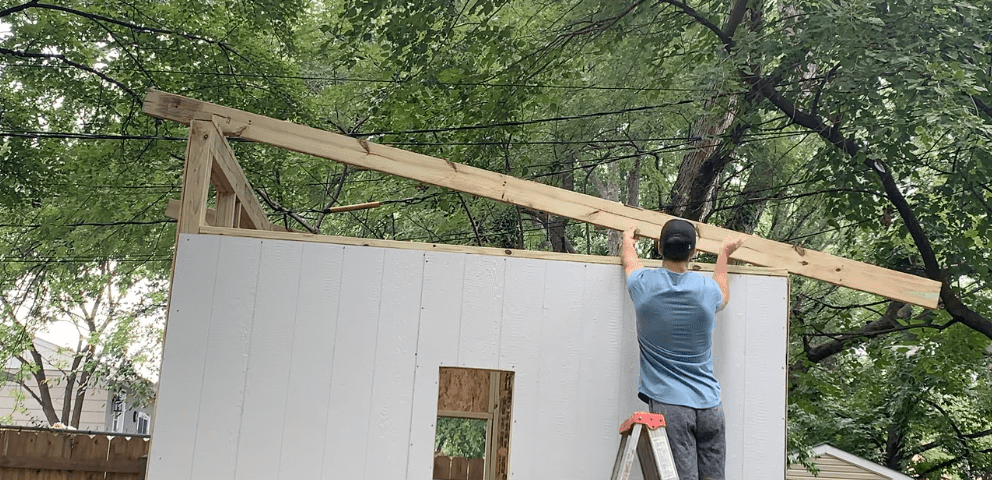
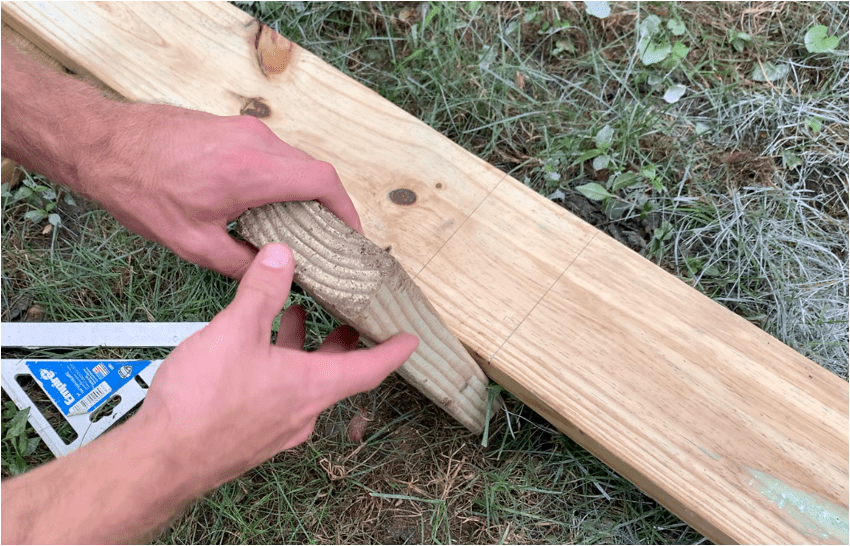
To make the birdsmouth cuts, I recommend that you first place a rafter on the shed roof as shown below:
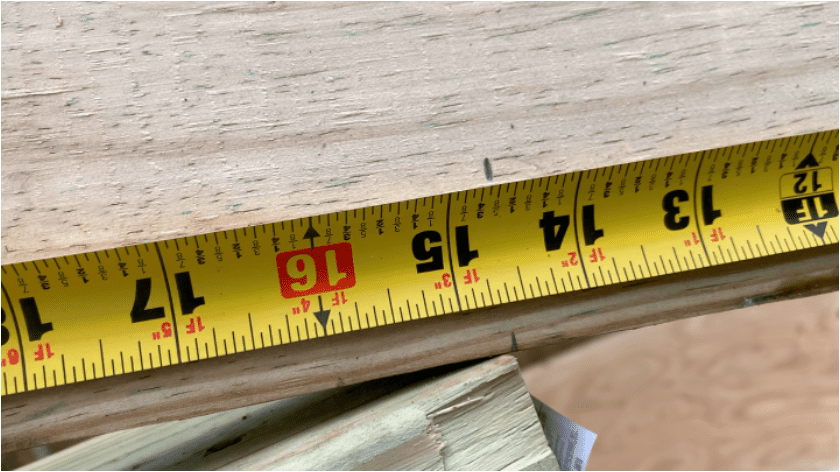
In order to mark and cut the birdsmouths on the rafters, it is recommended that you first mark your desired overhang (over the back wall of the shed) on the back of the rafter as shown below:
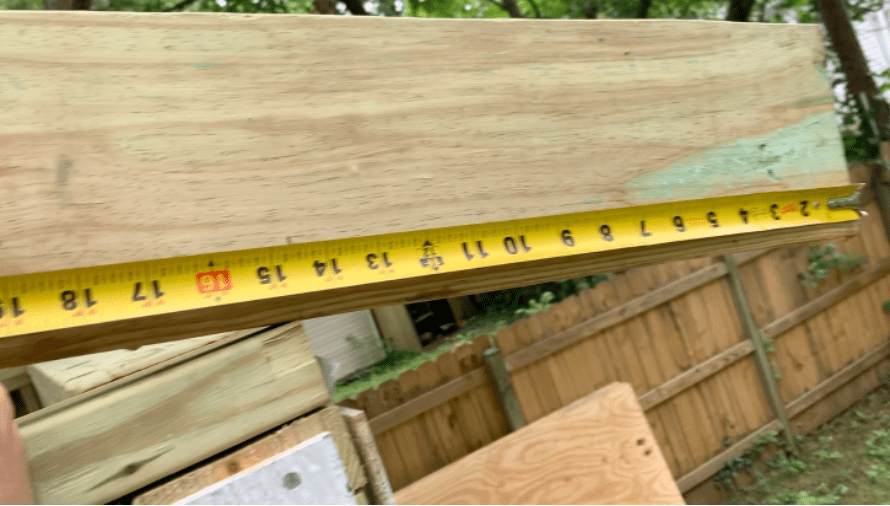
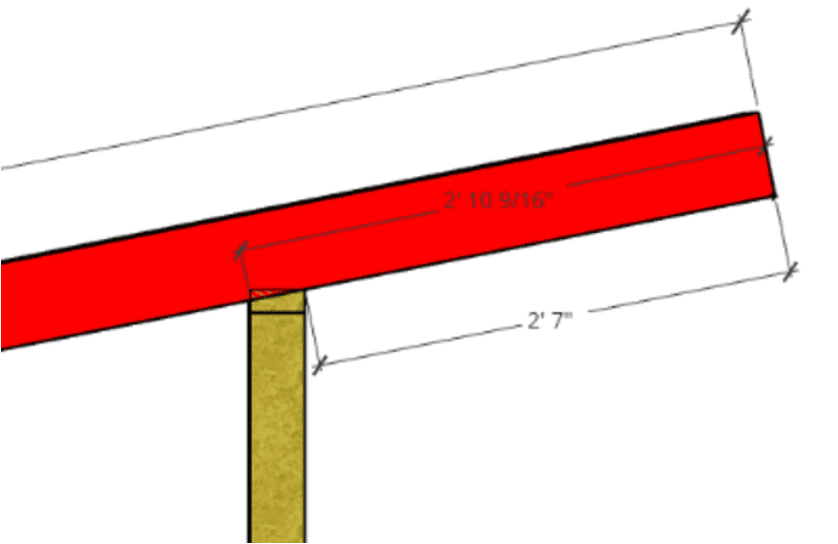
After marking the overhang distance from the back of the rafter, position the rafter so that that the marked line is perfectly in line with the top plate.
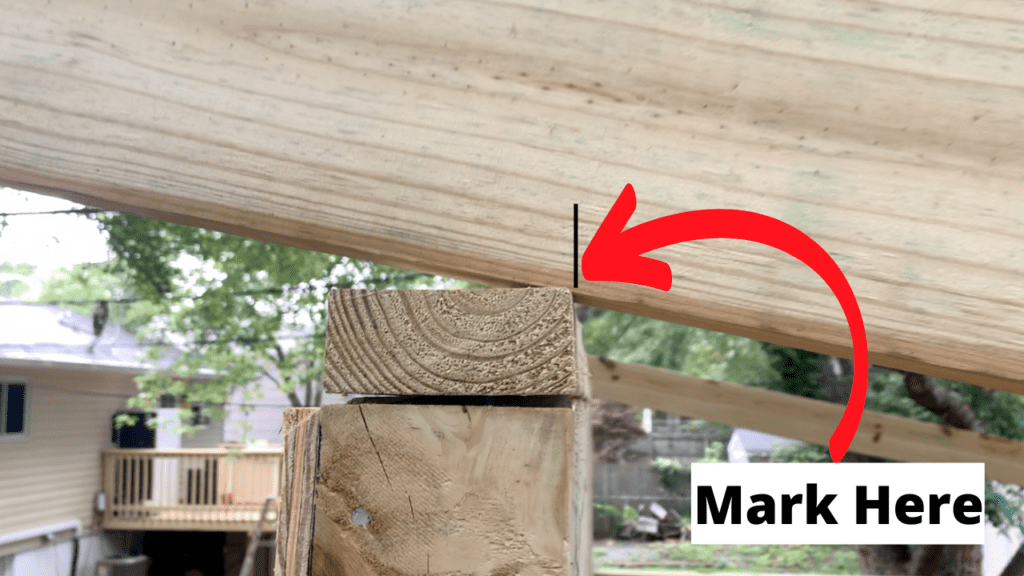
After positioning the back of the lean to shed rafter in place, move to the front of the rafter and mark the back of the birdsmouth cut where it lines up with the double wall plate, as shown.
With the location of the back of the birdsmouth cut marked at both the front and back of the rafter, you can begin making your birdsmouth cuts.
We will start by making the birdsmouth cut at the back of the rafter – as shown below:

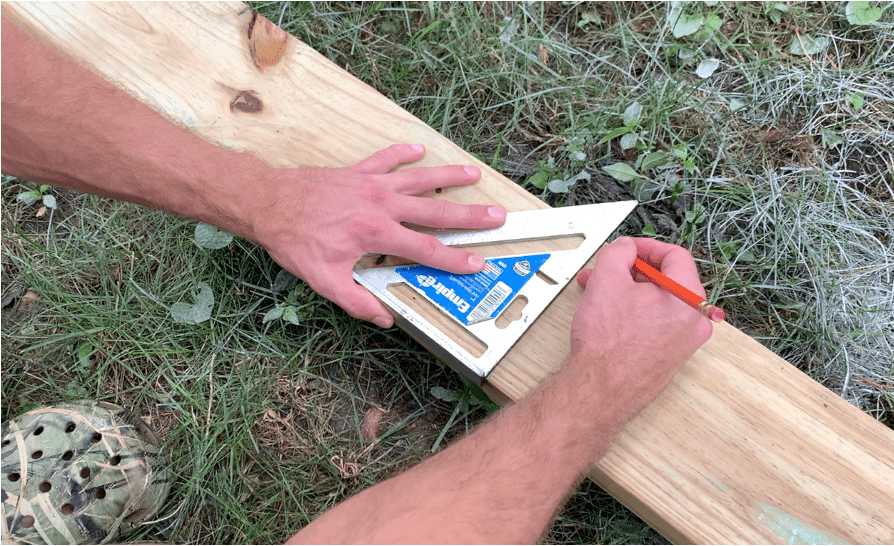
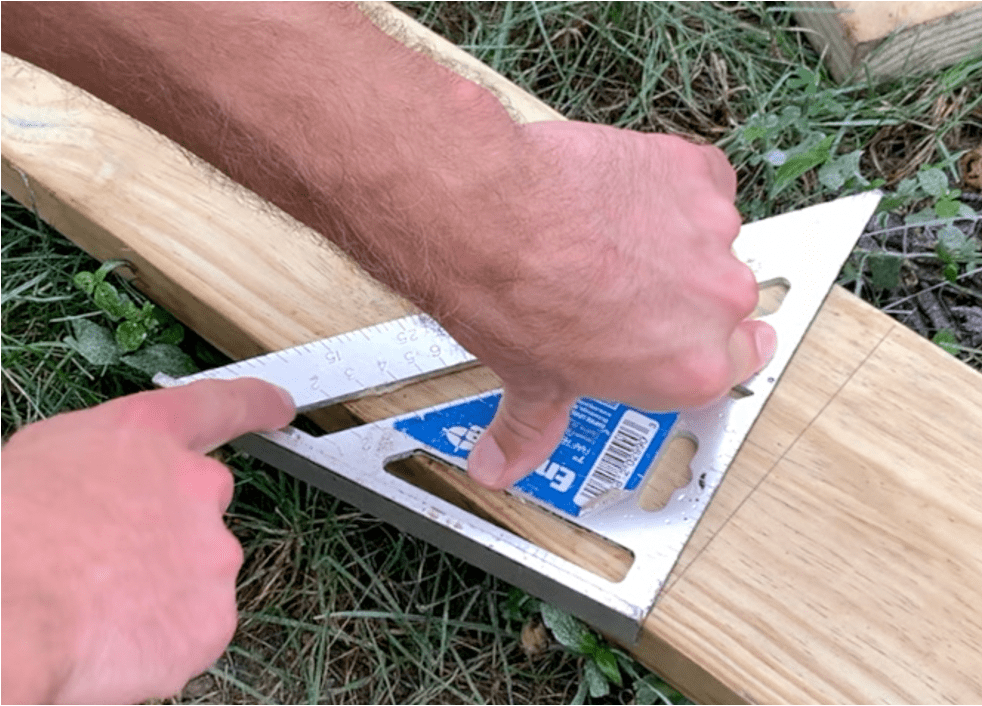
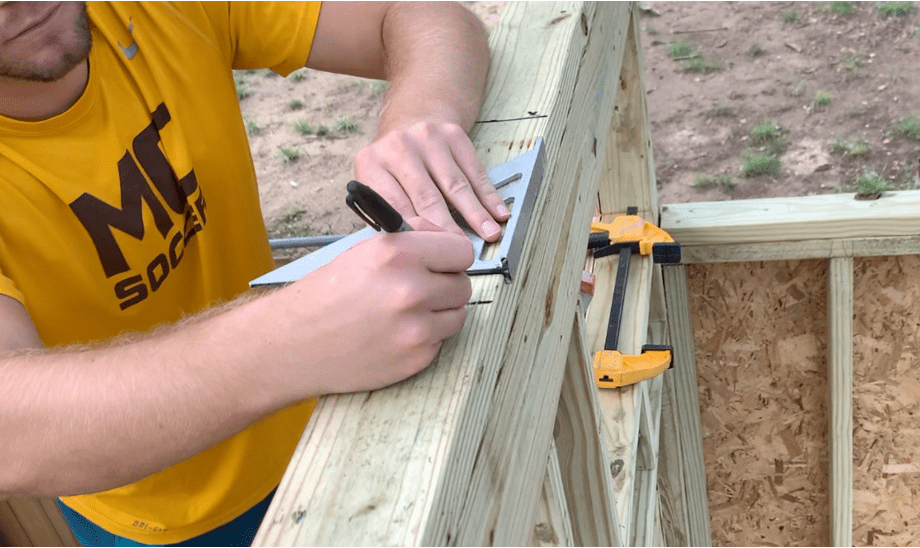
In order to make the birdsmouth cut, utilize a carpenter’s square. Start by making a straight line mark across the entire rafter along the line you marked previously (that corresponds to the back of the top plate).
Next, mark 3-1/2” in front of the original mark (towards the front of the shed/rafter) to account for the 2”x4” top plate. Note that a standard 2”x4” piece of lumber is actually 1.5”x3.5”.
As illustrated below, this mark 3-1/2” away from the original mark will illustrate where the rafter will intersect with the top plate.
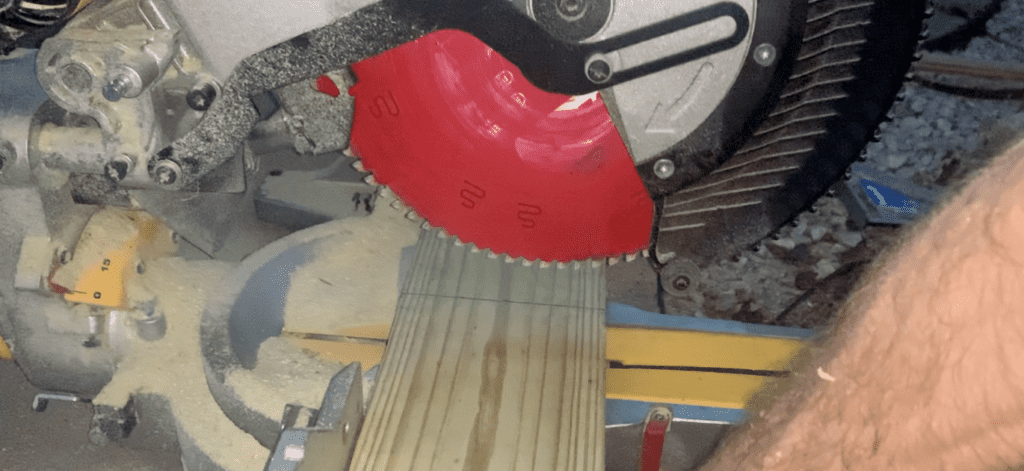
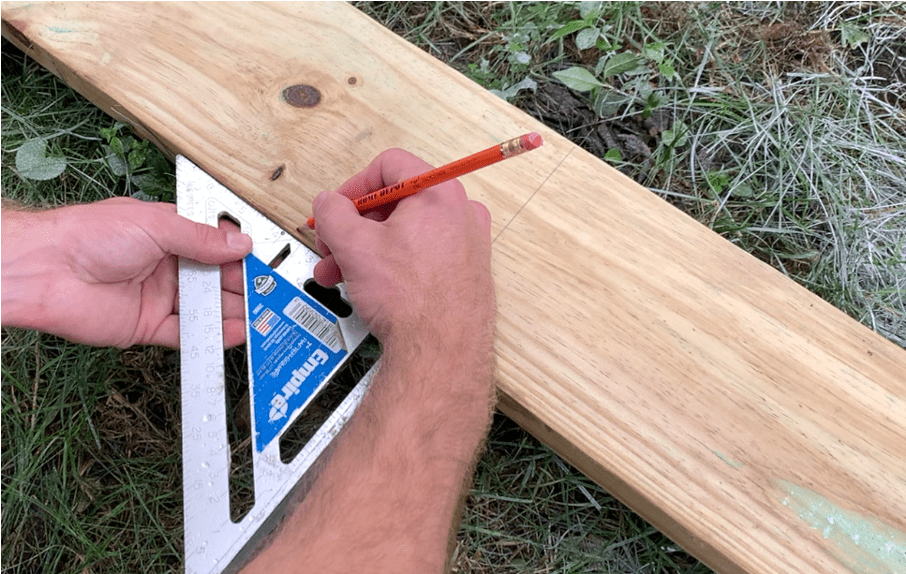
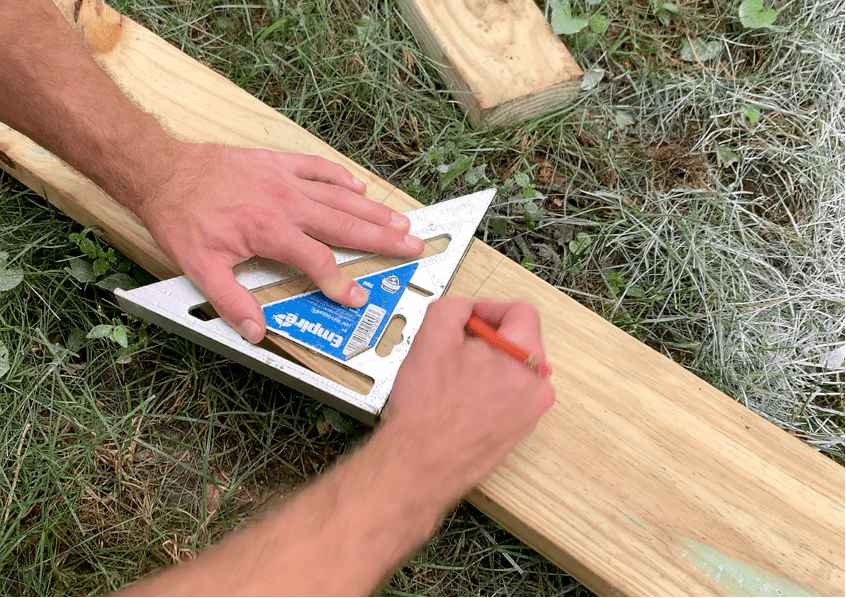
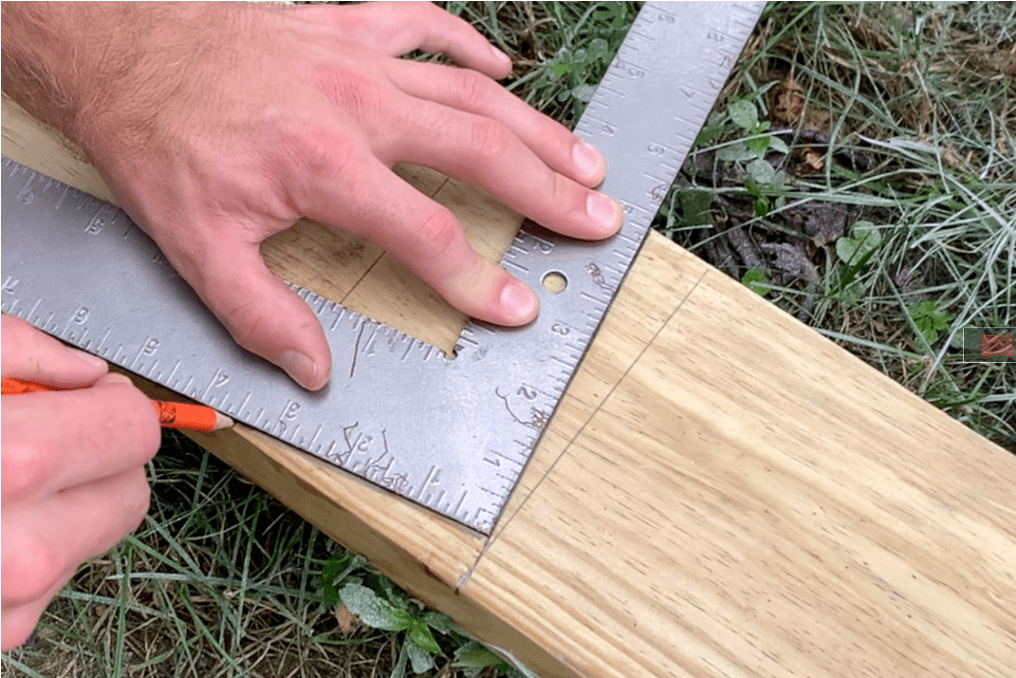
Next, rotate/pivot the carpenter’s square along the pivot point until the “2” is in line with the bottom of the rafter. This “2” indicates a 2:12 Rafter/Roof Pitch – which we will be using for this example.
Once the “2” is in line with the bottom of the rafter, mark the diagonal line.
Once you have the diagonal line marked, use a framing square and position it along the rafter until it is parallel with the diagonal line that you marked in the previous step.
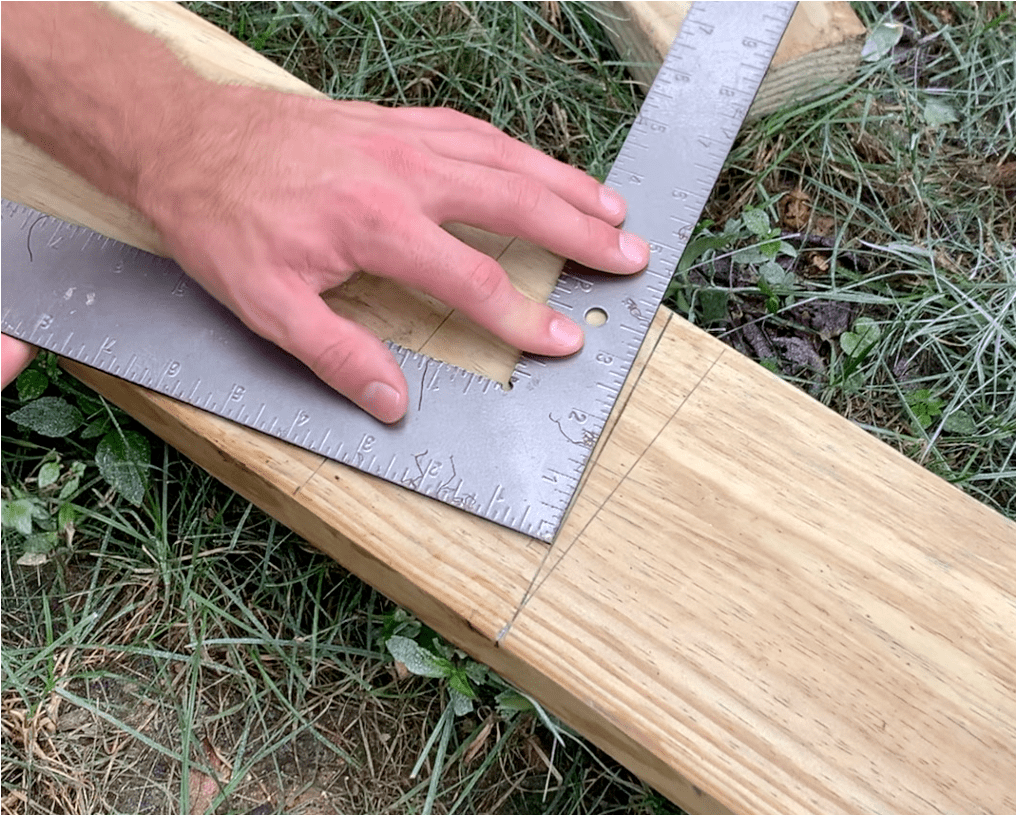
Slide the framing square down the rafter while keeping it in line (parallel) with the diagonally marked line. Keep adjusting the carpenter’s square until it hits the other mark made 3-1/2” away from the birdsmouth mark at the back.
Once the bottom of the carpenter’s square hits the line that was made 3-1/2” away from the original mark, use a pencil to mark this line.
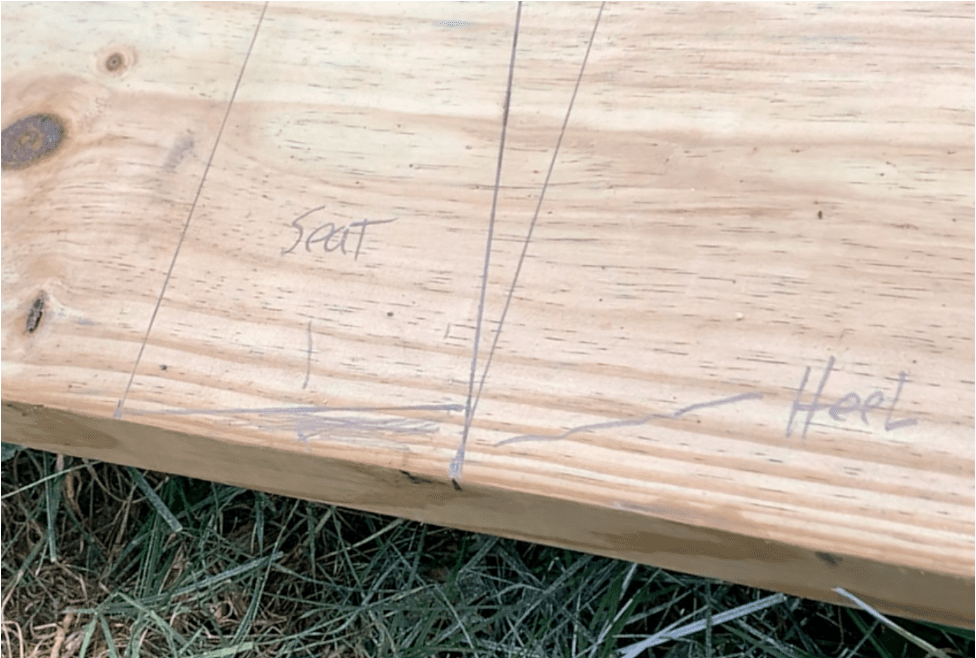
At this stage, the birdsmouth cut at the back of the rafter has been marked. The shaded area (above) indicates the part of rafter that we will need to cut out to make the birdsmouth.
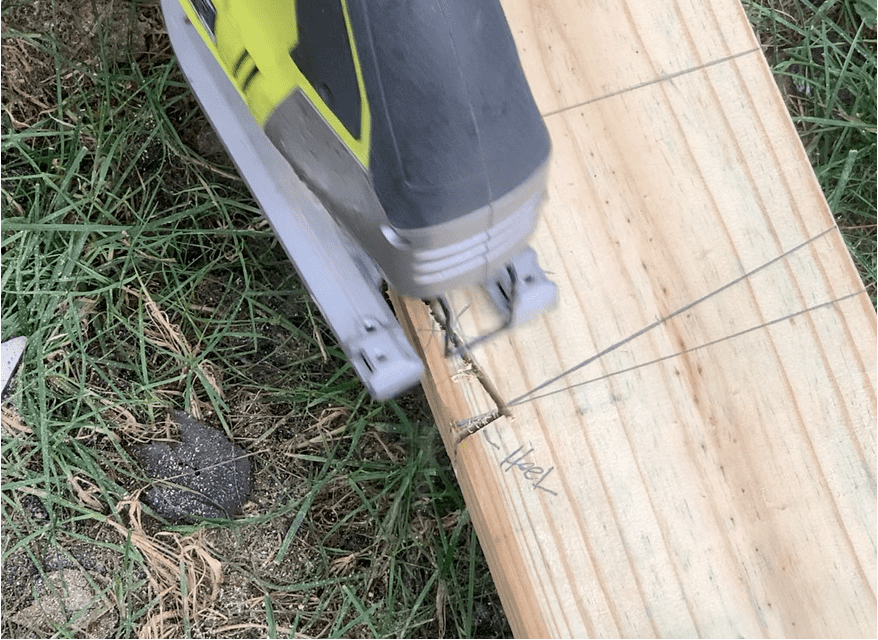
Use a circular saw to cut out the “Seat” and “Heel” of the birdsmouth as shown below.
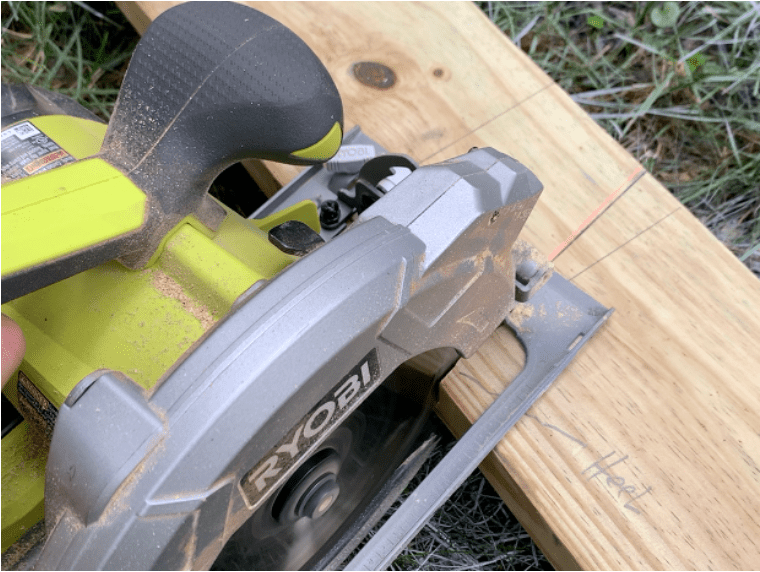
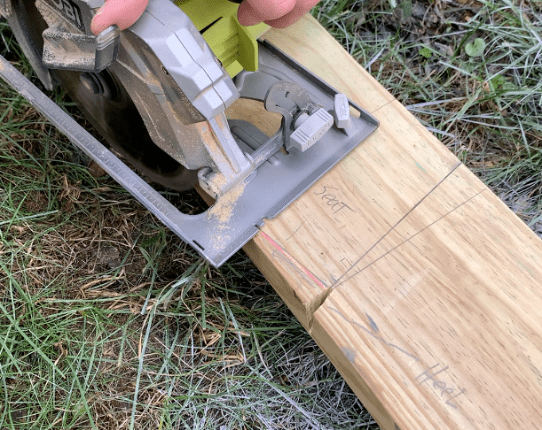
Because these cuts are small, you will likely need to clean up the inside corners of the birdsmouth cuts with a hand saw or jigsaw.
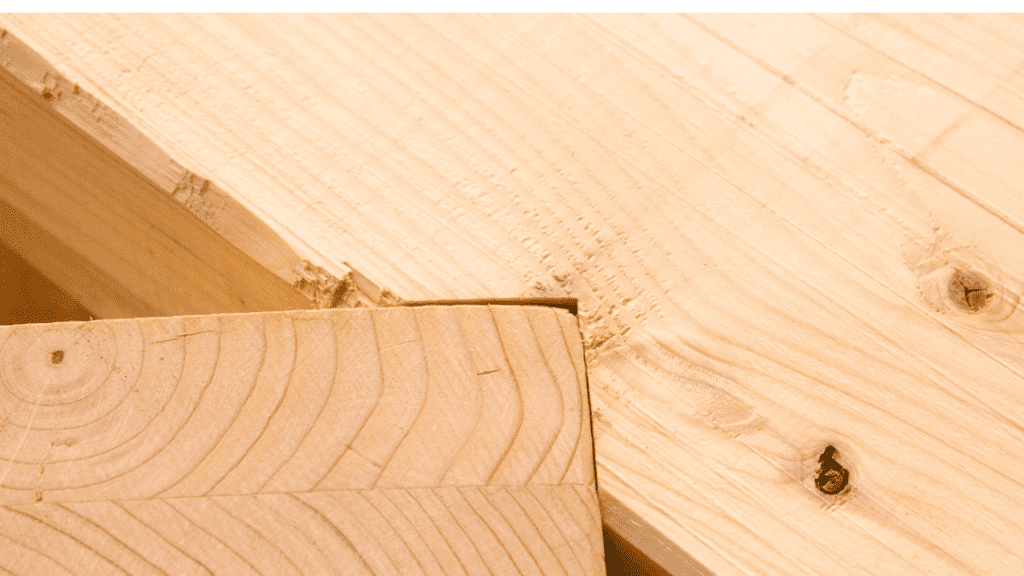
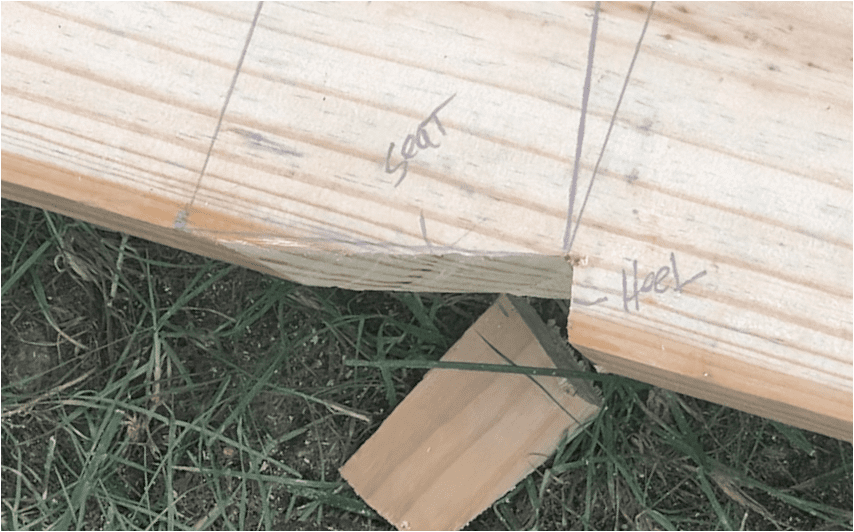
Below is a look at a completed birdsmouth cut on the back of the shed rafter:
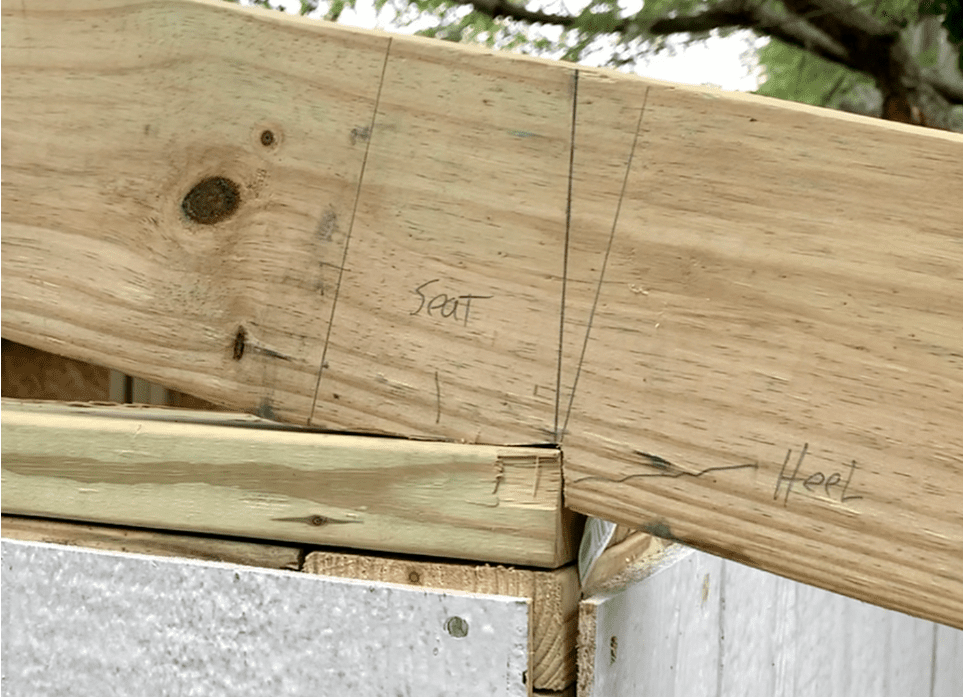
Below is a look at how the birdsmouth cut that rest on the back wall of the shed will look once installed:
After completing the bridsmouth cut at the back of the rafter, move to the front of the rafter and prepare to make the birdmouth cut that will rest on the front wall of the shed.

To make the birdsmouth cut at the front of the rafter, you will follow the exact same steps that were performed for the birdsmouth cut at the back of the rafter.
As a reminder:
- Mark the back line of the birdsmouth cut as a refernce line using a carpenter’s square.
- Mark the front of the birdsmouth cut 3-1/2” in front of the back line for the birdsmouth cut and mark the reference line using a carpenter’s square.
- Place the pivot point of the carpenter’s square on back mark of the birdsmouth cut and pivot the square until the “2” line intersects with the bottom of the rafter.
- Mark this diagonal line on the rafter.
- Use a framing square and position it so that one end is parallel to the diagonal line and that the other end intersects the mark that was made 3-1/2” away from the orginal mark.
- Scribe the line with a pencil.
- Cut out the seat and heel marks of the birdsmouth cut using a circular saw.
- Clean up the cuts (if needed) using a hand saw or circular saw.
By following these steps for the birdsmouth cut at the front of the rafter, you will be left with a birdsmouth cut that rests on the front wall of the shed as shown below:
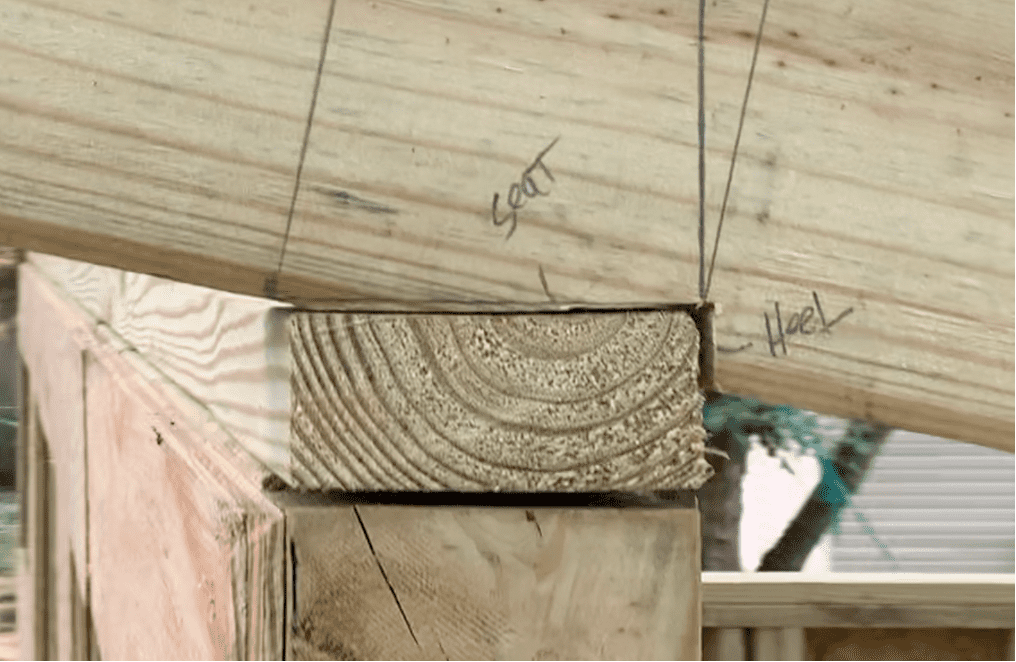
Below is an alternate view of how the birdsmouth cut at the front of the rafter will look:
After cutting the birrdsmouth cuts on the front and back of one of the shed roof rafters, dry fit it in place on top of the shed. If you are happy with the fit and the birdsmouth cuts land appropriately on the top plate for both the front and back wall, use that rafter as a template board to mark all of the rest of the birdsmouth cuts on the remaining rafters.
Mark the template board and use it to make the birdsmouth marks on the remaining shed roof rafters.

After marking all of the birdsmouth cut lines on the rafters, cut out the birdsmouths with a circular saw and hand/jigsaw as described in the previous steps.
PRO TIP – Cut a few rafters and confirm the fit on the shed. In some cases, you may need to make minor adjustments as you go.
NOTE: Some people will cut the front and backs of the rafters so that the fascia boards attached later are perfectly vertical. To do this, you simply need to mark the same pitch line (2:12 in this case) on the ends of the rafter and cut them off accordingly.
6. Position Your Lean To Shed Roof Rafters in Place
At this stage, you will place your shed roof rafters on top of the lean to shed based on the rafter spacing determined previously.
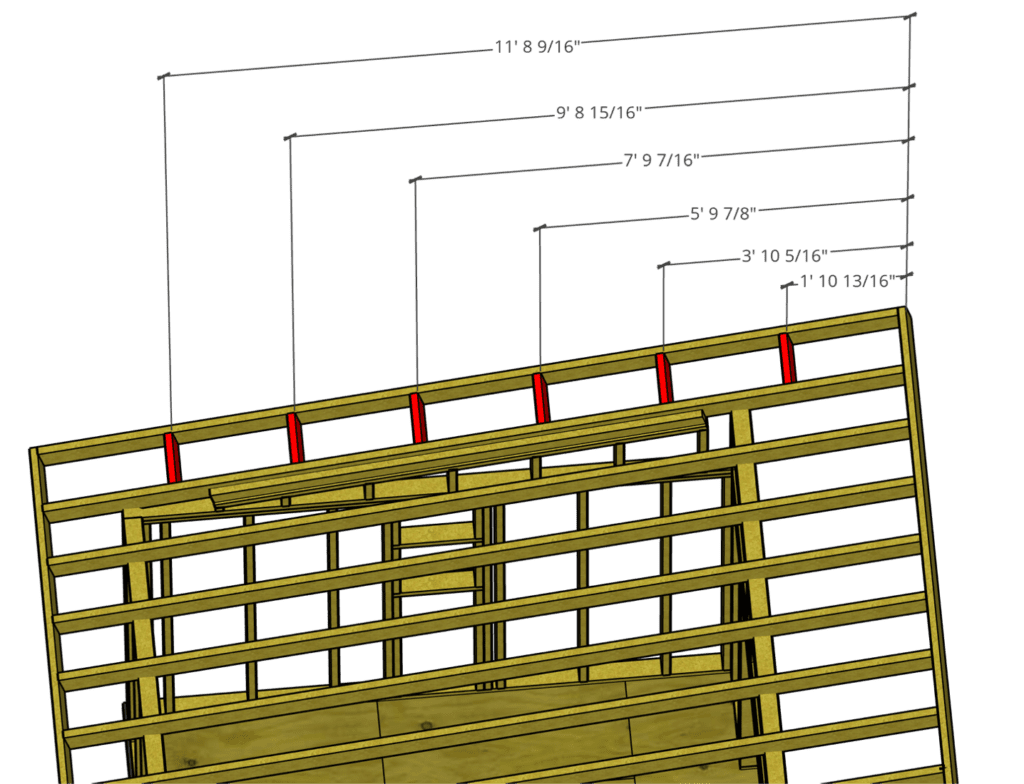
It is recommend that you mark the locations of the rafters on the front wall and back wall top plates all at one time before installing any of the rafters.
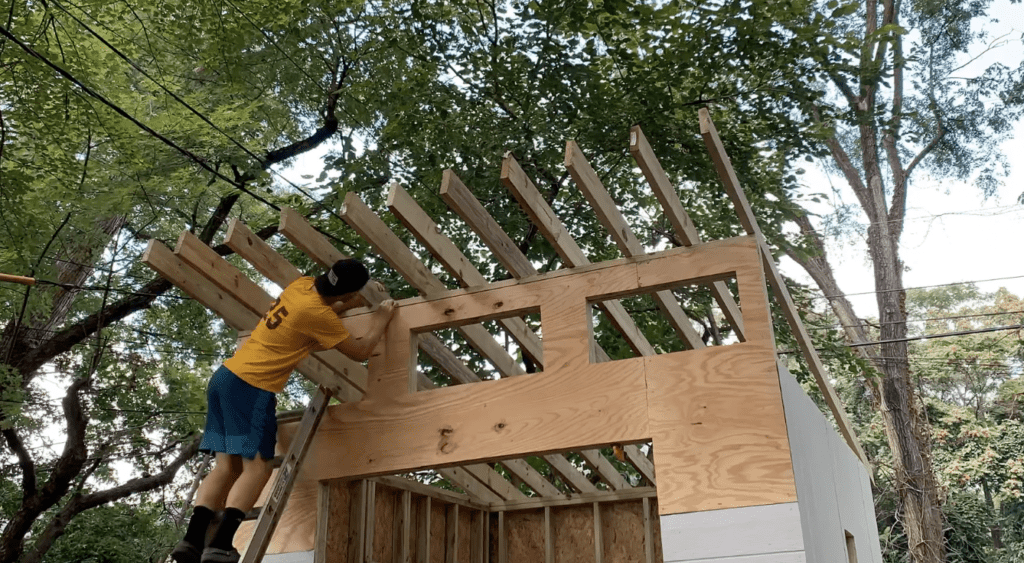
After marking the rafter spacing, lift all of the roof rafters into place:
7. Attach Shed Roof Rafters to Walls with Rafter Ties
After positioning all of the lean to shed roof rafters in place, secure the rafters to the top plate with hurricane or rafter ties. You can also “toenail” the rafters to the top plate with a nail gun, but this not as secure as using hurricane/rafter ties.

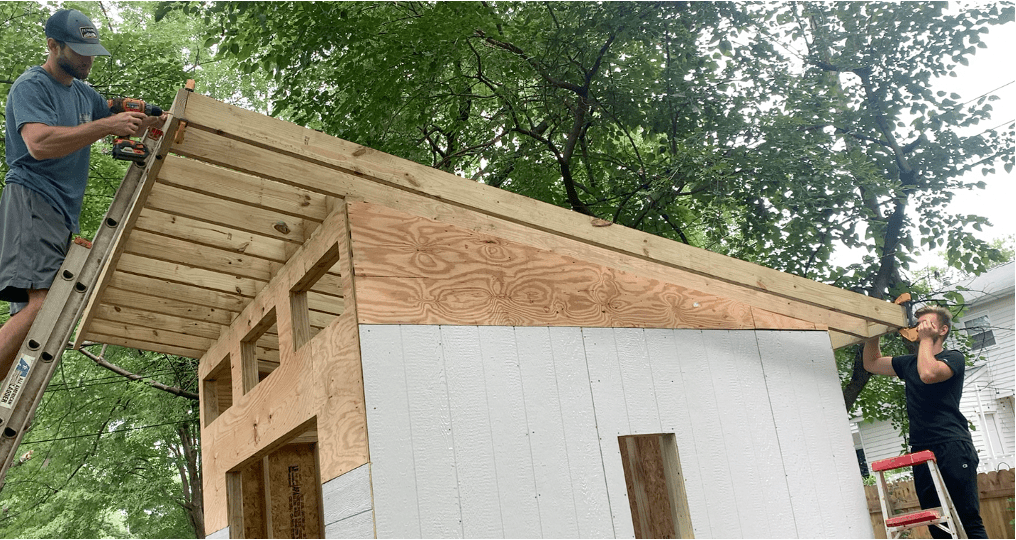
8. Attach the Fascia Boards
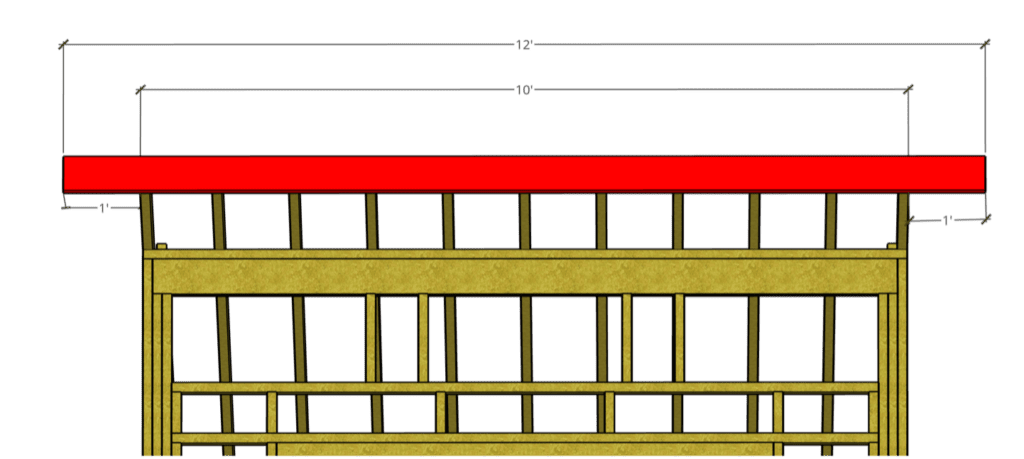
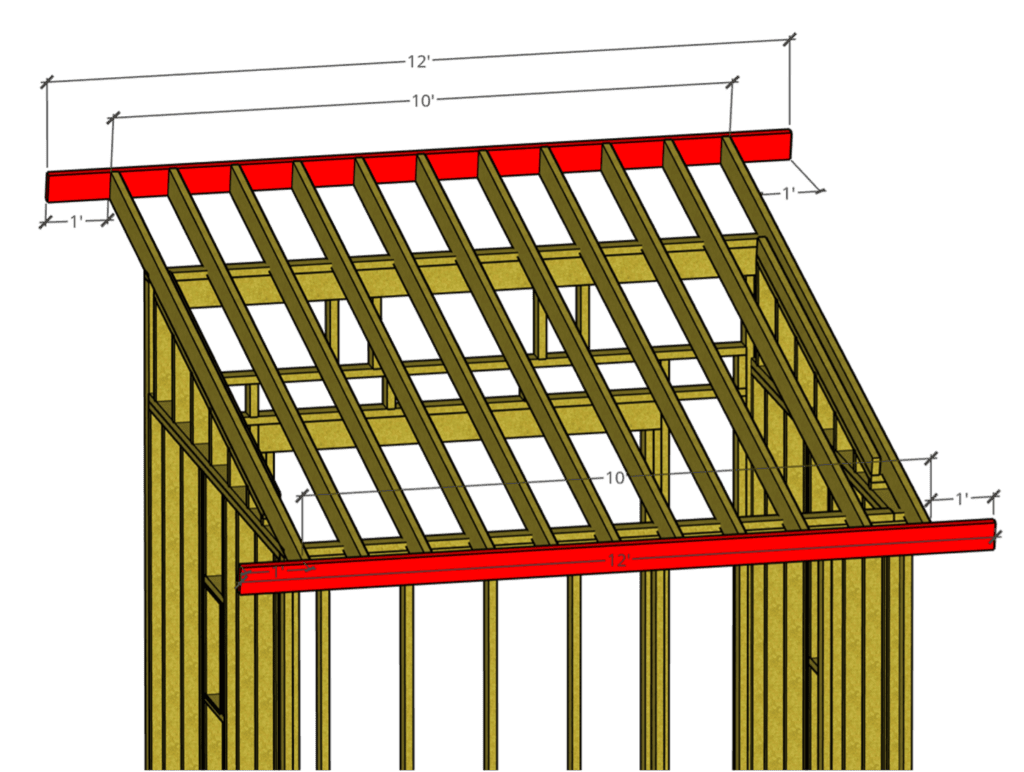
At this point in the shed installation, we will install the fascia boards on the front and back of the shed as shown below:
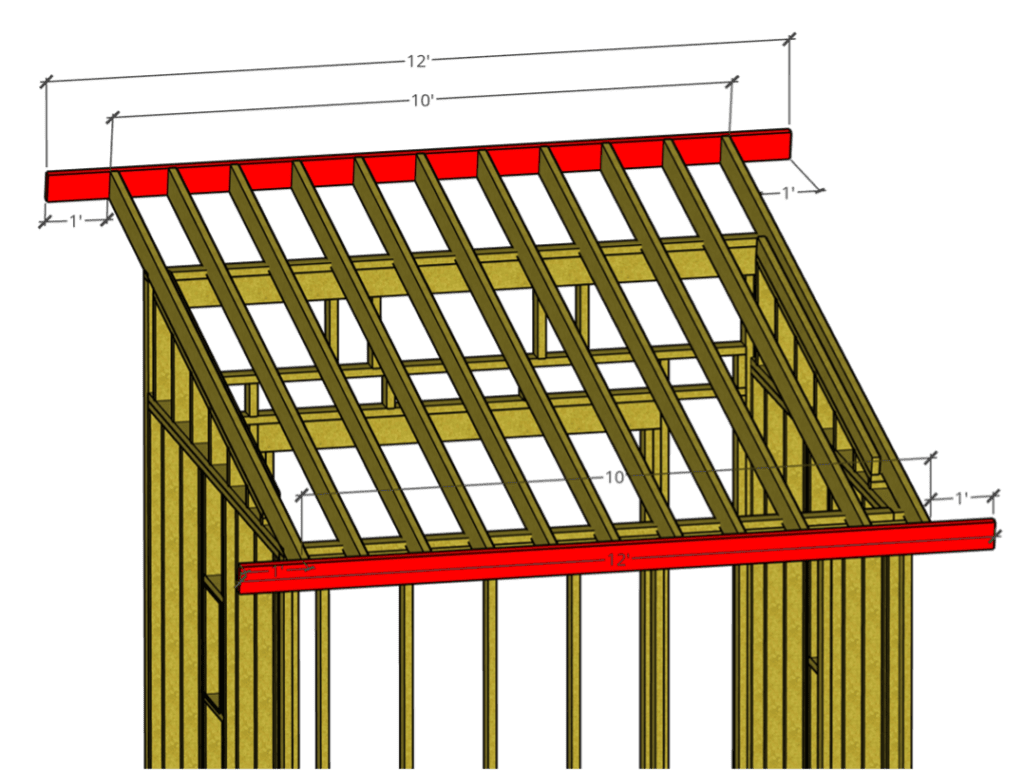
Cut your fascia boards as needed to achieve your desired overhang on each side of the shed. In this example, we have a one foot overhang on each side of the shed.
Mount the first fascia board to the front of the shed rafters leaving your desired overhang (1′ in this case) on each side as shown below.
If you are installing the fascia boards by yourself, you can install a temporary “holding brace” on on side of the rafters as shown below:

After positioning the fascia board in place, attach it to the front of each rafter using a nail gun. It is also recommended that you install a few exterior rated screws through the fascia board and into the rafters for a bit of additional durability.
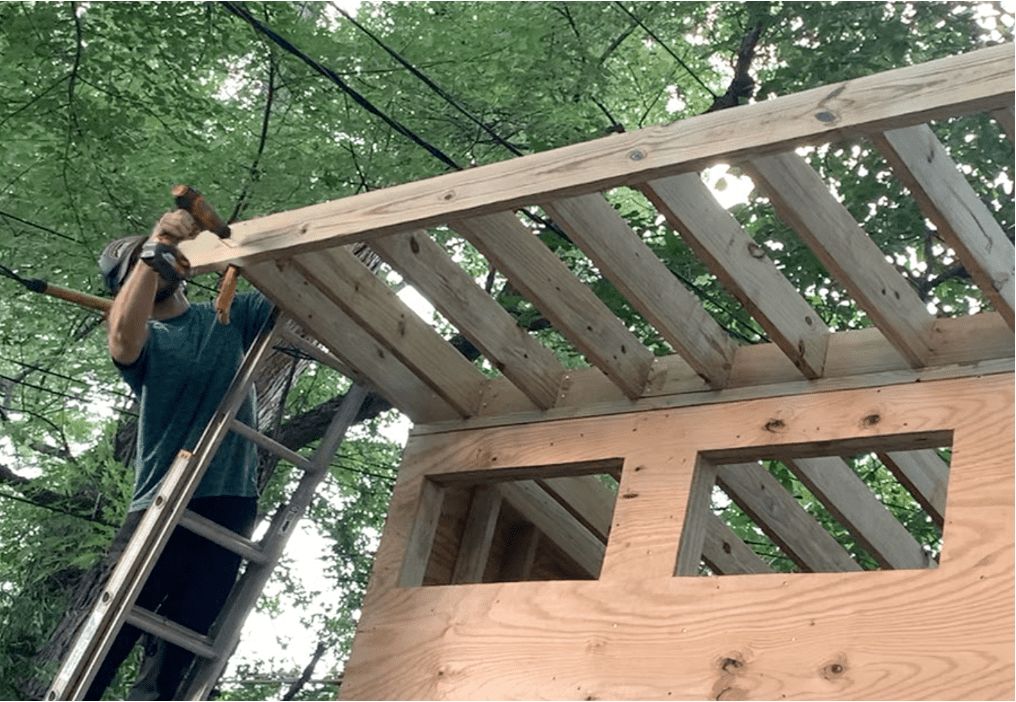
Use a clamp as needed to ensure that the fascia board is perfectly flush with the top/bottom of the rafter it is attached to.
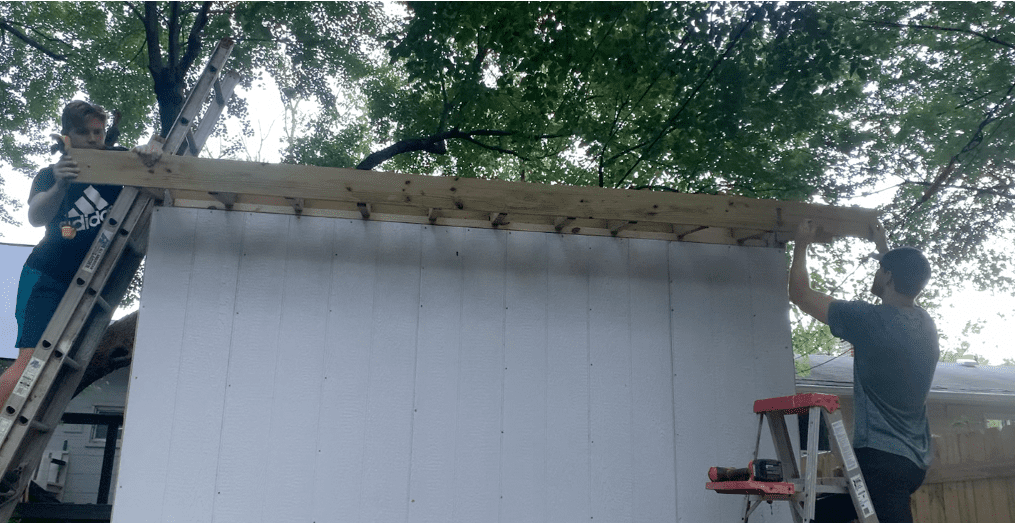
After securing the front fasica board to each rafter at the front of the shed, move to the back of the shed and repeat the same process.
Match the same rafter overhang as was done on the front fascia board, position it in place on the back rafters of the shed, and then attach the fascia board to the rafters.
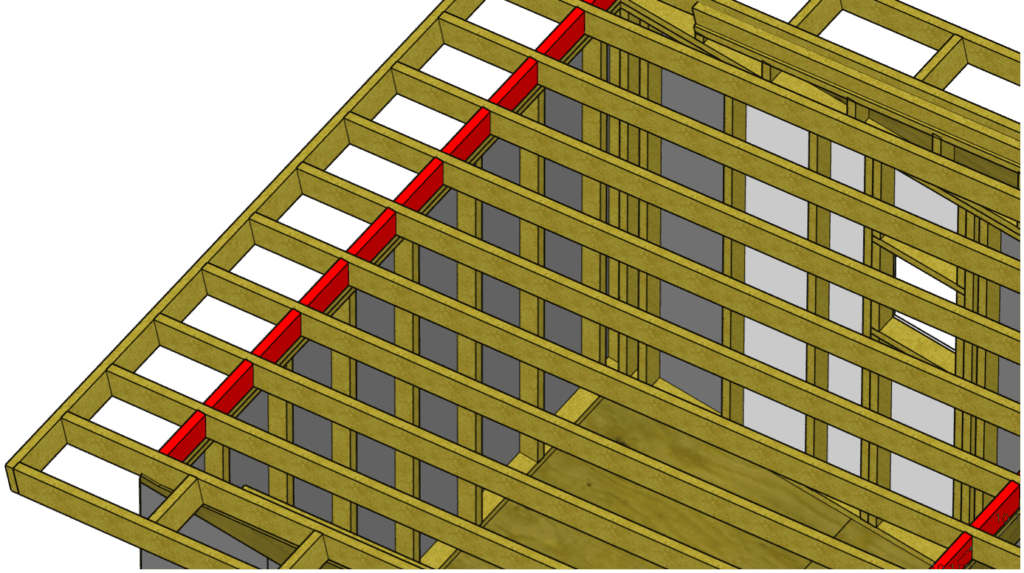
At this stage both the front and back fascia boards have been installed as Shown in red below:
Next, we will install the final two roof rafters.
9. Install Blocking and Side Rafter Overhang
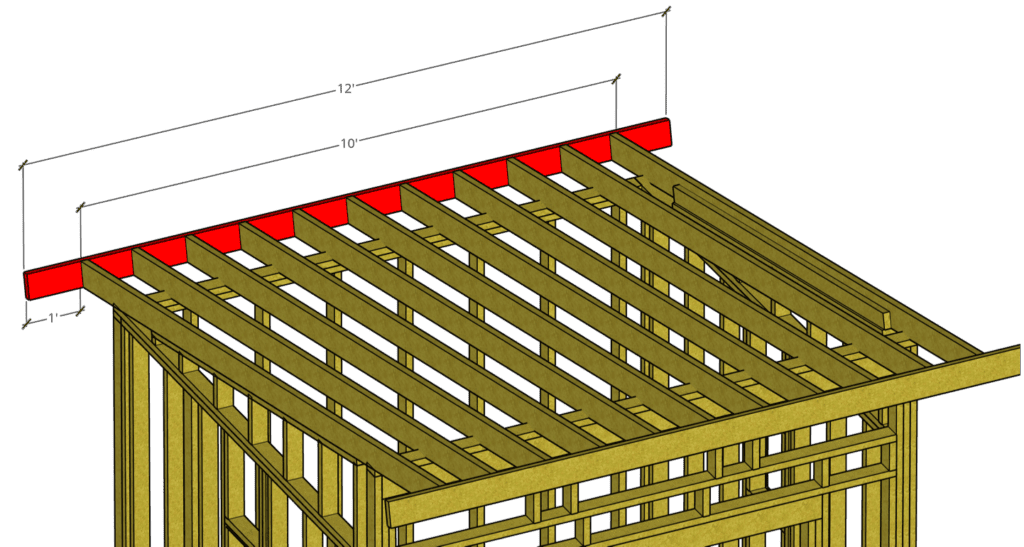
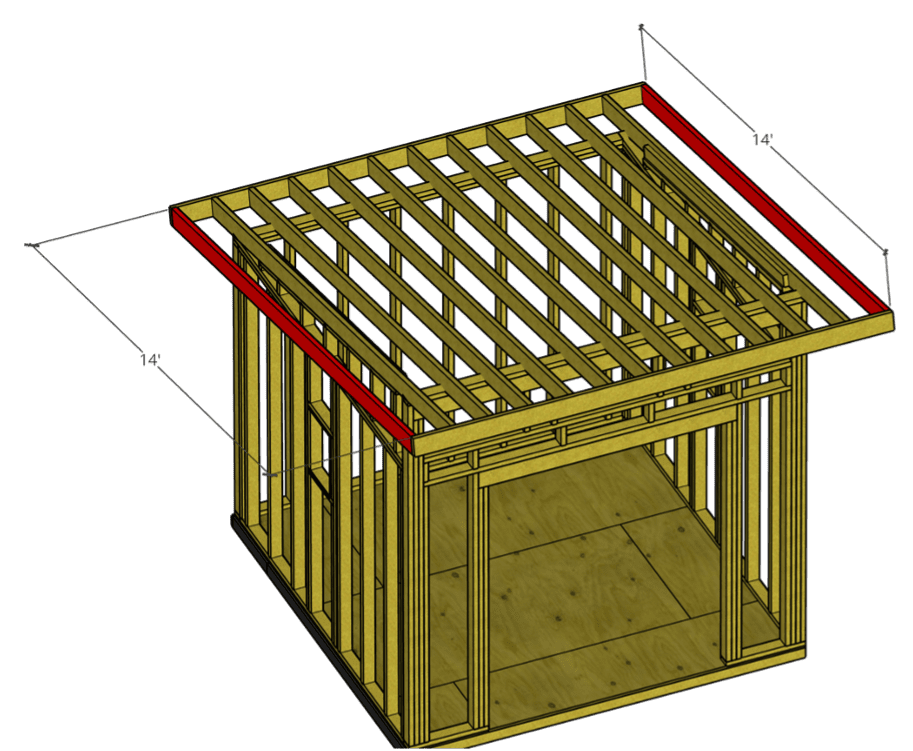
After attaching the fascia boards with the desired overhang (1′ in this case), you can now install the final rafter which will overhang the shed sides by 1’.
Install the rafters between both fascia boards so that they are flush with the end of the fascia boards. Refer to the Figure below:
Use clamps as necessary to temporarily hold the rafter in place while you fasten it to the fascia board. It is recommended that you use exterior rated screws to attach the overhung rafters to the fascia board (for additional strength).
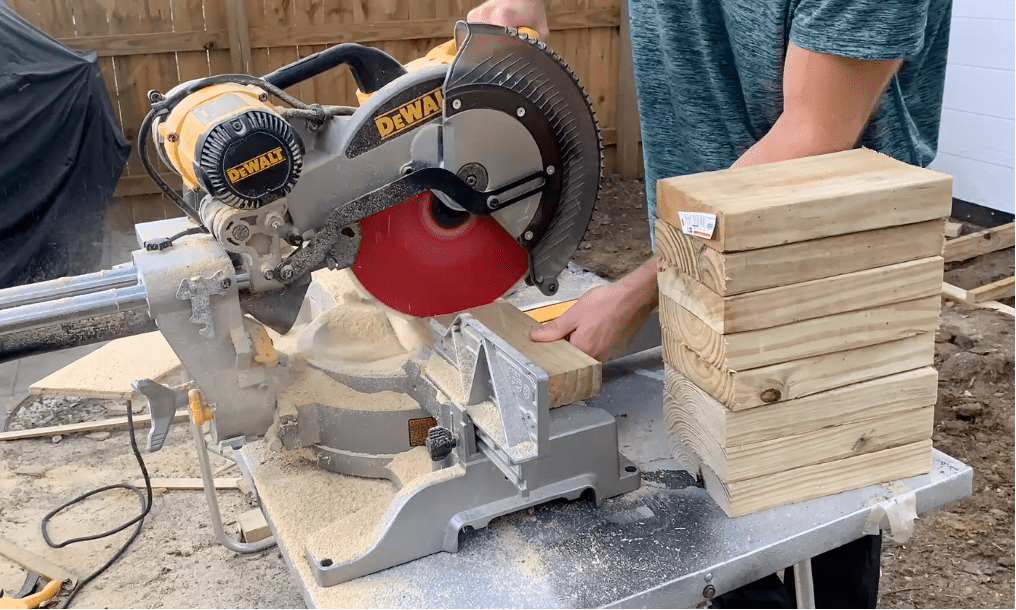
Next, cut blocking to go between the outermost rafters based on your overhang distance.
This blocking will be installed to provide addition support to secure the overhung rafter to the adjacent rafter as shown below:
Maintain the spacing between the blocking needed for your specific shed application.
Select your blocking spacing to ensure that the edges of the plywood roof decking (to be installed later) will land directly over a stud/block. Use clamps as needed to temporarily hold the blocking in place and fasten the blocking to the rafters using a nail gun.
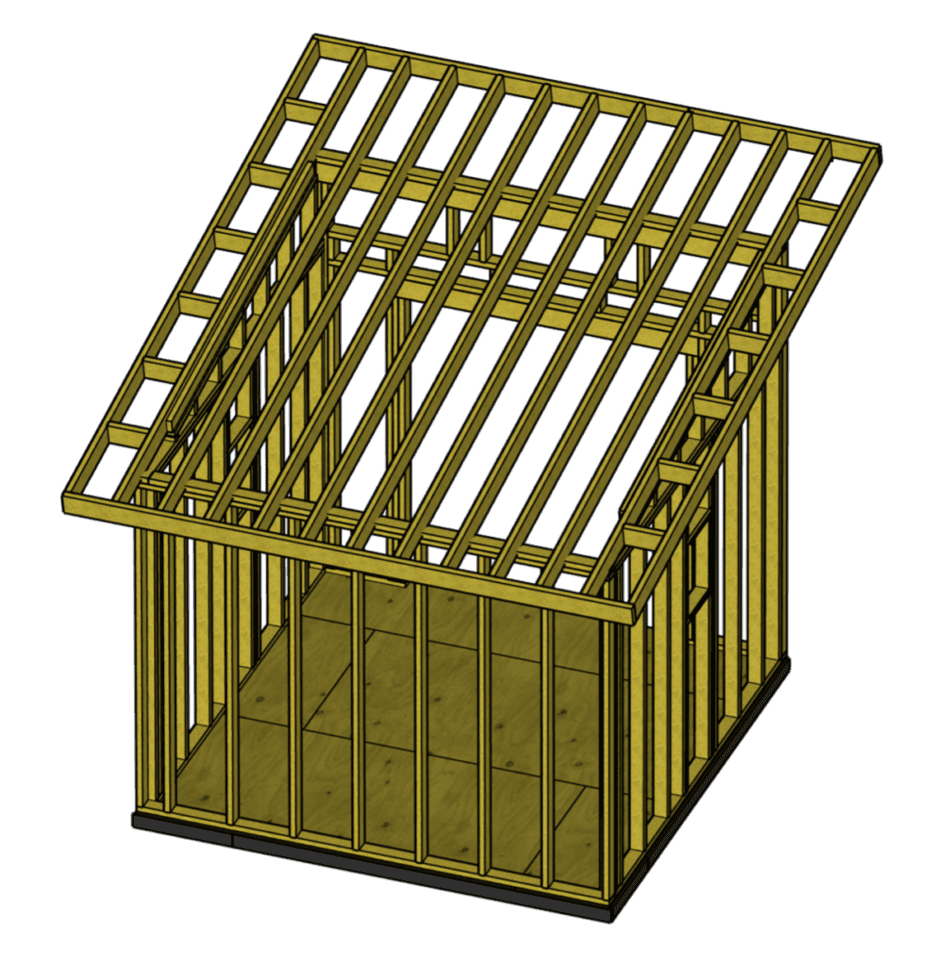
Once the rafters, fascia boards, and support blocking have been installed, your lean to shed roof will look like this:
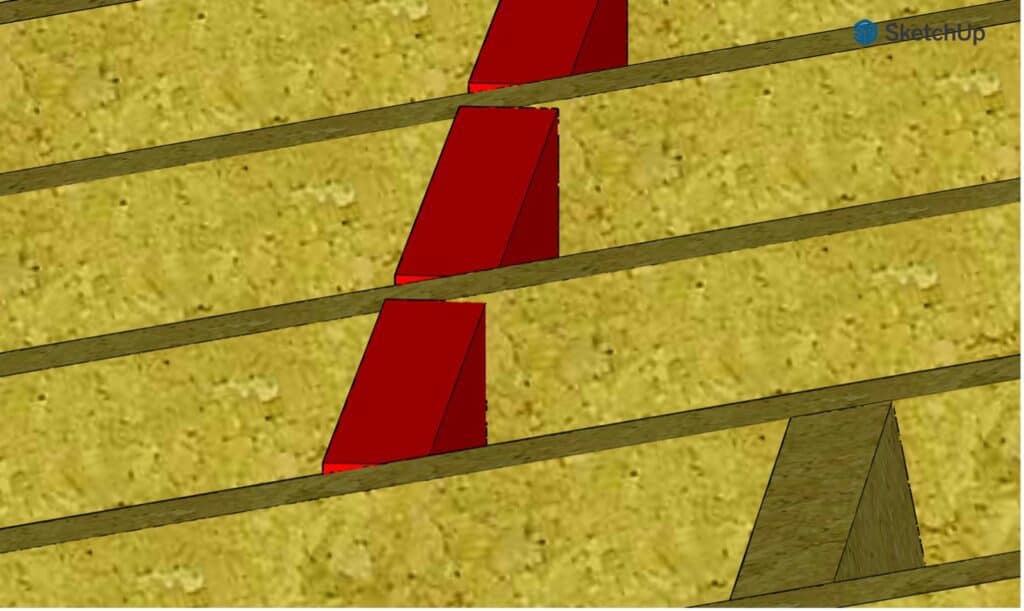
The last step to complete the lean to shed roof framing is to install blocking between each rafter at both the front and back of the shed as shown in the Figure below:
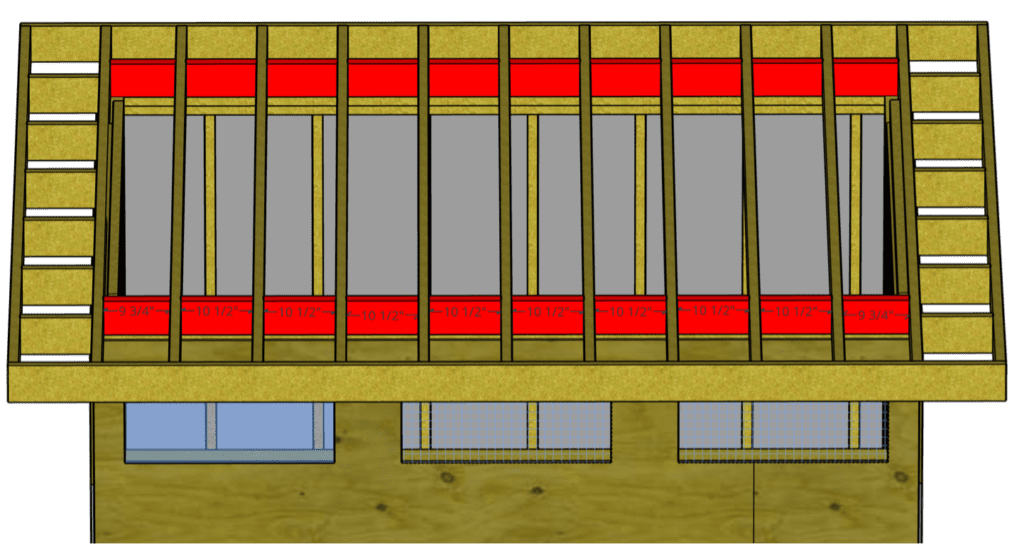
To do this, I recommend that you first trim off approximately ¼” off the width from the blocking lumber to account for the angle of the roof. If you don’t do this, your blocking may extend higher than the rafters, which is not acceptable. Refer to the figure below which shows how a full width blocking board could prevent the shed roof decking from laying flat.
To trim the blocking lumber, I recommend that you run a circular saw along the entire length of a board and then cut the individual pieces of blocking to length.
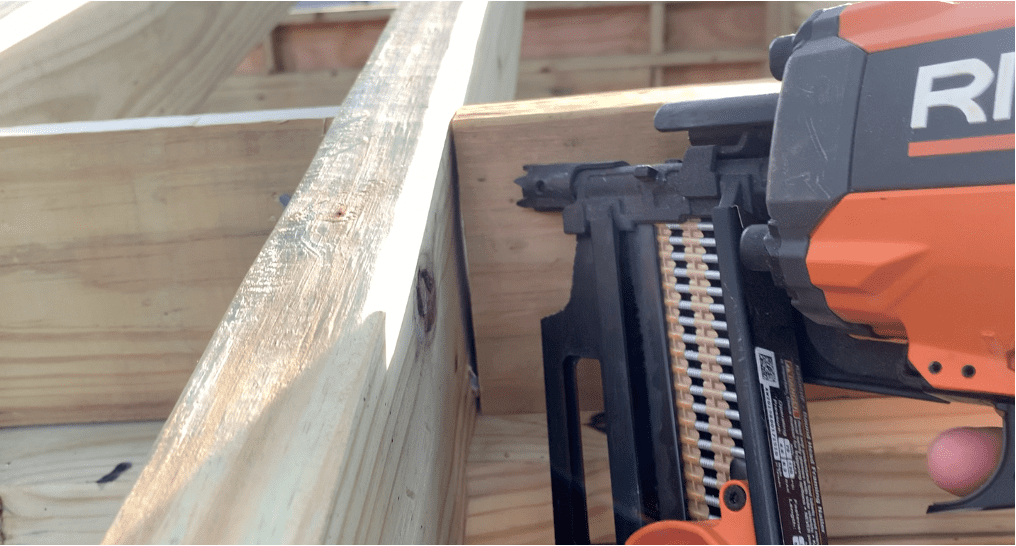
Place each piece of blocking in place between the rafter and attach it to each rafter by toenailing in nails with a nail gun.
Below is an alternate view of the blocking installed at the back wall of the shed.
Once the blocking has been installed between the lean to shed roof rafters, the only thing left to do is install the plywood roof decking.
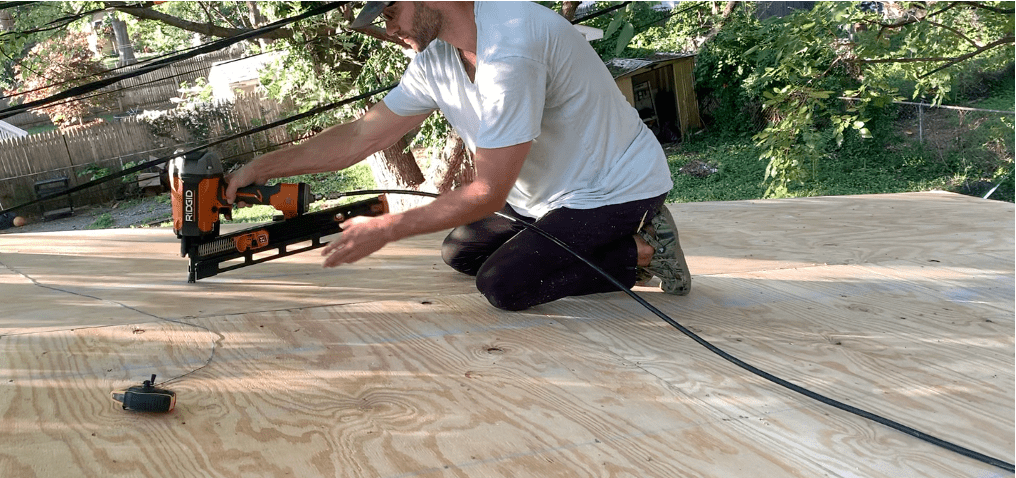
10. Install Plywood Roof Decking
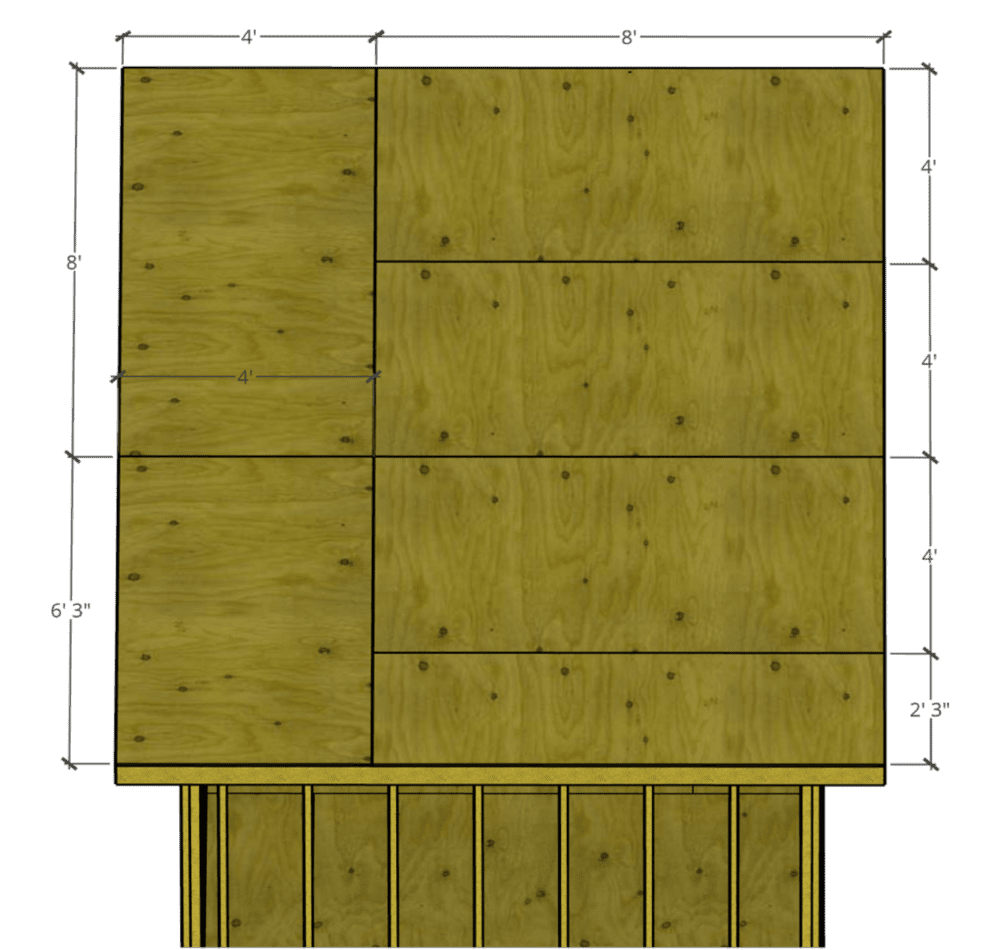
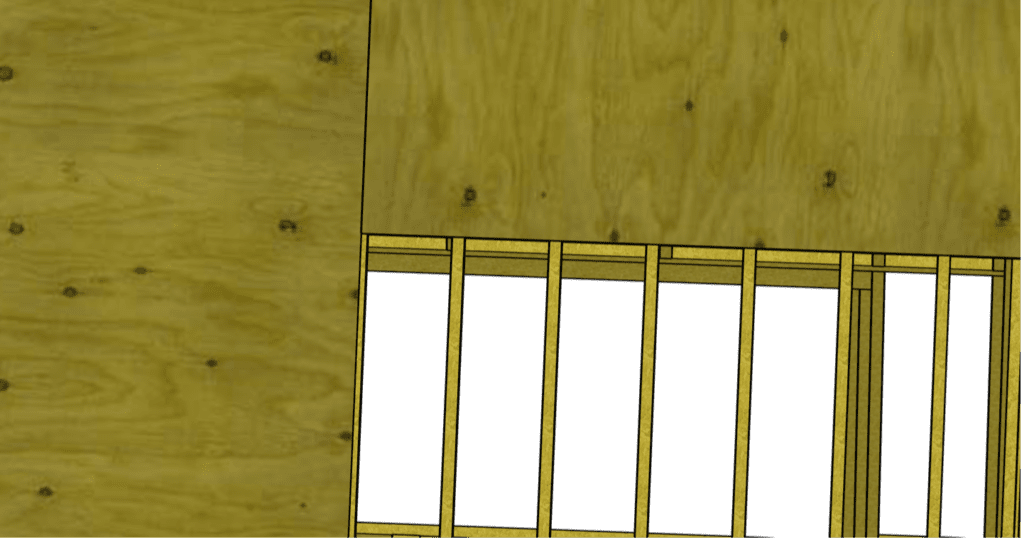
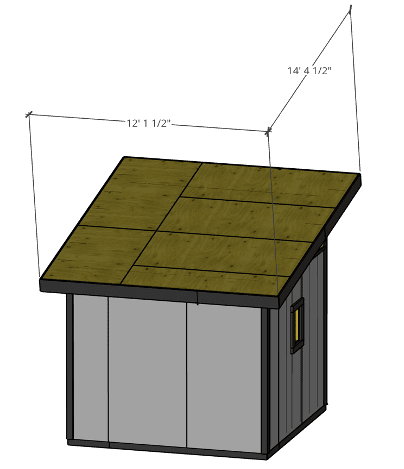
At this Stage, your lean to shed roof is fully framed. The last step in the lean to shed roof framing process is to install the plywood roof sheathing. If you planned out your rafter spacing appropriately in the previous steps, your plywood decking layout should ensure that the edges of each piece of plywood land in the center of a rafter. For the example shed described herein, the plywood roof decking layout would look like this:
It is recommended that you install all of the full plywood decking sheets first. Then, fill in the remaining gaps.
Position the each piece of plywood roof decking so that it is flush with the Fascia Board/Rafter and then attach it to the rafters/fascia boards with a nail gun.
Ensure that the edges of the plywood sheathing land directly in the center of a rafter/piece of blocking.
For the plywood decking that needs to be trimmed, consider dry fitting the plywood sheet in place and marking the cut line from below:
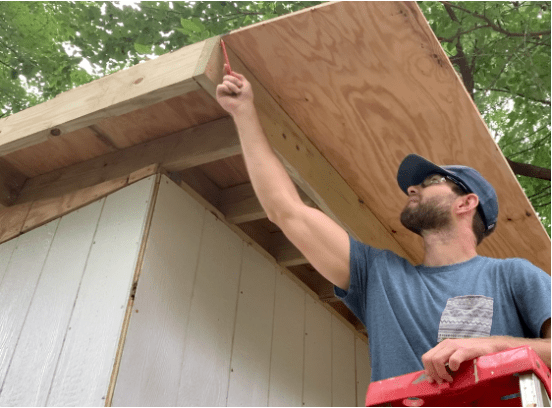
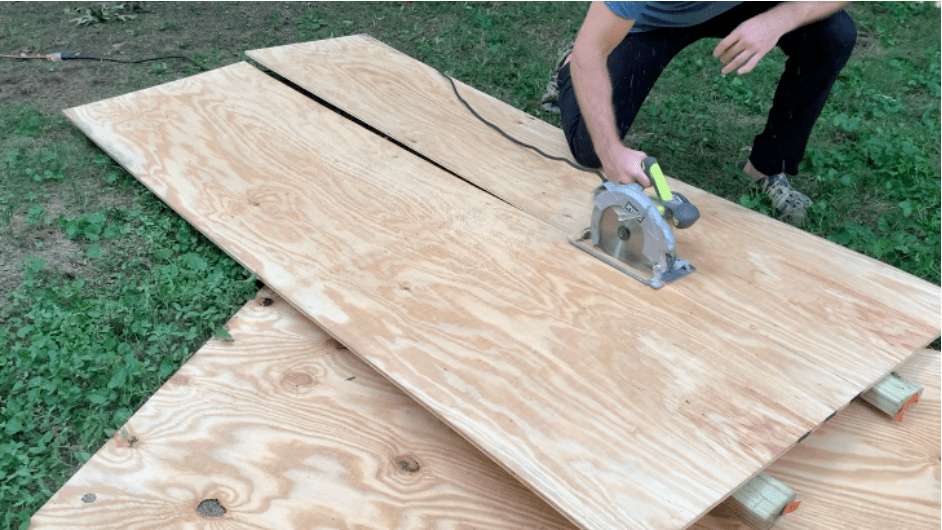
After marking the plywood roof decking cut line, make the cut with a circular saw as shown.
Again, the plywood roof decking edges should land in the center of a rafter/block – as shown below.
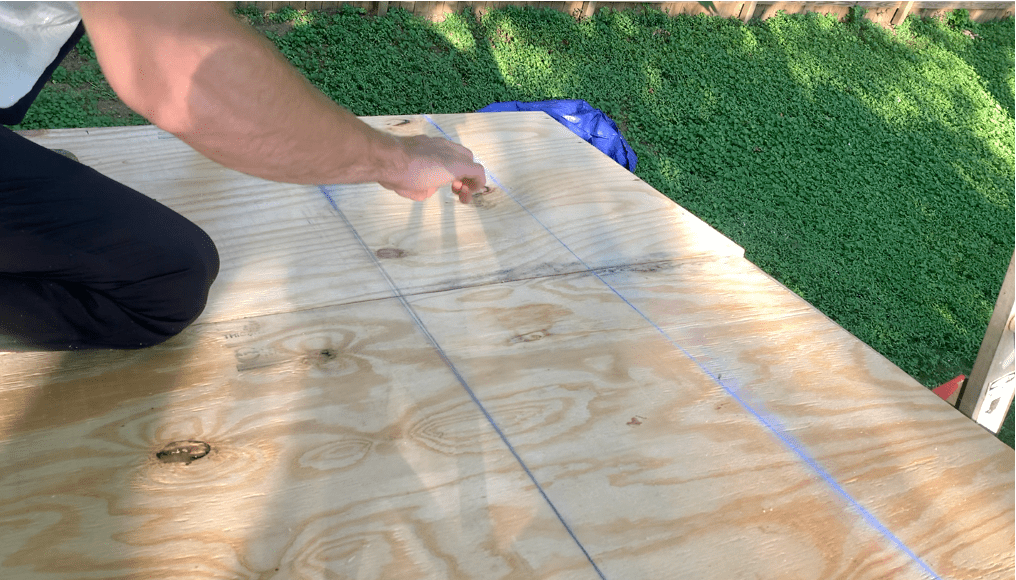
After placing all of your plywood roof decking in place, you may find it helpful to run a chaulk line to help identify the rafter location beneath the plywood roof decking.
Install any remaining nails needed to secure the plywood roof decking to the rafters (space nails every 12” O.C.)
At this stage, your plywood roof decking has been installed and your lean to shed roof is fully constructed – as modeled below:
The cost to build a lean to shed roof depends on the size of the shed. For a 10’x10′ shed, plan to spend approximately $150-$275 for the materials. Plan to spend roughly $75 for the roof rafter lumber and $125 for the plywood roof decking.
If you are more of a visual learner, you can watch my “How to Build a Lean to Shed Roof” YouTube Video below:
This Lean to Shed Roof was installed as part of the 10’x10′ Modern Shed Build Project. If you want to learn how to build a similar shed, check out my other Blogs or my “How to Build a Modern Shed” Video below:
For more information on how to Build a 10’x10 Modern Shed from start to finish, check out ATimprovements.com or watch my step-by-step tutorial videos on Youtube.
Thanks!
Thanks so much for checking out ATImprovements! If you learned something from this project, you might also like these other DIY Projects:
- How to Build a Concrete Slab Shed Foundation: https://atimprovements.com/how-to-build-a-shed-base-concrete-slab-step-by-step-diy-guide/
- How to Frame a 10’x10′ Shed Base: https://atimprovements.com/how-to-build-a-shed-floor-base-diy-step-by-step-guide/
- How to Frame Shed Walls:https://atimprovements.com/how-to-frame-a-shed-how-to-frame-walls-for-a-10×10-modern-shed-step-by-step-with-pictures/
- How in Install a Shed Window: https://atimprovements.com/shed-window-installation-how-to-install-a-window-in-a-shed-diy/
- How to Install a Roll Up Door in a Shed or Garage: https://atimprovements.com/roll-up-door-installation/
- How to Build a Fence: How to Build a Fence (DIY Guide) – AT Improvements
- How to Build a Fence Gate: How to Build a Fence Gate (7 Steps with Pictures & Video) – AT Improvements
- How to Install a DIY deck Wire Railing: DIY Cable Railing – How to Install Cable Railing Step-by-Step – (atimprovements.com)
- How to Build a Concrete Paver Patio: DIY PAVER PATIO – Easy DIY Paver Patio Ideas – (atimprovements.com)
Thanks!
DISCLAIMER: This is a reference guide only. Consult local code requirements. Links included in this article might be affiliate links. If you purchase a product or service with the links that I provide, I may receive a small commission. There is no additional charge to you! Thank you for supporting ATimprovements so I can continue to provide you with free content each week!