
A concrete garden curb edging is a great option for separating a garden bed from a lawn in a decorative manner. If you are a homeowner, you have likely struggled with lawn clippings and weeds encroaching into your garden beds. A concrete garden curb edging is a functional and visually appealing way to separate your garden beds from the rest of the lawn.
To build a concrete garden curb edging, start by determining the layout for the curb around the garden. Use a string line or spray paint to mark the location for the garden curb edging and then excavate down approximately 8”. Apply 4” of gravel subbase and then construct your concrete forms which will serve as the border for the concrete garden edge. Next, fill the concrete forms with concrete and use a use a edging trowel and finishing trowel to make the surface of the concrete garden curb smooth. Add control joints every four feet along the curb and then allow the concrete to cure. Finally, remove the concrete forms and backfill around the concrete curb with dirt and mulch as needed.
This article will show you how to build a concrete garden curb edging, step-by-step. If you are more of a visual learner, you can watch my “How to Build a Concrete Garden Curb Edging” YouTube video linked at the end of this article.
Before we get started, below are some of the tools and materials you will need to complete a concrete garden curb landscape edging project:
- Edging Trowel
- Finishing Trowel
- Grooving Trowel
- Concrete Forms (typically 2″x4″ or 2″x6″ lumber)
- Gravel Subbase
Plan Out The Concrete Garden Curb Edging Project
Before you can build a concrete garden curb edging or a mow strip, you will need to plan out your curb layout. Clearly define the limits of the concrete garden curb and use stakes and a string line to ensure that your curb will be straight.
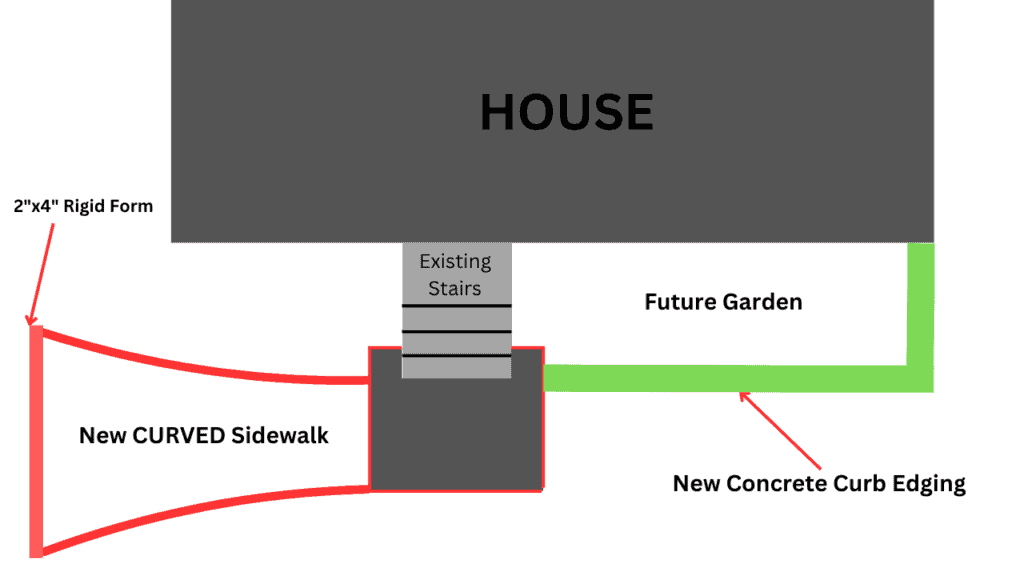
Typically, concrete garden curb edging or mow strips are 6” wide, but pick a curb width that works for your project. Use spray paint to mark the overall layout of your concrete curb so that you will be able to easily able to see where you will need to excavate.
Excavate Below Your Concrete Garden Curb Edging
After marking the layout of your concrete garden curb edging, excavate down approximately 8”.
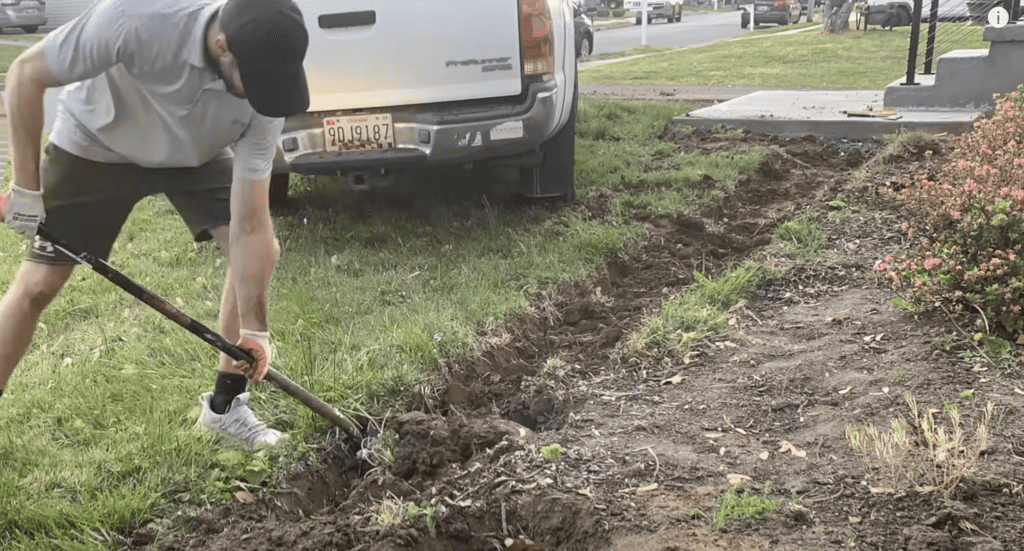
After excavating, compact the soil using a hand tamp.
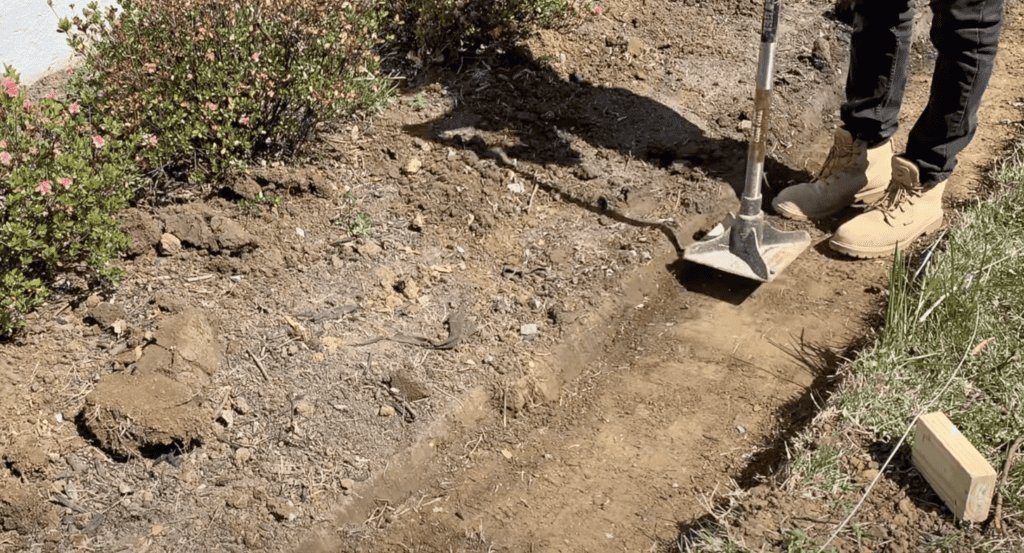
Typically, you will want a 4” gravel subbase beneath your concrete garden curb edging. This subbase can be easily compacted to give the concrete curb a firmer base. Additionally, this gravel subbase will help to facilitate drainage beneath the curb.
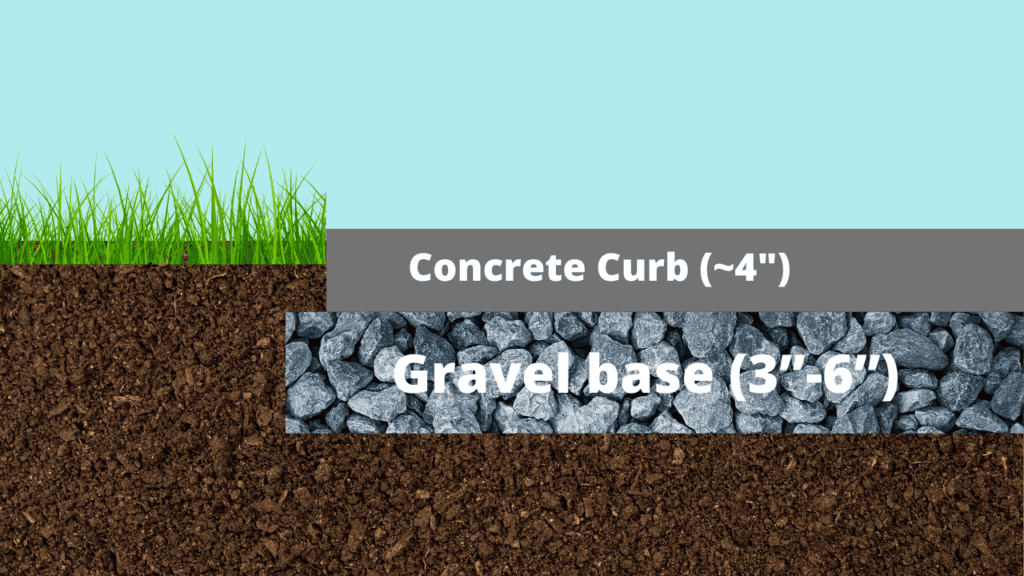
After excavating, apply 4” of gravel subbase to the excavated area. Both #57 Stone or CR6 crushed stone make for a great concrete garden curb subbase. Once the stone subbase has been added, use a hand tamp or mechanical compactor to thoroughly compact the stone.
Once the subbase has been installed and compacted, you can being the concrete form construction process.
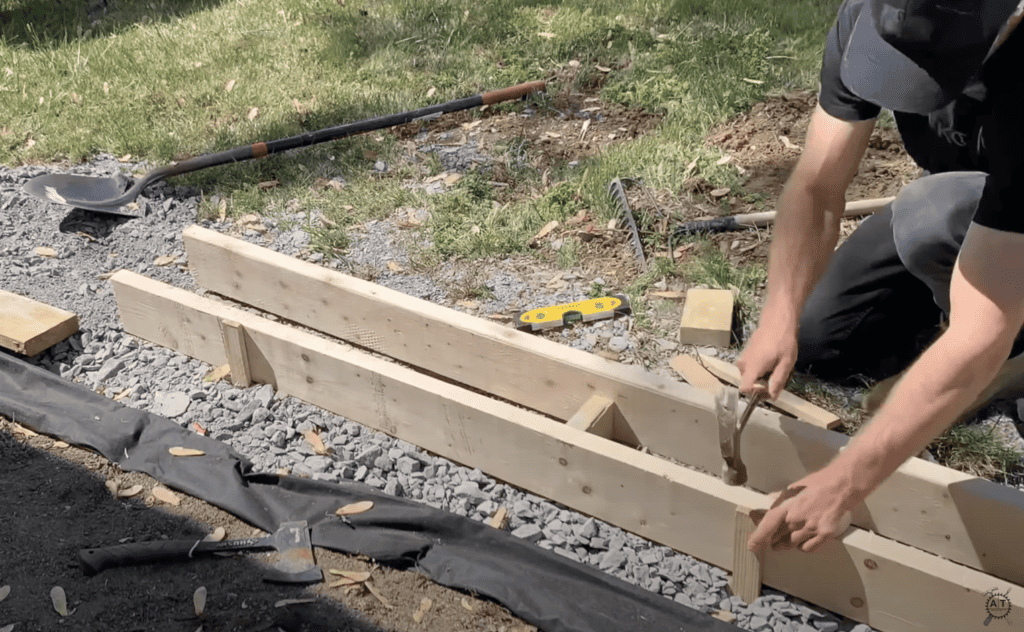
Construct the Concrete Forms
For almost any concrete project, you will need to concrete “concrete forms”. Concrete forms are typically made using dimensional lumber and they make will be used to make the perimeter for the concrete garden edging. Essentially, the concrete forms will give the concrete garden curb its shape.
There are methods of constructing a concrete garden curb without the use of forms, but I personally feel that these methods are inferior. To build a concrete garden curb without forms, you will need to use a special “curbing” trowel and a very dry concrete mix that can be molded into the appropriate shape the instant it is mixed.
To build your concrete forms, start by determining desired height for your concrete garden curb. If you want a 5.5” high curb, I recommend using 2”x6” dimensional lumber as your forms. If you want a shorter or taller curb, simply choose a different board width.
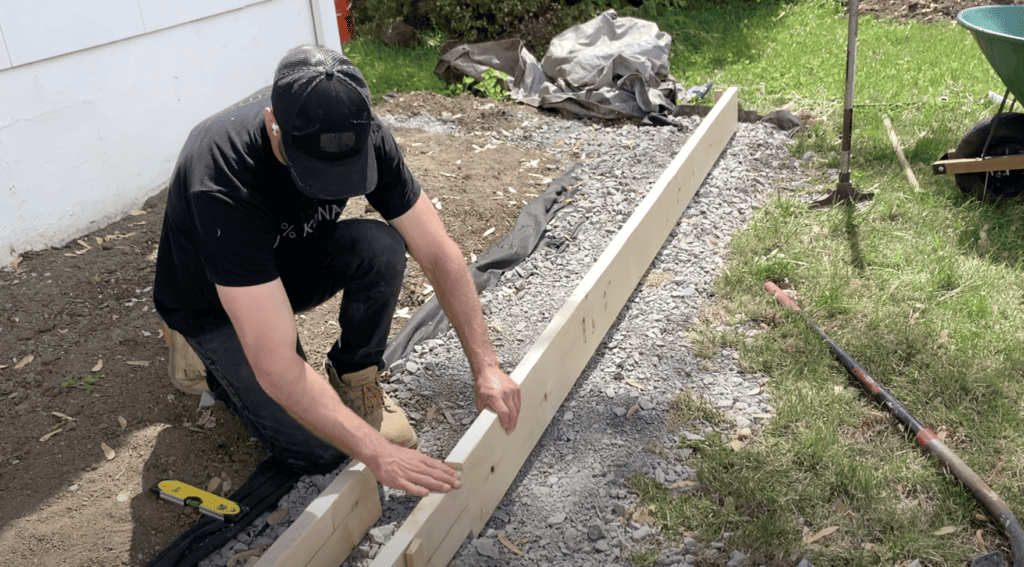
Place the long edge of the lumber along the gravel subbase and position it based on your desired concrete garden curb layout. Next, I recommend that you cut a piece of blocking based on the desired width of you concrete garden curb. Since we are constructing a 6” garden curb, a 6” piece of lumber blocking was cut. Use pieces of 6” blocking to serve as a “spacer” between the first piece of lumber and then second piece of lumber. This will ensure that you have a consistent 6” width between the concrete form boards along the entire length of your garden curb.
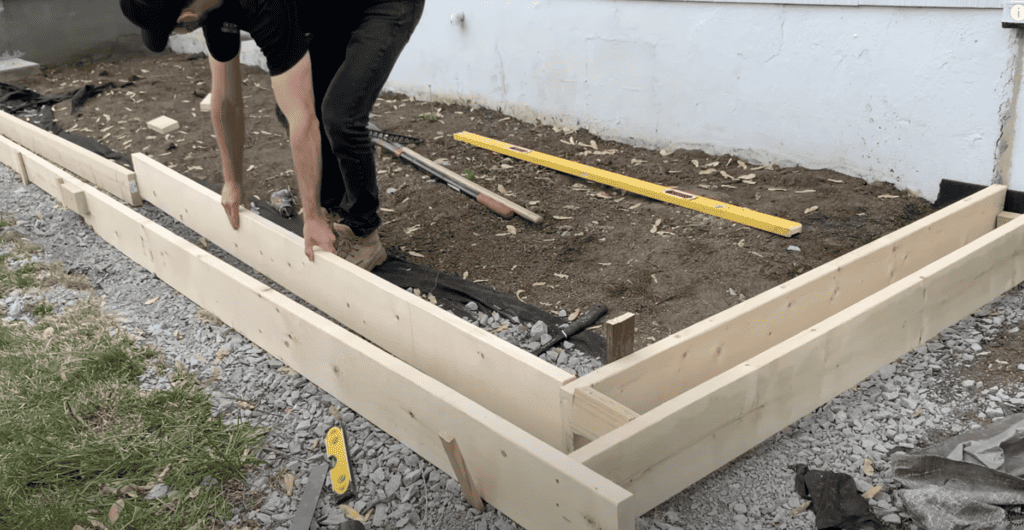
Continue to install concrete form boards along the entire length of your concrete garden curb area. Be sure to check level between boards and along the entire length of the curb. Make any adjustments as needed to achieve a level concrete garden curb.
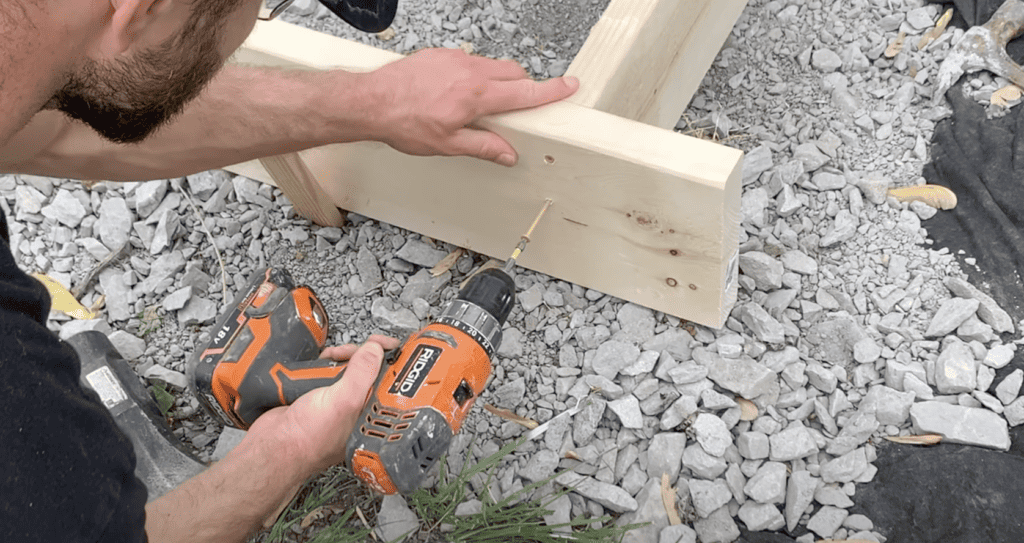
After positioning the concrete forms in place, it is recommended that you install stakes behind the concrete form board to help to hold them in place. Install stakes every few feet to ensure that the forms will not shift during the concrete pouring process.
After installing the concrete forms, checking for level, and securing them in place with stakes, it is time to determine how much concrete and what type of concrete you will need for the project.
Determine What Type of Concrete You Will Use For Your Concrete Garden Curb Edging
When it comes to concrete for the concrete garden curb edging, you basically have two options:
- You can have the concrete delivered via concrete truck (best for large projects)
- You can mix the concrete by hand (best for small project)
Although having concrete delivered is certainly easier than mixing concrete by hand, it is often cost prohibitive. Additionally, there is typically a “minimum amount” of concrete that can be delivered. Since most concrete garden curb edging projects only require a small amount of concrete, this may result in a lot of wasted concrete (and money!)
Mixing concrete by hand is much more labor intensive than having concrete delivered, but it is typically a more practical for concrete garden curb projects since it is both cheaper and allows for small quantities to be mixed.
There are many different types of bagged concrete that can be used for a concrete garden curb. Personally, I like to use RapidSet’s 24/6 concrete mix since it cures quickly. However, most bagged concrete at your local big box store will work. Read the instructions on the concrete bags to ensure that the type of concrete you plan on using will be appropriate for your project. For example, some concrete should not be poured over a few inches in height.
After determining what type of concrete you will be using to build your concrete garden curb edging, you will needed to determine the number of bags you will need to purchase.
Determine How Much Concrete You Will Need For the Project
Fortunately, there are many online tools that make calculating the amount of concrete bags you will need very simple. For my project, I used the concrete calculator tool from RapidSet linked here.
Basically, you will need to enter the length, width, and height of the concrete form area you constructed previously and the concrete quantity calculator will tell you exactly how many bags of concrete you will need to complete your project.
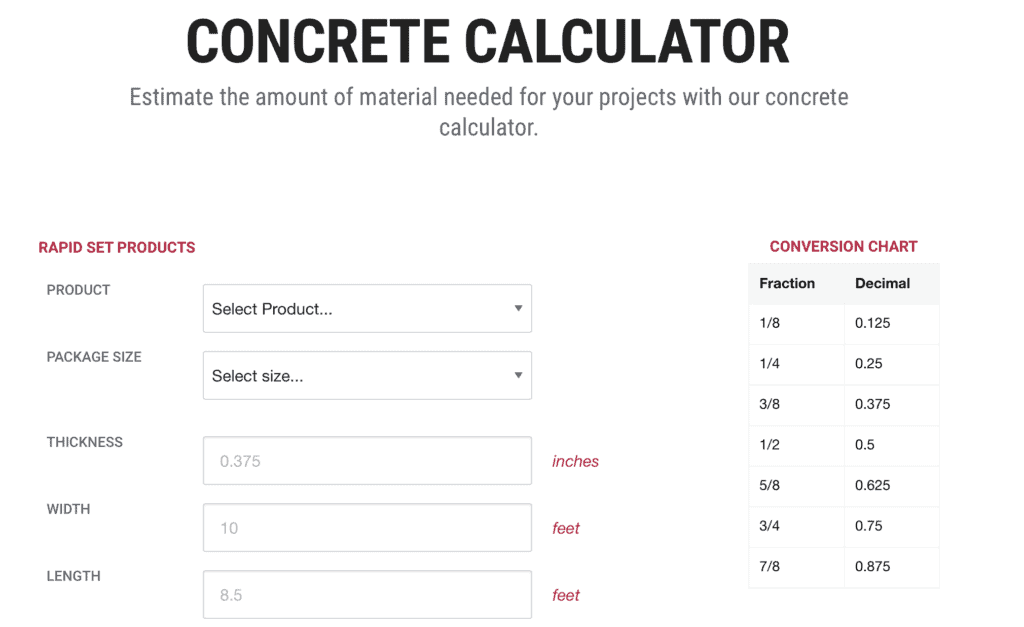
PRO TIP: I recommend purchasing an extra bag or two to ensure that you have enough concrete to complete your project. There is nothing worst than running out of concrete at the end of the project.
After selecting the type of concrete you are going to use and the quantity of bags needed, make the purchase and prepare to mix the concrete. If you are purchasing more that 20 bags of concrete, I highly recommend that you have the concrete bags delivered to your project site.
Mix Up the Bagged Concrete
When it comes to mixing bagged concrete, there are many different options available. Typically, concrete bags are mixed with water in wheelbarrow using a shovel. However, you can also rent a mechanical mixer from your local big box store that will make the mixing process a breeze.
Be sure to follow the manufacturer’s instructions on how much water to add per bag on concrete. If you add too much water, the concrete will be “soupy” and will lose strength. If you add too little water, the concrete will be too dry and will be hard to work with.
If you would like more information on how to mix bagged concrete, you can check out my “5 Ways to mix bagged concrete” article linked here or watch my Youtube Video:
This video will show you various ways to mix concrete (Wheelbarrow mixing, mechanical mixer, etc.). For my concrete curb project, I used a product called the MudMixer to mix my concrete. This product can mix up to 40 bags per hour and it makes the concrete mixing process a breeze.
After mixing up your concrete, it’s time to apply the concrete within the concrete form area.
Apply Concrete Within the Concrete Garden Curb Edging Form Area
After mixing the concrete, simply apply the concrete to the form area. You can apply the concrete to the forms using a shovel or you can dump the concrete into the project area using a wheelbarrow. Continue to apply concrete to the garden curb edging form area until the forms are completely filled with concrete.
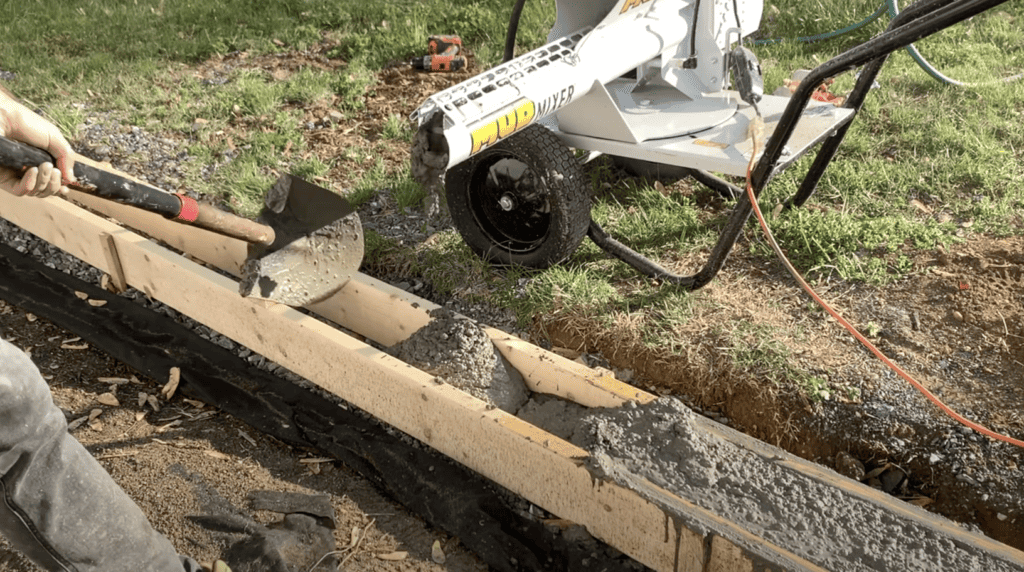
Use a board or trowel to “screed” the surface of the concrete by running it along the top of the forms. After screeding the surface to the concrete and getting the top of the concrete surface relatively flat, use a concrete finishing trowel to get the surface of the concrete relatively smooth. Next, give the concrete a few minutes to “set-up” a bit and cure.

After letting the concrete harden slightly (but not too much), it’s time to finish the concrete.
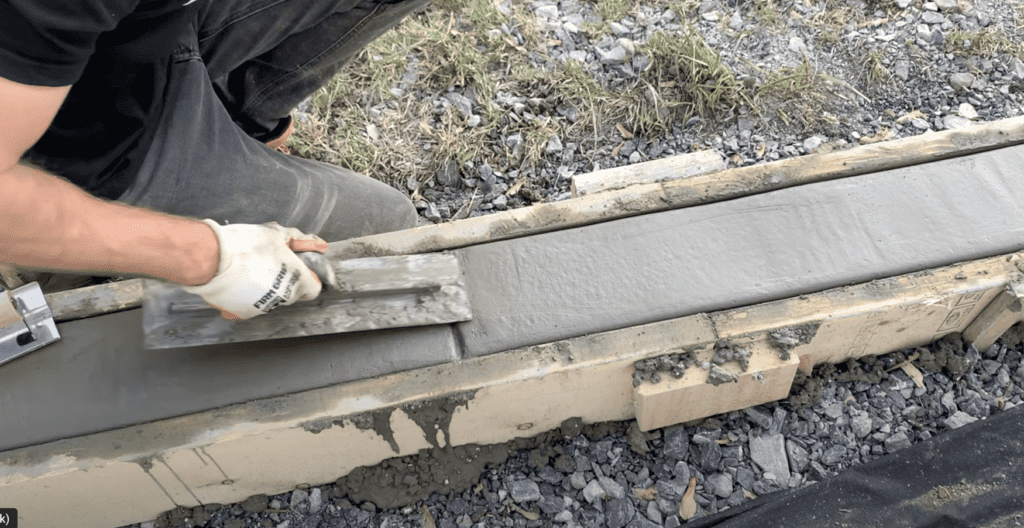
Finish the Garden Curb Edging Concrete
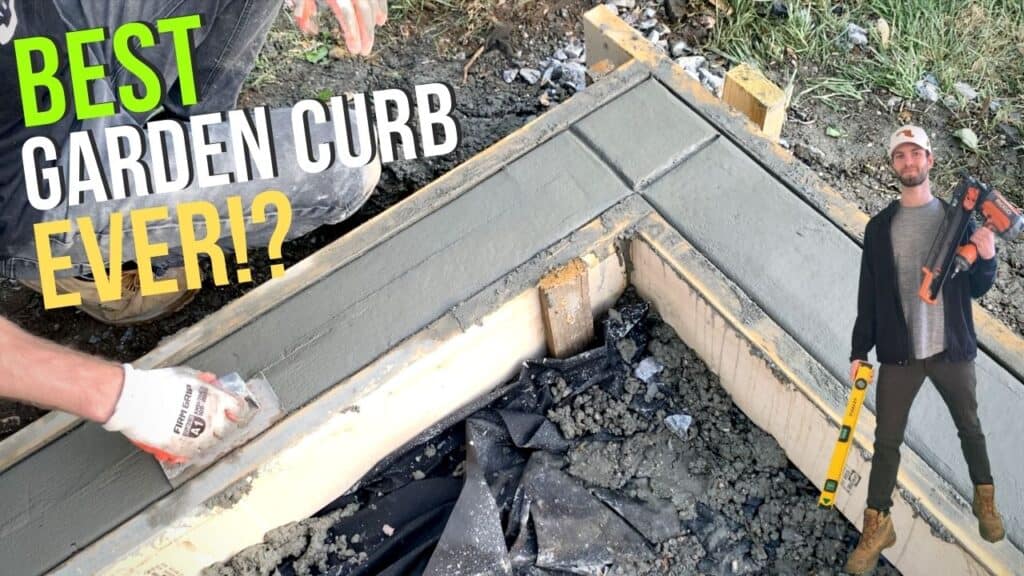
At this point, use an edging trowel to give the edges of the concrete a rounded look. Run the edging trowel back and fourth between the edge of the concrete and the concrete form board until a smooth edge is achieved. Repeat the concrete edging process on both sides of the curb until a smooth edge is achieved.
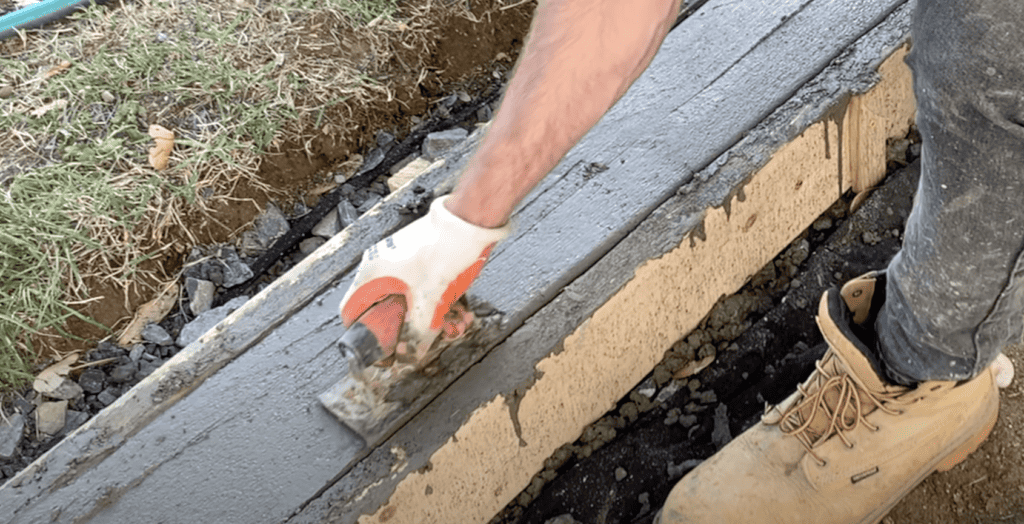
Next, use a concrete finishing trowel to smooth out the surface and to remove any of the “marks” or imperfections created by the edging trowel. Continue to use the finishing trowel and the edging trowel until the surface of the concrete garden curb is uniform and smooth.
Depending on the length of your concrete garden curb edging, you may want to consider adding “control joints” to your curb.
One thing is guaranteed about concrete – it will crack. However, you can try and control where the concrete will crack by strategically placing “control joints” in the concrete. A “control joint” is a shallow relief cut along the concrete surface that serves as an intentional weak point. The goal of these relief cut weak points is for the concrete to crack along them – as opposed to cracks randomly forming.
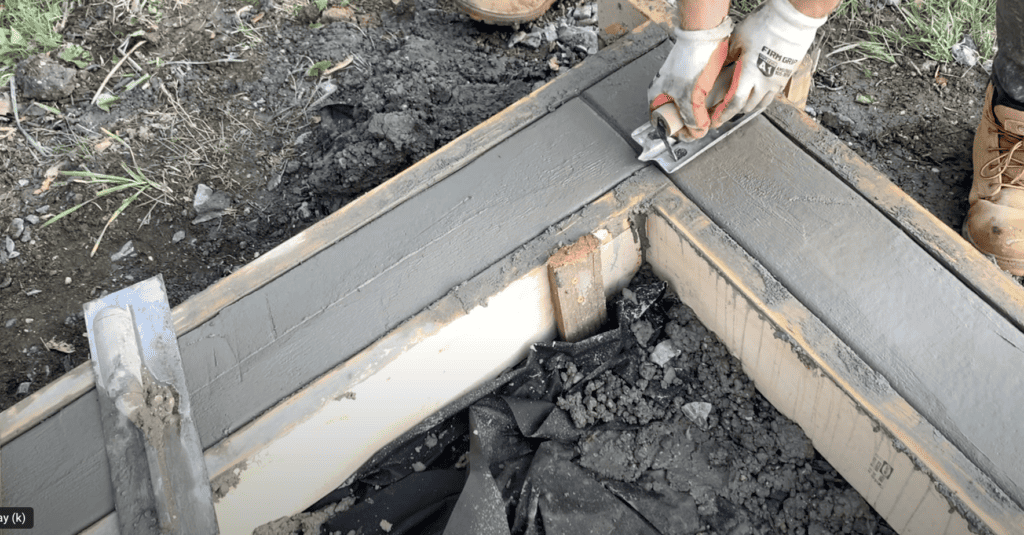
For a concrete curb, it is recommended that you place a control joint every 4 feet along the entire length of concrete curb edging. I recommend that you mark the control joint locations using a 4’ level and pencil.
To create a control joint, use a grooving trowel to create a shallow groove in the surface of the concrete.
After creating the control joint, you may have some marks adjacent to the control joint that will need to be smoothed out. Use a finishing trowel to make any correction to the surface of the concrete curb. Continue creating control joints every 4’ along the length of the concrete curb edging.
After finishing the surface of concrete curb and adding the control joint, simply allow the concrete to cure based on the manufacturer’s recommendations.
Remove the Concrete Forms
After allowing the concrete to cure, remove the wooden concrete forms. To remove the concrete forms, use a prybar as needed to pry the wooden forms away from the face of the concrete. Continue to remove the concrete forms along the entire length of the concrete curb edging.
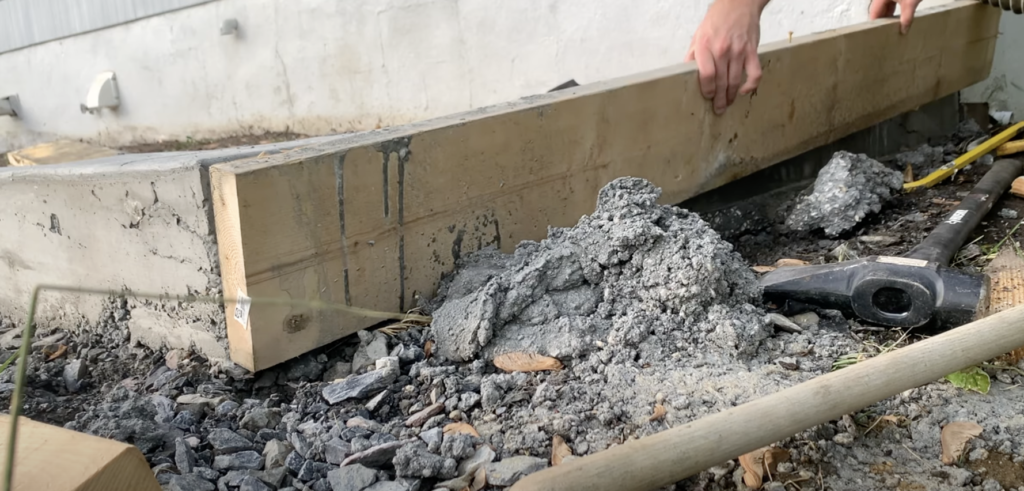
After removing the forms, inspect the concrete for any imperfections or spalling. If any imperfections are observed, you can mix a small quantity of concrete and repair the damaged area.
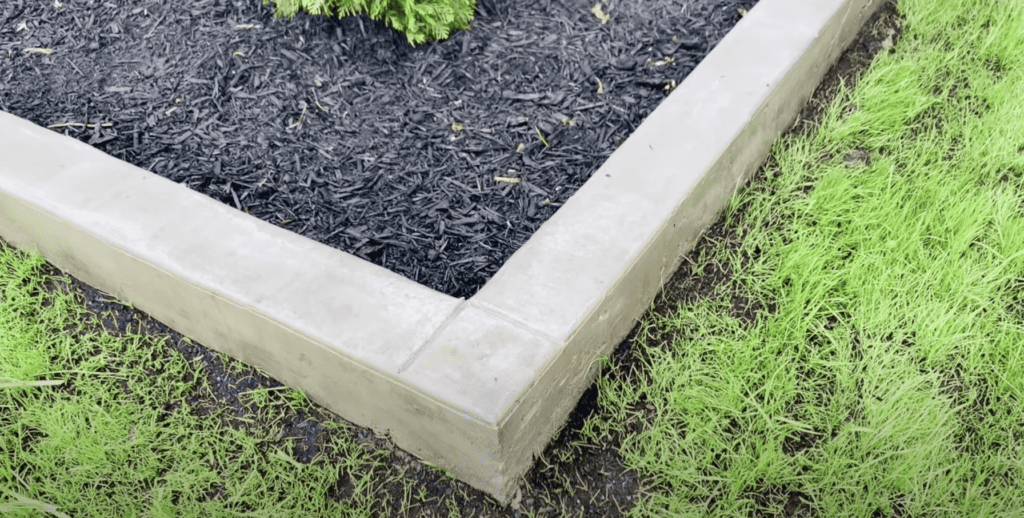
Once the forms are removed and the any imperfections are repaired (if any), your concrete garden curb edging is complete. Simply backfill around the curb and place mulch as needed. Below is a look of the final result of the concrete garden curb landscape edging!
If you are more of a visual learner, you can check out my “How to Build a Concrete Garden Curb Edging” YouTube Video below.
Additionally, if you want to see how I completely transformed my home’s curb appeal using concrete, check out my concrete curb appeal transformation video below:
Thanks so much for checking out ATImprovements! If you learned something from this project, you might also like these other DIY Projects:
- How to Build a Concrete Slab Shed Foundation: https://atimprovements.com/how-to-build-a-shed-base-concrete-slab-step-by-step-diy-guide/
- How to Frame a 10’x10′ Shed Base: https://atimprovements.com/how-to-build-a-shed-floor-base-diy-step-by-step-guide/
- How to Frame Shed Walls:https://atimprovements.com/how-to-frame-a-shed-how-to-frame-walls-for-a-10×10-modern-shed-step-by-step-with-pictures/
- How in Install a Shed Window: https://atimprovements.com/shed-window-installation-how-to-install-a-window-in-a-shed-diy/
- How to Install a Roll Up Door in a Shed or Garage:https://atimprovements.com/roll-up-door-installation/
- How to Build a Fence: How to Build a Fence (DIY Guide) – AT Improvements
- How to Build a Fence Gate: How to Build a Fence Gate (7 Steps with Pictures & Video) – AT Improvements
- How to Install a DIY deck Wire Railing: DIY Cable Railing – How to Install Cable Railing Step-by-Step – (atimprovements.com)
- How to Build a Concrete Paver Patio: DIY PAVER PATIO – Easy DIY Paver Patio Ideas – (atimprovements.com)
Thanks!
DISCLAIMER: This is a reference guide only. Consult local code requirements. Links included in this article might be affiliate links. If you purchase a product or service with the links that I provide, I may receive a small commission. There is no additional charge to you! Thank you for supporting ATimprovements so I can continue to provide you with free content each week!